Create a Windows Forms app in Visual Studio with C#

Applies to: yesVisual Studio noVisual Studio for Mac

Note

This article applies to Visual Studio 2017. If you're looking for the latest Visual Studio documentation, see Visual Studio documentation. We recommend upgrading to the latest version of Visual Studio. Download it here

In this short introduction to the Visual Studio integrated development environment (IDE), you'll create a simple C# application that has a Windows-based user interface (UI).

If you haven't already installed Visual Studio, go to the Visual Studio downloads page to install it for free.

Create a project

First, you'll create a C# application project. The project type comes with all the template files you'll need, before you've even added anything.

  1. Open Visual Studio 2017.

  2. From the top menu bar, choose File > New > Project.

  3. In the New Project dialog box in the left pane, expand Visual C#, and then choose Windows Desktop. In the middle pane, choose Windows Forms App (.NET Framework). Then name the file HelloWorld.

    If you don't see the Windows Forms App (.NET Framework) project template, cancel out of the New Project dialog box and from the top menu bar, choose Tools > Get Tools and Features. The Visual Studio Installer launches. Choose the .NET desktop development workload, then choose Modify.
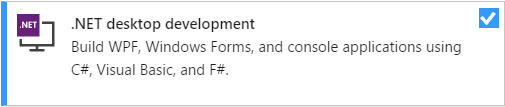
    .NET Core workload in the Visual Studio Installer

Create the application

After you select your C# project template and name your file, Visual Studio opens a form for you. A form is a Windows user interface. We'll create a "Hello World" application by adding controls to the form, and then we'll run the app.

Add a button to the form

  1. Choose Toolbox to open the Toolbox fly-out window.

    Choose the Toolbox to open the Toolbox window

    (If you don't see the Toolbox fly-out option, you can open it from the menu bar. To do so, View > Toolbox. Or, press Ctrl+Alt+X.)

  2. Choose the Pin icon to dock the Toolbox window.

    Choose the Pin icon to pin the Toolbox window to the IDE

  3. Choose the Button control and then drag it onto the form.

    Add a button to the form

  4. In the Properties window, locate Text, change the name from Button1 to Click this, and then press Enter.

    Add text to the button on the form

    (If you don't see the Properties window, you can open it from the menu bar. To do so, choose View > Properties Window. Or, press F4.)

  5. In the Design section of the Properties window, change the name from Button1 to btnClickThis, and then press Enter.

    Add a function to the button on the form

    Note

    If you've alphabetized the list in the Properties window, Button1 appears in the (DataBindings) section, instead.

Add a label to the form

Now that we've added a button control to create an action, let's add a label control to send text to.

  1. Select the Label control from the Toolbox window, and then drag it onto the form and drop it beneath the Click this button.

  2. In either the Design section or the (DataBindings) section of the Properties window, change the name of Label1 to lblHelloWorld, and then press Enter.

Add code to the form

  1. In the Form1.cs [Design] window, double-click the Click this button to open the Form1.cs window.

    (Alternatively, you can expand Form1.cs in Solution Explorer, and then choose Form1.)

  2. In the Form1.cs window, after the private void line, type or enter lblHelloWorld.Text = "Hello World!"; as shown in the following screenshot:

    Add code to the form

Run the application

  1. Choose the Start button to run the application.

    Choose Start to debug and run the app

    Several things will happen. In the Visual Studio IDE, the Diagnostics Tools window will open, and an Output window will open, too. But outside of the IDE, a Form1 dialog box appears. It will include your Click this button and text that says Label1.

  2. Choose the Click this button in the Form1 dialog box. Notice that the Label1 text changes to Hello World!.

    A Form1 dialog box that includes Label1 text

  3. Close the Form1 dialog box to stop running the app.

Next steps

To learn more, continue with the following tutorial:

See also