Note
Access to this page requires authorization. You can try signing in or changing directories.
Access to this page requires authorization. You can try changing directories.
Applies to: ![]() Visual Studio
Visual Studio ![]() Visual Studio for Mac
Visual Studio for Mac
Note
This article applies to Visual Studio 2017. If you're looking for the latest Visual Studio documentation, see Visual Studio documentation. We recommend upgrading to the latest version of Visual Studio. Download it here
You can use a web performance test to test web services. By using the Insert Request and Insert Web Service Request options, you can customize the individual requests in the Web Performance Test Editor to locate web service pages. Typically, you do not display these pages in the web application. Therefore, you must customize the request to gain access to these pages.
Note
Web performance and load test functionality is deprecated in Visual Studio 2019. For Application Insights, multi-step web tests depend on Visual Studio webtest files. It was announced that Visual Studio 2019 will be the last version with webtest functionality. It is important to understand that while no new features will be added, webtest functionality in Visual Studio 2019 is still currently supported and will continue to be supported during the support lifecycle of the product. The Azure Monitor product team has addressed questions regarding the future of multi-step availability tests here.
Requirements
- Visual Studio Enterprise
- Internet Explorer
Note
Web performance and load test functionality only supports Internet Explorer which is not available on Windows 11 and some versions of Windows 10. Read more on Internet Explorer Lifecycle policy.
To create a simple web service
To test, you can use your own web service or use the basic Web Service (ASMX) template included in Visual Studio. To create a simple web service using this template:
In Visual Studio, create a new project using the ASP.NET Web Application (.NET Framework) template, and select the Empty template when prompted. Type a name and create the project.
In Solution Explorer, right-click the project node, choose Add > New Item, and then choose Web Service (ASMX). Add the web service.
Open WebService1.asmx and replace the default
HelloWorldweb method with the following code.public string HelloWorld(string str) { return "Hello, " + str; }
Install the load testing component
If you don't already have the web performance and load testing tools component installed, you'll need to install it through the Visual Studio Installer.
Open Visual Studio Installer from the Start menu of Windows. You can also access it in Visual Studio from the new project dialog box or by choosing Tools > Get Tools and Features from the menu bar.
In Visual Studio Installer, choose the Individual components tab, and scroll down to the Debugging and testing section. Select Web performance and load testing tools.
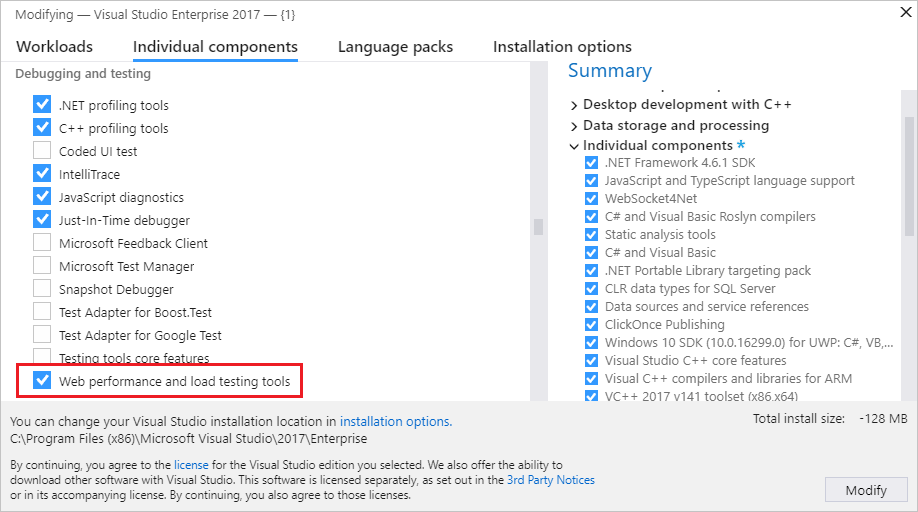
Choose the Modify button.
The web performance and load testing tools component is installed.
Create a web test project
A web test requires the Web Performance and Load Test Project project template. In this section, we'll create a C# load test project. You can also create a Visual Basic load test project, if you prefer.
Open Visual Studio.
If you are using the sample Web Service (ASMX) template, you can add the web test project to the same solution.
Choose File > New > Project from the menu bar.
The New Project dialog box opens.
In the New Project dialog box, expand Installed and Visual C#, and then select the Test category. Choose the Web Performance and Load Test Project template.
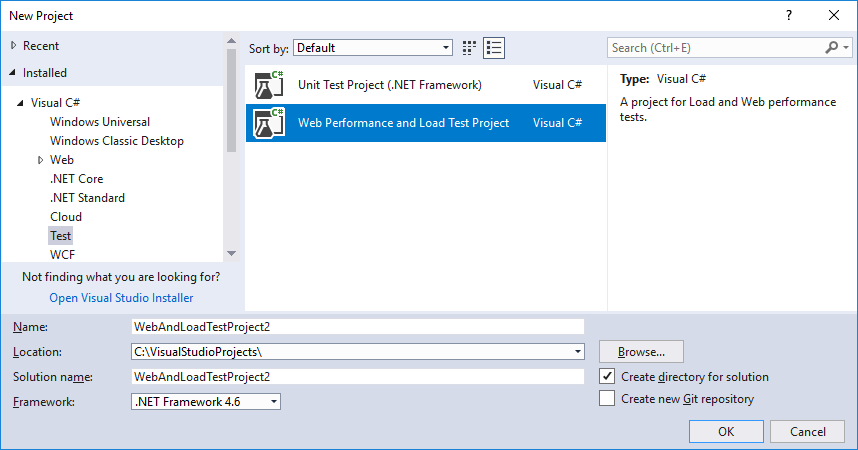
Enter a name for the project if you don't want to use the default name, and then choose OK.
Visual Studio creates the project and displays the files in Solution Explorer. The project initially contains one web test file named WebTest1.webtest.
To test a web service
Start your web service and, if necessary, choose Stop to pause the service.
In the web test project, open WebTest1.webtest, which opens the Web Performance Test Editor. In the test editor, right-click the web performance test and select Add Web Service Request.
In the Url property of the new request, type the name of the web service, such as https://localhost:44318/WebService1.asmx.
For the web service, open a separate session of the browser and type the URL of the .asmx page in the Address toolbar. At the top of the web page, select the method that you want to test and examine the SOAP message. (In the example web service, the method is HelloWorld.) When you open the method, you see it contains a
SOAPAction.In the Web Performance Test Editor, right-click the request and select Add Header to add a new header. In the Name property, type
SOAPAction. In the Value property, type the value that you see inSOAPAction, such as http://tempuri.org/HelloWorld.Expand the URL node in the test editor, choose the String Body node and in the Content Type property enter a value of
text/xml.Return to the browser in step 4, select the XML portion of the SOAP request from the web service description page and copy it to the clipboard.
The XML content resembles the following example:
<?xml version="1.0" encoding="utf-8"?>
<soap:Envelope xmlns:xsi="http://www.w3.org/2001/XMLSchema-instance" xmlns:xsd="http://www.w3.org/2001/XMLSchema" xmlns:soap="http://schemas.xmlsoap.org/soap/envelope/">
  <soap:Body>
    <HelloWorld xmlns="http://tempuri.org/">
      <str>string</str>
    </HelloWorld>
  </soap:Body>
</soap:Envelope>
Return to the Web Performance Test Editor, and then choose the ellipsis (…) in the String Body property. Paste the contents of the clipboard into the property.
Replace any placeholder values in the XML with valid values so that the test can pass. In the previous example, you would replace the instance of
stringwith a name.Right-click the web service request and select Add URL QueryString Parameter.
Assign the query string parameter a name and value. In the previous example, the name is
opand the value isHelloWorld. This identifies the web service operation to perform.Note
You can use data binding in the SOAP body to replace any placeholder value with data bound values by using the
{{DataSourceName.TableName.ColumnName}}syntax.Run the test. In the top pane of the Web Performance Test Results Viewer, select the web service request. In the bottom pane, select the Web Browser tab. The XML that is returned by the web service, and the results of any operations, will be displayed.
Look for the results for your web service request.