Note
Access to this page requires authorization. You can try signing in or changing directories.
Access to this page requires authorization. You can try changing directories.
Important
The information in this section pertains to iOS 9 and prior. For iOS 10 and later, please see the User notification framework guide.
iOS has three ways to indicate to the user that a notification has been received:
- Sound or vibration - iOS can play a sound to notify users. If the sound is disabled, the device can be configured to vibrate.
- Alerts - It is possible to display a dialog on the screen with information about the notification.
- Badges - When a notification is published, a number can be displayed (badged) on the application icon.
iOS also provides a Notification Center that will display all the notifications, both local and remote, to the user. Users may access this by swiping down from the top of the screen:

Creating local notifications in iOS
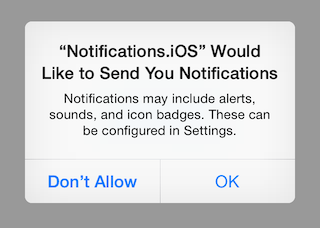
iOS makes it fairly simple to create and handle local notifications. First, iOS 8 requires applications to ask for the user's permission to display notifications. Add the following code to your app before attempting to send a local notification, typically in the AppDelegate's FinishedLaunching method:
var notificationSettings = UIUserNotificationSettings.GetSettingsForTypes(
    UIUserNotificationType.Alert | UIUserNotificationType.Badge | UIUserNotificationType.Sound, null
);
application.RegisterUserNotificationSettings(notificationSettings);
To schedule a local notification, create a UILocalNotification object,
set the FireDate, and schedule it via the ScheduleLocalNotification
method on the UIApplication.SharedApplication object. The following
code snippet shows how to schedule a notification that will fire one
minute in the future, and display an alert with a message:
UILocalNotification notification = new UILocalNotification();
notification.FireDate = NSDate.FromTimeIntervalSinceNow(15);
//notification.AlertTitle = "Alert Title"; // required for Apple Watch notifications
notification.AlertAction = "View Alert";
notification.AlertBody = "Your 15 second alert has fired!";
UIApplication.SharedApplication.ScheduleLocalNotification(notification);
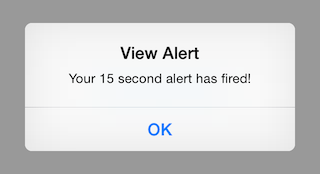
The following screenshot shows what this alert looks like:
Note that if the user chose to not allow notifications then nothing will be displayed.
If you want to apply a badge to the application icon with a number, you can set it as shown in the following line code:
notification.ApplicationIconBadgeNumber = 1;
In order play a sound with the icon, set the SoundName property on the notification as shown in the following code snippet:
notification.SoundName = UILocalNotification.DefaultSoundName;
If the notification sound is longer than 30 seconds, iOS will play the default sound instead.
Important
There is a bug in the iOS simulator that will fire the delegate notification twice. This issue should not occur when running the application on a device.
Handling notifications
iOS applications handle remote and local notifications in almost exactly the same fashion. When an application is
running, the ReceivedLocalNotification method or the ReceivedRemoteNotification method on the AppDelegate class will
be called, and the notification information will be passed as a parameter.
An application can handle a notification in different ways. For instance, the application might just display an alert to remind users about some event. Or the notification might be used to display an alert to the user that a process has finished, such as synching files to a server.
The following code shows how to handle a local notification and display an alert and reset the badge number to zero:
public override void ReceivedLocalNotification(UIApplication application, UILocalNotification notification)
{
    // show an alert
    UIAlertController okayAlertController = UIAlertController.Create(notification.AlertAction, notification.AlertBody, UIAlertControllerStyle.Alert);
    okayAlertController.AddAction(UIAlertAction.Create("OK", UIAlertActionStyle.Default, null));

    Window.RootViewController.PresentViewController(okayAlertController, true, null);

    // reset our badge
    UIApplication.SharedApplication.ApplicationIconBadgeNumber = 0;
}
If the application is not running, iOS will play the sound and/or update the icon badge as applicable. When the user
starts up the application associated with the alert, the application will launch and the FinishedLaunching method on
the app delegate will be called and the notification information will be passed in via the launchOptions parameter. If the
options dictionary contains the key UIApplication.LaunchOptionsLocalNotificationKey, then the AppDelegate knows that
the application was launched from a local notification. The following code snippet demonstrates this process:
// check for a local notification
if (launchOptions.ContainsKey(UIApplication.LaunchOptionsLocalNotificationKey))
{
    var localNotification = launchOptions[UIApplication.LaunchOptionsLocalNotificationKey] as UILocalNotification;
    if (localNotification != null)
    {
        UIAlertController okayAlertController = UIAlertController.Create(localNotification.AlertAction, localNotification.AlertBody, UIAlertControllerStyle.Alert);
        okayAlertController.AddAction(UIAlertAction.Create("OK", UIAlertActionStyle.Default, null));

        Window.RootViewController.PresentViewController(okayAlertController, true, null);

        // reset our badge
        UIApplication.SharedApplication.ApplicationIconBadgeNumber = 0;
    }
}
For a remote notification, launchOptions will have a
LaunchOptionsRemoteNotificationKey with an associated NSDictionary
containing the remote notification payload. You can extract the
notification payload via the alert, badge, and sound keys. The
following code snippet shows how to get remote notifications:
NSDictionary remoteNotification = options[UIApplication.LaunchOptionsRemoteNotificationKey];
if(remoteNotification != null)
{
    string alert = remoteNotification["alert"];
}
Summary
This section showed how to create and publish a notification in Xamarin.iOS. It show how an application may react
to notifications by overriding the ReceivedLocalNotification method or the ReceivedRemoteNotification method in the AppDelegate.

