Note
Access to this page requires authorization. You can try signing in or changing directories.
Access to this page requires authorization. You can try changing directories.
Use Microsoft Purview Priority Cleanup to permanently delete targeted files from SharePoint and OneDrive after the required review and approval. This option bypasses the SharePoint and OneDrive recycle bins. After deletion, the content is no longer discoverable in SharePoint search, Microsoft 365 Copilot, or eDiscovery.
Permanent deletion is an additional option for a Priority Cleanup policy. Use the standard Priority Cleanup workflow when you want identified items to move to the second-stage Recycle Bin.
Before you begin, review the required roles, approvers, auditing, and simulation requirements.
Prerequisites
Before you configure permanent deletion:
- Review the prerequisites, permissions, approver requirements, and simulation process in Override holds to clean up files for Copilot and reclaim storage.
- Assign the Priority Cleanup Admin role to the administrator who creates and manages the policy.
- Assign the required roles to each approver before policy creation.
- Enable auditing at least one day before you create and run the first Priority Cleanup policy.
- Confirm that the permanent deletion option is available in your tenant. Public preview rollout begins on August 24, 2026.
Important
Permanent deletion can override retention settings or eDiscovery holds. Items already copied to an eDiscovery review set aren't deleted by Priority Cleanup.
Configure permanent deletion
Create a Priority Cleanup policy and explicitly select the permanent deletion option.
Sign in to the Microsoft Purview portal and go to Solutions > Data Lifecycle Management > Priority cleanup.
Select + Create a priority cleanup.
Enter the policy name and description, choose an adaptive or static scope, select the SharePoint or OneDrive locations, and define the query for the targeted files.
On the Choose what to do with the content page, select Delete data permanently.
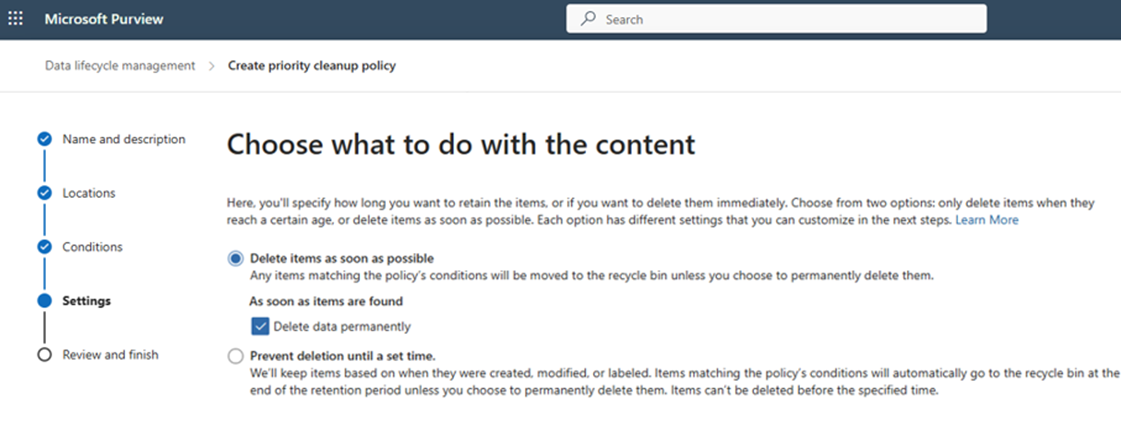
Choose whether to delete matched items as soon as possible or prevent deletion until a set time.
Assign the required approvers.
Run the policy in simulation mode and review the returned samples.
After the simulation results are satisfactory, have a second Priority Cleanup admin review the results and turn on the policy.
Important
The last person to edit the policy can't also turn it on.
Review and approve permanent deletion
Required approvers review identified items before permanent deletion occurs.
- In the Microsoft Purview portal, go to Data Lifecycle Management > Priority cleanup > Pending cleanups.
- Select the cleanup and review the identified items, their locations, and their history.
- Select the items to delete, and then select Approve disposal.
- Acknowledge the action, optionally add a comment, and then select Apply.
After all required approvals are complete, the selected items bypass the recycle bins and are permanently deleted. The deleted content is no longer discoverable in SharePoint search, Microsoft 365 Copilot, or eDiscovery.
If an item shouldn't be deleted, select Relabel, and then assign an existing retention label.
Monitor permanent deletion
Use the cleanup ID and auditing to monitor the policy and deletion activity.
- Go to Data Lifecycle Management > Priority cleanup and open the policy details.
- Copy the cleanup ID.
- In the auditing solution, use the cleanup ID as the keyword search string.
- Check for the PriorityCleanupFileDeleted operation, which indicates that Priority Cleanup permanently deleted an item.