Note
Access to this page requires authorization. You can try signing in or changing directories.
Access to this page requires authorization. You can try changing directories.
This article outlines how to register Tableau, and how to authenticate and interact with Tableau in Microsoft Purview. For more information about Microsoft Purview, read the introductory article.
Important
This feature is currently in preview. The Supplemental Terms of Use for Microsoft Azure Previews include additional legal terms that apply to Azure features that are in beta, in preview, or otherwise not yet released into general availability.
Supported capabilities
Scanning capabilities
| Metadata Extraction | Full Scan | Incremental Scan | Scoped Scan |
|---|---|---|---|
| Yes | Yes | No | Yes |
The supported Tableau Server version is 8.x to 2023.x.
When scanning Tableau, Microsoft Purview supports extracting technical metadata including:
- Server
- Projects
- Workbooks
- Dashboards
- Data sources
- Stories
- Worksheets and the fields/axes
- Workbook data sources
- Tables and the columns
When setting up scan, you can choose to scan an entire Tableau server, or if you have multiple sites installed, to scope the scan to a given site.
Other capabilities
For classifications, sensitivity labels, policies, data lineage, and live view, see the list of supported capabilities.
Known limitations
- Currently, scan isn't supported if your Tableau server doesn’t allow access from public network.
- When object is deleted from the data source, currently the subsequent scan won't automatically remove the corresponding asset in Microsoft Purview.
Prerequisites
You must have an Azure account with an active subscription. Create an account for free.
You must have an active Microsoft Purview account.
You need an Azure Key Vault, and to grant Microsoft Purview permissions to access secrets.
You need Data Source Administrator and Data Reader permissions to register a source and manage it in the Microsoft Purview governance portal. For more information about permissions, see Access control in Microsoft Purview.
Set up the right integration runtime for your scenario. If your data source isn't publicly accessible, set up the latest kubernetes supported self-hosted integration runtime.
Required permissions for scan
Microsoft Purview supports basic authentication (username and password) for scanning Tableau server.
The user account must be licensed as "Interactor" (renamed to "Explorer" in the latest versions) on the Tableau server, and must have 'View' and 'Download' rights for all of the Workbooks, Data Sources and Projects that are about to import. It is preferable to use an account that has "Site Administrator" security role.
Register
This section describes how to register a Tableau server in Microsoft Purview by using the Microsoft Purview governance portal.
Go to your Microsoft Purview account.
Select Data Map on the left pane.
Select Register.
In Register sources, select Tableau > Continue.
On the Register sources (Tableau) screen, do the following:
For Name, enter a name that Microsoft Purview will list as the data source.
For Host, enter the URL of your Tableau server. If SSL is used, the URL must start by https and possibly end with a custom port if the SSL default port of 443 is not used.
Select a collection from the list.
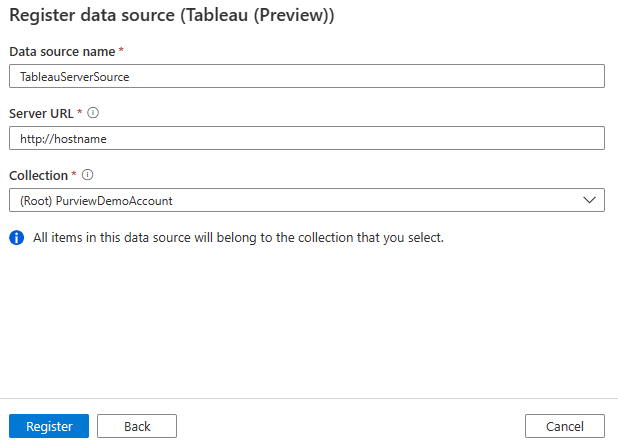
Select Register.
Scan
Tip
To troubleshoot any issues with scanning:
- Confirm you have followed all prerequisites.
- Review our scan troubleshooting documentation.
Use the following steps to scan Tableau server to automatically identify assets. For more information about scanning in general, see Scans and ingestion in Microsoft Purview.
Go to Sources.
Select the registered Tableau source.
Select + New scan.
Provide the following details:
Name: Enter a name for the scan.
Connect via integration runtime: Choose the default Azure integration runtime, Managed VNet IR, or a Kubernetes supported self-hosted integration runtime you created.
Credential: Select the credential to connect to your data source. Make sure to:
- Select Basic Authentication while creating a credential.
- Provide the user name used to connect to Tableau server in the User name input field.
- Store the user password used to connect to Tableau server in the secret key.
For more information, see Credentials for source authentication in Microsoft Purview.
Site: Site is only required when connecting to an online Tableau server with multiple sites installed. The value is case sensitive, and must not contain any space as it is used in the URL to connect to Tableau.
Click Test connection to validate the settings.
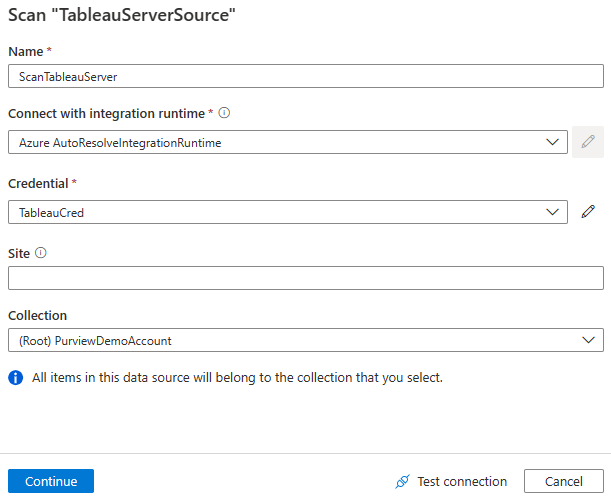
Select Continue.
For Scan trigger, choose whether to set up a schedule or run the scan once.
Review your scan and select Save and Run.
View your scans and scan runs
To view existing scans:
- Go to the Microsoft Purview portal. On the left pane, select Data map.
- Select the data source. You can view a list of existing scans on that data source under Recent scans, or you can view all scans on the Scans tab.
- Select the scan that has results you want to view. The pane shows you all the previous scan runs, along with the status and metrics for each scan run.
- Select the run ID to check the scan run details.
Manage your scans
To edit, cancel, or delete a scan:
Go to the Microsoft Purview portal. On the left pane, select Data Map.
Select the data source. You can view a list of existing scans on that data source under Recent scans, or you can view all scans on the Scans tab.
Select the scan that you want to manage. You can then:
- Edit the scan by selecting Edit scan.
- Cancel an in-progress scan by selecting Cancel scan run.
- Delete your scan by selecting Delete scan.
Note
- Deleting your scan does not delete catalog assets created from previous scans.
Browse, search, and view assets
After successfully scanning your Tableau server, you can browse Unified Catalog or search Unified Catalog to view the asset details.
Next steps
Now that you've registered your source, use the following guides to learn more about Microsoft Purview and your data: