Sign a user into a Desktop application using Microsoft Identity Platform and call a protected ASP.NET Core Web API, which calls Microsoft Graph on-behalf of the user
About this sample
Table of content
- About this sample
- How to run this sample
- How was the code created
- How to deploy this sample to Azure
- Community Help and Support
- Contributing
- More information
Scenario
In this sample, we would protect an ASP.Net Core Web API using the Microsoft Identity Platform. The Web API will be protected using Microsoft Entra ID OAuth Bearer Authorization. The API will support authenticated users with Work and School accounts. Further on the API will also call a downstream API (Microsoft Graph) on-behalf of the signed-in user to provide additional value to its client apps.
Overview
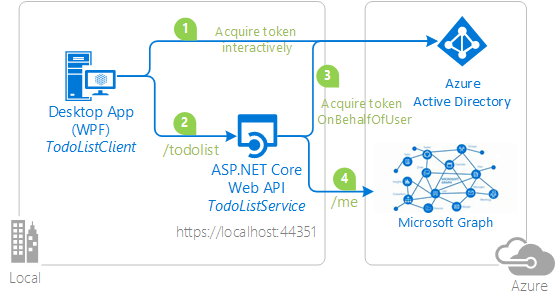
This sample presents an ASP.NET core Web API, protected by Microsoft Entra ID OAuth Bearer Authorization, that also calls the Microsoft Graph on-behalf of the signed-in user. The Web API is called by a .NET Desktop WPF application.
Both applications use the Microsoft Authentication Library MSAL.NET to sign-in user and obtain a JWT access token through the OAuth 2.0 protocol.
The WPF client application:
- Signs-in users using the MSAL.NET library.
- Acquires an access token for the Web API
- Calls the ASP.NET Core Web API by using the access token as a bearer token in the authentication header of the Http request.
The Web API:
- Authorizes the caller (user) using the ASP.NET JWT Bearer Authorization middleware.
- Acquires another access token on-behalf-of the signed-in user using the on-behalf of flow.
- The Web API then uses this new Access token to call Microsoft Graph.
- Developers who wish to gain good familiarity of programming for Microsoft Graph are advised to go through the An introduction to Microsoft Graph for developers recorded session.
User experience when using this sample
The Web API (TodoListService) maintains an in-memory collection of to-do items for each authenticated user. Several applications signed-in under the same identity will share the same to-do list.
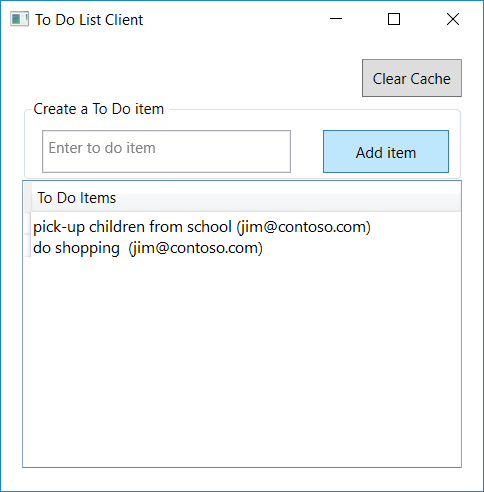
The WPF application (TodoListClient) allows a user to:
- Sign-in. The first time a user signs in, a consent screen is presented where the user consents for the application accessing the TodoList Service on their behalf.
- When the user has signed-in, the user is presented with a list of to-do items fetched from the Web API for this signed-in identity.
- The user can add more to-do items by clicking on Add item button. As they add items, they see that these items appear with their user name between parenthesis.
Next time a user runs the application, the user is signed-in with the same identity as the WPF application maintains a cache on disk. Users can clear the cache (which will have the effect of them signing out).
How to run this sample
Pre-requisites
- Visual Studio 2019 or just the .NET Core SDK
- An Internet connection
- A Windows machine (necessary if you want to run the app on Windows)
- An OS X machine (necessary if you want to run the app on Mac)
- A Linux machine (necessary if you want to run the app on Linux)
- a Microsoft Entra tenant. For more information on how to get a Microsoft Entra tenant, see How to get a Microsoft Entra tenant
- A user account in your Microsoft Entra tenant. This sample will not work with a Microsoft account (formerly Windows Live account). Therefore, if you signed in to the Microsoft Entra admin center with a Microsoft account and have never created a user account in your directory before, you need to do that now.
Step 1: Clone or download this repository
From your shell or command line:
git clone https://github.com/Azure-Samples/active-directory-dotnet-native-aspnetcore-v2.git
cd "2. Web API now calls Microsoft Graph"
or download and extract the repository .zip file.
Given that the name of the sample is quite long, and so are the names of the referenced NuGet packages, you might want to clone it in a folder close to the root of your hard drive, to avoid file size limitations on Windows.
Step 2: Register the sample application with your Microsoft Entra tenant
There are two projects in this sample. Each needs to be separately registered in your Microsoft Entra tenant. To register these projects, you can:
- either follow the steps below for manual registration
- or use PowerShell scripts that:
- automatically creates the Microsoft Entra applications and related objects (passwords, permissions, dependencies) for you. Note that this works for Visual Studio only.
- modify the Visual Studio projects' configuration files.
Expand this section if you want to use this automation:
On Windows, run PowerShell and navigate to the root of the cloned directory
In PowerShell run:
Set-ExecutionPolicy -ExecutionPolicy RemoteSigned -Scope Process -ForceRun the script to create your Microsoft Entra application and configure the code of the sample application accordingly.
In PowerShell run:
cd .\AppCreationScripts\
.\Configure.ps1
Other ways of running the scripts are described in App Creation Scripts The scripts also provide a guide to automated application registration, configuration and removal which can help in your CI/CD scenarios.
Open the Visual Studio solution and click start to run the code.
Follow the steps below to manually walk through the steps to register and configure the applications.
Choose the Microsoft Entra tenant where you want to create your applications
As a first step you'll need to:
- Sign in to the Microsoft Entra admin center using either a work or school account or a personal Microsoft account.
- If your account is present in more than one Microsoft Entra tenant, select your profile at the top right corner in the menu on top of the page, and then switch directory. Change your portal session to the desired Microsoft Entra tenant.
Register the service app (TodoListService(ms-identity-dotnet-native-aspnetcore-v2))
- Navigate to the Microsoft identity platform for developers App registrations page.
- Select New registration.
- In the Register an application page that appears, enter your application's registration information:
- In the Name section, enter a meaningful application name that will be displayed to users of the app, for example
TodoListService(ms-identity-dotnet-native-aspnetcore-v2). - Under Supported account types, select Accounts in any organizational directory and personal Microsoft accounts (e.g. Skype, Xbox, Outlook.com).
- In the Redirect URI (optional) section, select Web in the combo-box and enter the following redirect URI:
https://localhost:44351/. - Select Register to create the application.
- In the Name section, enter a meaningful application name that will be displayed to users of the app, for example
- In the app's registration screen, find and note the Application (client) ID. You use this value in your app's configuration file(s) later in your code.
- Select Save to save your changes.
- In the app's registration screen, click on the Certificates & secrets blade in the left to open the page where we can generate secrets and upload certificates.
- In the Client secrets section, click on New client secret:
- Type a key description (for instance
app secret), - Select one of the available key durations (6 months (recommended), 3, 12, 18, 24 months or Custom ) as per your security concerns.
- The generated key value will be displayed when you click the Add button. Copy the generated value for use in the steps later.
- You'll need this key later in your code's configuration files. This key value will not be displayed again, and is not retrievable by any other means, so make sure to note it from the Microsoft Entra admin center before navigating to any other screen or blade.
- Type a key description (for instance
- In the app's registration screen, click on the API permissions blade in the left to open the page where we add access to the APIs that your application needs.
- Click the Add a permission button and then,
- Ensure that the Microsoft APIs tab is selected.
- In the Commonly used Microsoft APIs section, click on Microsoft Graph
- In the Delegated permissions section, select the User.Read in the list. Use the search box if necessary.
- Click on the Add permissions button at the bottom.
- In the app's registration screen, select the Expose an API blade to the left to open the page where you can declare the parameters to expose this app as an API for which client applications can obtain access tokens for.
The first thing that we need to do is to declare the unique resource URI that the clients will be using to obtain access tokens for this API. To declare an resource URI, follow the following steps:
- Click
Setnext to the Application ID URI to generate a URI that is unique for this app. - For this sample, accept the proposed Application ID URI (api://{clientId}) by selecting Save.
- Click
- All APIs have to publish a minimum of one scope for the client's to obtain an access token successfully. To publish a scope, follow the following steps:
- Select Add a scope button open the Add a scope screen and Enter the values as indicated below:
- For Scope name, use
access_as_user. - Select Admins and users options for Who can consent?
- For Admin consent display name type
Access TodoListService(ms-identity-dotnet-native-aspnetcore-v2) - For Admin consent description type
Allows the app to access TodoListService(ms-identity-dotnet-native-aspnetcore-v2) as the signed-in user. - For User consent display name type
Access TodoListService(ms-identity-dotnet-native-aspnetcore-v2) - For User consent description type
Allow the application to access TodoListService(ms-identity-dotnet-native-aspnetcore-v2) on your behalf. - Keep State as Enabled
- Click on the Add scope button on the bottom to save this scope.
- For Scope name, use
- Select Add a scope button open the Add a scope screen and Enter the values as indicated below:
Configure the service app (TodoListService(ms-identity-dotnet-native-aspnetcore-v2)) to use your app registration
Open the project in your IDE (like Visual Studio) to configure the code.
In the steps below, "ClientID" is the same as "Application ID" or "AppId".
- Open the
TodoListService\appsettings.jsonfile - Find the app key
Domainand replace the existing value with your Microsoft Entra tenant name. - Find the app key
TenantIdand replace the existing value with your Microsoft Entra tenant ID. - Find the app key
ClientIdand replace the existing value with the application ID (clientId) of theTodoListService(ms-identity-dotnet-native-aspnetcore-v2)application copied from the Microsoft Entra admin center. - Find the app key
ClientSecretand replace the existing value with the key you saved during the creation of theTodoListService(ms-identity-dotnet-native-aspnetcore-v2)app, in the Microsoft Entra admin center.
Register the client app (TodoListClient(ms-identity-dotnet-native-aspnetcore-v2))
- Navigate to the Microsoft identity platform for developers App registrations page.
- Select New registration.
- In the Register an application page that appears, enter your application's registration information:
- In the Name section, enter a meaningful application name that will be displayed to users of the app, for example
TodoListClient(ms-identity-dotnet-native-aspnetcore-v2). - Under Supported account types, select Accounts in any organizational directory and personal Microsoft accounts (e.g. Skype, Xbox, Outlook.com).
- In the Name section, enter a meaningful application name that will be displayed to users of the app, for example
- Select Register to create the application.
- In the app's registration screen, find and note the Application (client) ID. You use this value in your app's configuration file(s) later in your code.
- In the app's registration screen, select Authentication in the menu.
- If you don't have a platform added, select Add a platform and select the Public client (mobile & desktop) option.
- In the Redirect URIs | Suggested Redirect URIs for public clients (mobile, desktop) section, select https://login.microsoftonline.com/common/oauth2/nativeclient
- Select Save to save your changes.
- In the app's registration screen, click on the API permissions blade in the left to open the page where we add access to the APIs that your application needs.
- Click the Add a permission button and then,
- Ensure that the My APIs tab is selected.
- In the list of APIs, select the API
TodoListService(ms-identity-dotnet-native-aspnetcore-v2). - In the Delegated permissions section, select the access_as_user in the list. Use the search box if necessary.
- Click on the Add permissions button at the bottom.
Important. Even if you declared the permission in the application registration to be (middle-tier)/access_as_user, in the code, you will need to acquire a token for (middle-tier)/.default in order to let the user consent to the downstream API (Graph) as well as the TodoListService. See Configure the TodoListClient C# project below
Configure the client app (TodoListClient(ms-identity-dotnet-native-aspnetcore-v2)) to use your app registration
Open the project in your IDE (like Visual Studio) to configure the code.
In the steps below, "ClientID" is the same as "Application ID" or "AppId".
- Open the
TodoListClient\App.Configfile - Find the app key
ida:ClientIdand replace the existing value with the application ID (clientId) of theTodoListClient(ms-identity-dotnet-native-aspnetcore-v2)application copied from the Microsoft Entra admin center. - Find the app key
todo:TodoListScopeand replace the existing value with ScopeDefault. - Find the app key
todo:TodoListBaseAddressand replace the existing value with the base address of the TodoListService(ms-identity-dotnet-native-aspnetcore-v2) project (by defaulthttps://localhost:44351/).
Configure Known Client Applications for service (TodoListService(ms-identity-dotnet-native-aspnetcore-v2))
For a middle tier Web API (TodoListService(ms-identity-dotnet-native-aspnetcore-v2)) to be able to call a downstream Web API, the middle tier app needs to be granted the required permissions as well.
However, since the middle tier cannot interact with the signed-in user, it needs to be explicitly bound to the client app in its Microsoft Entra ID registration.
This binding merges the permissions required by both the client and the middle tier Web API and presents it to the end user in a single consent dialog. The user then consent to this combined set of permissions.
To achieve this, you need to add the Application Id of the client app, in the Manifest of the Web API in the knownClientApplications property. Here's how:
In the Microsoft Entra admin center, navigate to your
TodoListService(ms-identity-dotnet-native-aspnetcore-v2)app registration, and select Manifest section.In the manifest editor, change the
"knownClientApplications": []line so that the array contains the Client ID of the client application (TodoListClient(ms-identity-dotnet-native-aspnetcore-v2)) as an element of the array.For instance:
"knownClientApplications": ["ca8dca8d-f828-4f08-82f5-325e1a1c6428"],Save the changes to the manifest.
Step 3: Run the sample
Clean the solution, rebuild the solution, and run it. You might want to go into the solution properties and set both projects as startup projects, with the service project starting first.
When you start the Web API from Visual Studio, depending on the browser you use, you'll get:
- an empty web page (with Microsoft Edge)
- or an error HTTP 401 (with Chrome)
This behavior is expected as the browser is not authenticated. The WPF application will be authenticated, so it will be able to access the Web API.
Explore the sample by signing in into the TodoList client, adding items to the To Do list, removing the user account (clearing the cache), and starting again. As explained, if you stop the application without removing the user account, the next time you run the application, you won't be prompted to sign in again. That is because the sample implements a persistent cache for MSAL, and remembers the tokens from the previous run.
NOTE: Remember, the To-Do list is stored in memory in this TodoListService-v2 sample. Each time you run the TodoListService API, your To-Do list will get emptied.
How was the code created
For details about the way the code to protect the Web API was created, see How was the code created section, of the README.md file located in the sibling folder named 1. Desktop app calls Web API.
This section is only about the additional code added to let the Web API call the Microsoft Graph
Reference MSAL.NET
Calling a downstream API involves getting a token for this API. The Access Token acquisition is achieved by using MSAL.NET.
Reference the Microsoft.Identity.Client NuGet package from the TodoListService project.
Add a reference to the Microsoft.Identity.Web library. It contains reusable code that you can use in your Web APIs (and web apps)
Modify the Startup.cs file to add a token received by the Web API to the MSAL.NET cache
Update Startup.cs file:
Add a using for
Microsoft.Identity.ClientIn the
ConfigureServicesmethod, replace:services.AddAuthentication(AzureADDefaults.BearerAuthenticationScheme) .AddAzureADBearer(options => Configuration.Bind("AzureAd", options));by
services.AddMicrosoftIdentityWebApiAuthentication(Configuration) .EnableTokenAcquisitionToCallDownstreamApi() .AddInMemoryTokenCaches();AddMicrosoftIdentityWebApiAuthenticationdoes the following:- add the JwtBearerAuthenticationScheme (Note the replacement of BearerAuthenticationScheme by JwtBearerAuthenticationScheme)
- set the authority to be the Microsoft identity platform identity
- set the audiences to be validated
- register an issuer validator that accepts issuers from Microsoft Identity Platform clouds.
The .NET Core "services" that are added are:
- a token acquisition service leveraging MSAL.NET
- an in memory token cache
The implementations of these classes are in the Microsoft.Identity.Web library, and they are designed to be reusable in your applications (Web apps and Web apis).
EnableTokenAcquisitionToCallDownstreamApisubscribes to theOnTokenValidatedJwtBearerAuthentication event, and in this event, adds the user account into MSAL.NET's user token cache.AddInMemoryTokenCachesadds an in memory token cache provider, which will cache the Access Tokens acquired for the downstream Web API.
Modify the TodoListController.cs file to add information on the todo item about its owner
In the TodoListController.cs file, the Post method is modified by replacing
todoStore.Add(new TodoItem { Owner = owner, Title = Todo.Title });
with
User user = _graphServiceClient.Me.Request().GetAsync().GetAwaiter().GetResult();
string title = string.IsNullOrWhiteSpace(user.UserPrincipalName) ? todo.Title : $"{todo.Title} ({user.UserPrincipalName})";
TodoStore.Add(new TodoItem { Owner = owner, Title = title });
The work of calling Microsoft Graph to get the owner name is done by GraphServiceClient, which is set up by Microsoft Identity Web.
GraphServiceClient
- gets an access token for the Microsoft Graph on behalf of the user (leveraging the in-memory token cache, which was added in the
Startup.cs), and - calls the Microsoft Graph
/meendpoint to retrieve the name of the user.
Handling required interactions with the user (dynamic consent, MFA, etc.)
On the Web API side
An interesting piece is how MicrosoftIdentityWebChallengeUserException are handled. These exceptions are typically sent by Microsoft Entra ID when there is a need for a user interaction. This can be the case when the user needs to re-sign-in, or needs to grant some additional consent, or to obtain additional claims. For instance, the user might need to do multi-factor authentication required specifically by a specific downstream API. When these exceptions happen, given that the Web API does not have any UI, it needs to challenge the client app passing all the required information, so this client app can handle the interaction with the user.
This sample uses the ReplyForbiddenWithWwwAuthenticateHeaderAsync available on the TokenAcquisition service (part of Microsoft.Identity.Web library), which uses the HttpResponse to:
- Send an HTTP 403 (Forbidden) to the client app
- Set information in the www-Authenticate header of the HttpResponse with information that would enable a client to get more consent from the user that is:
- the client ID of our Web API
- the scopes to request
- the claims (for conditional access, MFA etc.)
The code for this method is available in Microsoft.Identity.Web library
On the client side
On the client side, when it calls the Web API and receives a 403 with a www-Authenticate header, the client will call the HandleChallengeFromWebApi method, which will
- extract the consent URI from the www-Authenticate header,
- navigate to the consent URI provided by the Web API.
The code for HandleChallengeFromWebApi method is available from TodoListClient\MainWindow.xaml.cs L162-197
How to deploy this sample to Azure
See Readme.md to deploy this sample to Azure.
Community Help and Support
Use Stack Overflow to get support from the community.
Ask your questions on Stack Overflow first and browse existing issues to see if someone has asked your question before.
Make sure that your questions or comments are tagged with [microsoft-entra-id msal dotnet].
If you find a bug in the sample, please raise the issue on GitHub Issues.
To provide a recommendation, visit the following User Voice page.
Contributing
If you'd like to contribute to this sample, see CONTRIBUTING.MD.
This project has adopted the Microsoft Open Source Code of Conduct. For more information, see the Code of Conduct FAQ or contact opencode@microsoft.com with any additional questions or comments.
More information
For more information, see MSAL.NET's conceptual documentation:
To learn more about the scenario, see Scenario: Web app that calls web APIs
To learn more about Microsoft.Identity.Web, see Microsoft.Identity.Web/README.md
To learn more about the application registration, visit:
To learn more about the code, visit Conceptual documentation for MSAL.NET and in particular:
Articles about the Microsoft identity platform endpoint http://aka.ms/aaddevv2, with a focus on: