Deploy your Angular application to Azure Cloud and use Azure services to manage your operations
- Overview
- Scenario
- Prerequisites
- Registration
- Deployment
- Explore the sample
- More information
- Community Help and Support
- Contributing
Overview
This sample demonstrates how to deploy an Angular single-page application (SPA) coupled with a .NET Core web API to Azure Cloud using Azure Storage and Azure App Service, respectively. To do so, we will use the same code sample from Chapter 3.
ℹ️ You may also choose to deploy the B2C sample from Chapter 3 instead. Steps below are more or less the same.
Scenario
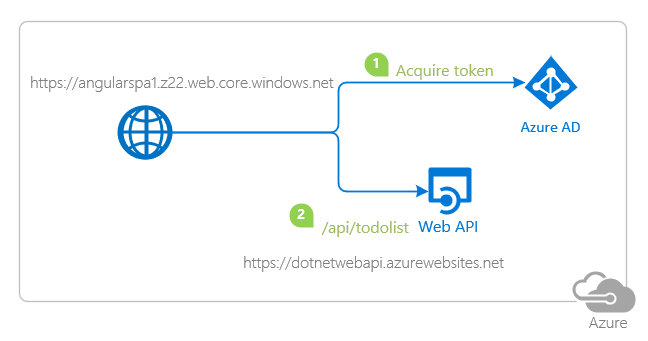
- The client application uses MSAL Angular to sign-in a user and obtain a JWT Access Token from Azure AD.
- The Access Token is used as a bearer token to authorize the user to call the protected web API.
- The protected web API responds with the claims in the Access Token.
Prerequisites
- An Azure subscription. This sample uses Azure Storage and Azure App Service.
Setup
Step 1: Clone or download this repository
From your shell or command line:
git clone https://github.com/Azure-Samples/ms-identity-javascript-angular-tutorial.git
or download and extract the repository .zip file.
⚠️ To avoid path length limitations on Windows, we recommend cloning into a directory near the root of your drive.
Step 2: Install project dependencies
- Setup the service app:
    cd ms-identity-javascript-angular-tutorial
    cd 3-Authorization-II/1-call-api
    cd API
    dotnet restore
- Setup the client app:
    cd ..
    cd SPA
    npm install
Registration
Register the service app (.NET Core web API)
Use the same app registration credentials that you've obtained during chapter 3-1. Update your project files here as needed.
Register the client app (Angular SPA)
Use the same app registration credentials that you've obtained during chapter 3-1. Update your project files here as needed.
Deployment
Deploying web API to Azure App Services
There is one .NET Core web API in this sample. To deploy it to Azure App Services, you'll need to:
- create an Azure App Service
- publish the projects to the App Services
Publish your files
Sign-in to App Service using an Azure AD Account.
Open the
APIproject folder.Choose View > Terminal from the main menu.
The terminal opens in the
APIfolder.Run the following command:
dotnet publish --configuration ReleasePublish folder is created under path
bin/Release/<Enter_Framework_FolderName>.Right-click on Publish folder and select Deploy to Web App.
Select Create New Web App, enter a unique name for the app.
Select Windows as the OS. Press Enter.
Disable Azure App Services default authentication
- Go to Azure portal, and locate your project there.
- On the Settings tab, select Authentication/Authorization. Make sure
App Service Authenticationis Off. Select Save.
- On the Settings tab, select Authentication/Authorization. Make sure
- Browse your website. If you see the default web page of the project, the publication was successful.
Enable cross-origin resource sharing (CORS)
- Go to Azure portal, and locate your project there.
- On the API tab, select CORS. Check the box Enable Access-Control-Allow-Credentials.
- Under Allowed origins, add the coordinates of your published website.
Deploying SPA to Azure Storage
There is one Angular single-page application in this sample. To deploy it to Azure Storage, you'll need to:
- create an Azure Storage blob and obtain website coordinates
- build your project and upload it to Azure Storage blob
- update config files with website coordinates
ℹ️ If you would like to use VS Code Azure Tools extension for deployment, watch the tutorial offered by Microsoft Docs.
Build and upload the Angular SPA to an Azure Storage blob
Build your project to get a distributable files folder, where your built html, css and javascript files will be generated.
    cd SPA
    ng build --prod
Then follow the steps below:
⚠️ When uploading, make sure you upload the contents of your distributable files folder and not the entire folder itself.
ℹ️ If you don't have an account already, see: How to create a storage account.
- Sign in to the Azure portal.
- Locate your storage account and display the account overview.
- Select Static website to display the configuration page for static websites.
- Select Enabled to enable static website hosting for the storage account.
- In the Index document name field, specify a default index page (For example:
index.html). - The default index page is displayed when a user navigates to the root of your static website.
- Select Save. The Azure portal now displays your static website endpoint. Make a note of the Primary endpoint field.
- Next, select Storage Explorer.
- Expand the BLOB CONTAINERS node, and then select the
$webcontainer. - Choose the Upload button to upload files.
- If you intend for the browser to display the contents of file, make sure that the content type of that file is set to
text/html. - In the pane that appears beside the account overview page of your storage account, select Static Website. The URL of your site appears in the Primary endpoint field. In the next section, you will register this URI.
Update the Azure AD app registration
- Navigate back to to the Azure portal.
- In the left-hand navigation pane, select the Azure Active Directory service, and then select App registrations.
- In the resulting screen, select
msal-angular-spa. - In the app's registration screen, select Authentication in the menu.
- In the Redirect URIs section, update the reply URLs to match the site URL of your Azure deployment. For example:
https://angularspa1.z22.web.core.windows.net
- In the Redirect URIs section, update the reply URLs to match the site URL of your Azure deployment. For example:
Update authentication configuration parameters
- In your IDE, locate the
SPAproject. Then, openSPA\src\app\auth-config.ts. - Find the key for redirect URI and replace its value with the address of the web app you published, for example,
https://angularspa1.z22.web.core.windows.net. - Find the key for web API endpoint and replace its value with the address of the web API you published, for example,
https://dotnetwebapi.azurewebsites.net/api/todolist.
Explore the sample
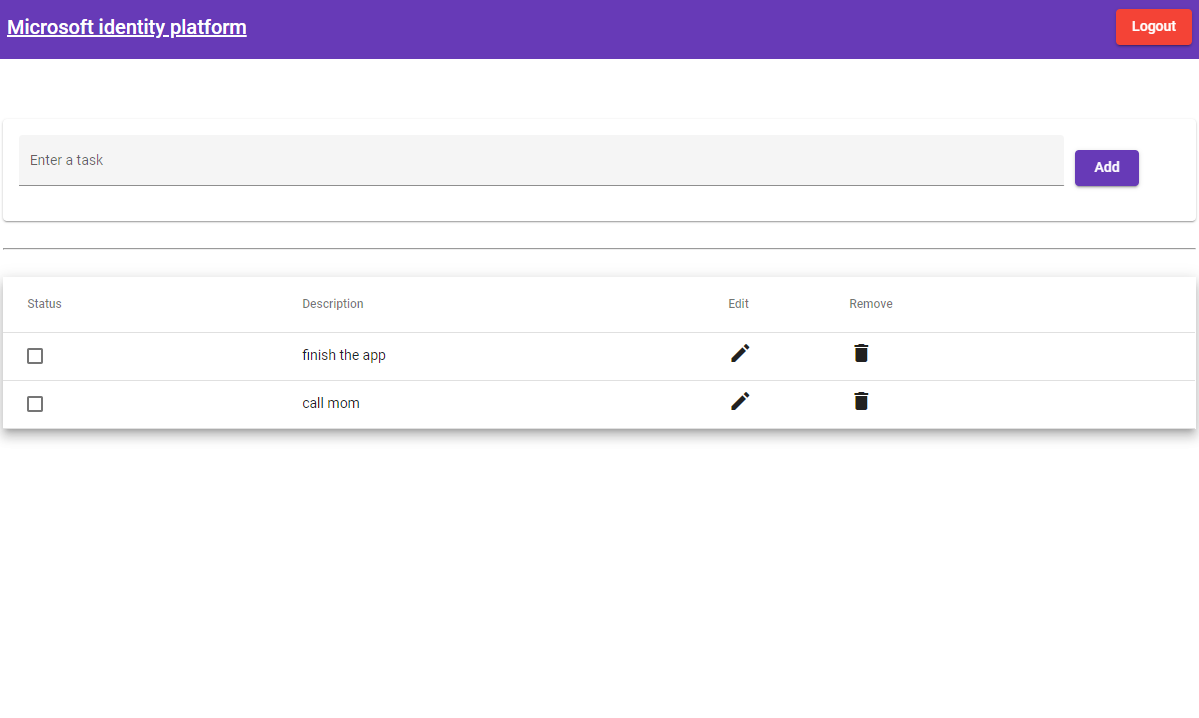
- Open your browser and navigate to your deployed client app's URI, for instance:
https://angularspa1.z22.web.core.windows.net/. - Select the Sign In button on the top right corner.
- Select the TodoList button on the navigation bar to access your todo list.
We'd love your feedback!
Were we successful in addressing your learning objective? Consider taking a moment to share your experience with us.
More information
For more information about how OAuth 2.0 protocols work in this scenario and other scenarios, see Authentication Scenarios for Azure AD.
Community Help and Support
Use Stack Overflow to get support from the community.
Ask your questions on Stack Overflow first and browse existing issues to see if someone has asked your question before.
Make sure that your questions or comments are tagged with [azure-active-directory azure-ad-b2c ms-identity adal msal].
If you find a bug in the sample, raise the issue on GitHub Issues.
To provide feedback on or suggest features for Azure Active Directory, visit User Voice page.
Contributing
If you'd like to contribute to this sample, see CONTRIBUTING.MD.
This project has adopted the Microsoft Open Source Code of Conduct. For more information, see the Code of Conduct FAQ or contact opencode@microsoft.com with any additional questions or comments.