Remote MCP with Azure Functions (Python)
This is a quickstart template to easily build and deploy custom remote MCP servers to the cloud using Azure Functions with Python. You can clone/restore/run on your local machine with debugging, and azd up to have it in the cloud in a couple minutes.
The MCP servers are configured with built-in authentication using Microsoft Entra as the identity provider.
You can also use API Management to secure the server, as well as network isolation using VNET.
If you're looking for this sample in more languages check out the .NET/C# and Node.js/TypeScript versions.
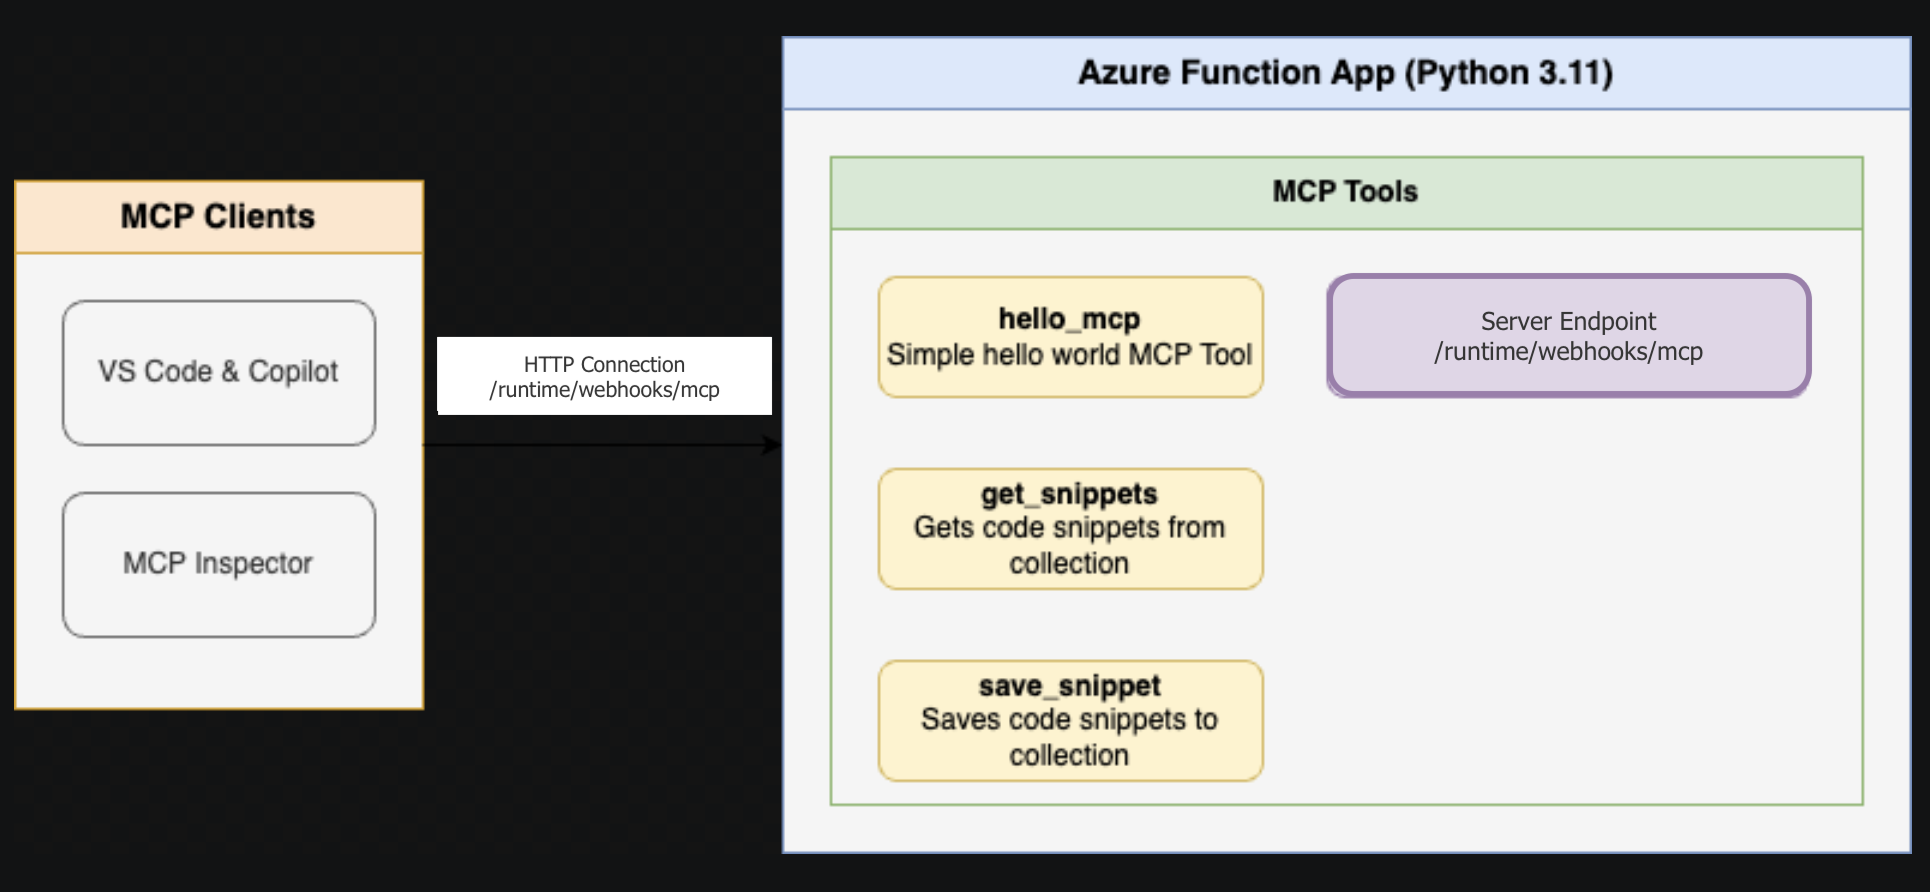
Below is the architecture diagram for the Remote MCP Server using Azure Functions:

Sample Applications
This repository includes two sample MCP applications:
- FunctionsMcpTool - An MCP server with sample tools demonstrating various patterns (hello world, snippet management, and more)
- McpWeatherApp - An interactive MCP App that displays weather information with a visual UI
See each app's README for detailed setup and usage instructions.
Prerequisites
- Python version 3.13 or higher
- Azure Functions Core Tools >=
4.8.0 - Azure Developer CLI
- To use Visual Studio Code to run and debug locally:
Local testing
Choose the sample app you want to run and follow its README:
- FunctionsMcpTool - Sample tools (hello world, snippets, and more)
- McpWeatherApp - Interactive weather UI
Each app's README contains detailed instructions for:
- Setting up the local environment
- Installing dependencies
- Running the function app locally
- Connecting from MCP clients (VS Code, MCP Inspector)
- Testing and verification
Deploy to Azure for Remote MCP
Step 1: Choose which app to deploy
This repository contains multiple sample apps. Open azure.yaml and set project: to the app you want to deploy:
| App | project: value |
|---|---|
| FunctionsMcpTool (default) | ./src/FunctionsMcpTool |
| McpWeatherApp | ./src/McpWeatherApp |
services:
api:
project: ./src/FunctionsMcpTool # ← change this to deploy a different app
language: python
host: function
Step 2: Create an environment and configure
In the root directory, create a new azd environment:
azd env new <environment-name>
Configure VS Code as an allowed client application to request access tokens from Microsoft Entra:
azd env set PRE_AUTHORIZED_CLIENT_IDS aebc6443-996d-45c2-90f0-388ff96faa56
Optional: Enable VNet isolation:
azd env set VNET_ENABLED true
Step 3: Deploy
Run this azd command to provision the function app, with any required Azure resources, and deploy your code:
azd up
Additionally, API Management can be used for improved security and policies over your MCP Server.
Step 4: Connect to remote MCP server in VS Code
After deployment, connect to your remote MCP server using https://<funcappname>.azurewebsites.net/runtime/webhooks/mcp.
The .vscode/mcp.json file is already configured with both local and remote server options. Click Start on the remote-mcp-function server and provide your function app name when prompted. The server uses built-in MCP authentication, so you'll be asked to login.
Redeploy your code
You can run the azd deploy command as many times as you need to both provision your Azure resources and deploy code updates to your function app.
Note
Deployed code files are always overwritten by the latest deployment package.
Clean up resources
When you're done working with your function app and related resources, you can use this command to delete the function app and its related resources from Azure and avoid incurring any further costs:
azd down
Troubleshooting
| Error | Solution |
|---|---|
deployment was partially successful / KuduSpecializer restart during azd up |
This is a transient error. Run azd deploy to retry just the deployment step. |
AttributeError: 'FunctionApp' object has no attribute 'mcp_resource_trigger' |
Python 3.13 is required. Verify with python3 --version. Install via brew install python@3.13 (macOS) or from python.org. Recreate your virtual environment with Python 3.13 after installing. |
Helpful Azure Commands
Once your application is deployed, you can use these commands to manage and monitor your application:
# Get your function app name from the environment file
FUNCTION_APP_NAME=$(cat .azure/$(cat .azure/config.json | jq -r '.defaultEnvironment')/env.json | jq -r '.FUNCTION_APP_NAME')
echo $FUNCTION_APP_NAME
# Get resource group
RESOURCE_GROUP=$(cat .azure/$(cat .azure/config.json | jq -r '.defaultEnvironment')/env.json | jq -r '.AZURE_RESOURCE_GROUP')
echo $RESOURCE_GROUP
# View function app logs
az webapp log tail --name $FUNCTION_APP_NAME --resource-group $RESOURCE_GROUP
Architecture
This sample demonstrates building MCP servers with Azure Functions using Python. It showcases two different patterns:
- Simple MCP Tools - Functions that expose tools using the
@app.mcp_tool()decorator with Azure bindings (see FunctionsMcpTool) - MCP Apps - Tools that return interactive UIs using MCP resources and the
ui://scheme (see McpWeatherApp)
Both patterns use the first-class MCP decorators available in azure-functions>=2.0.0, which:
- Infer tool properties from function signatures and type hints
- Eliminate manual JSON serialization
- Integrate seamlessly with Azure Functions bindings
Next Steps
- Learn more about the Azure Functions MCP extension
- Add API Management to your MCP server (auth, gateway, policies, more!)
- Enable VNET using VNET_ENABLED=true flag