CI/CD using Jenkins on Azure Container Service (AKS)
Architecture overview
Containers make it very easy for you to continuously build and deploy your applications. By orchestrating deployment of those containers using Kubernetes in Azure Container Service, you can achieve replicable, manageable clusters of containers.
By setting up a continuous build to produce your container images and orchestration, you can increase the speed and reliability of your deployment.

- Change application source code.
- Commit code to GitHub.
- Continuous Integration Trigger to Jenkins.
- Jenkins triggers a build job using Azure Container Service (AKS) for a dynamic build agent.
- Jenkins builds and pushes Docker container Azure Container Registry.
- Jenkins deploys new containerized app to Kubernetes on Azure Container Service (AKS) backed by Azure Cosmos DB.
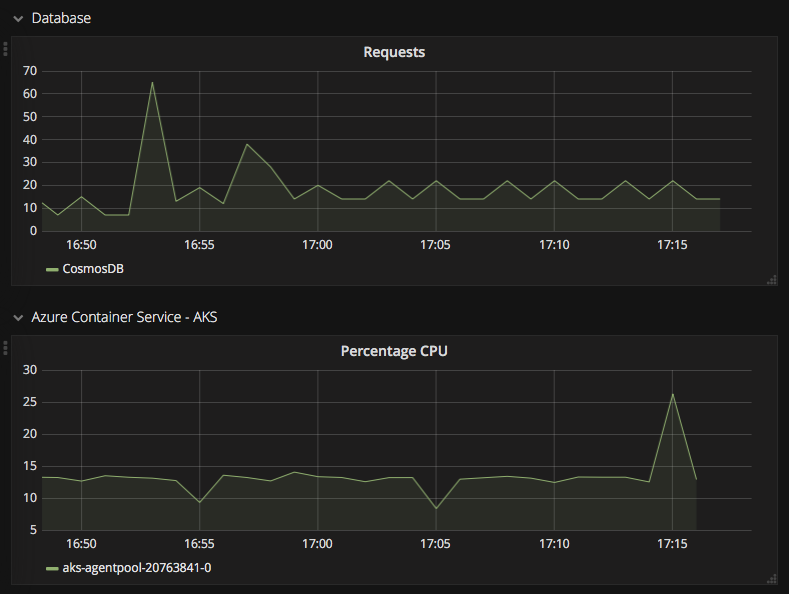
- Grafana displays visualization of infrastructure and application metrics via Azure Monitor.
- Monitor application and make improvements.
Deploy to Azure
Create an Azure service principal
Install Azure CLI if you have not.
Note: Alternatively, you can also use Azure Cloud Shell from the Azure Portal.
Open terminal, then execute:
az loginFollow the guide to sign in.
Note: If you use Azure Cloud Shell from the Azure Portal, you are automatically authenticated. Therefore there is no need to
az loginagain.Execute the command below to create service principal, with the role
Contributorand under the current subscription by default.az ad sp create-for-rbac --name <AppName> --role ContributorNote: please replate the <AppName> placeholder.
You will get a response like below.
{
   "appId": "8e897eb4-069d-40c2-9563-000000003c14",
   "displayName": "<AppName>",
   "password": "xxxxxvJgeKZoRAfxxxx0SitnANH8Kxxxx",
   "tenant": "000088bf-0000-0000-0000-2d7cd0100000"
}
Copy the values appId and password, they will be used later.
Note: for more details about creating an Azure service principal, please refer to Create an Azure service principal with Azure CLI 2.0
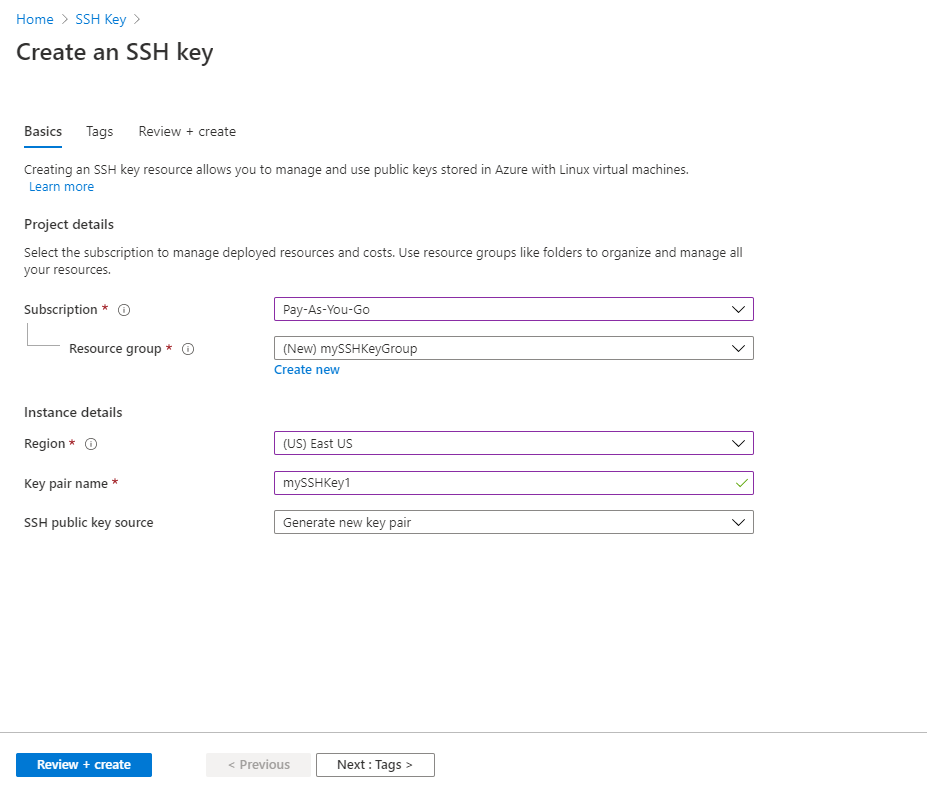
Create a SSH Key for Linux VMs
Navigate to Azure Portal.
At the top of the page, type SSH to search. Under Services, select SSH keys.
On the SSH Key page, select Create.

In Resource group select Create new to create a new resource group to store your keys. Type a name for your resource group and select OK.
In Region select a region to store your keys. You can use the keys in any region, this is just the region where they will be stored.
Type a name for your key in Key pair name.
In SSH public key source, select Generate public key pair.
When you are done, select Review + create.
After it passes validation, select Create.
You will then get a pop-up window to, select Download private key and create resource. This will download the SSH key as a .pem file.

Once the .pem file is downloaded, you might want to move it somewhere on your computer where it is easy to point to from your SSH client.
Deploy
Click Deploy to Azure to start the deployment.
Fill the form:
Choose a subscription.
Use a new resource group and choose a location.
Input the settings.
Note:
- The names and DNS prefixes should be unique. To avoid naming conflicting, we strongly recommend you to add some suffix. For example, the Cosmos Db name could be cosmos-180130-1512.
- ACR (Azure Container Registry) names may contain alpha numeric characters only. A valid name is acr1801301512.
- Plesae select the SSH Key created in last step, rather than generate a new one.
Check I agree to the terms and conditions stated above.
Click Purchase.
Note: It will take about 13 minutes to finish the deployment.
Deployment output
After the deployment finishes, you will get some important information from the outputs section.

Note: the deployment window above could be re-open in the Deployments tab of the resource group.
Click the first one Microsoft.Template.
Access Deployed Resources
Access Jenkins
This Jenkins instance does not support https, so logging in through a public IP address has been disabled (it would expose your password and other information to eavesdropping). To securely login, you need to connect to the Jenkins instance using SSH port forwarding.
Connect to the Jenkins instance using SSH port forwarding
Find out the SSH Key pem file path and replace the
<keyfile>of below command.Open terminal, then paste and execute it.
$ ssh -i <keyfile> -L 8080:localhost:8080 azureuser@jenkins-180131-1520.eastus.cloudapp.azure.com
ECDSA key fingerprint is SHA256:ky3f+1oqa/nHzzLWZGf5TqiyZbJahoztoODcbobBGS8.
Are you sure you want to continue connecting (yes/no/[fingerprint])?
Input yes and press Enter key to accept and add the ECDSA to the list of known hosts.
Warning: Permanently added 'jenkins-180131-1520.eastus.cloudapp.azure.com,40.71.20.174' (ECDSA) to the list of known hosts.
azureuser@jenkins-180131-1520.eastus.cloudapp.azure.com's password:
Input the Linux Admin Password
If your pass work is correct, you will get the welcome message:
Welcome to Ubuntu 18.04.6 LTS (GNU/Linux 5.4.0-1067-azure x86_64)
...
Keep the terminal open.
Get the Jenkins admin password
Execute the command in the terminal:
sudo cat /var/lib/jenkins/secrets/initialAdminPasswordYou will get the Jenkins admin password which looks like below:
77a6d3183ad24f9ca7df6181c81400d0Follow the Jenkins Getting Started wizard to finalise the setup. You just need to install default recommended plugins.
Log into Jenkins
Open http://localhost:8080 in a browser.
Click log in at the top-right.
Input the user and password:
- User: admin
- Password: use the password you get in previous step
Click log in.
Check the sample pipeline job
After logged in, you will see the Hello World Build & Deploy pipline job. Please click to explore it.

Access the hello world web app
Sign into Azure and get AKS credentials
Open terminal, execute:
az loginFollow the guide to sign in.
Execute the command below to get Kubenetes cluster credentials.
aks get-credentials --resource-group <ResourceGroup> --name <KubenetesClusterName>Note: please replace <ResourceGroup> and <KubenetesClusterName> before executing it.
When done, you will get a prompt:
Merged "kube-180131-1520" as current context in /Users/<User>/.kube/config
Get Kubenetes service
Install kubectl if you have not. Or, you can install
kubectllocally using the az aks install-cli command:az aks install-cliExecute the command below:
kubectl get serviceYou will get the response like below:
NAME                  TYPE           CLUSTER-IP   EXTERNAL-IP      PORT(S)        AGE
hello-world-service   LoadBalancer   10.0.98.99   52.168.126.156   80:32611/TCP   1h
kubernetes            ClusterIP      10.0.0.1     <none>           443/TCP        1h
Copy the external ip of the hello-world-service.
Access the hello world web app
Open the external ip in a browser. You will see the response:
Hello World!
There are 0 request records.
Refresh the page, the number of request records will increase.
Access the Grafana instance
Copy the GRAFANAURL value from the Outputs section of the deployment.
Open it in a browser, then log in:
- User: admin
- Password: use the Linux Admin Password
Click Home.

Then click Hello World Overview:

You will see the graphs:

If you want to SSH to Grafana host machine, you can open terminal, then paste and execute a command like below.
ssh -i <private_ssh_key> <username>@<GRAFANAURL>
Tags: Microsoft.ContainerRegistry/registries, Microsoft.DocumentDb/databaseAccounts, Microsoft.Network/virtualNetworks, Microsoft.Resources/deployments, Microsoft.ContainerService/managedClusters, Microsoft.Network/publicIPAddresses, Microsoft.Network/networkSecurityGroups, Microsoft.Network/networkInterfaces, Microsoft.Compute/virtualMachines, extensions, CustomScript


