Xamarin.Forms - Sign In with Apple
A sample Xamarin.Forms (iOS, Android, UWP) app which demonstrates how to implement Apple Sign In, as well as an Azure Functions project which is required for non-iOS13+ platforms, and a library project which contains the code for handling Apple Sign In's OpenID/OAuth calls.
- XamarinFormsAppleSignIn - Sample Xamarin.Forms project using DependencyService pattern for calling Apple Sign In flows (native iOS 13+ sign in API's and OAuth/OpenID for the other platforms)
- AppleSignInAzureFunction - Azure Functions for generating Apple Sign In Authorization URL and handling sign in callback from Apple
- Xamarin.AppleSignIn - Library project containing code to handle the OAuth/OpenID flow for Apple Sign In
Apple Developer Setup
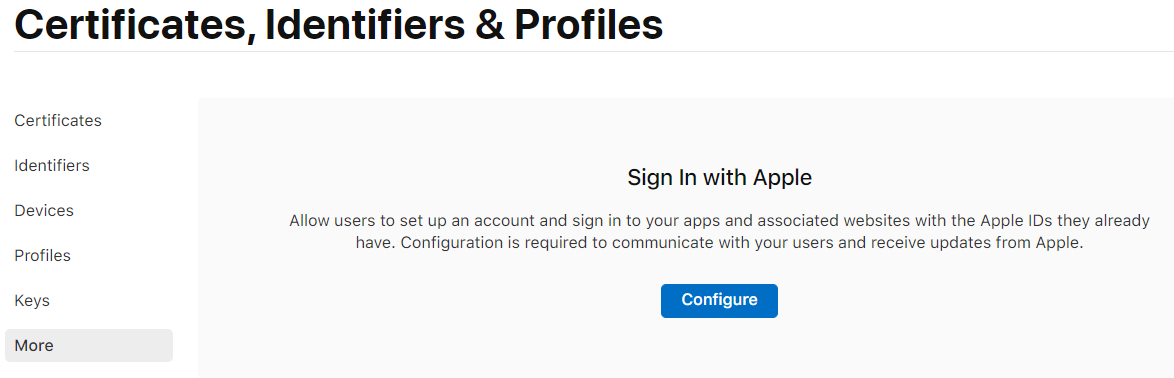
First of all you need to set up a few things in Apple's Developer portal, in the Certificates, Identifiers & Profiles section.
Setup Apple Sign In Domain
First of all you will need to register your domain name and verify it with Apple in the More section of the Certificates, Identifiers & Profiles portal, by clicking Configure.
Add your domain and click Register
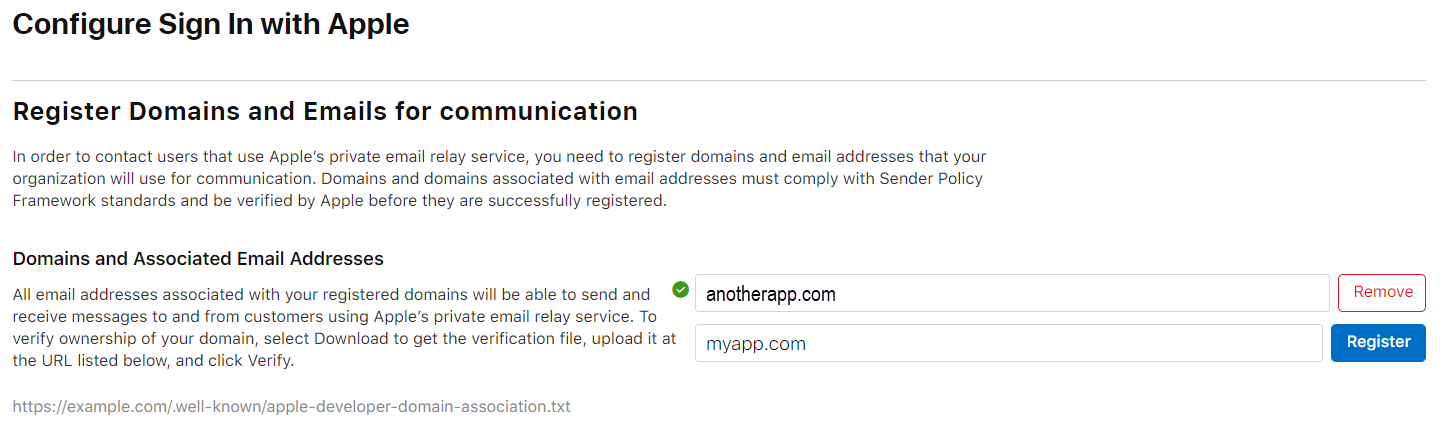
NOTE: If you see an error about your domain not being SPF Compliant, you will need to add a SPF DNS TXT Record to your domain and wait for it to propagate before continuing:
The SPF TXT may look something like this:
v=spf1 a a:myapp.com -all
Next you will need to verify ownership of the domain by clicking Download to download the apple-developer-domain-association.txt file, and uploading that file to the .well-known/ folder of your website, for the given domain.
Once your .well-known/apple-developer-domain-association.txt file is uploaded, and reachable at your site's url, you can click Verify to have Apple verify your domain ownership.
NOTE: Apple will verify ownership with
https://, so ensure you have SSL setup and the file is accessible through a secure URL.
You will need to successfully complete this process before continuing to the next Setup section.
Setup your App ID
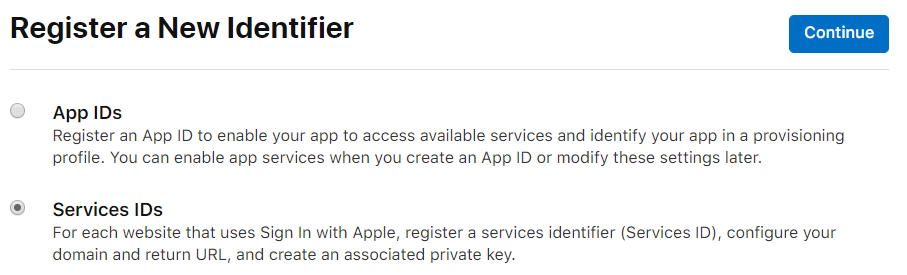
In the Identifiers section, create a new identifier, and choose App IDs. If you already have an App ID, choose to edit it instead.

Enable Sign In with Apple. You will most likely want to use the Enable as primary App ID option.

Save your App ID changes.
Create a Server ID
Next, in the Identifiers section, create a new identifier, and this time choose Service IDs
Give your Services ID a description, and an identifier. This identifier will be your ServerId later on. Make sure you enable Sign In with Apple.
Before continuing, click Configure next to the Sign In with Apple option you enabled.
In the configuration panel, ensure the correct Primary App ID is selected.
Next, choose the Web Domain you configured previously.
Finally, add one ore more Return URLs. Any redirect_uri you use later must be registered here exactly as you use it. Make sure you include the http:// or https:// in the URL when you enter it.
NOTE: For testing purposes, you cannot use
127.0.0.1orlocalhost, but you can use other domains such aslocal.test. If you choose to do this, you can edit your machine'shostsfile to resolve this fictitious domain to your local IP address.
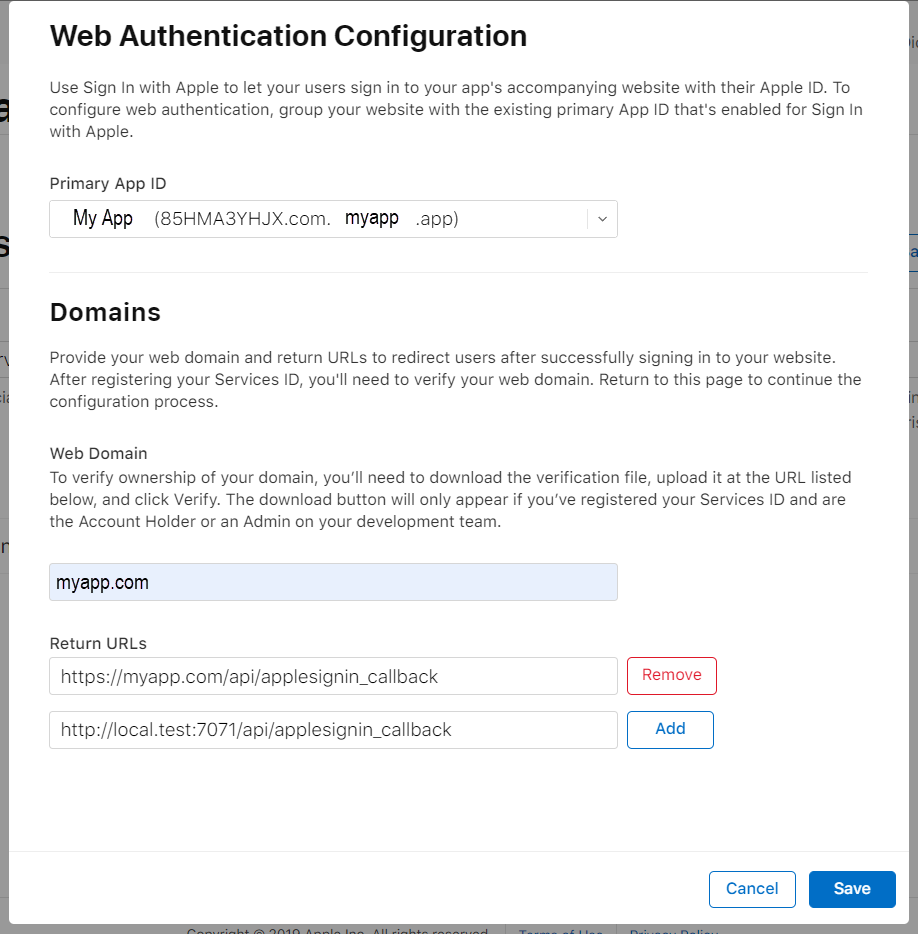
Save your changes when your are finished.
Create a Key for your Services ID
In the Keys section, create a new Key.
Give you key a name, and enable Sign In with Apple.
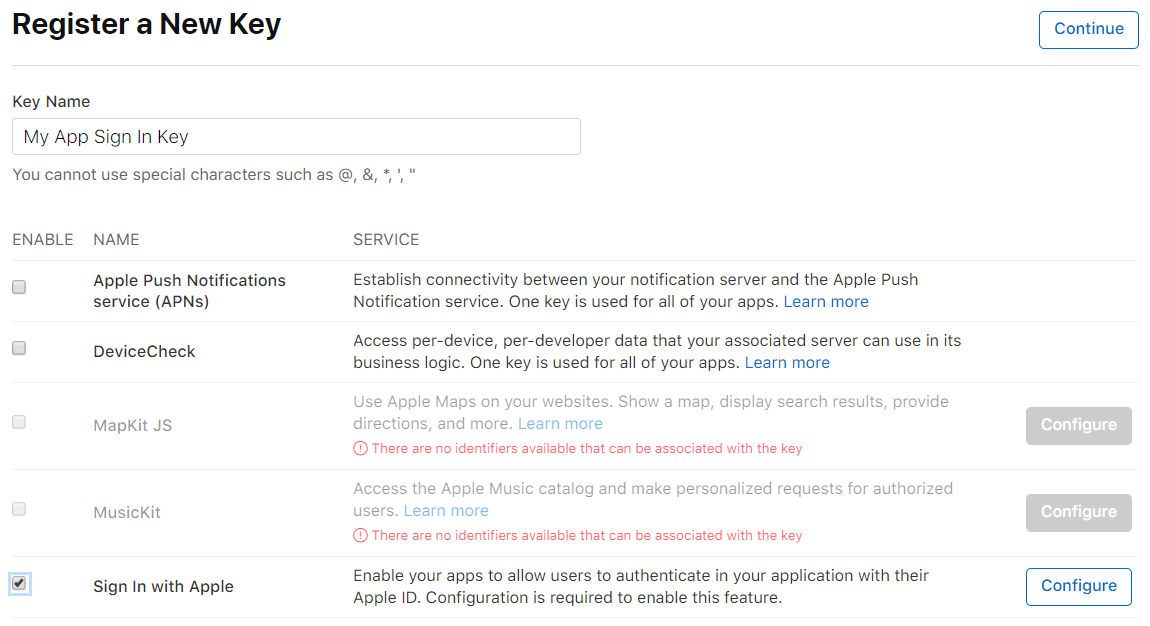
Click Configure beside Sign In with Apple.
Ensure the correct Primary App ID is selected and click Save.
Click Continue and then Register to create your new key.
Next, you will only have one chance to download the key you just generated. Click Download.
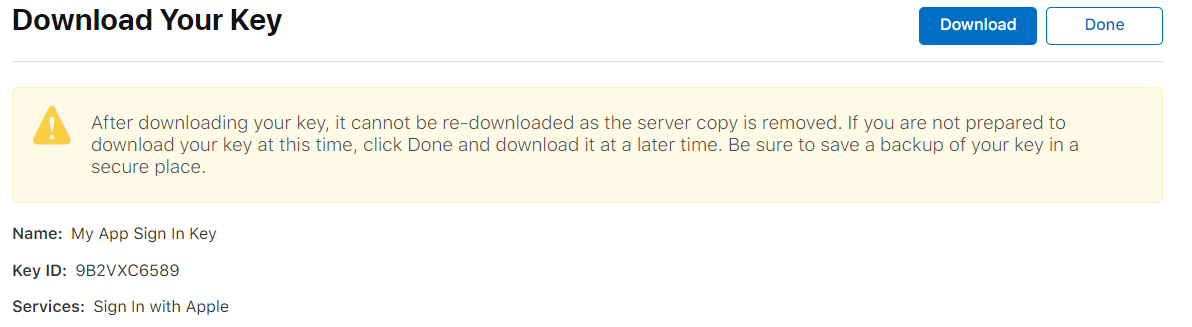
Also, take note of your Key ID at this step. This will be used for your KeyId later on.
You will have downloaded a .p8 key file. You can open this file in Notepad, or VSCode to see the text contents. They should look something like:
-----BEGIN PRIVATE KEY-----
MIGTAgEAMBMGBasGSM49AgGFCCqGSM49AwEHBHkwdwIBAQQg3MX8n6VnQ2WzgEy0
Skoz9uOvatLMKTUIPyPCAejzzUCgCgYIKoZIzj0DAQehRANCAARZ0DoM6QPqpJxP
JKSlWz0AohFhYre10EXPkjrih4jTm+b0AeG2BGuoIWd18i8FimGDgK6IzHHPsEqj
DHF5Svq0
-----END PRIVATE KEY-----
Keep this key in a safe place. We will use it later as the P8FileContents.
Using Apple Sign In in your App
iOS 13+
In iOS 13 and newer, Apple has native API's to help Authenticate users with Apple Sign In.
The AppleSignInServiceiOS.cs file demonstrates how to use the native API's.
iOS 13+ Setup
You will need to add a new entitlement to your app. Make sure you add the following to your entitlements file:
<?xml version="1.0" encoding="UTF-8"?>
<!DOCTYPE plist PUBLIC "-//Apple//DTD PLIST 1.0//EN" "http://www.apple.com/DTDs/PropertyList-1.0.dtd">
<plist version="1.0">
<dict>
	<key>com.apple.developer.applesignin</key>
	<array>
		<string>Default</string>
	</array>
</dict>
</plist>
Note: For testing of your iOS app, ensure you are signing with a certificate and provisioning profile for the App ID you enabled Apple Sign In for.
Android, UWP, and older iOS versions
Apple also supports a version of OpenID/OpenAuth for other platforms.
Sample Apple Sign In Flow
This sample offers an opinionated implementation for getting Apple Sign In to work in your Xamarin.Forms app.
We use two Azure Functions to help with the authentication flow:
applesignin_auth- Generates the Apple Sign In Authorization URL and redirects to it. We do this on the server side, instead of the mobile app, so we can cache thestateand validate it when Apple's servers send a callback.applesignin_callback- Handles the POST callback from Apple and securely exchanges the authorization code for an Access Token and ID Token. Finally, it redirects back to the App's URI Scheme, passing back the tokens in a URL Fragment.
The mobile app registers itself to handle the custome URI scheme we have selected (in this case xamarinformsapplesignin://) so the applesignin_callback function can relay the tokens back to it.
When the user initiates authentication, the following steps happen:
- The mobile app generates a
nonceandstatevalue and passes them to theapplesignin_authAzure function. - The
applesignin_authAzure function generates an Apple Sign In Authorization URL (using the providedstateandnonce), and redirects the mobile app browser to it. - The user enters their credentials securely in the Apple Sign In authorization page hosted on Apple's servers.
- After the Apple Sign In flow finishes on Apple's servers, Apple Redirects to the
redirect_uriwhich will be theapplesignin_callbackAzure function. - The request from Apple sent to the
applesignin_callbackfunction is validated to ensure the correctstateis returned, and that the ID Token claims are valid. - The
applesignin_callbackAzure function exchanges thecodeposted to it by Apple, for an Access Token, Refresh Token, and ID Token (which contains claims about the User ID, Name, and Email). - The
applesignin_callbackAzure function finally redirects back to the app's URI scheme (xamarinformsapplesignin://) appending a URI fragment with the Tokens (eg:xamarinformsapplesignin://#access_token=...&refresh_token=...&id_token=...). - The Mobile app parses out the URI Fragment into an
AppleAccountand validates thenonceclaim received matches thenoncegenerated at the start of the flow. - The mobile app is now authenticated!
Azure Functions / Server Configuration
This sample uses Azure Functions, but you could just as easily use an ASP.NET Core Controller by copying the simple logic in each of the functions, or even some completely different web server for that matter (but you're on your own to implement those!).
Configuration
There are several App Settings you will need to configure for your Azure Functions:
APPLE_SIGNIN_KEY_ID- This is yourKeyIdfrom earlier.APPLE_SIGNIN_TEAM_ID- This is usually your Team ID found in your Membership ProfileAPPLE_SIGNIN_SERVER_ID: This is theServerIdfrom earlier. It's not your App Bundle ID, but rather the Identifier of the Services ID you created.APPLE_SIGNIN_APP_CALLBACK_URI- This is the custom URI Scheme you want to redirect back to your app with. In this samplexamarinformsapplesignin://is used.APPLE_SIGNIN_REDIRECT_URI- The Redirect URL you setup when creating your Services ID in the Apple Sign In Configuration section. To test, it might look something like:http://local.test:7071/api/applesignin_callbackAPPLE_SIGNIN_P8_KEY- The text contents of your.p8file, with all the\nnewlines removed so it's one long string
Security Notes
First of all, it is very important that you should never store your P8 key inside of your application code. Your application code is easy to download and disassemble. Placing your private p8 key value inside your app should be considered about as safe as posting it publicly.
It is also considered a bad practice to use a WebView to host the authentication flow, and to intercept URL Navigation events to obtain the authorization code.
There is currently no secure way to handle the Apple Sign In flow on non iOS13+ devices/platforms without hosting some code on a server to handle the token exchange. We also recommend hosting the authorization url generation code on the server so you can cache the state and validate it when Apple POST's a callback to your server.