Note
Access to this page requires authorization. You can try signing in or changing directories.
Access to this page requires authorization. You can try changing directories.
If you're working with a Microsoft Managed Security Solution Provider (MSSP), ensure they access your Security Copilot capabilities only when you grant them access.
There are several ways to allow a partner to manage your Security Copilot.
Azure Lighthouse
Approve your MSSP to gain Security Copilot permissions for your Microsoft Sentinel workspaces and other supported Azure resources. The capacity plan (SCUs) used are the partner tenant's capacity plan.GDAP (recommended)
Approve your MSSP to gain Security Copilot permissions for your tenant. They assign a security group the permissions needed using Granular Delegated Admin Privileges (GDAP). The capacity plan (SCUs) used are the customer's capacity plan.B2B collaboration
Set up guest accounts for individuals from your partner to log into your tenant. The capacity plan (SCUs) used are the customer tenant's capacity plan.
There are tradeoffs for both methods. Use the following table to help decide which method is best for your organization. It's possible to mix both methods for an overall partner strategy.
| Consideration | GDAP | B2B collaboration | Azure Lighthouse |
|---|---|---|---|
| How is time-bound access implemented? | Access is time-bound by default and built into the permission approval process. | Customers can implement Privileged Identity Management (PIM) with time-bound access, but they must maintain it themselves. | Privileged Identity Management (PIM) with time-bound access is possible for Azure role-based access control (Azure RBAC). |
| How is least-privileged access administered? | GDAP requires security groups. A list of least-privileged roles needed guides the setup. | Security groups are optional, and maintained by customer. | Azure Lighthouse requires Microsoft Entra security groups. For more information, see Tenants, users, and roles in Azure Lighthouse scenarios. |
| What plugins are supported? | A partial set of plugins are supported. | All plugins available for the customer are available to the partner. | Azure Lighthouse supports delegated access to Azure resources, which includes Microsoft Sentinel. For more information on supported workloads, see What is Azure Lighthouse. |
| What is the standalone login experience? | The MSSP uses Service management to seamlessly log into Security Copilot for the appropriate tenant. | Use the tenant switch selection from the Security Copilot setting. | The MSSP analyst, from their Security Copilot standalone portal, is able to prompt against any Microsoft Sentinel workspace that the analyst has permissions to access using the Azure Lighthouse delegated access. |
| What is the embedded experience? | Supported, with Service management links to facilitate access. | Supported normally. | Supported, with the Unified SecOps Platform integration between Microsoft Defender XDR and Microsoft Sentinel. Microsoft Sentinel incidents show under "Investigation & response" allowing for embedded Security Copilot experiences to be ran. For more information, see Microsoft Defender XDR integration with Sentinel. |
| Who's Security Copilot capacity plan (SCUs) are used when performing prompts? | Customer tenant's capacity plan. | Customer tenant's capacity plan. | Partner tenant's capacity plan. |
Azure Lighthouse
Azure Lighthouse allows an MSSP to set up least-privileged and time-bound access explicitly granted by the Security Copilot customer for delegated access to Azure resources. When performing Security Copilot prompts within the partner's tenant against Microsoft Sentinel workspaces of the customer, the partner's capacity plan SCUs are used instead of the customer's capacity plan SCUs.
For more information, see Introduction to Azure Lighthouse.
Here's the current matrix of Security Copilot plugins that support Azure Lighthouse:
| Security Copilot plugin | Supports Azure Lighthouse |
|---|---|
| Microsoft Defender External Attack Surface Mgmt | No |
| Microsoft Defender Threat Intelligence | No |
| Microsoft Defender XDR | No |
| Microsoft Entra | No |
| Microsoft Intune | No |
| Microsoft Purview | No |
| Microsoft Sentinel | Yes |
| NL2KQL Defender | No |
| NL2KQL Sentinel | Yes |
Onboard a customer to Azure Lighthouse
Gather tenant and subscription details
- To onboard a customer's tenant, you must have an active Azure subscription, and you'll need the following information to create an Azure Resource Manager template.
- MSSP's tenant ID
- Customer's tenant ID
- Azure Subscription IDs for each specific subscription in the customer's tenant that will be managed by the MSSP including the offering details.
- For more information, see, Onboard a customer to Azure Lighthouse.
- For more information If you require publishing a private or public managed service offering to Azure Marketplace, see Publish a Managed Service offer to Azure Marketplace.
- To onboard a customer's tenant, you must have an active Azure subscription, and you'll need the following information to create an Azure Resource Manager template.
Define roles and permissions
As a service provider, you may want to perform multiple tasks for a single customer, requiring different access for different scopes. You can define as many authorizations as you need in order to assign the appropriate Azure built-in roles. To define authorizations in your template, you must include the ID values for each user, user group, or service principal in the managing tenant to which you want to grant access. You'll also need to include the role definition ID for each built-in role you want to assign. For more information, see, Onboard a customer to Azure Lighthouse - Azure Lighthouse.
To use Microsoft Entra Privileged Identity Management (PIM) for just-in-time access, you need to create eligible authorizations. For more information, see Create eligible authorizations.
Create an Azure Resource Manager template
- To onboard your customer, you need to create an Azure Resource Manager template for your offer with the following information. The mspOfferName and mspOfferDescription values are visible to the customer in the Service providers page of the Azure portal once the template is deployed in the customer's tenant. You can create this template in the Azure portal, or by manually modifying the templates provided in our samples repo. For more information, see, Onboard a customer to Azure Lighthouse.
Deploy Azure Resource Manager template
- Once you have created your template, a user in the customer's tenant must deploy it within their tenant. A separate deployment is needed for each subscription that you want to onboard (or for each subscription that contains resource groups that you want to onboard). The deployment may be done by using PowerShell, by using Azure CLI, or in the Azure portal. For more information, see, Onboard a customer to Azure Lighthouse.
Confirm successful onboarding
- When a customer subscription has successfully been onboarded to Azure Lighthouse, users in the service provider's tenant will be able to see the subscription and its resources. You can confirm this within the Azure portal, using PowerShell or by using Azure CLI. For more information, see, Onboard a customer to Azure Lighthouse.
GDAP
GDAP allows an MSSP to set up least-privileged and time-bound access explicitly granted by the Security Copilot customer. Only MSSPs registered as a Cloud Solution Partner (CSP) are allowed to manage Security Copilot. Access is assigned to an MSSP security group, which reduces the administrative burden for both the customer and the partner. An MSSP user is assigned the appropriate role and security group to manage the customer.
For more information, see Introduction to GDAP.
Here's the current matrix of Security Copilot plugins that support GDAP:
| Security Copilot plugin | Supports GDAP |
|---|---|
| Defender External Attack Surface Management | No |
| Microsoft Entra | Overall, no, but a few capabilities work. |
| Intune | Yes |
| MDTI | No |
| Defender XDR | Yes |
| NL2KQL Defender | Yes |
| NL2KQL Sentinel | No |
| Purview | Yes |
| Microsoft Sentinel | No |
For more information, see Workloads supported by GDAP.
GDAP relationship
The MSSP sends a GDAP request to their customer. Follow the instructions in this article, Obtain permissions to manage customer. For best results, the MSSP should request Security reader and Security operator roles to access Security Copilot platform and plugins. For more information, see Understand authentication.
The customer approves the GDAP request from the partner. For more information, see Customer approval.
Security group permissions
The MSSP creates a security group and assigns it the approved permissions. For more information, see Assign Microsoft Entra roles.
The customer adds the roles the MSSP requested to the appropriate Security Copilot role (Copilot owner or copilot contributor). For example, if the MSSP requested Security operator permissions, the customer adds that role to the Copilot contributor role within Security Copilot. For more information, see Assigning Security Copilot roles.
MSSP Security Copilot access
The MSSP user account needs membership to the partner security group assigned and an approved role to access the delegated Microsoft Sentinel workspace of the customer in the partner tenant.
The MSSP can access Security Copilot standalone portal and use the example prompts below:
"List all Sentinel workspaces" to see all available Sentinel workspaces within the partner tenant and the delegated customer Microsoft Sentinel workspaces.
"Summarize incident <incident ID> from workspace <name of customer's Microsoft Sentinel workspace>" to see a summarization of the Microsoft Sentinel incident from the customer's Microsoft Sentinel workspace.
The MSSP can access their Security Copilot's Usage Monitoring Dashboard in the standalone experience to see the SCU cost associated with the prompt performed against the customer's Microsoft Sentinel workspace. This can be validated by seeing the session ID in the Usage Monitoring Dashboard and the session ID in the browser URL when viewing the Security Copilot session.
B2B collaboration
This method of access invites individual partner accounts as guests to the customer tenant to operate Security Copilot.
Set up a guest account for your partner
Note
To perform the procedures described in this option, you must have an appropriate role, such as User Administrator, or Billing Administrator, assigned in Microsoft Entra.
Go to the Microsoft Entra admin center and sign in.
Go to Identity > Users > All users.
Select New user > Invite external user, and then specify settings for the guest account.
On the Basics tab, fill in the user's email address, display name, and a message if you want to include one. (You can optionally add a Cc recipient to receive a copy of the email invitation.)
On the Properties tab, in the Identity section, fill in the user's first and last name. (You can optionally fill in any other fields you want to use.)
On the Assignments tab, select + Add role. Scroll down, and select either Security Operator or Security Reader.
On the Review + invite tab, review your settings. When you're ready, select Invite.
The partner receives an email with a link to accept the invitation to join your tenant as a guest.
Tip
To learn more about setting up a guest account, see Invite an external user.
B2B Security Copilot access
After you have set up a guest account for your partner, you're ready to notify them that they can now use your Security Copilot capabilities.
Tell your partner to look for an email notification from Microsoft. The email contains details about their user account and includes a link they must select to accept the invitation.
Your partner accesses Security Copilot by visiting securitycopilot.microsoft.com and signing in using their email account.
The partner uses the tenant switch feature to ensure they're accessing the appropriate customer. For example, the following image shows a partner from Fabrikam using their credentials to work in Security Copilot for their customer, Contoso.
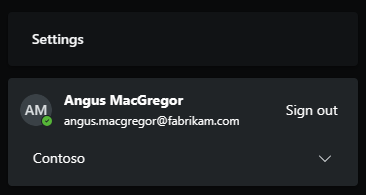
Alternatively, set the tenant ID directly in the URL, for example,https://securitycopilot.microsoft.com/?tenantId=aaaabbbb-0000-cccc-1111-dddd2222eeee.Share the following articles to help your MSSP get started using Security Copilot:
Technical support
Currently, if your MSSP or partner has questions and needs technical support for Security Copilot outside of the partner center, the customer organization should contact support on the MSSP's behalf.