API plugins in Microsoft Copilot for Security
API plugin from existing OpenAI Plugin
This quickstart tutorial shows how to use an existing OpenAI Plugin in Copilot for Security.
For this exercise, this manifest file is used.
Upload the plugin manifest
Sign in to Microsoft Copilot for Security.
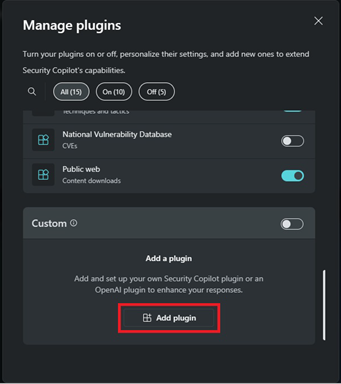
Access Manage Plugins by selecting the Plugin button from the prompt bar.

Scroll down to Custom and select Add plugin.
Select OpenAI plugin as the upload format, enter
https://hacktrack.routum.io/.well-known/ai-plugin.jsonas the link and select Add.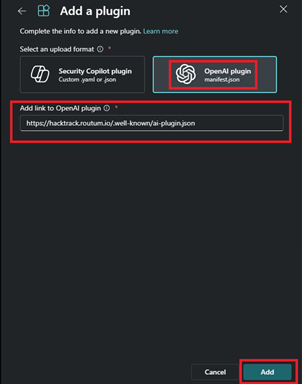


API plugin from existing API
This quickstart tutorial shows how to turn an existing API into a Copilot for Security API plugin.
Create the OpenAPI specification
If the API already has an OpenAPI Spec, then you can just use that. Host the OpenAPI spec https://[domain]/template.yaml.
Create a new plugin manifest file with the following contents (replacing the OpenaApiSpecUrl value with the URL to the OpenAPI spec file created in the prior section):
Descriptor:
  Name:
  DisplayName:
  Description:

SkillGroups:
  - Format: API
    Settings:
      OpenApiSpecUrl: https://[domain]/template.yaml
API Authentication
Supported schemes
Copilot for Security supports several schemes for authenticating plugins:
| Scheme | Description | Copilot manifest support | OpenAI support + |
|---|---|---|---|
| None | No authentication. | Yes | Yes |
| Basic | Basic authentication. | Yes | No |
| ApiKey | ApiKey based authentication where a developer provided ApiKey is passed in a custom header or query parameter. | Yes | Yes* |
| ServiceHttp | Authentication based on the provided token. | Yes | Yes |
| OAuthAuthorizationCodeFlow | OAuth 2.0 Authorization Code Flow is a more secure and complex authentication method used to grant access to non-Microsoft applications without sharing user credentials. | Yes | Yes |
| OAuthClientCredentialsFlow | Like Basic Auth but used for server-to-server communication instead or when accessing public data that doesn't require user-specific permissions. | Yes | No |
| Microsoft Entra ID | Application only access. | Yes | Yes* |
| AADDelegated | User + application only access. | Yes | Yes* |
+ This field is used to indicate the two different types of upload supported in Copilot for Security.
* These represent authentication methods that are extended beyond what was initially supported by openAI.
The following table shows the supported settings for each authentication type.
| Authentication Type | Setting | Description |
|---|---|---|
AAD or AADDelegated |
EntraScopes |
A comma separated list of Microsoft Entra scopes to request. |
Basic |
Username |
The username to use for basic authentication. |
Basic |
Password |
The password to use for basic authentication. |
ApiKey or ServiceHttp |
Key |
The name of the header/query parameter. |
ApiKey or ServiceHttp |
AuthScheme |
The name of the authentication scheme, prepended to the Value when used in a header. |
ApiKey or ServiceHttp |
Location |
The location of the API key, either Header or QueryParams. |
ApiKey or ServiceHttp |
Value |
The key/token to use. |
OAuthAuthorizationCodeFlow or OAuthClientCredentialsFlow |
TokenEndpoint |
The endpoint to request the token from. |
OAuthAuthorizationCodeFlow or OAuthClientCredentialsFlow |
Scopes |
A comma separated list of scopes to request. |
OAuthAuthorizationCodeFlow or OAuthClientCredentialsFlow |
ClientId |
The client ID to use when requesting the token. |
OAuthAuthorizationCodeFlow or OAuthClientCredentialsFlow |
ClientSecret |
The client secret to use when requesting the token. |
OAuthAuthorizationCodeFlow or OAuthClientCredentialsFlow |
AuthorizationContentType |
The content type used when sending the token request. |
OAuthAuthorizationCodeFlow |
AuthorizationEndpoint |
The endpoint to request the authorization code from. |
Preconfiguring authentication settings
Note
It is currently only possible to preconfigure settings for one authentication type.
It's possible to preconfigure authentication settings for your plugin in cases where the same values will be used for every instance of your plugin (for example the set of Microsoft Entra scopes). Preconfiguring the settings is handled by populating the Authorization field in the descriptor with a collection of key/value pairs along with the authentication type.
The following example shows how to specify a default set of Microsoft Entra scopes for the AAD authentication type.
Descriptor:
  Name: SampleAPI
  Description: Sample API
  SupportedAuthTypes:
    - AAD
  Authorization:
    Type: AAD
    EntraScopes: https://graph.microsoft.com/.default
API plugin with basic authentication
This quickstart tutorial shows how to create a plugin that uses HTTP Basic authentication.
Note
It is strongly recommended that Basic authentication is only used with APIs endpoints that use HTTPS.
Create the OpenAPI specification
In this example, we'll be using the httpbin.org service to validate basic authentication. Httpbin.org already publishes and OpenAPI specification, however, for example, purposes we're only going to use one of the operations.
Create a new file with the following contents and upload it somewhere publicly accessible. This tutorial used GitHub Gist to create a new gist with the content at https://gist.githubusercontent.com/PetRich-MSFT/fd3a8a92cbd7b6c120569a7a2c96c93c/raw/d1716b9022b140d702c31da59ff431c4b1fc603e/openapi.yaml
openapi: 3.0.0

info:
    title: httpbin.org
    description: A simple HTTP Request & Response Service.
    version: "0.9.2"

servers:
    - url: https://httpbin.org/

paths:
    /basic-auth/{user}/{passwd}:
        get:
            operationId: TestBasicAuth
            description: |
              This is a plugin to test basic authentication
              #ExamplePrompts Test Basic Auth using HTTPbin plugin
              #ExamplePrompts Use HTTPbin to test basic authorization
            summary: Prompts the user for authorization using HTTP Basic
            parameters:
                - in: path
                  name: user
                  schema:
                    type: string
                  required: true
                - in: path
                  name: passwd
                  schema:
                    type: string
                  required: true
            responses:
                200:
                    description: Successful authentication.
                401:
                    description: Unsuccessful authentication.
Create the plugin manifest
In this example, we'll be using the httpbin.org service to validate basic authentication. Httpbin.org already publishes and OpenAPI specification.
Create a new plugin manifest file plugin.yaml with the following contents:
Descriptor:
  Name: SampleAPIForBasicAuth
  DisplayName: httpbin.org
  Description: Plugin for making example http requests
  SupportedAuthTypes:
    - Basic

SkillGroups:
  - Format: API
    Settings:
      OpenApiSpecUrl: https://gist.githubusercontent.com/PetRich-MSFT/fd3a8a92cbd7b6c120569a7a2c96c93c/raw/d1716b9022b140d702c31da59ff431c4b1fc603e/openapi.yaml
Upload the plugin manifest
Follow the instructions in Manage plugins to upload the plugin manifest to Copilot for Security.
Configure authentication
Warning
DO NOT enter any existing username or password when setting up this example. The credentials are not validated so any values will be accepted.
After uploading the plugin, enter the username and password for the basic authentication. You can either complete the step now, or select Do this later to configure it later.
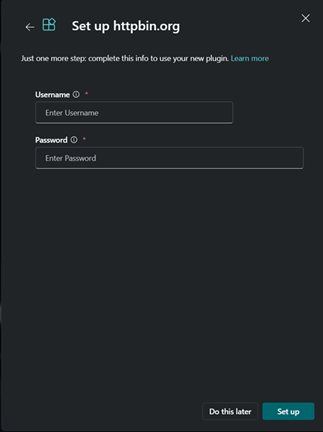
If you chose the Do this later option, then you can configure the username and password later by selecting the Set up button on the manage plugins page.
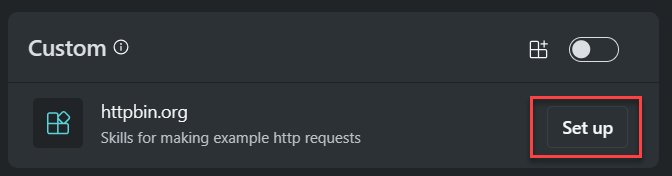
If you want to update the settings after configuration you can do so by clicking on the settings icon in the management plugins page.

API plugin with API key authentication
This quickstart tutorial shows how to create a plugin that uses an API Key to authenticate. API Key authentication uses a secret key/token that is passed as part of the request either as query-string parameter or as a header. The API Key is used to authenticate the request and isn't tied to a specific user.
Create the OpenAPI specification
In this example, we'll be using the httpbin.org service to validate API key authentication. Httpbin.org already publishes and OpenAPI specification, however, for example, purposes we're only going to use one of the operations.
Create a new file with the following contents and upload it somewhere publicly accessible. This tutorial used GitHub Gist to create a new gist with the content at https://gist.githubusercontent.com/PetRich-MSFT/85c8ab522a15710302e5f1b6e7525f43/raw/99aab78b8e4cd933453591227565075d62ecd7df/openapi.yaml
openapi: 3.0.0

info:
    title: httpbin.org
    description: A simple HTTP Request & Response Service.
    version: "0.9.2"

servers:
    - url: https://httpbin.org/

paths:
    /headers:
        get:
            operationId: TestApiKeyAuth
            summary: Returns the provided headers
            responses:
                200:
                    description: Successful request.
Create the plugin manifest
In this example, we'll configure the plugin so send the API Key using a x-test-api-key header. We'll preconfigure the location of the key, but require the user to enter the key value when installing the plugin.
Create a new plugin manifest file plugin.yaml with the following contents:
Descriptor:
  Name: SampleAPIForApiKeyAuth
  DisplayName: httpbin.org - API Key Authentication
  Description: Plugin for making example http requests
  SupportedAuthTypes:
    - ApiKey
  Authorization:
    Type: APIKey
    Key: x-test-api-key
    Location: Header
    AuthScheme: ''

SkillGroups:
  - Format: API
    Settings:
      OpenApiSpecUrl: https://gist.githubusercontent.com/PetRich-MSFT/85c8ab522a15710302e5f1b6e7525f43/raw/99aab78b8e4cd933453591227565075d62ecd7df/openapi.yaml
Upload the Plugin Manifest
Follow the instructions in Manage plugins to upload the plugin manifest to Copilot for Security.
Configure Authentication
Warning
DO NOT enter any existing API Key when setting up this example. The API key is not validated so any values will be accepted.
After uploading the plugin, you'll be prompted to enter the API Key for authentication. You can either complete this now, or select Do this later to configure it later.
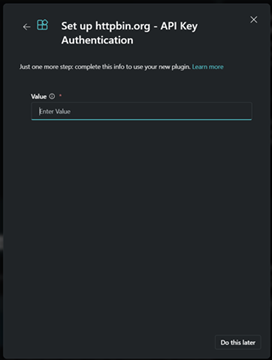
If you chose the Do this later option then you can configure the username and password later by selecting the Set up button on the manage plugins page.
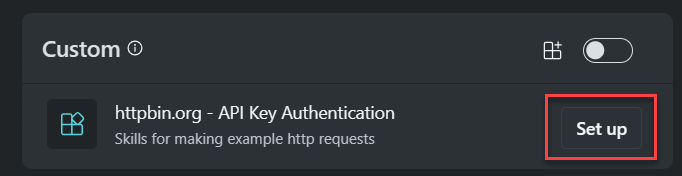
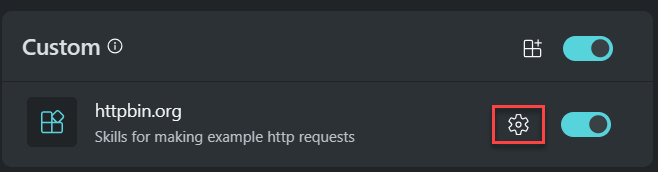
If you want to update the settings after configuration, you can do so by clicking on the settings icon in the management plugins page.
API Plugin with customizable endpoint URL
This example adds a configurable settings name "InstanceURL" that the user can configure through Copilot for Security. A setting is then added under the API skill group that tells Copilot for Security to use the value of the "InstanceURL" setting as the endpoint for making the API requests:
Descriptor:
  Name: Example
  Settings:
    - Name: InstanceURL
      Label: Instance URL
      Description: The URL of the instance to connect to
      HintText: "e.g. https://example.com"
      SettingType: String
      Required: true

SkillGroups:
 - Format: API
   Settings:
     OpenApiSpecURL: https://example.com/openapi.json
     EndpointUrlSettingName: InstanceURL
The following example shows the use of a customizable endpoint URL with an API Key:
Descriptor:
  Name: Example
  Settings:
    - Name: InstanceURL
      Label: Instance URL
      Description: The URL of the instance to connect to
      HintText: "e.g. https://example.com"
      SettingType: String
      Required: true
  SupportedAuthTypes:
    - ApiKey
  Authorization:
    Type: APIKey
    Key: session
    Location: Header
    AuthScheme: ''

SkillGroups:
 - Format: API
   Settings:
     OpenApiSpecURL: https://example.com/openapi.json
     EndpointUrlSettingName: InstanceURL
API Plugin with OAuthAuthorizationCodeFlow
This quickstart tutorial shows how to create a skill that uses OAuthAuthorizationCodeFlow flow for authentication.
Create the Plugin Manifest
Create a new Plugin manifest file plugin.yaml with the following contents and replace the OpenApiSpecUrl and EndpointUrl values from your webapp.
Descriptor:
  Name: SamplePluginManifestOAuth
  Description: Gets info via OAuth
  DescriptionDisplay: Current DateTime, report status
  DescriptionForModel: Shows an OAUTH Sample
  DisplayName: WeatherNew
  Authorization:
    Type: OAuthAuthorizationCodeFlow
    ClientId: <id of client that wants to auth>
    AuthorizationEndpoint: https://sample.com/oauth2/v2.0/authorize
    TokenEndpoint: https://sample.com/oauth2/v2.0/token
    Scopes: <Scopes>
    AuthorizationContentType: application/x-www-form-urlencoded
SkillGroups:
- Format: API
  Settings:
    OpenApiSpecUrl: https://sample.com
    EndpointUrl: https://sample.com
Upload the Plugin Manifest
Follow the instructions here to upload the plugin manifest to Copilot for Security.
Configure the Authentication
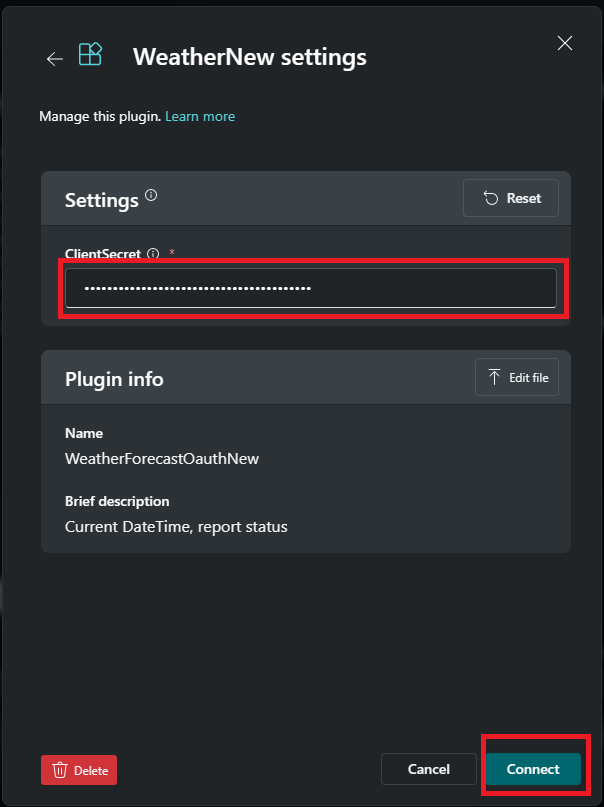
Sign in to Microsoft Copilot for Security.
Scroll down to Custom and select Setup.

Enter the client secret and select Connect.
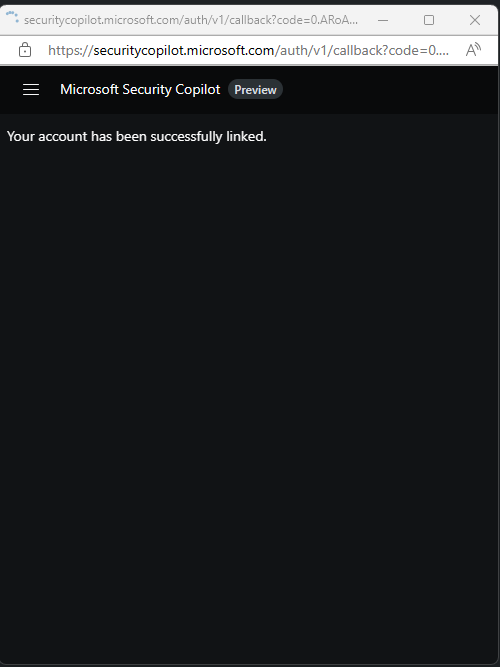
You'll see a notification that the account has been successfully linked.
The setup is complete.
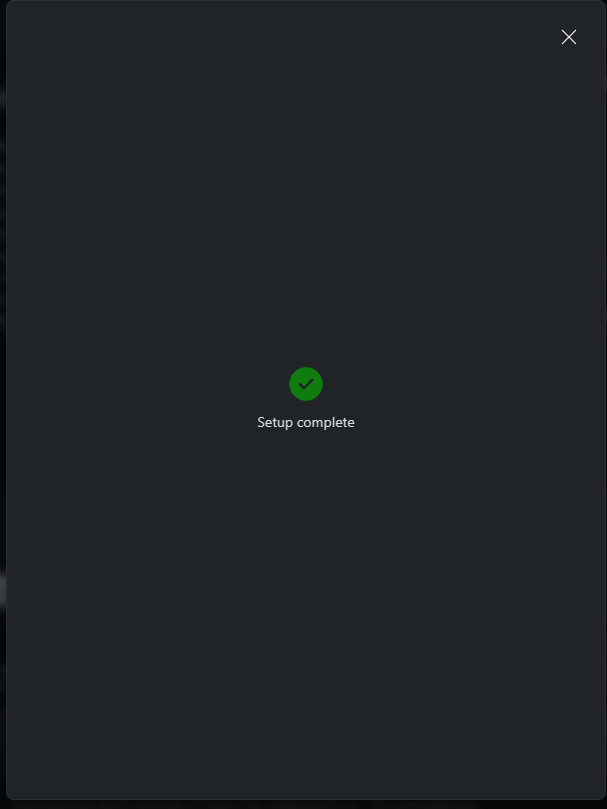
The plugin should now be enabled.
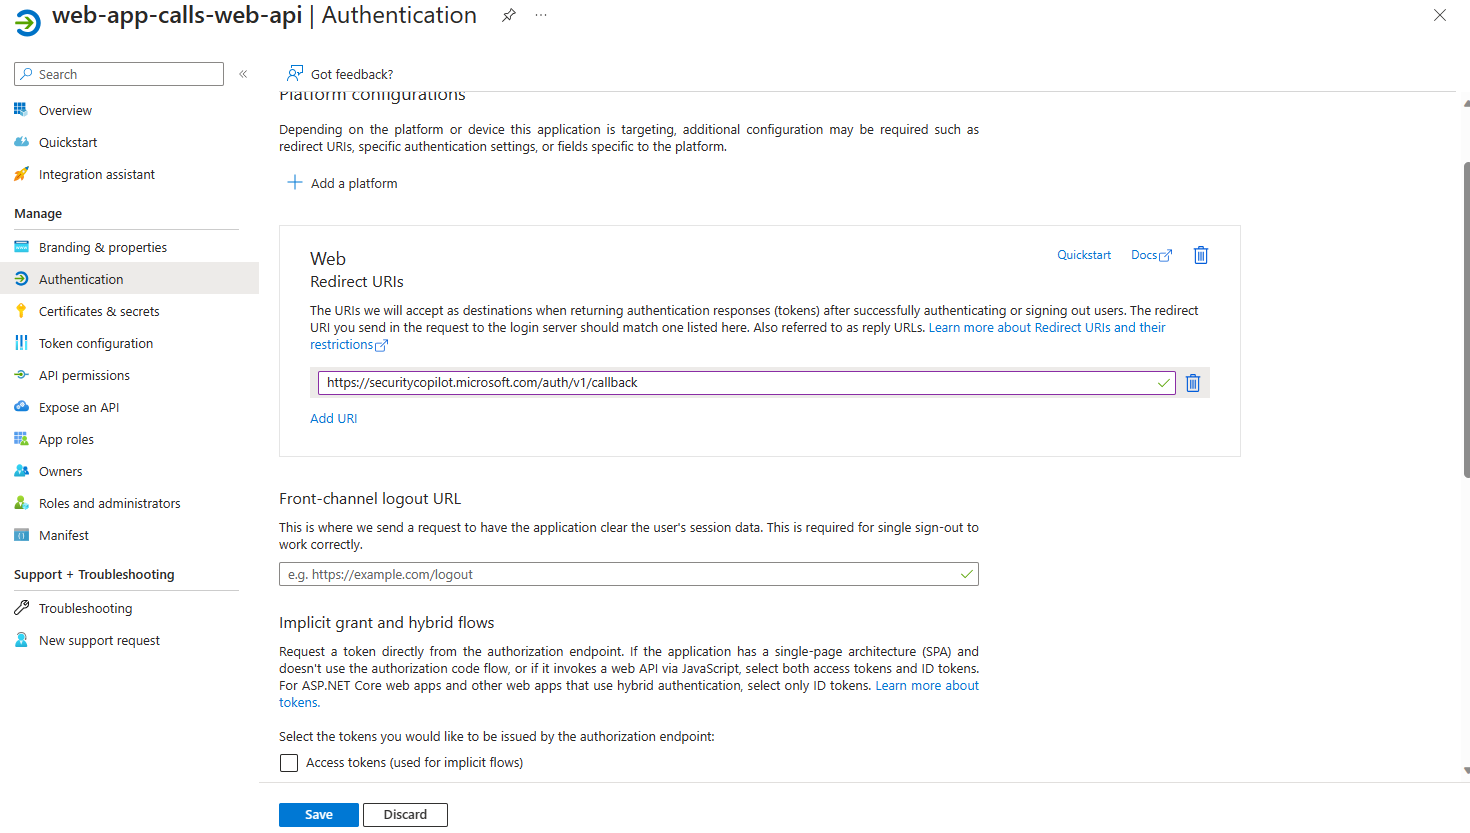
If you see an error message when you select Connect, use the following steps to address the error:
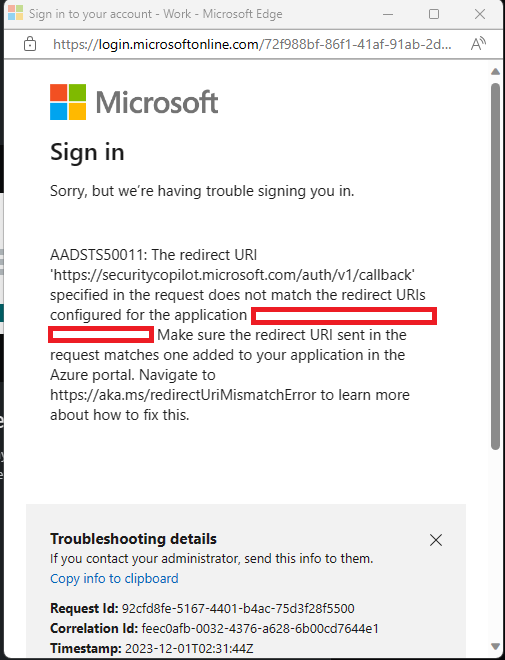
Add the following callback uri (https://securitycopilot.microsoft.com/auth/v1/callback) as shown in the following image and try reconnecting.