Note
Access to this page requires authorization. You can try signing in or changing directories.
Access to this page requires authorization. You can try changing directories.
As part of a customer’s Microsoft Support agreement, they receive a single Services Hub workspace for managing their digital support experience. Many customers require more segmentation inside their organization to meet the way they consume their Microsoft support. This capability allows customers to configure additional workspaces, so they receive the granularity they require.
Workspaces
Workspaces are created by your Customer Success Account Manager (CSAM) or Account Coordinator (AC) to separate your agreement based on the needs of your organization. Individual workspaces provide the following benefits:
- Support case data is limited to the members of the workspace.
- Each workspace can have its own administrator who is familiar with the goals of that workspace.
- The Customer Activity page shows the aspects of the agreement which apply to that workspace; if you have access to view multiple workspaces, you can select the "All Workspaces" filter, and the Customer Activity page will show the aspect of the agreement which applies to the selected workspaces.
We recommend that you reach out to your CSAM or AC when your agreement starts. This will allow your Services Hub experience to be tailored to your organization’s needs, without requiring users to re-register for additional workspaces.
Default workspace
After your support agreement with Microsoft becomes active, a default workspace is set up for your organization with no user intervention required. At that time, the Services Administrator and all named support contacts on the agreement will be invited to the workspace. These users are able to open cases and leverage the other benefits of Services Hub immediately at that time.
If add-in support benefits were purchased as part of your agreement, contact your CSAM or AC and request they add them to your workspace.
Create additional workspaces
Additional workspaces can be created at any time during the agreement. Contact your CSAM or AC to discuss the goals for the workspace. After an additional workspace is created, a new Workspace Administrator is set up for the workspace. This user can then invite members from your organization to join the workspace and begin using your company’s support entitlements.
Note
A separate invitation is required for each Services Hub workspace. Services Hub workspaces that are associated with a Premier Support agreement will accept either Work or School accounts or Personal accounts. Services Hub workspaces that are associated with a Unified Support agreement will be configured to prevent using Personal accounts to sign in to the workspace by default. These workspaces can, however, be configured to allow Personal accounts to sign in if the customer either does not have Work or School accounts set up or otherwise determines that they would like to allow Personal accounts.
Information segregation
While all information belonging to a customer is defined by their single agreement, each Services Hub workspace displays user data independently, based on the members of the workspace.
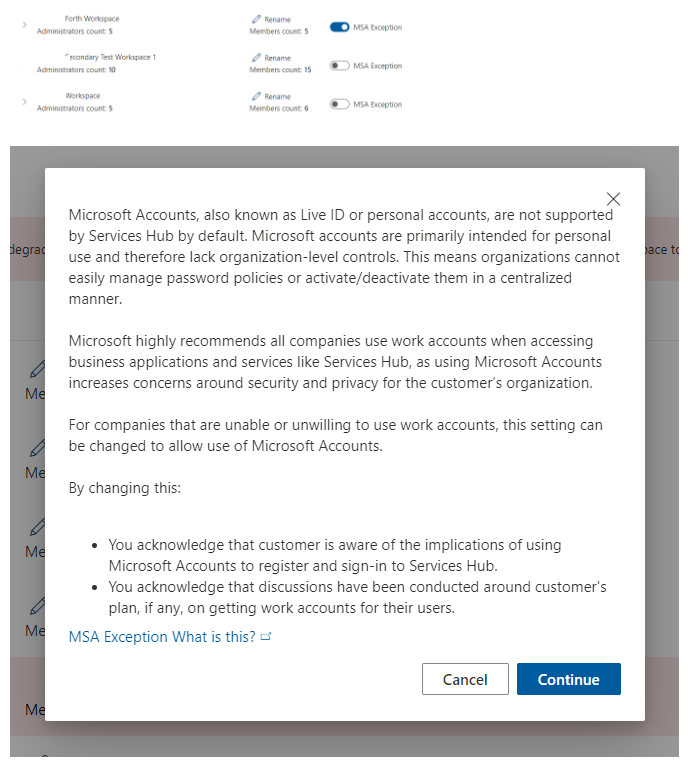
MSA exceptions
Important
Effective October 13, 2025, enabling the MSA exception within Services Hub is no longer supported. You are able to disable the exception. However, once it has been turned off, it can't be re-enabled. For more information, see Retirement of direct MSA sign-in for Services Hub and Microsoft Engage Center.
Some existing Services Hub Workspaces are currently enabled with the MSA exception. This functionality can be turned off directly from the Admin Center once it’s deemed that the exception is no longer needed. To learn more about the value and importance of using work and school accounts, see Services Hub Registration and Roles.
Your CSAM or customer Global Administrator can disable the MSA exception by following these steps:
Access the Admin Center for the customer.
Choose the Workspace tab.
If the MSA Exception is blue and to the right, you can disable it by clicking on the slider.
Note
Once the MSA exception is disabled, it can't be re-enabled.

You'll then be presented with the security and privacy dialog which you’ll need to read and then acknowledge by selecting Continue.