Note
Access to this page requires authorization. You can try signing in or changing directories.
Access to this page requires authorization. You can try changing directories.
Download the Assessment Troubleshooting Script
To self-evaluate and troubleshoot the On-Demand Assessments, download and run the Assessment Troubleshooting script. Refer to the full troubleshooting guide in the following sections of this article.
Most common troubleshooting issues
1. DCR Creation Failed error message when adding an assessment to a machine from Services Hub portal

Ensure that your Azure subscription has the Microsoft. Insights provider registered, then retry adding the assessment solution from Service sHub portal.
For details on how to register a provider, see Azure resource providers and types.
If this didn't correct the issue for you, you can attempt to create a basic DCR for your machine/workspace from the Azure portal. To test if you have the right permission to do so, see Create and edit data collection rules (DCRs) in Azure Monitor.
2. Error message: "You don't have access to Azure Log Analytics" in Services Hub -> IT Health -> On-Demand Assessments
Follow the guidance in Azure Roles for Log Analytics and How they Relate to Services Hub to ensure you have the right permission level for your role.
3. Unable to find ARC/Azure VM when adding ODA Assessment in Service sHub Connector
Currently SH Connector has a limitation that only allows it to discover ARC/VM machines inside the same resource group as the Log Analytics workspace selected, if you're unable to see a specific machine in the list when adding an assessment, check if both machine and Log Analytics workspace are found in the same resource group/subscription.
4. Recommendations aren't uploading from data collector machine to Azure Log Analytics workspace
If you can't see the results of the data collected in the Azure Workbook, follow these steps:
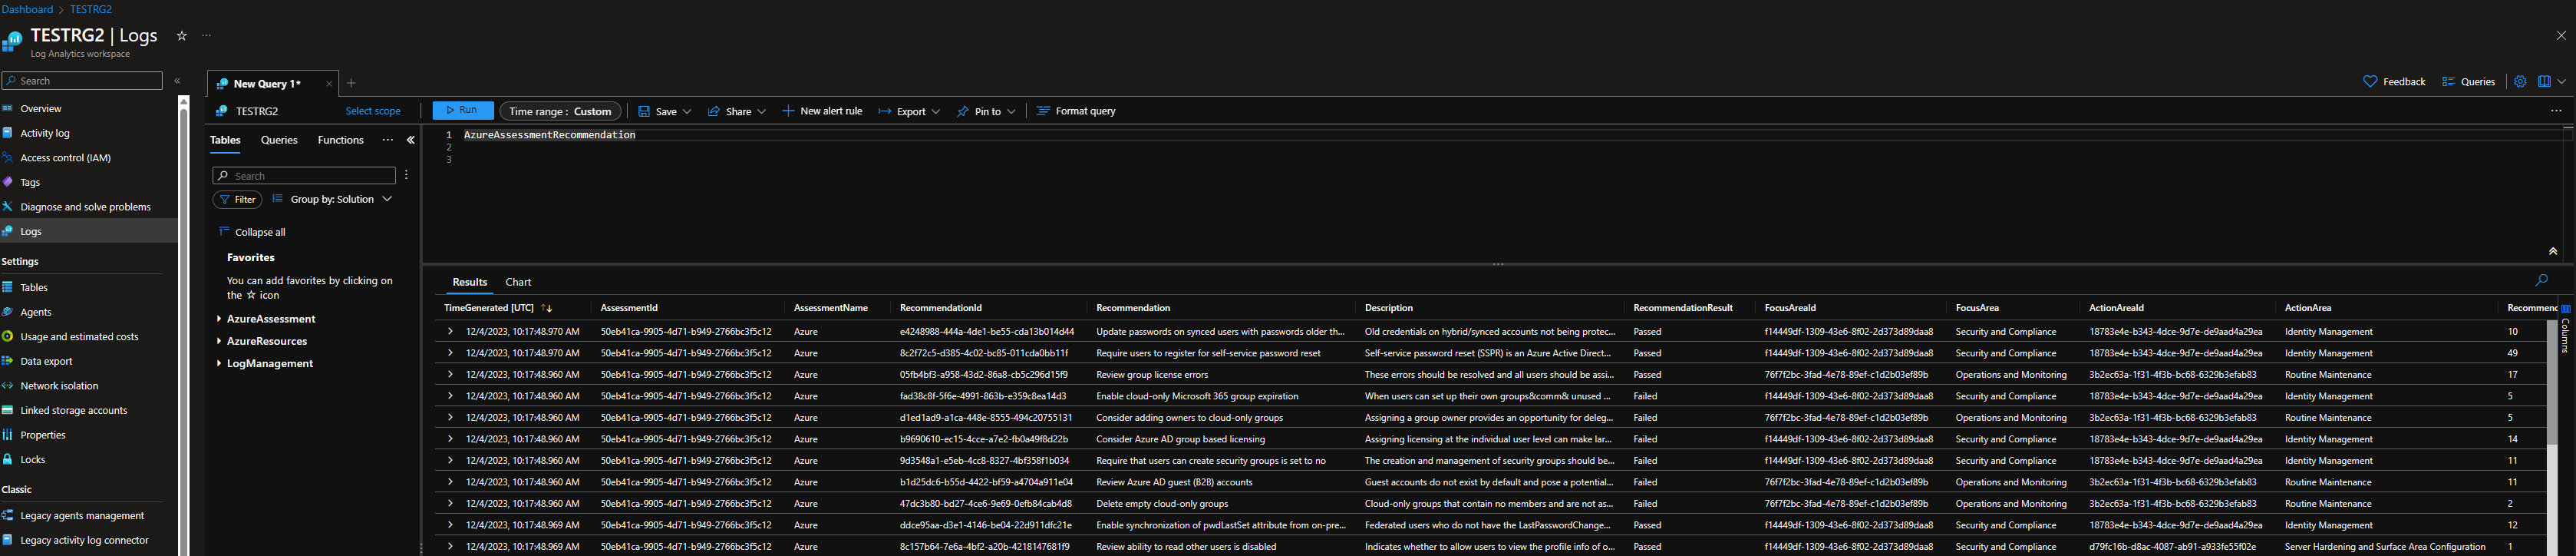
Ensure that you have a set of recommendation files in the data directory for your assessment. The usual format is
new.recommendation.*.solutionrec(ex:new.recommendations.*.adrecsfor AD).Verify that the content of the files was uploaded to the Azure Log Analytics workspace by checking the Logs section for the workspace you're using, and run a query based of the time stamp.
Example: Run
AzureAssessmentRecommendationsand the time set to match your last run time (such as 24 hours ago).If the upload was successful, you can see the same content you have in the recommendation files inside the Azure table as well
If the data is present, verify that you selected the correct workbook associated with your workspace data.

Note
If you're unable to find any uploaded data, and you're using an Azure VM for data collection, ensure that Managed System Identity is turned on for the machine.
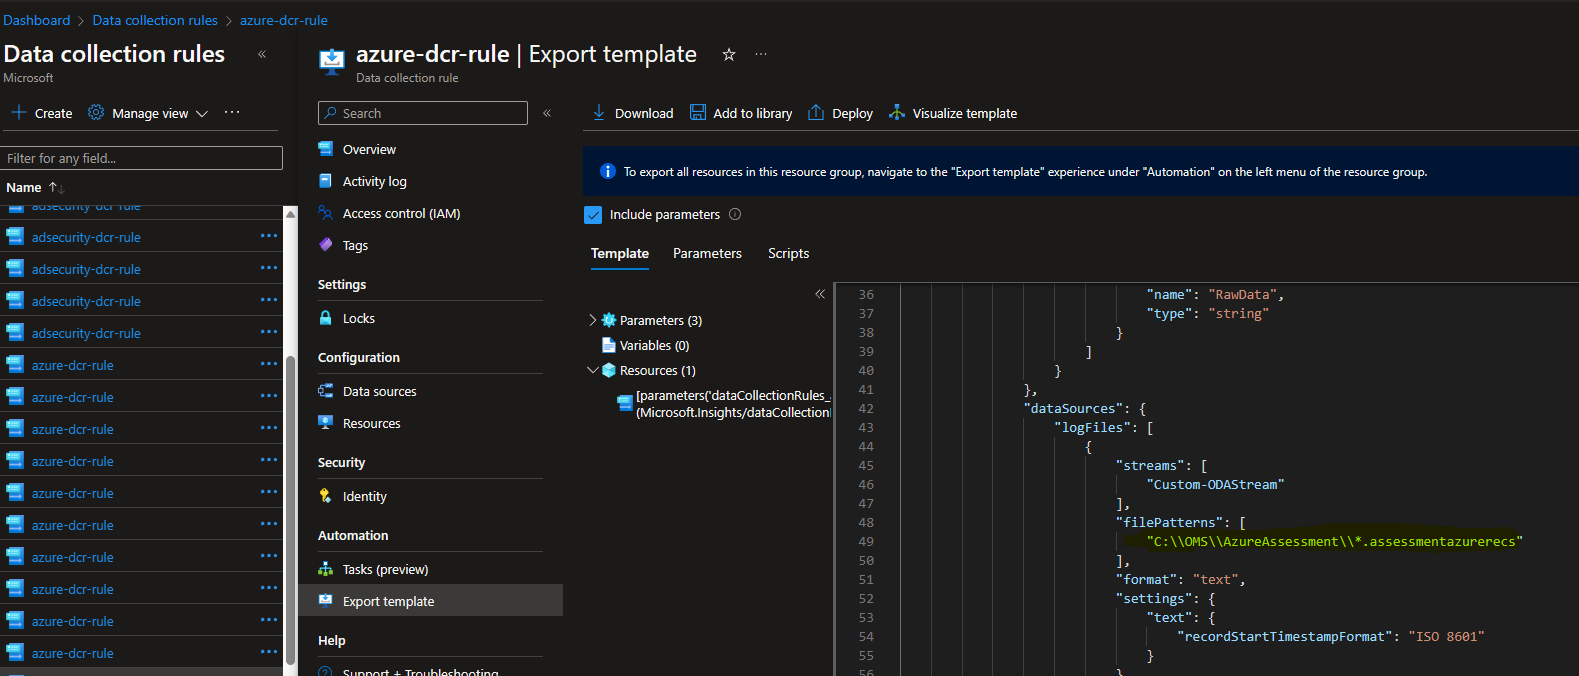
If you're using an ARC-enabled machine for data collection, check the setting for your DCR to ensure you mapped the correct working directory path when adding the assessment.
Go to the Azure portal.
Look for Data Collection Rules (DCR).
Locate the DCR associated with your assessment (it should contain the ODA reference and the assessment type).
Open the DCR and select Export Template.
Look for "filePatterns" in the json, and ensure the path is pointing to the folder where you created your recommendation files.

If the path is correct, try rerunning data collection on the machine to ensure the data isn't old/expired. If rerunning data collection doesn't help, try restarting the machine to avoid any glitches or pending updates.
If you haven't done so yet, review the network requirements for AMA to rule out any connectivity issues.
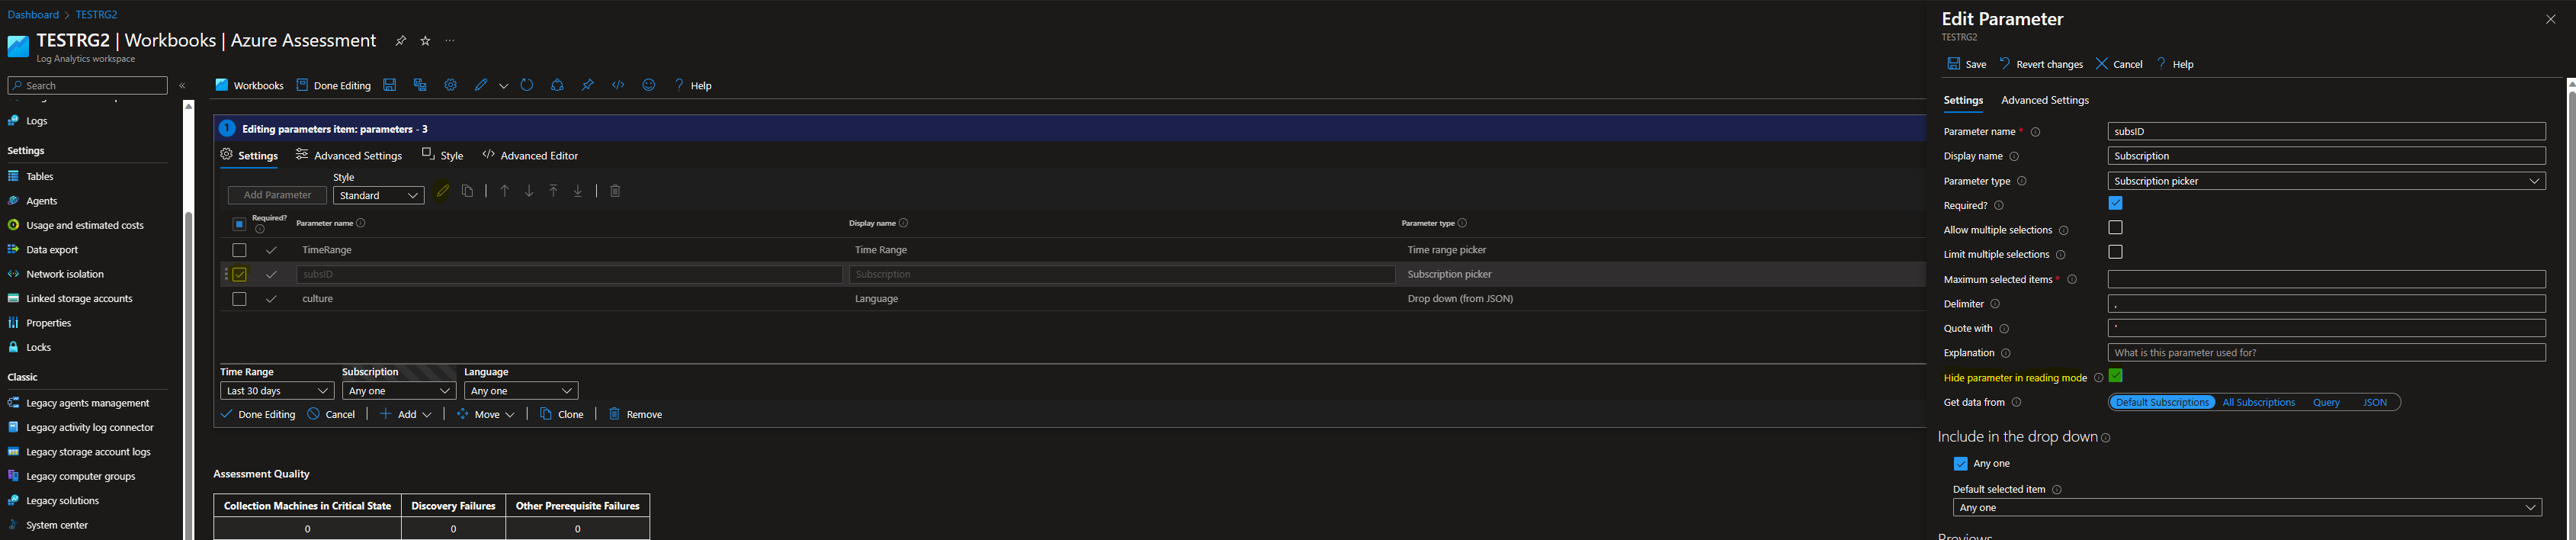
5. Workbook results showing content unavailable due to permission issues

Try Refreshing the Content query.
Edit the Workbook. Select "Edit" on the top right to expand the parameters.
Select SubsId, then edit the parameters: check the box for "Hide parameter in reading mode," then save your changes and close the editor.
If the issue isn't resolved, try re-registering the Microsoft.ServicesHub resource provider for your subscription. For guidance on registering or re-registering a resource provider, see Azure resource providers and types.
Linking and Permissions
Verify that you have the Azure Subscription permissions necessary for your role through the same email ID that you use to sign in to Services Hub.
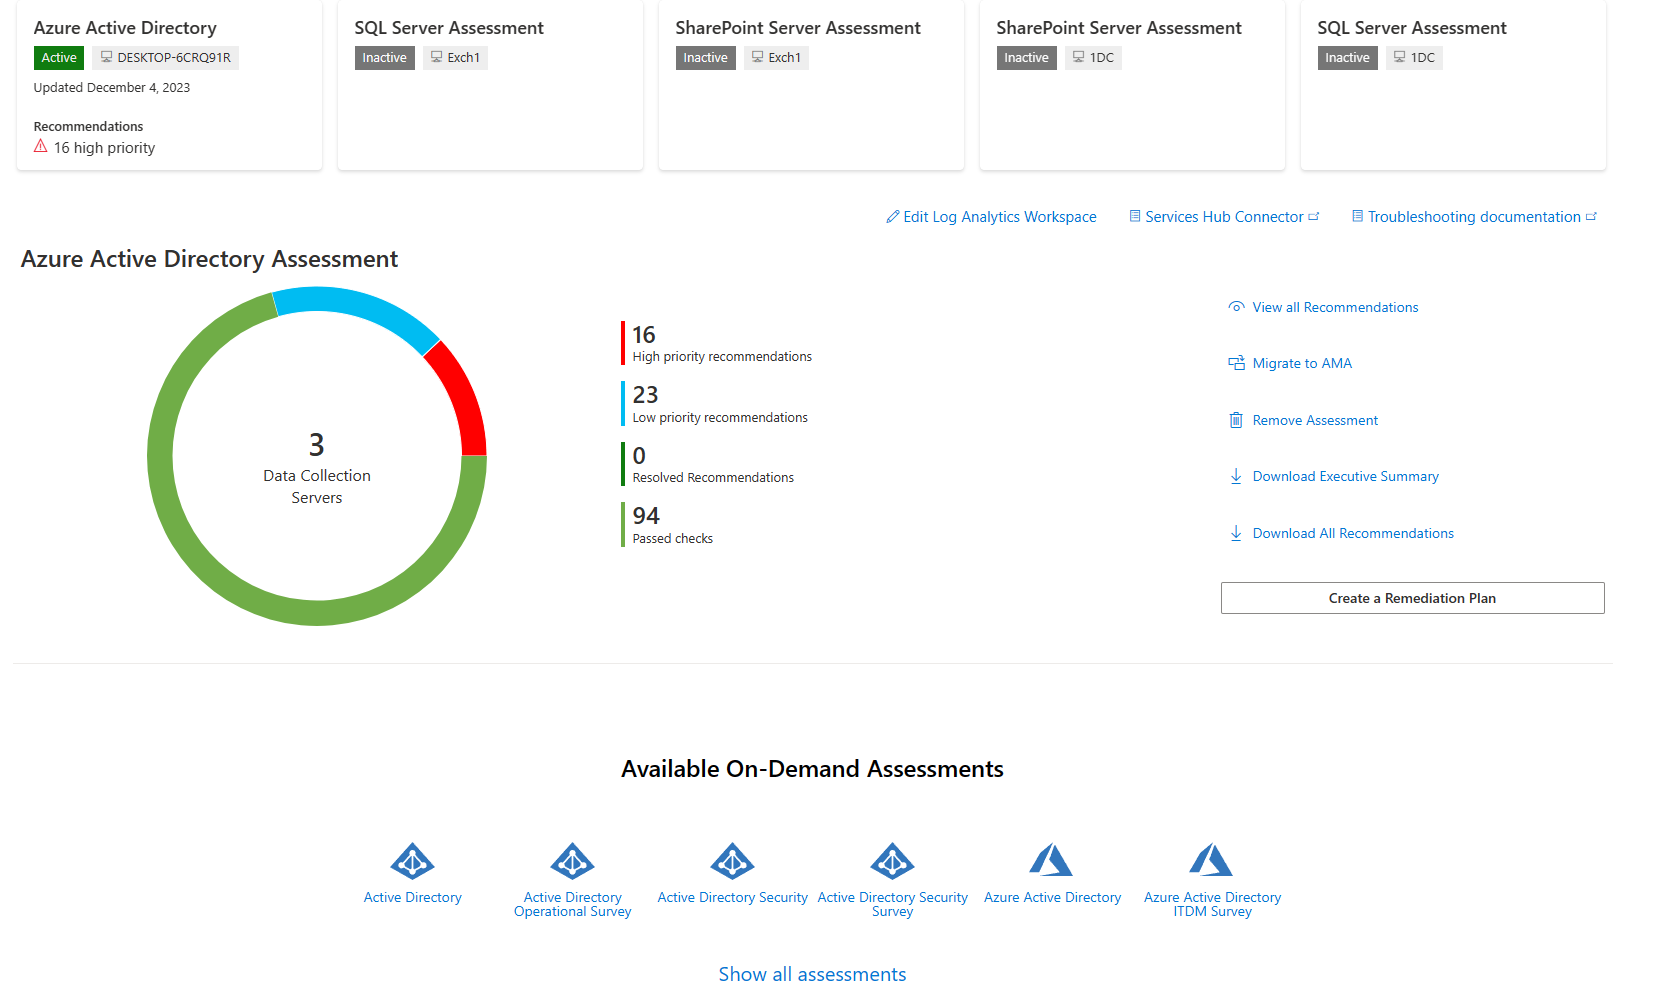
Go to the Health tab, then to Assessments.
Confirm that the Log Analytics workspace you have access to is the one linked in Services Hub.
If it's not, relink. Select your profile in the top right, then select "Edit Log Analytics Workspace" and link your desired workspace.
Confirm that you added your desired assessment from the catalog.


Add-*AssessmentTask Commandlet related issues
This section covers some of the most frequent problems you might encounter when you invoke a command such as AddExchangeAssessmentTask.
Windows Server 2008 R2 doesn't recognize Add-*AssessmentTask commandlets
We recommend that you don't run assessments on a Windows Server 2008 machine. But if you absolutely must run assessments on one, follow these steps:
Install the latest version of PowerShell and .NET 4.6.2 on the Windows 2008 server.
Most Windows 2008 Servers have PowerShell that uses .NET 2.0, and that doesn't meet the requirements.
Run PowerShell in Administrator mode.
Check that the custom ODA module is available on your machine:
Get-Module Microsoft.PowerShell.Oms.Assessments -listavailable. Ensure the path displayed isC:\ODA\Binaries\bin\Microsoft.PowerShell.Oms.Assessments.If you can't find the module using the
getcommand, check whether the module is found in your environment variables list. Run$env:psmodulepathin PowerShell to show the list.The correct path is typically added as part of your extension installation. If it's missing, you can manually add the correct path by running:
$env:PSModulePath = $env:PSModulePath + ";C:\ODA\Binaries\bin\Microsoft.PowerShell.Oms.Assessments"As a precaution, verify that the path exists on your machine to ensure the module is installed on your machine.
Note
If you notice a second entry for the module pointing to
\Program Files\Microsoft Monitoring Agentand you migrated from an MMA-based assessment type, feel free to remove this secondary path. To do so, run$env, then go to Environment Variables -> PsModulePath, and remove the entry from the list.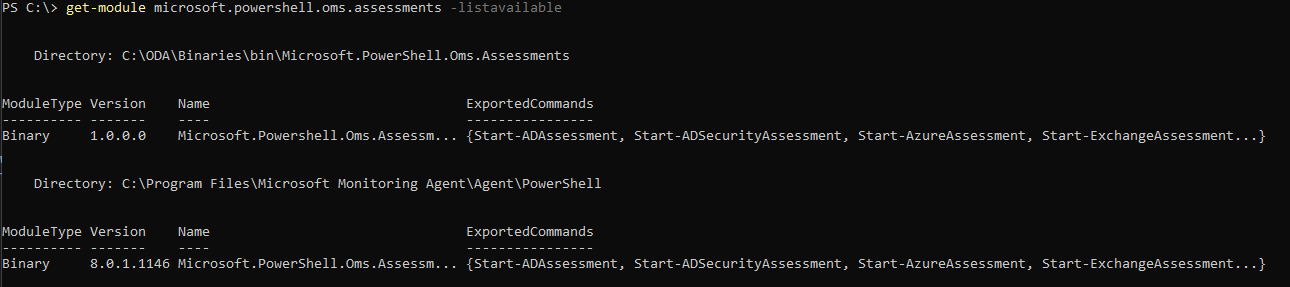


After you run this command, you should be able to invoke Add-*AssessmentTask commandlets.
Note
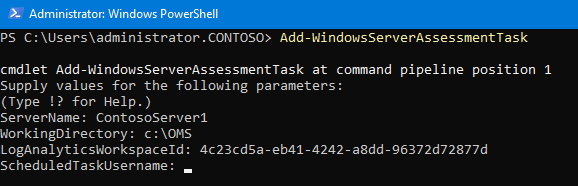
To ensure that PowerShell is loading the AMA module, run Add-*AssessmentTask and verify that you're prompted to provide the Log Analytics workspace ID during setup.

The previous version of the module that is used for MMA does not prompt you to enter the workspace ID.
On any platform, if the Add-*AssessmentTask commandlets aren't recognized
Verify that the OMS Assessments PowerShell module is downloaded.
Verify that
C:\ODA\Binaries\binhas a subdirectory namedMicrosoft.PowerShell.Oms.Assessments, and in that subdirectory there's a file namedMicrosoft.PowerShell.Oms.Assessments.dll.If Microsoft.PowerShell.Oms.Assessments.dll isn't there, make sure that your Log Analytics workspace is linked from Services Hub.
Verify that the installed version of PowerShell is at least 4.0
Type $PsVersionTable in the PowerShell window) and that PowerShell uses a CLRVersion equal to or greater than 4.0.
Ensure you have the right module path.
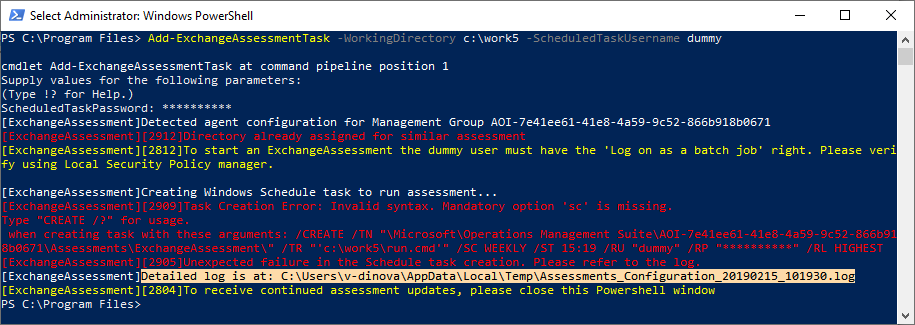
Troubleshooting Assessment Installation Errors when executing an Add-*AssessmentTask cmdlet
Review the log file.
The log file location is displayed on the PowerShell console window. It's an informational message, in white, as visible in the following screenshot:
Note
If
Add-_AssessmentTaskfails for some reason, look in the log file.The
-ScheduledTaskUserNameand-ScheduledTaskPasswordmight be invalid--no such user exists, or the password is invalid or expired.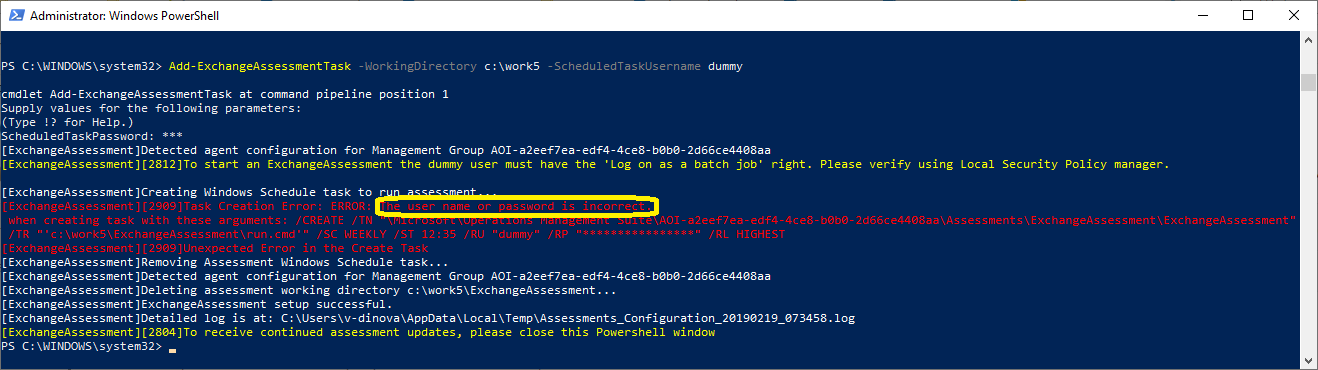


Requirements for successfully running the scheduled task
Verify the user account Group Policies: Logon as Batch Job Permission
Note
At times, the assessment might not be triggered from the Task Scheduler, which can happen if you don't have the running batch job permission. In this case, you need the permission to be explicitly granted through gpedit.msc.*.
Select and hold or right-click on "Log on as batch job," then select Properties.
Select "Add User or Group" and include the relevant user.
Don't forcefully unload the user registry at user logoff
On the data collection machine, change the following setting in the group policy editor (gpedit.msc) from "not configured" to "enabled."
Go to Computer Configuration -> Administrative Templates -> System -> User Profiles.
Enable "Don't forcefully unload the user registry at user logoff."
Disable the FIPS Policy
Go to the Control Panel.
Select "Administrative Tools," then select "Local Security Policy."
Expand "Local Policies," then select "Security Options."
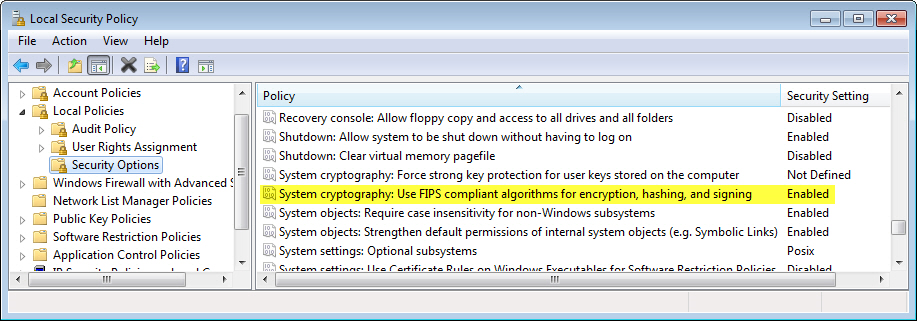
Select "System cryptography" under "Policy" in the right-side pane.
Use FIPS compliant algorithms for encryption, hashing, and signing, then select "Disabled."

Network Access: Don't allow storage of passwords and credentials
This error occurs with the message "A specified logon session does not exist. It may already have been terminated." To resolve this error:
Go to SECPOL.MSC -> Security Settings -> Local Policies -> Security Options.
Don't allow storage of passwords and credentials for network authentication.
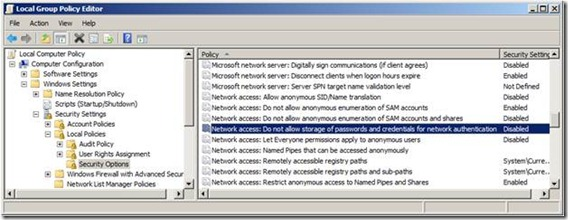
Set the policy to "Disabled."

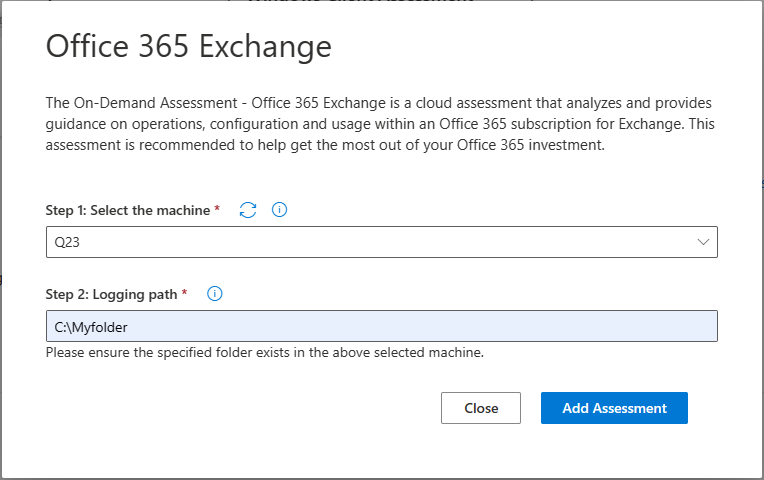
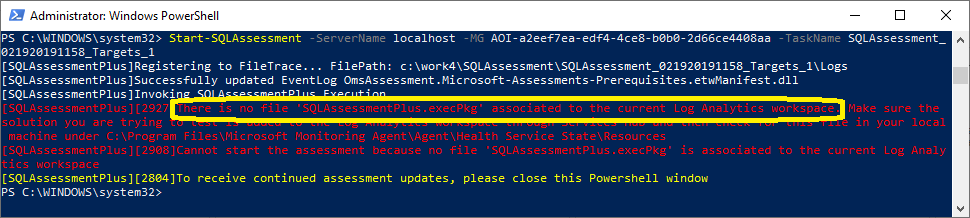
Assessment wasn't added to your workspace
If invoking the start-XXXAssessment results in this error: "There is no file XXXAssessment.execPkg associated to the current Log Analytics workspace...," the reason is that the specific assessment-type must be added to your machine via Service sHub portal.
Add the assessment on Services Hub page:
Select the Health tab, then select Assessments.
Select the desired assessment listed under "Available On-Demand Assessments" at the end of the page.
Select "Add Assessment."
Wait at least 5-10 minutes for the solution extension to be added.

Data from OnDemand assessment is no longer seen in Log Analytics, but it was seen in the past
Find the scheduled task in the Task Scheduler.
Run the task manually from the Task Scheduler.
Verify that an OmsAssessment.exe process is running.
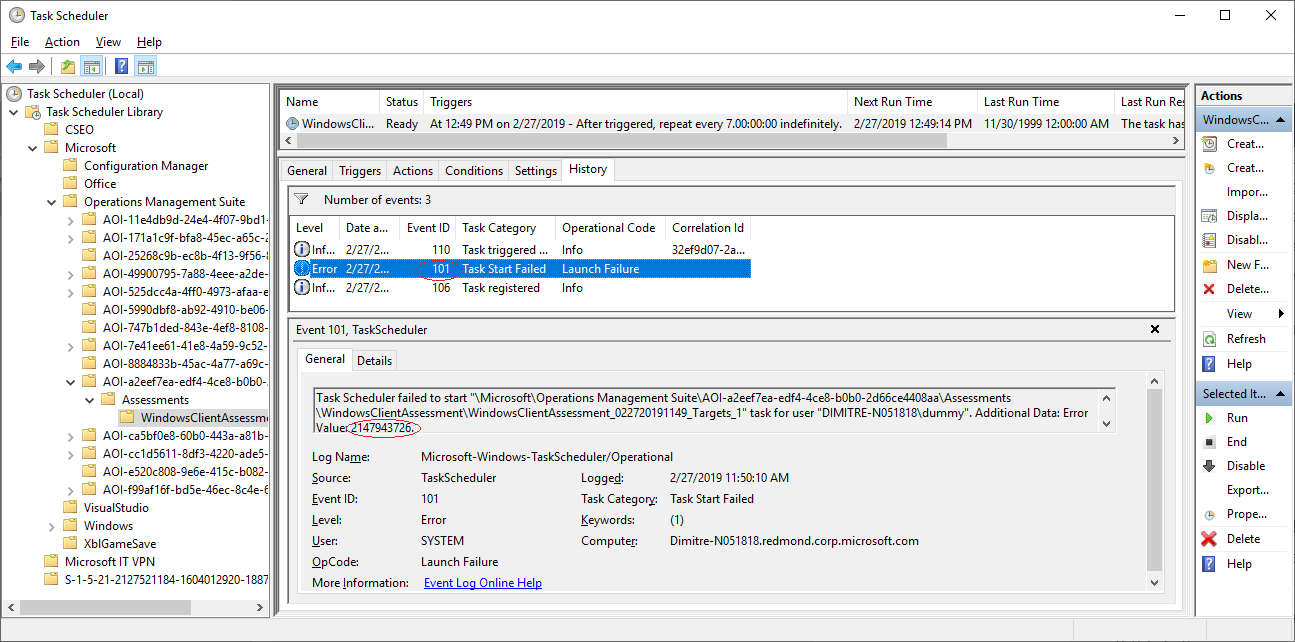
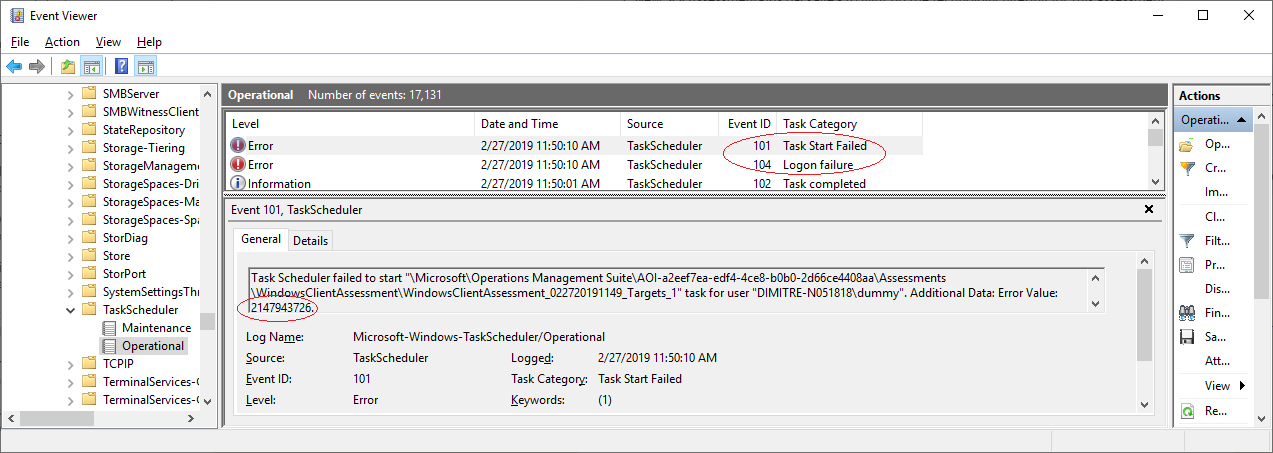
If no such process is running, it's possible that the password specified when
Add-XXXAssessmentTaskwas run for this assessment expired or was changed, and isn't valid anymore.In that case, you can see the error both on the History tab of the Task Scheduler, and in the Task Scheduler Event Log--with EventId 101 (and 104) and ErrorValue 2147943726, as shown in the following screenshots:


OmsAssessment.exe isn't running or appears stuck for long periods of time
Sometimes you might notice from logging that the OMSAssessment.exe process fails to launch or appears to be stuck on the same step for extended periods of time. The OMSAssessment.exe process is triggered when you run the task, and is the process responsible for environment discovery, data collection, and analysis.
Your antivirus blocking certain scripts or related dependencies can result in the process failing or getting stuck. You can run the assessment with your antivirus on, but you might have times where the antivirus affects the process's performance or blocks files from being created, depending on your product or environment settings.
To avoid related issues, we recommend adding an exception in your antivirus for the folder you're running the assessment from.
Check for any conflicting omsassessment.exe processes running
Open Task Manager and look for a process named omsassessment.exe. If visible, it indicates that the assessment is still running.
If it's been running for a long time (like an entire day), the assessment agent might not be able to process the data. Follow the troubleshooting steps in the next section to resolve the problem.
Go through any errors in the prerequisite file
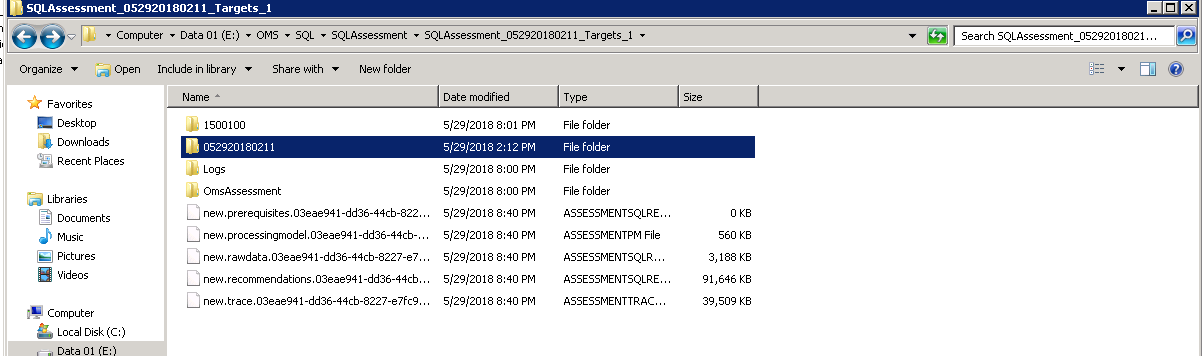
Go to the assessment working directory and look at the prerequisites (processed.prerequisites) files to find any errors mentioned for the assessment targets.

If any errors are found (for example, WMI connectivity issues), the target names and the error is mentioned in this file.
Resolve any mentioned errors, then trigger the assessment:
Go to Task Scheduler -> Microsoft -> Operations Management Suite -> AOI***** -> Assessments.
Select and hold or right-click on the desired assessment scheduled task, then select Run.
Go through error in the discovery log file
Go to the assessment working directory, then into the 6-8 digit numbered folder inside the directory.
Look for a folder named
Logs. Within it, you can find a file namedDiscoveryTrace***.Look for any errors or exceptions in this file and resolve them, since they relate to credential/permissions issue, WMI failure, network issues, and more.
Large file ingestion

Try to reduce the number of targets per assessment schedule
If you're running the Windows Server, Windows Client, or SQL Assessment, and you add over five targets in a single scheduled task, the assessment agent might not be able to process so many targets at once.
If you encounter this situation, use the following cmdlet to remove any existing configuration:
Remove-WindowsClientAssessmentTask -LogAnalyticsWorkspaceId "YourWorkspaceId"
Remove-WindowsServerAssessmentTask -LogAnalyticsWorkspaceId "YourWorkspaceId"
Remove-SQLAssessmentTask -LogAnalyticsWorkspaceId "YourWorkspaceId"
Then run Add-AssessmentTasks again with fewer targets.
You can add multiple such tasks and create batches of tasks with 3-5 targets per task, resulting in a faster evaluation of your entire environment.
Go through Scheduled Task dispatch and uploader log files
In the Assessments working directory, there's a folder named \Logs\ that contains *Commandlet*.log and *Module*.log.
The Commandlet.log file contains data about the scheduled task starting the PowerShell commandlet. You can use this data to find why the scheduled task didn't start.
If this file isn't produced when the ODA scheduled task is started, it usually indicates a password error.
The Applications and Services Logs\Operations Manager Event Log also contains information you can use to troubleshoot various issues.
No prompt for Log Analytics Workspace ID when adding Assessment Task in PowerShell
You should be prompted for a Log Analytics Workspace ID (LAW-ID) during the creation of the Assessment Task in PowerShell. This process is what creates the Scheduled Task to run the assessment.
If you aren't prompted to provide the LAW-ID, you're not using the correct PowerShell modules. This can happen if the Microsoft Monitoring Agent is still installed, or if your data collection machine didn't pick up the path of the Azure Monitoring Agent’s PowerShell modules.
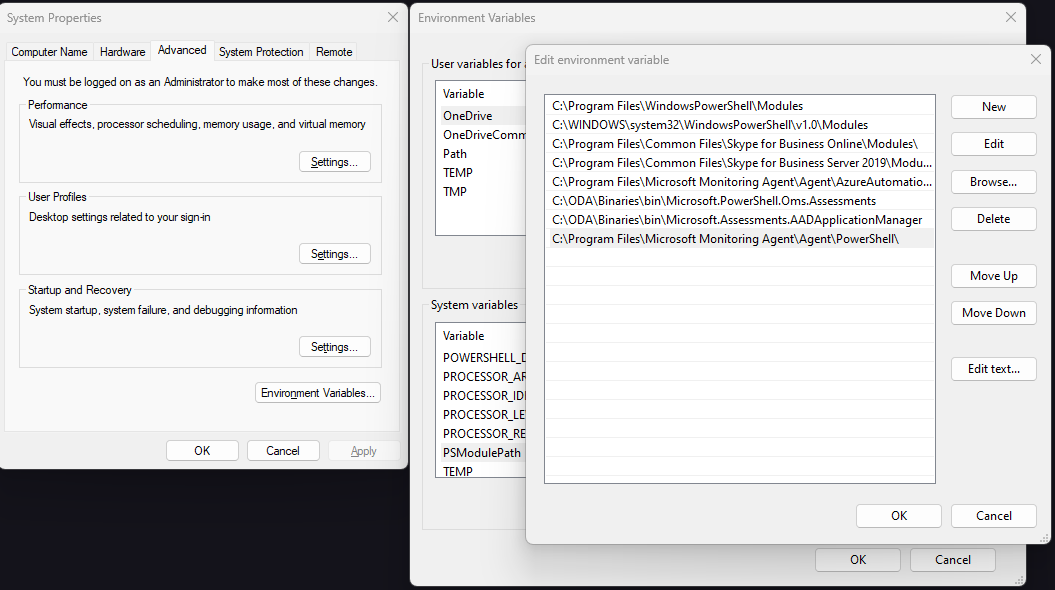
To configure the environment variables:
Select "Start."
Use the search box to search for "Environment."
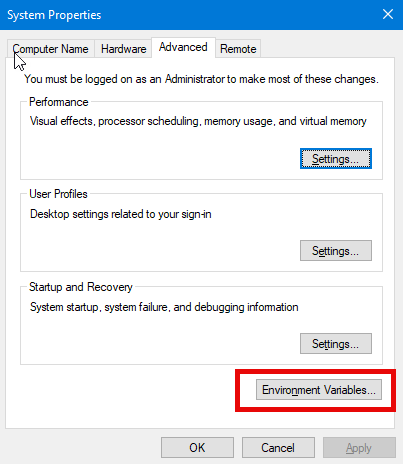
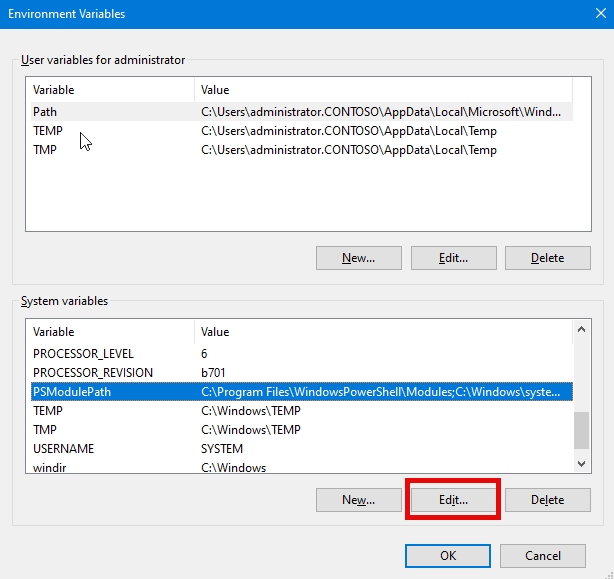
In the System Properties window, select "Environment Variables."
In the Environment Variables window, find the variable called "PSModulePath" and select it, then select "Edit."
Move the line
C:\ODA\Binaries\bin\Microsoft.PowerShell.OMS.Assessmentsabove the lineC:\ProgramFiles\MicrosoftMonitoringAgent\Agent\PowerShell\.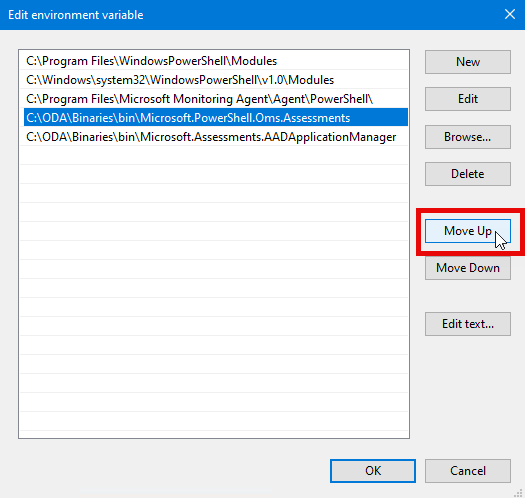
Select "OK" three times to exit System Properties.
Open a new Administrative PowerShell window.
Try to add the assessment again.
If you still see no change, restart your machine.


