Note
Access to this page requires authorization. You can try signing in or changing directories.
Access to this page requires authorization. You can try changing directories.
This article describes how to build an application that adds and handles SharePoint webhook requests. You will learn how to use Postman client to construct and execute SharePoint webhook requests quickly while interacting with a simple ASP.NET Web API as the webhook receiver.
You will use plain HTTP requests, which is useful for helping you understand how webhooks work.
To complete the step-by-step instructions in this article, download and install the following tools:
- Google Chrome Browser
- Postman
- Visual Studio Community Edition
- ngrok (to install ngrok, see Download and Installation)
- An Office 365 developer subscription with SharePoint Online. If you are new to Office 365, you can also sign up for an Office 365 developer subscription through the Office 365 Developer Program. See the Office 365 Developer Program documentation for step-by-step instructions about how to join the Office 365 Developer Program and sign up and configure your subscription.
Step 1: Register an Azure AD application for Postman client
In order for the Postman client to communicate with SharePoint, you need to register a Microsoft Azure Active Directory (Azure AD) app in your Azure AD tenant associated with your Office 365 tenant.
Ensure that you register the application as a Web Application.
To access SharePoint Online, it's important to grant the Azure AD app permissions to the Office 365 SharePoint Online application and select the read and write items and lists in all site collections permission.
Note
For more information about adding an Azure AD application and granting permissions to applications, see Adding an application.
Enter the following endpoint as the Reply (Redirect) URL for the app. This is the endpoint to which Azure AD will send the authentication response, including the access token, if authentication was successful.
https://www.getpostman.com/oauth2/callbackGenerate a Key, which will be the client secret.
The following properties are required in later steps, so copy them to a safe place:
- Client Id
- Client Secret
Step 2: Build a webhook receiver
For this project, use the Visual Studio Web API project to build the webhook receiver.
Create a new ASP.NET Web API project
- Open Visual Studio.
- Select File > New > Project.
- In the Templates pane, select Installed Templates, and expand the Visual C# node.
- Under Visual C#, select Web.
- In the list of project templates, select ASP.NET Web Application.
- Name the project SPWebhooksReceiver, and select OK.
- In the New ASP.NET Project dialog, select the Web API template from the ASP.NET 4.5. group.
- Change the authentication to No Authentication by selecting the Change Authentication button.
- Select OK to create the Web API project.
Note
You can clear the Host in the cloud check box because this project will not be deployed to the cloud.
Visual Studio creates your project.
Build the webhook receiver
Install NuGet packages
Use ASP.NET Web API Tracing to log the requests coming from SharePoint. The following steps install the tracing package:
- Go to Solution Explorer in Visual Studio.
- Open the context menu (right-click) for the project, and select Manage NuGet Packages.
- In the search box, enter Microsoft.AspNet.WebApi.Tracing.
- In the search results, select the Microsoft.AspNet.WebApi.Tracing package, and then select Install to install the package.
Build SPWebhookNotification model
Each notification generated by the service is serialized into a webhookNotification instance. You need to build a simple model that represents this notification instance.
Go to Solution Explorer in Visual Studio.
Open the context menu (right-click) for the Models folder, and select Add > Class.
Enter SPWebhookNotification as the class name and select Add to add the class to your project.
Add the following code to the body of the SPWebhookNotification class:
public string SubscriptionId { get; set; }
public string ClientState { get; set; }
public string ExpirationDateTime { get; set; }
public string Resource { get; set; }
public string TenantId { get; set; }
public string SiteUrl { get; set; }
public string WebId { get; set; }
Build SPWebhookContent model
Because multiple notifications can be submitted to your webhook receiver in a single request, they are combined together in an object with a single array value. Build a simple model that represents the array.
Go to Solution Explorer in Visual Studio.
Open the context menu (right-click) for the Models folder, and select Add > Class.
Enter SPWebhookContent as the class name, and select Add to add the class to your project.
Add the following code to the body of the SPWebhookContent class:
public List<SPWebhookNotification> Value { get; set; }
Add SharePoint webhook client state
Webhooks provide the ability to use an optional string value that is passed back in the notification message for your subscription. This can be used to verify that the request is indeed coming from the source you trust, which in this case is SharePoint.
Add a client state value with which the application can verify the incoming requests.
Go to Solution Explorer in Visual Studio.
Open the web.config file, and add the following key as the client state to the
<appSettings>section:<add key="webhookclientstate" value="A0A354EC-97D4-4D83-9DDB-144077ADB449"/>
Enable tracing
In the web.config file, enable tracing by adding the following key inside the <system.web> element in the <configuration> section:
<trace enabled="true"/>
A trace writer is required, so you must add a trace writer to the controller configuration (in this case use the one from System.Diagnostics).
Go to Solution Explorer in Visual Studio.
Open WebApiConfig.cs in the App_Start folder.
Add the following line inside the Register method:
config.EnableSystemDiagnosticsTracing();
Build SharePoint webhook controller
Now build the webhook receiver controller that handles the incoming requests from SharePoint and take action accordingly.
Go to Solution Explorer in Visual Studio.
Open the context menu (right-click) for the Controllers folder, and select Add > Controller.
In the Add Scaffold dialog, select Web API 2 Controller - Empty.
Select Add.
Name the controller SPWebhookController, and select Add to add the API controller to your project.
Replace the
usingstatements with the following code:using Newtonsoft.Json; using SPWebhooksReceiver.Models; using System.Collections.Generic; using System.Configuration; using System.Linq; using System.Net; using System.Net.Http; using System.Threading.Tasks; using System.Web; using System.Web.Http; using System.Web.Http.Tracing;Replace the code in the SPWebhookController class with the following code:
[HttpPost]
public HttpResponseMessage HandleRequest()
{
    HttpResponseMessage httpResponse = new HttpResponseMessage(HttpStatusCode.BadRequest);
    var traceWriter = Configuration.Services.GetTraceWriter();
    string validationToken = string.Empty;
    IEnumerable<string> clientStateHeader = new List<string>();
    string webhookClientState = ConfigurationManager.AppSettings["webhookclientstate"].ToString();

    if (Request.Headers.TryGetValues("ClientState", out clientStateHeader))
    {
        string clientStateHeaderValue = clientStateHeader.FirstOrDefault() ?? string.Empty;

        if (!string.IsNullOrEmpty(clientStateHeaderValue) && clientStateHeaderValue.Equals(webhookClientState))
        {
            traceWriter.Trace(Request, "SPWebhooks",
                TraceLevel.Info,
                string.Format("Received client state: {0}", clientStateHeaderValue));

            var queryStringParams = HttpUtility.ParseQueryString(Request.RequestUri.Query);

            if (queryStringParams.AllKeys.Contains("validationtoken"))
            {
                httpResponse = new HttpResponseMessage(HttpStatusCode.OK);
                validationToken = queryStringParams.GetValues("validationtoken")[0].ToString();
                httpResponse.Content = new StringContent(validationToken);

                traceWriter.Trace(Request, "SPWebhooks",
                    TraceLevel.Info,
                    string.Format("Received validation token: {0}", validationToken));
                return httpResponse;
            }
            else
            {
                var requestContent = Request.Content.ReadAsStringAsync().Result;

                if (!string.IsNullOrEmpty(requestContent))
                {
                    SPWebhookNotification notification = null;

                    try
                    {
                        var objNotification = JsonConvert.DeserializeObject<SPWebhookContent>(requestContent);
                        notification = objNotification.Value[0];
                    }
                    catch (JsonException ex)
                    {
                        traceWriter.Trace(Request, "SPWebhooks",
                            TraceLevel.Error,
                            string.Format("JSON deserialization error: {0}", ex.InnerException));
                        return httpResponse;
                    }

                    if (notification != null)
                    {
                        Task.Factory.StartNew(() =>
                        {
                              //handle the notification here
                              //you can send this to an Azure queue to be processed later
                            //for this sample, we just log to the trace

                            traceWriter.Trace(Request, "SPWebhook Notification",
                                TraceLevel.Info, string.Format("Resource: {0}", notification.Resource));
                            traceWriter.Trace(Request, "SPWebhook Notification",
                                TraceLevel.Info, string.Format("SubscriptionId: {0}", notification.SubscriptionId));
                            traceWriter.Trace(Request, "SPWebhook Notification",
                                TraceLevel.Info, string.Format("TenantId: {0}", notification.TenantId));
                            traceWriter.Trace(Request, "SPWebhook Notification",
                                TraceLevel.Info, string.Format("SiteUrl: {0}", notification.SiteUrl));
                            traceWriter.Trace(Request, "SPWebhook Notification",
                                TraceLevel.Info, string.Format("WebId: {0}", notification.WebId));
                            traceWriter.Trace(Request, "SPWebhook Notification",
                                TraceLevel.Info, string.Format("ExpirationDateTime: {0}", notification.ExpirationDateTime));

                        });

                        httpResponse = new HttpResponseMessage(HttpStatusCode.OK);
                    }
                }
            }
        }
        else
        {
            httpResponse = new HttpResponseMessage(HttpStatusCode.Forbidden);
        }
    }

    return httpResponse;
}
Save the file.
Step 3: Debug the webhook receiver
- Select F5 to debug the webhook receiver.
- When you have the browser open, copy the port number from the address bar. For example:
http://localhost:<_port-number_>
Step 4: Run ngrok proxy
Open a console terminal.
Go to the extracted ngrok folder.
Enter the following with the port number URL from the previous step to start ngrok:
./ngrok http port-number --host-header=localhost:port-numberYou should see ngrok running.
Copy the Forwarding HTTPS address. You will use this address as the service proxy for SharePoint to send requests.
Step 5: Add webhook subscription using Postman
Get new access token
Postman makes it really simple to work with APIs. The first step is to configure Postman to authenticate with Azure AD so you can send API requests to SharePoint. You will use the Azure AD app that you registered in Step 1.
Open Postman. You are presented with a Sidebar and Request Editor.
Select the Authorization tab in the Request Editor.
Select OAuth 2.0 in the Type list.
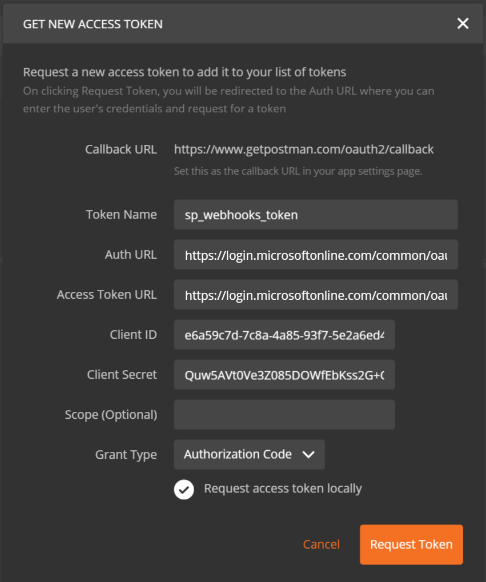
Select the Get New Access Token button.
In the dialog window, enter the following:
- Auth URL:
https://login.microsoftonline.com/common/oauth2/authorize?resource=https%3A%2F%2F<_your-sharepoint-tenant-url-without-https_>- Replace
your-sharepoint-tenant-url-without-httpswith your tenant url without the https prefix.
- Access Token URL:
https://login.microsoftonline.com/common/oauth2/token - Client Id: Client Id of the app you registered previously in Step one.
- Client Secret: Client Secret of the app you registered previously in Step one.
- Token name: sp_webhooks_token
- Grant type: Authorization Code
- Auth URL:
Select the Request Token to sign in, consent, and get the token for the session.
When the token is successfully retrieved, you should see access_token variable added to the Authorization tab.
Select the option to Add token to header.
Double-click the access_token variable to add the token to the header for the request.
Get Documents list Id
You need to manage webhooks for the default document library, which is provisioned in your default site collection under the name Documents. Get the Id of this list by issuing a GET request:
Enter the following request URL:
https://site-collection/_api/web/lists/getbytitle('Documents')?$select=Title,IdReplace site-collection with your site collection.
Postman executes your request and if successful, you should see the result.
Copy the Id from the results. Later you will use the Id to make webhook requests.
Add webhook subscription
Now that you have the required information, construct the query and the request to add a webhook subscription. Use the request editor for the following steps:
Change the request to POST from GET.
Enter the following as the request URL:
https://site-collection/_api/web/lists('list-id')/subscriptionsReplace site-collection with your site collection.
Go to the Headers tab.
Make sure you still have the Authorization header. If not, you need to request a new access token.
Add the following header key > value pairs:
- Accept:
application/json;odata=nometadata - Content-Type:
application/json
- Accept:
Go to the Body tab and select raw format.
Paste the following JSON as the body:
{
  "resource": "https://site-collection/_api/web/lists('list-id')",
  "notificationUrl": "https://ngrok-forwarding-address/api/spwebhook/handlerequest",
  "expirationDateTime": "2016-10-27T16:17:57+00:00",
  "clientState": "A0A354EC-97D4-4D83-9DDB-144077ADB449"
}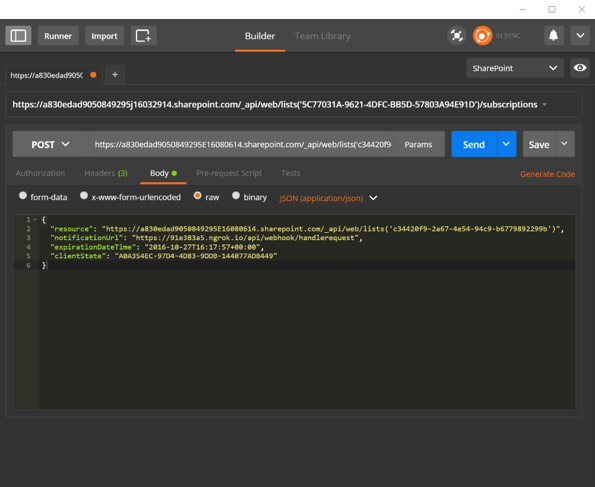
Make sure the expirationDateTime is at most 6 months from today.
Make sure you are debugging the webhook receiver as in Step 4.
Select Send to execute the request.
If the request is successful, you should see the response from SharePoint that provides the subscription details. The following example shows a response for a newly created subscription:
{
  "clientState": "A0A354EC-97D4-4D83-9DDB-144077ADB449",
  "expirationDateTime": "2016-10-27T16:17:57Z",
  "id": "32b95d9-4d20-4a17-bfa3-2957cb38ead8",
  "notificationUrl": "https://85557d4b.ngrok.io/api/spwebhook/handlerequest",
  "resource": "c34420f9-2ad7-4e54-94c9-b67798d2299b"
}
Copy the subscription id. You will need it for the next set of requests.
Go to the webhook receiver project in Visual Studio and examine the Output window. You should see the trace logs that look similar to the following trace, along with other messages:
iisexpress.exe Information: 0 : Message='Received client state: A0A354EC-97D4-4D83-9DDB-144077ADB449'
iisexpress.exe Information: 0 : Message='Received validation token: daf2803c-43cf-44c7-8dff-7066eaa40f13'
The trace indicates that the webhook received initially received a validation request. If you look at the code, you'll see that it returns the validation token immediately so that SharePoint can validate the request:
if (queryStringParams.AllKeys.Contains("validationtoken"))
{
  httpResponse = new HttpResponseMessage(HttpStatusCode.OK);
  validationToken = queryStringParams.GetValues("validationtoken")[0].ToString();
  httpResponse.Content = new StringContent(validationToken);

  traceWriter.Trace(Request, "SPWebhooks",
    TraceLevel.Info,
    string.Format("Received validation token: {0}", validationToken));
  return httpResponse;
}
Step 6: Get subscription details
Now you'll run queries in Postman to get the subscription details.
Open the Postman client.
Change the request to GET from POST.
Enter the following as the request:
https://site-collection/_api/web/lists('list-id')/subscriptionsReplace site-collection with your site collection.
Select Send to execute the request.
If successful, you should see SharePoint return the subscriptions for this list resource. Because we just added one, you should at least see one subscription returned. The following example shows a response with one subscription:
{
  "value": [
    {
      "clientState": "A0A354EC-97D4-4D83-9DDB-144077ADB449",
      "expirationDateTime": "2016-10-27T16:17:57Z",
      "id": "32b95add-4d20-4a17-bfa3-2957cb38ead8",
      "notificationUrl": "https://85557d4b.ngrok.io/api/spwebhook/handlerequest",
      "resource": "c34420f9-2a67-4e54-94c9-b67798229f9b"
    }
  ]
}
Run the following query to get details of the specific subscription:
https://site-collection/_api/web/lists('list-id')/subscriptions('subscription-id')Replace
subscription-idwith your subscription id.
Step 7: Test webhook notification
Now add a file to the Documents library and test if you get a notification from SharePoint in the webhook receiver.
Go to Visual Studio.
In the SPWebhookController, place a breakpoint on the following line of code:
var requestContent = Request.Content.ReadAsStringAsync().Result;Go to the Documents library. It is named Shared Documents library in your default site collection.
Add a new file.
Go to Visual Studio and wait for the breakpoint to be hit.
The wait time may vary from a few seconds to up to five minutes. When the breakpoint is hit, the webhook receiver has just received a notification from SharePoint.
Select F5 to continue.
To see the notification data, look in the Output window for the following entries, since you added the notification data into the trace log:
iisexpress.exe Information: 0 : Message='Resource: c34420f9-2a67-4e54-94c9-b6770892299b'
iisexpress.exe Information: 0 : Message='SubscriptionId: 32b95ad9-4d20-4a17-bfa3-2957cb38ead8'
iisexpress.exe Information: 0 : Message='TenantId: 7a17cb7d-6898-423f-8839-45f363076f06'
iisexpress.exe Information: 0 : Message='SiteUrl: /'
iisexpress.exe Information: 0 : Message='WebId: 62b80e0b-f889-4974-a519-cc138413be40'
iisexpress.exe Information: 0 : Message='ExpirationDateTime: 2016-10-27T16:17:57.0000000Z'
This project only writes the information to the trace log. However, in your receiver, you send this information into a table or a queue that can process the received data to get information from SharePoint.
With this data, you can construct the URL and use the GetChanges API to get the latest changes.
Next steps
In this article, you used Postman client and a simple web API to subscribe and receive webhook notifications from SharePoint.
Next, take a look at SharePoint webhooks sample reference implementation, which shows an end-to-end sample that uses Azure Storage Queues to process the information, get changes from SharePoint, and push those changes back into a SharePoint list.