Note
Access to this page requires authorization. You can try signing in or changing directories.
Access to this page requires authorization. You can try changing directories.
You can configure the list form in a list or library with a custom header, footer and the form body with one or more sections with fields in each of those sections. The form configuration does not change the data in the list item or file; it only changes how the form is displayed to users who browse the list or library. Anyone who can create and manage views in a list can use form configuration to configure the form with header, footer, and body with sections.
To configure a form, you will use JSON formatters that you are already familiar with when formatting a column or a view in a list or library. Form configuration allows for certain predefined elements and attributes to build the custom header, footer, and body with one or more sections.
Important
Content Type Hub Considerations: Custom form formatting JSON is stored on the list content type. Be sure that the content type you are customizing is set to allow edits at the site or list content type level before applying custom form formatting. This is highly likely to impact you if you are working with content types consumed from the content type hub, as these are read-only by default. You may need to temporarily set the content type to "Edit mode," apply your formatting, then return it to "Read mode."
Get started
To configure the form in a list or library:
Go to the list or library for which you want to configure the form.
If you are in a list:
- Open an item to view the item details in the display form.
If you are in a document library:
- Select a file.
- Select ...
- Select More
- Select Properties
At the top of the form, expand Edit Form icon and then select Configure layout
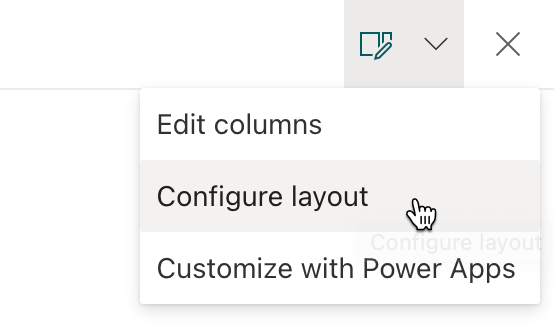
In the Format pane, you can choose to apply formatting to the following form sections:
- Header
- Body
- Footer
Configure custom header
To apply formatting to the header, select Header in the Apply formatting to dropdown.
Paste your custom header formatter in the JSON text input area.
Note
Form configuration allows for certain predefined elements and attributes to build the custom header.
Below is an example of a custom header & JSON:
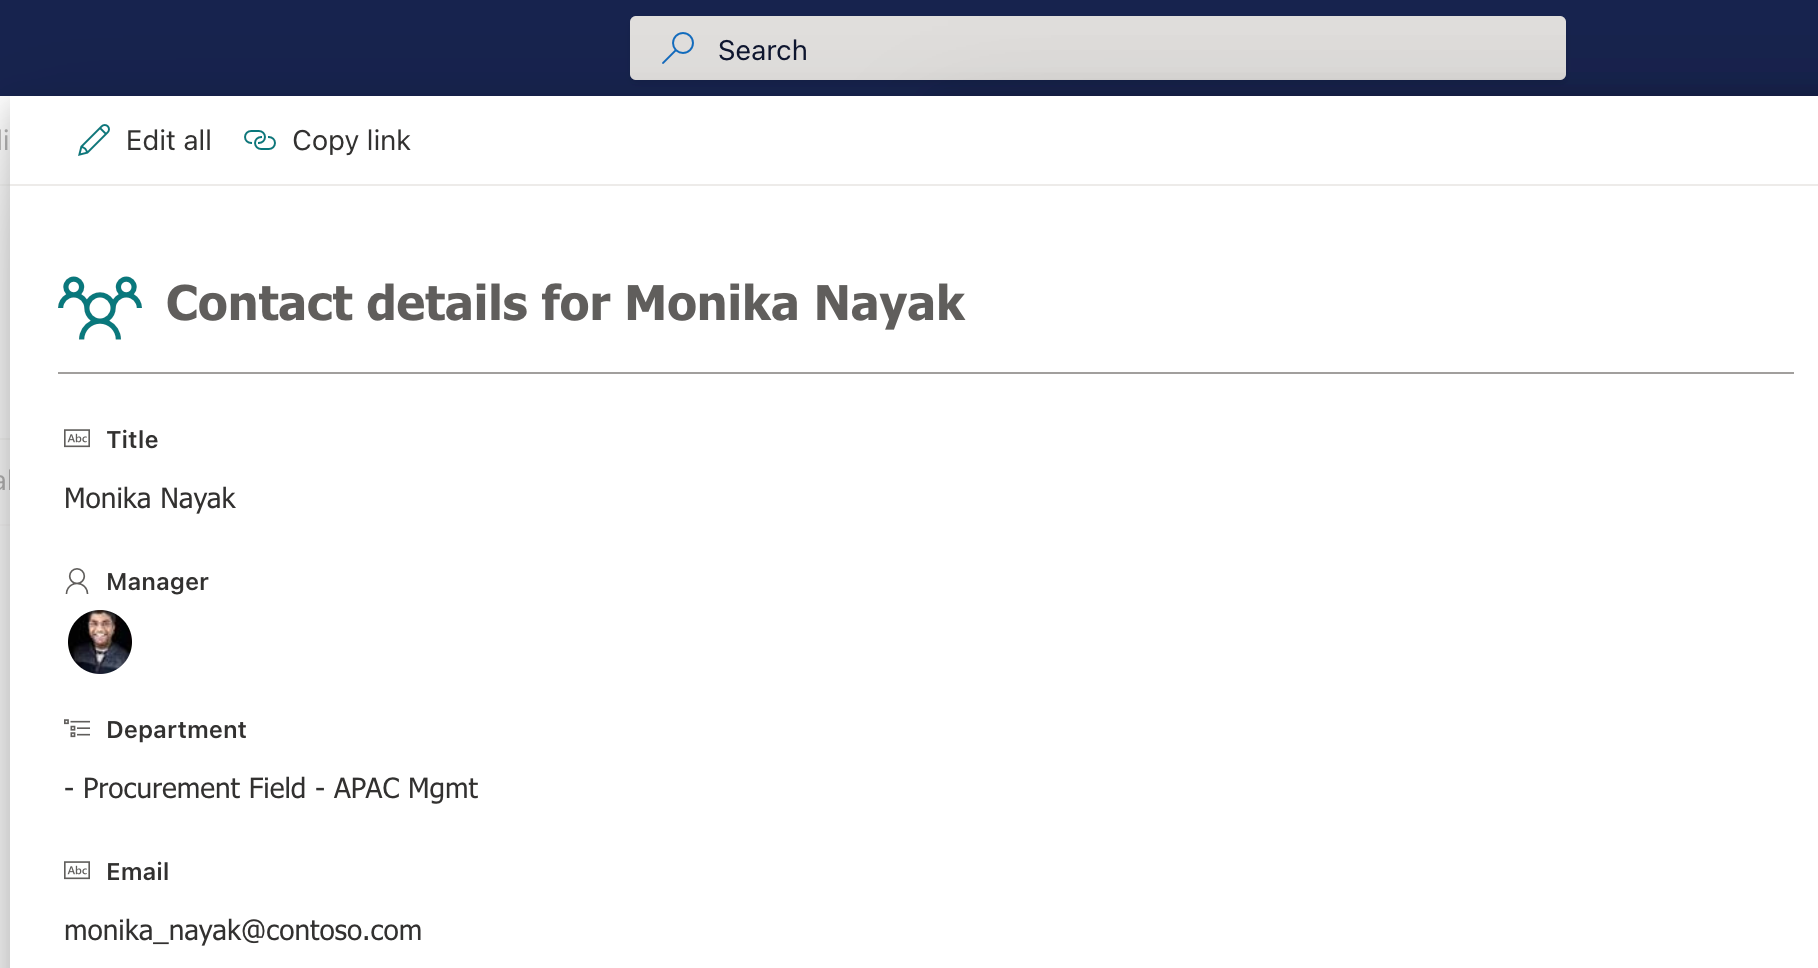
{
  "elmType": "div",
  "attributes": {
    "class": "ms-borderColor-neutralTertiary"
  },
  "style": {
    "width": "99%",
    "border-top-width": "0px",
    "border-bottom-width": "1px",
    "border-left-width": "0px",
    "border-right-width": "0px",
    "border-style": "solid",
    "margin-bottom": "16px"
  },
  "children": [
    {
      "elmType": "div",
      "style": {
        "display": "flex",
        "box-sizing": "border-box",
        "align-items": "center"
      },
      "children": [
        {
          "elmType": "div",
          "attributes": {
            "iconName": "Group",
            "class": "ms-fontSize-42 ms-fontWeight-regular ms-fontColor-themePrimary",
            "title": "Details"
          },
          "style": {
            "flex": "none",
            "padding": "0px",
            "padding-left": "0px",
            "height": "36px"
          }
        }
      ]
    },
    {
      "elmType": "div",
      "attributes": {
        "class": "ms-fontColor-neutralSecondary ms-fontWeight-bold ms-fontSize-24"
      },
      "style": {
        "box-sizing": "border-box",
        "width": "100%",
        "text-align": "left",
        "padding": "21px 12px",
        "overflow": "hidden"
      },
      "children": [
        {
          "elmType": "div",
          "txtContent": "='Contact details for ' + [$Title]"
        }
      ]
    }
  ]
}
To preview your changes, click the Preview button.
To save your changes, click the Save button.
Close and open the form again to view the custom header.
Configure custom footer
To apply formatting to the footer, in the Format pane, select Footer in the Apply formatting to dropdown.
Paste your custom footer formatter in the JSON text input area.
Note
Form configuration allows for certain predefined elements and attributes to build the custom footer.
Below is an example of a custom footer & JSON:
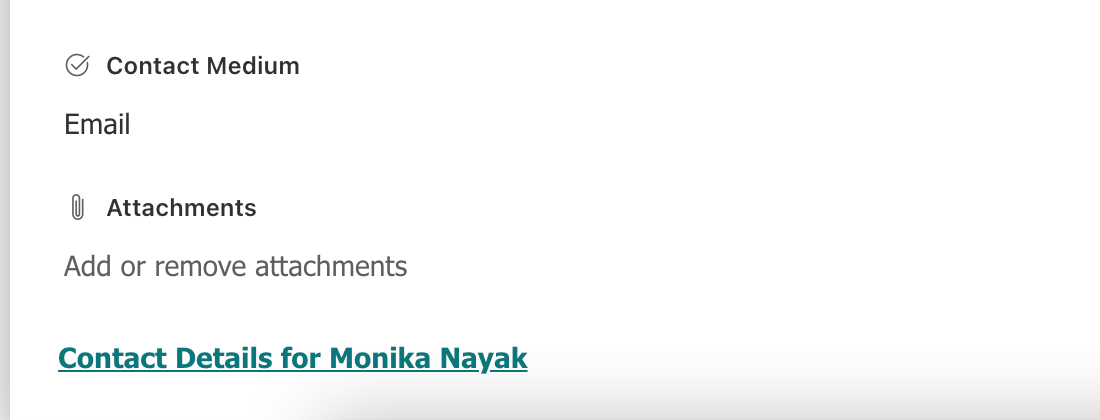
{
    "elmType": "div",
    "style": {
        "width": "100%",
        "text-align": "left",
        "overflow": "hidden",
        "border-top-width": "1px"
    },
    "children": [
        {
            "elmType": "div",
            "style": {
                "width": "100%",
                "padding-top": "10px",
                "height": "24px"
            },
            "children": [
                {
                    "elmType": "a",
                    "txtContent": "='Contact Details for ' + [$Title]",
                    "attributes": {
                        "target": "_blank",
                        "href": "='https://aka.ms/contacts?email=' + [$Email]",
                        "class": "ms-fontColor-themePrimary ms-borderColor-themePrimary ms-fontWeight-semibold ms-fontSize-m ms-fontColor-neutralSecondary–hover ms-bgColor-themeLight–hover"
                    }
                }
            ]
        }
    ]
}
To preview your changes, click the Preview button.
To save your changes, click the Save button.
Close and open the form again to view the custom footer.
Configure custom body with one or more sections
To apply formatting to the body, in the Format pane, select Body in the Apply formatting to dropdown.
Paste your custom body formatter in the JSON text input area.
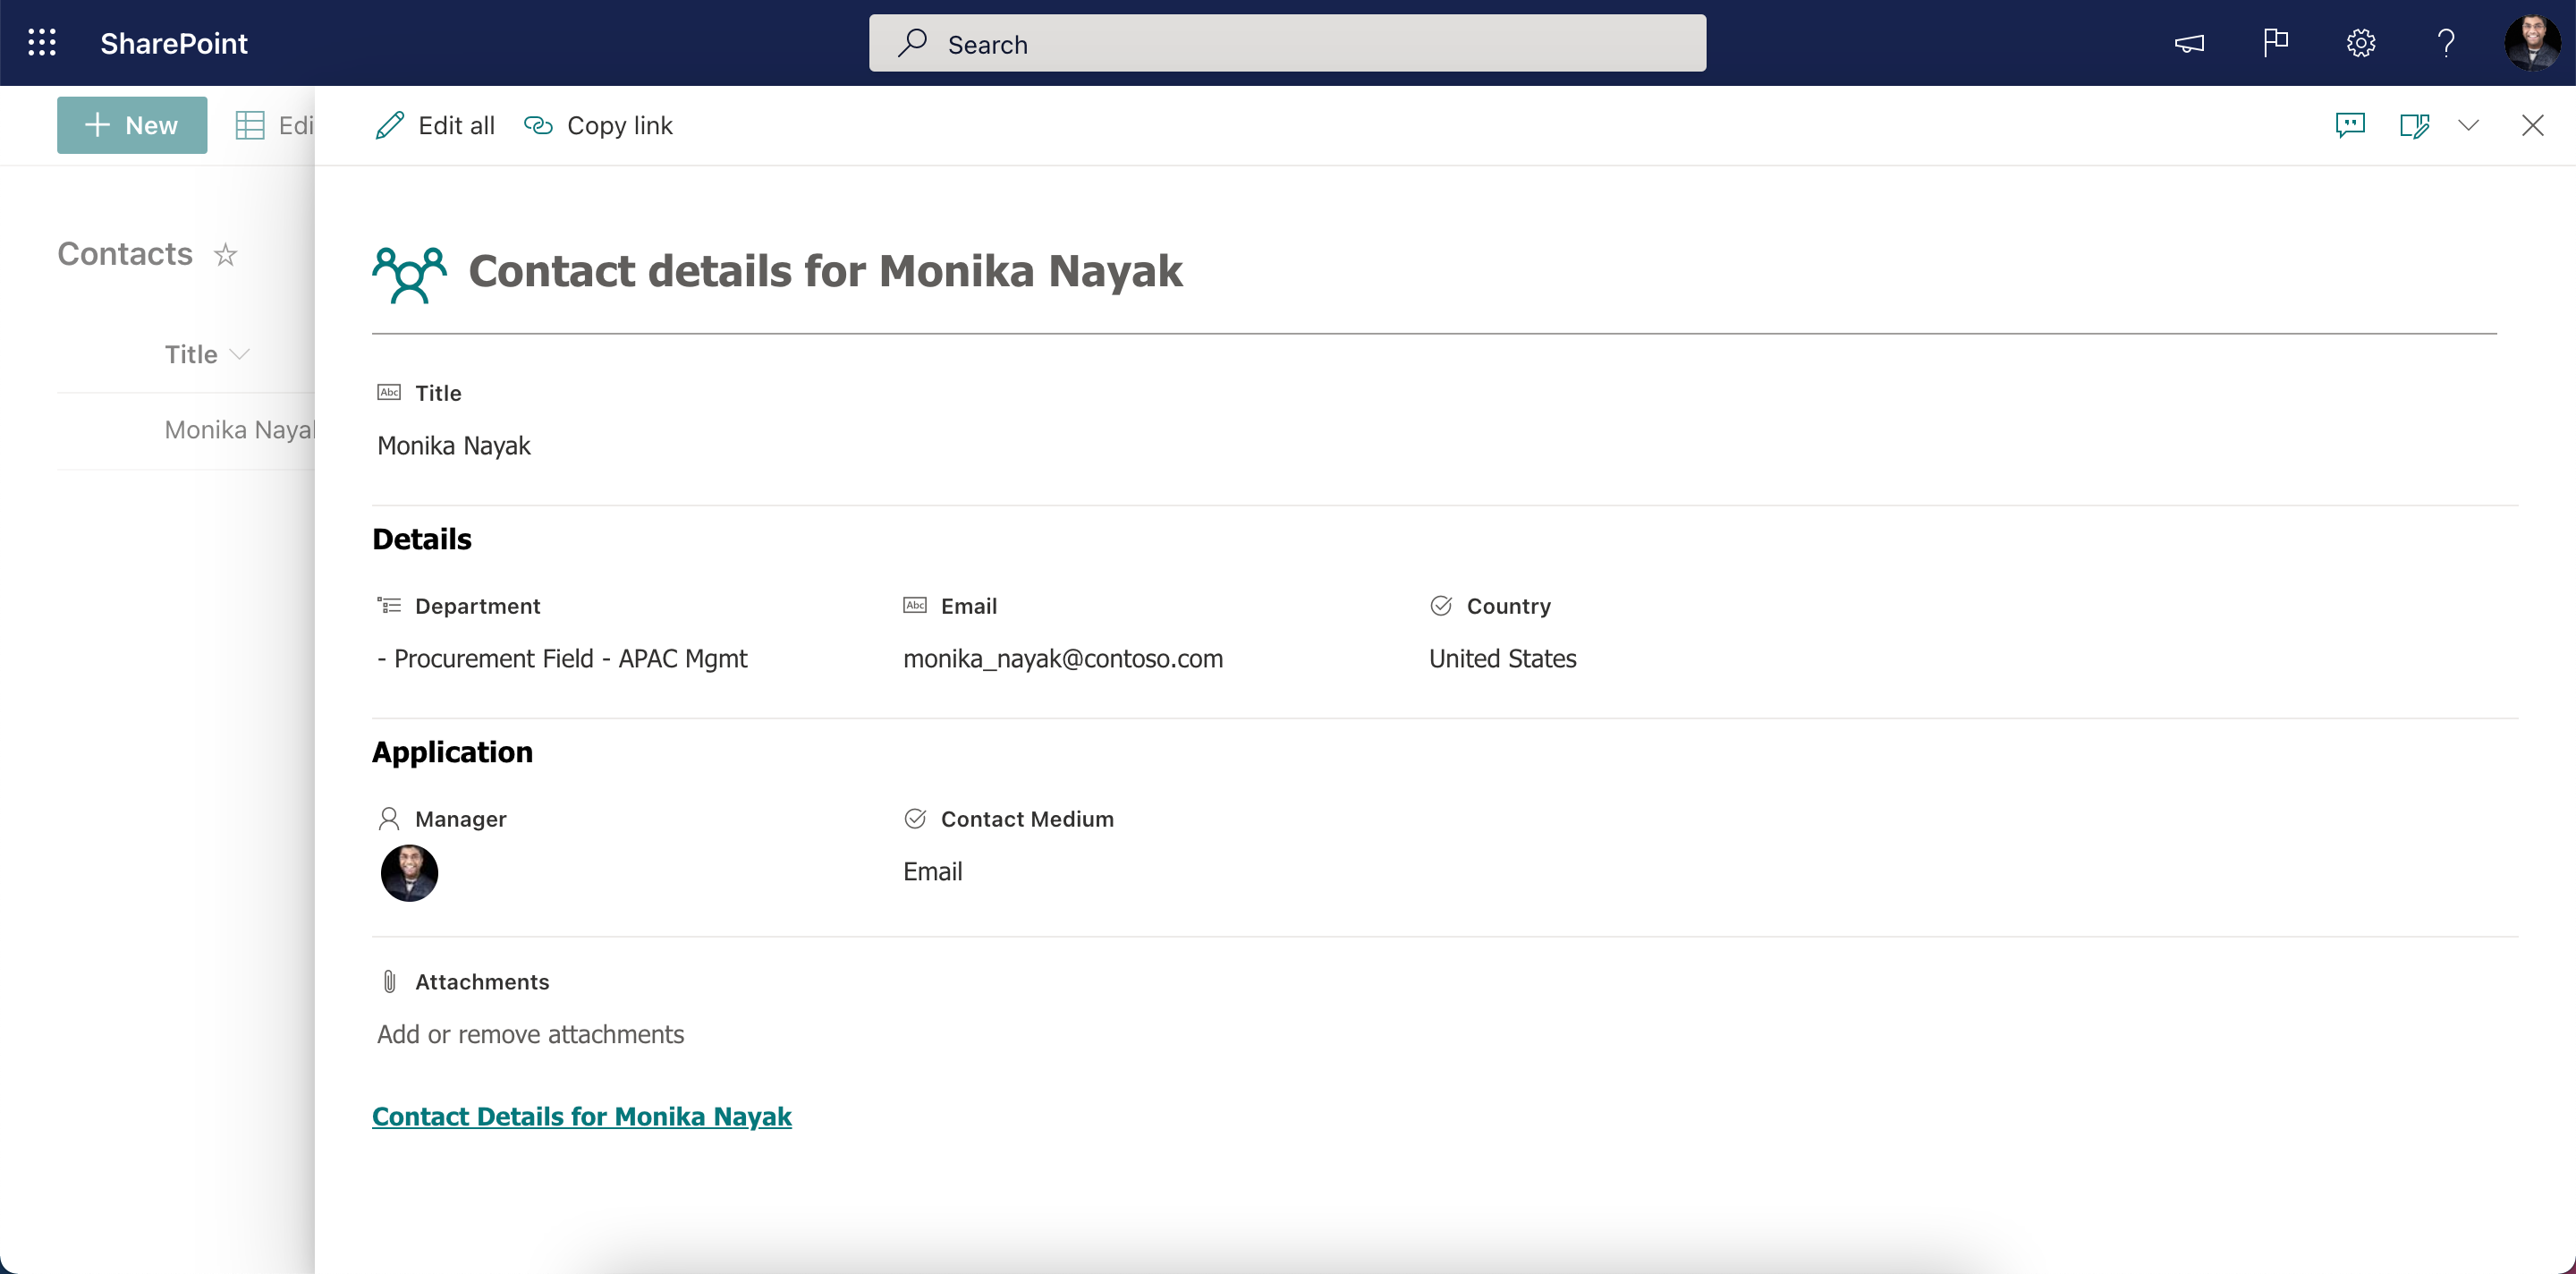
Unlike the header and the footer, body configuration only allows defining one or more sections and adding one or more columns into each of those sections.
- One or more sections can be defined for a body.
- Each section can reference one or more columns in the list or library.
- A column can be referenced only in one section.
- If a column is referenced in multiple sections, the first section where the column is referenced will take precedence.
- A column not referenced in any of the sections will be automatically referenced in the last section.
- New columns added will be automatically referenced in the last section.
Below is the JSON structure to get started with defining sections and referencing columns in the sections:
{
  "sections": [
    {
      //give a display name for the section
      "displayname": "",
      "fields": [
        //reference your fields here using their display name
        "Title"
      ]
    },
    {
      //give a display name for the section
      "displayname": "",
      "fields": [
        //reference your fields here using their display name
      ]
    }
  ]
}
Below is an example of a custom body JSON with sections:
{
  "sections": [
    {
      "displayname": "",
      "fields": [
        "Title"
      ]
    },
    {
      "displayname": "Details",
      "fields": [
        "Department",
        "Email",
        "Country"
      ]
    },
    {
      "displayname": "Application",
      "fields": [
        "Application Id",
        "Approver",
        "Reviewer"
      ]
    }
  ]
}
Once the body is customized with one or more sections, the list or library form will switch to a multi-column layout.
Note
Configuring form body will switch your list or library form layout from single-column to a multi-column layout. We will add support for configuring the body with single-column layout in a future update.
To preview your changes, click the Preview button.
To save your changes, click the Save button.
Close and open the form again to view the custom body.
Custom Formatter for Read-Only Fields
Introduction
Microsoft Lists offers a powerful way to organize information and collaborate with your team. With the rise of AI-based list item creation, users often need to view but not edit certain fields — like system-generated data or bot-added details. To meet this need, a new custom formatter feature is proposed to allow fields to appear as read-only in list forms.
Why Read-Only Fields Matter
Currently, read-only fields are hidden from New Item and Edit forms. This creates challenges when AI bots or automated processes create items containing critical data that users need to see but not modify. For example:
- A bot creates a customer service ticket with Issue details Issue Title, Issue Description.
- Users should see this information to take actions (e.g., send an email), but not be able to change it.
The new custom formatter solves this by allowing these fields to display as read-only.
How the Custom Formatter Works
The custom formatter introduces a new JSON configuration to mark fields as read-only in the form views.
JSON Structure
{
    "sections": [{}],
    "fieldsettings": [
        {
            "name": "fieldName",
            "readonly": true
        }
    ]
}
- name: The internal name of the field.
- readonly: When set to true, the field is displayed as read-only.
Behavior in Different Form Views
The custom formatter ensures a consistent user experience:
- New Item form: The read-only field will not be shown.
- Edit form: The field is displayed without an editable textbox, similar to a Calculated Column.
- Edit all mode: The field remains visible and uneditable.
The Save button works as expected — no accidental modifications to the read-only fields.
Example Use Case
Imagine a CRM bot creating tickets with pre-filled Issue details. Using this formatted:
- Issue Title (read-only): Users can see and copy the Issue Title but can't modify it.
- Issue Description (read-only): Users can see and copy the Issue Description but can't modify it.
- Issue Source (read-only): Users can click on the Issue source link but can't modify it.