Note
Access to this page requires authorization. You can try signing in or changing directories.
Access to this page requires authorization. You can try changing directories.
Walk through the process of creating a workflow SharePoint Add-in using Microsoft Visual Studio 2012.
Note
SharePoint 2010 workflows have been retired since August 1, 2020 for new tenants and removed from existing tenants on November 1, 2020. If you’re using SharePoint 2010 workflows, we recommend migrating to Power Automate or other supported solutions. For more info, see SharePoint 2010 workflow retirement.
Prerequisites
This development scenario presumes that a SharePoint farm and a Workflow Manager 1.0 farm are installed and paired. These two farms can be located on the same or on separate server computers. The scenario further presumes that workflow development is taking place remotely - that is, on a computer separate from either of the server computers - and is using Microsoft Visual Studio 2012 or later.
- On the server platforms:
- Windows Server 2008 R2.
- Microsoft SharePoint
- Workflow Manager 1.0
- On the development platform:
Microsoft Visual Studio 2012 or later.
Office Developer Tools for Visual Studio 2013.
Note
Office Developer Tools for Visual Studio 2013 is only required when using Visual Studio 2012. Later versions of Visual Studio include the Office Developer Tools.
For assistance setting up and configuring your SharePoint workflow development environment, see the following:
- Prepare to set up and configure a SharePoint workflow development environment
- Configure workflow in SharePoint
- Video series: Install and configure Workflow in SharePoint
Get started
A common workflow scenario in business settings is the document review and approval process. In this walkthrough, we create an SharePoint Add-in that automates the routing, notifications, and approval (or rejection) of a document using a SharePoint workflow. We create this workflow using the SharePoint workflow designer in Microsoft Visual Studio 2012.
Here's a flowchart that shows the course of the workflow we're going to create.
Figure 1. Flowchart showing the document approval workflow.
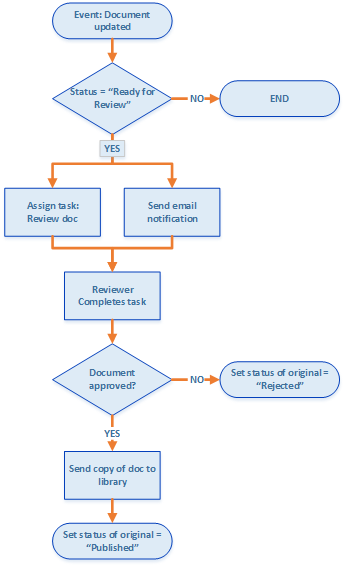
In summary, the workflow does the following:
- A document change event associated with a specific document library launches the workflow instance.
- If the document's status is set to "Ready For Review," the workflow assigns a task to a prearranged reviewer, then sends the reviewer an email notification about the task.
- If the reviewer fails to approve the document, the document file remains in the Draft Documents library; however, the document status is set to "Rejected."
- If the reviewer approves the document, the workflow copies the document into a Published Documents library. The original file remains in the Draft Documents library, but its status is set to "Published."
Important
Before you start this walkthrough, ensure that you have a properly installed and configured workflow development environment. For more information, see Prepare to set up and configure a SharePoint workflow development environment. Also, ensure that you have a SharePoint instance that you can develop your workflow against. For more information, see Install SharePoint.
Prepare your environment
The first step is preparing our SharePoint site with document libraries that our workflow will use.
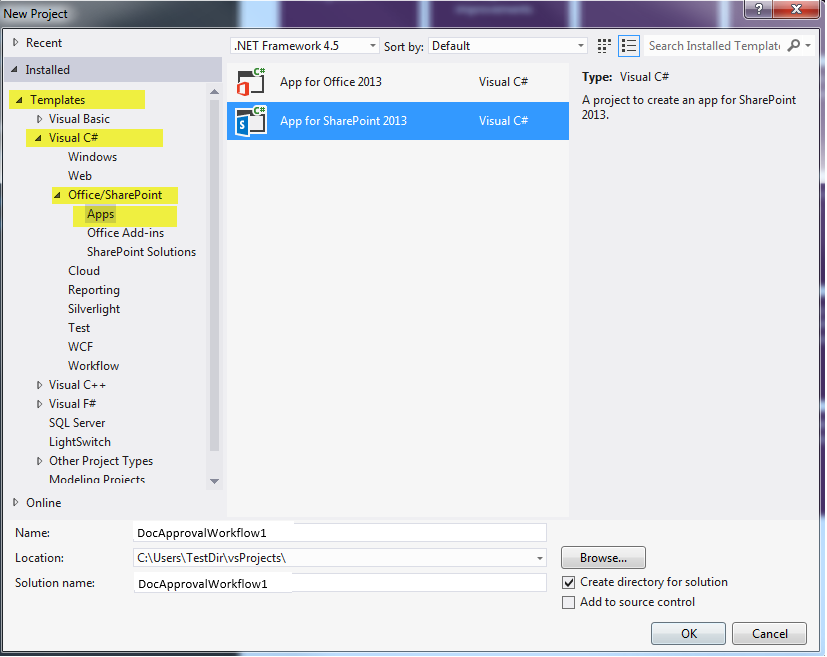
Launch Visual Studio 2012 and create a new project using the App for SharePoint template, as shown in Figure 2.
Note
In this walkthrough, the solution file is named "DocApprovalWorkflow1". It is recommended that you use the same name. However, if you name your solution differently, be sure that you make necessary adjustments in the instructions that follow.
Figure 2. Create new project in Visual Studio 2012
On your associated SharePoint site, create two new document libraries by doing the following:
- In Solution Explorer, right-click on the "DocApprovalWorkflow1" icon and select Add > New Item and then select List.
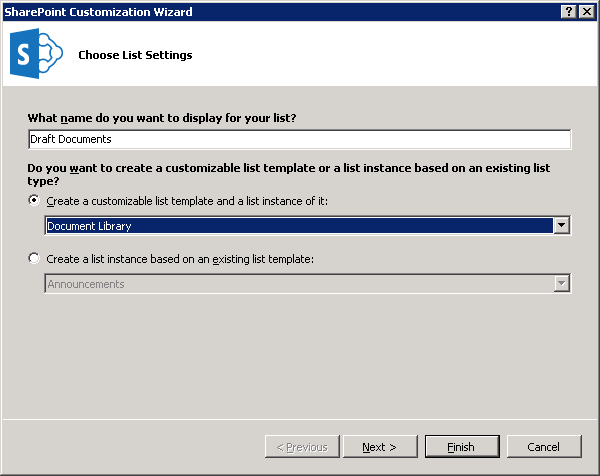
- In the resulting SharePoint Customization Wizard, enter "Draft Documents" in the name field; then select "Document Library" in the drop-down under the first radio button, as shown in Figure 3.
- Click Next, then take default settings, and then click Finish.
Figure 3. SharePoint customization wizard for List settings.
Create the second document library using the same steps as above, except name this second library "Published Documents".
Add two custom columns to both of the new document libraries that you created:
- Create a custom column named "Approver" and make it a Person or Group list column type.
- Create a custom column named "Document Status" and make it a Choice list column type (see Figure 4).
On the Document Status column, add five choices by expanding the Type property in the property grid, then clicking the ellipsis button (…) on the Items property. Enter the choice values in the dialog box that appears, as shown in Figure 4.
- Draft in Progress
- Ready for Review
- Approved for Publishing
- Rejected
- Published

Create the basic workflow
Now we're ready to create the workflow itself.
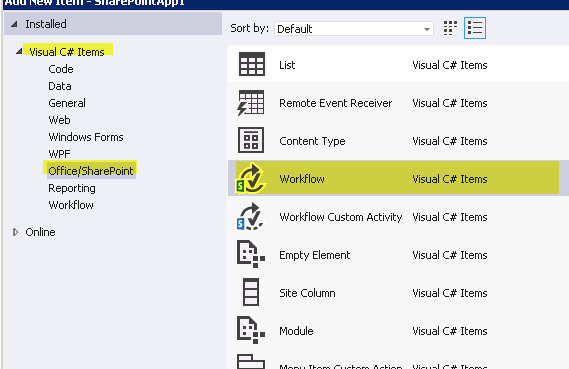
In Visual Studio, create a new workflow by right-clicking on the DocApprovalWorkflow1 icon (in Solution Explorer) and selecting Add > New Item, and then selecting Workflow (see Figure 5).
Figure 5. Add New Item > Workflow wizard.
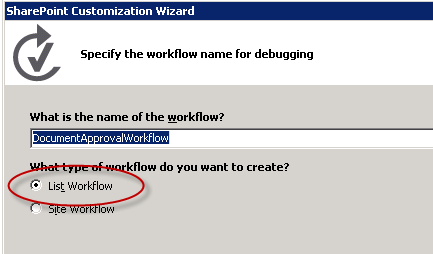
When prompted, name the workflow "DocumentApprovalWorkflow" and select List Workflow as the workflow type (see Figure 6).
Figure 6. Specify workflow name and type.
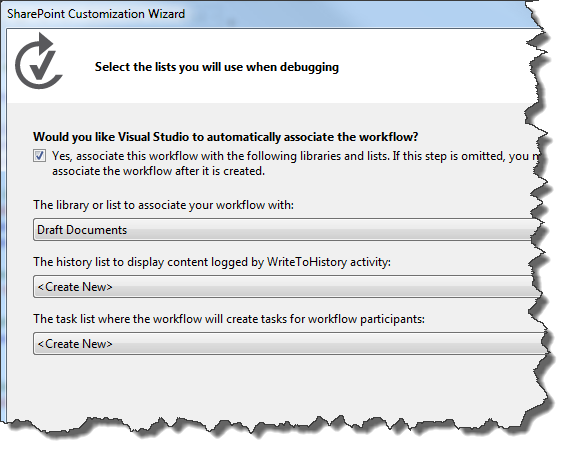
In the SharePoint Customization Wizard, associate the new workflow with the Draft Document library; then, opt to create a new history list and a new workflow task list, as shown in Figure 7. Then click Next.
Figure 7. Completing the SharePoint Customization Wizard for the new workflow.
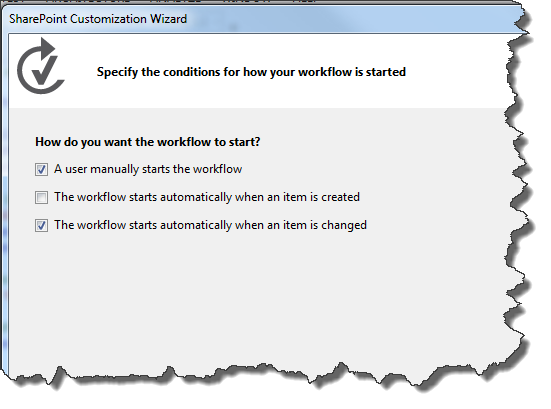
Set the workflow to start automatically when an item in the Draft Documents library is changed. You can also leave the check box for manually starting the workflow selected; this allows you to easily test the workflow without needing to change a document. See Figure 8.
Figure 8. Set the activation parameters for the workflow.
Note
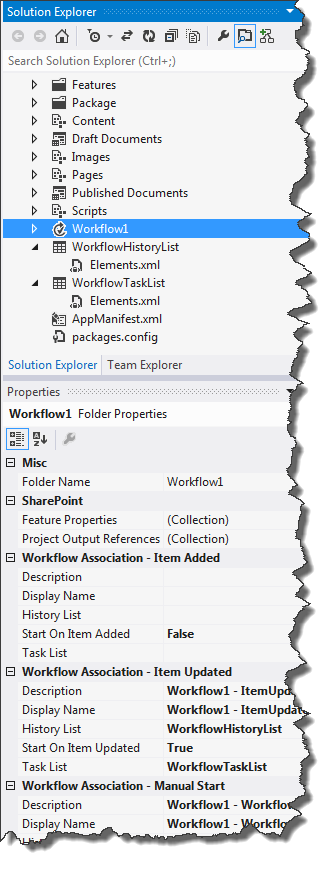
You can change the workflow association type after the workflow has been created by using the property grid with the workflow selected in Solution Explorer (see Figure 9). Then click Finish.
Figure 9. The workflow property grid.
Finally, configure your SharePoint Server to manage outgoing email using the SMTP service. For instructions, see Configure outgoing email for a SharePoint farm. This is necessary to allow the workflow to send email notifications related to workflow tasks.
Implement the workflow logic
Now that we have our SharePoint Server set up and our basic workflow created, we can now design the workflow logic.
Open the workflow designer by double-clicking on the workflow project item in Solution Explorer. You'll see the workflow designer surface (and the workflow toolbox); the designer is populated with an initial workflow stage named Sequence.
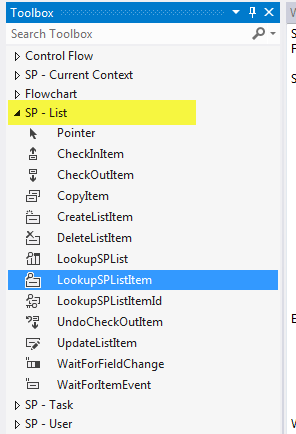
Our first step is to grab the LookupSPListItem activity from the toolbox (see Figure 10) and drop it in the Sequence stage on the designer surface. We use this activity to get the status of the document at any given time, which the LookupSPListItem activity returns as a DynamicValue object that contains a set of SharePoint list item properties as key-value pairs.
Figure 10. LookupSPListItem activity selector.
To configure the LookupSPListItem activity, first click on it in the designer to select it. This activates the property grid for the activity.
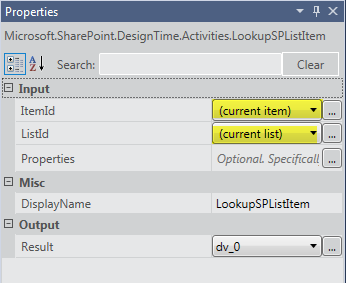
Use the combo boxes in the property grid to configure the LookupSPListItem activity to use "current item" for ItemId and "current list" as ListId, as shown in Figure 11.
Figure 11. Configuring LookupSPListItem properties.
On the LookupSPListItem activity tile, click the Get Properties link. This completes two important steps for you:
- First, it creates a variable of type DynamicValue and binds it to the out-argument (named Result) of the LookupSPListItem activity. Properties of the list item are stored in this variable.
- Second, it adds a new activity named GetDynamicValueProperties (see Figure 12) and sets the newly created DynamicValue variable as the in-argument of this new activity. This activity lets you extract the list item properties from the DynamicValue variable.
On the GetDynamicValueProperties activity, click on Define… to open a dialog box that lets you pick the properties you wish to extract. In selecting properties, refer to Figure 12, which shows a portion of the designer surface merged with the open Properties dialog box.
Figure 12. Selecting the DynamicValue properties that you wish to extract.
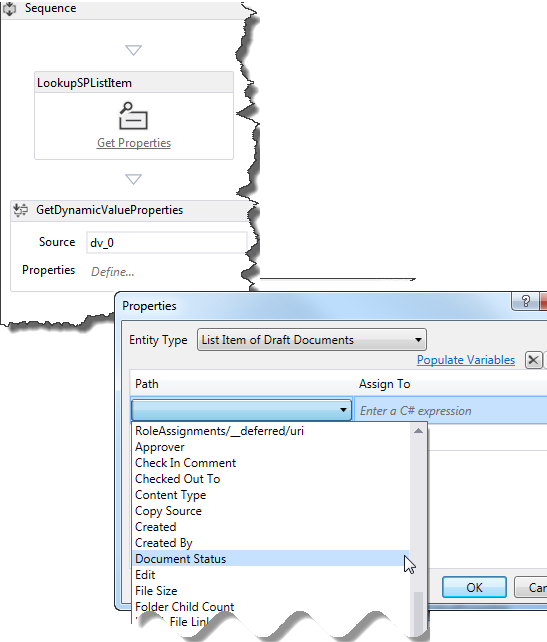
For Entity Type, select List Item of Draft Documents.
In the data grid, in the Path column, click Create Property to open a combo box that contains available properties for list items in the Draft Documents library. Select Document Status from the combo box.
On the next row in the data grid, click Create Property again; this time, select Approver from the combo box.
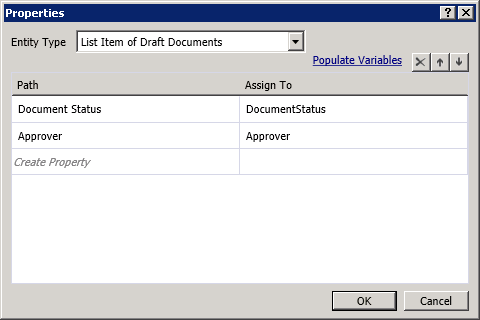
Now click the Populate Variables link on the dialog box. This creates a variable of the appropriate data type for each row and assigns it in the Assign To column of the data grid, as shown in Figure 13.
Figure 13. Get Document Status and Approver properties.
We now have the list item values that we need. Next step is to set up the workflow to check whether the document is "ready for review" and to take the appropriate action when it is.
From the toolbox, drag the If activity onto the workflow designer surface. (You'll find the If activity in the Control Flow section of the toolbox.)
Set the If condition to
DocumentStatus.Equals("Ready for Review"), as shown in Figure 14.Figure 14. Creating an If/Then clause to trigger a task.
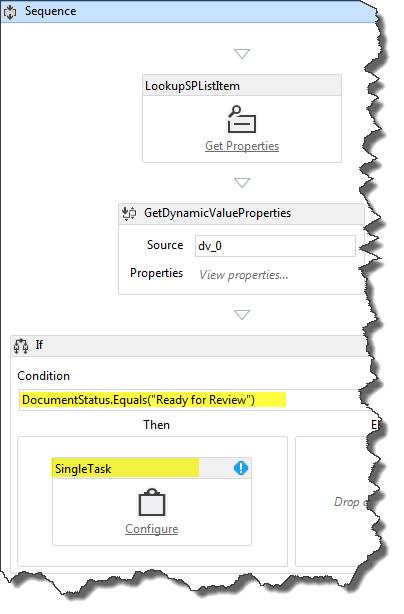
Next, from the SP - Task section of the toolbox, drag a SingleTask activity and drop it in the Then box of your If activity. In effect, you've configured the workflow such that If the document is ready for review, Then it will then complete this task.
Our next step is to configure the task that we just created using the configuration dialog box, shown in Figure 15.
Figure 15. Task configuration dialog box.
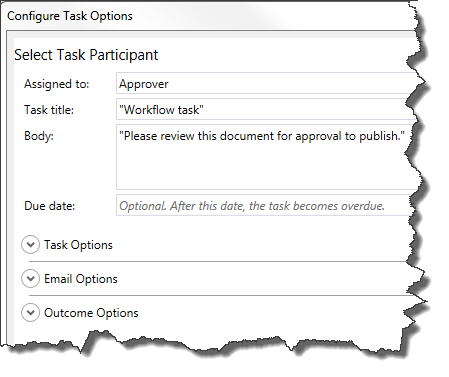
First, we assign the task to an approver. To do this, click the Configure link in the SingleTask activity tile.
Set the Assigned to: field to "Approver".
Notice that the Task title: field is automatically populated with "Workflow task".
In the Body: field, enter a message with instructions for the approver, such as "Please review this document for approval to publish."
Click OK to save.
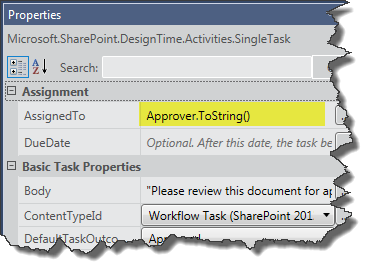
Notice that at this point you have a validation error on the SingleTask activity. With the SingleTask tile selected, look at the AssignedTo property in the property grid and note that it has an error icon. Hover over the property name to see a tooltip that describes the problem. We see that the AssignedTo property expects a String value; however, the Approver variable is of Int32 data type.
To correct this error, cast the variable to a String data type by appending ".ToString()" to "Approver" in the AssignedTo row on the property grid, as shown in Figure 16.
Figure 16. Casting the "Approver" variable to string data type in the property grid.
At the present point in this walkthrough, you have created and configured a workflow task that does two things: It sets a document to be reviewed, but also sends an email to the task assignee (the "Approver" in this case) notifying him or her that a task has been assigned and is waiting for actions.
Let's look at the property grid for the SingleTask activity. Scroll to the bottom of the property grid and note in the Output section there are two properties, Outcome and TaskItemId, which are out-arguments.
Note the name of the Outcome variable: outcome_0 (or similar). We use this variable to check the outcome of the task - that is, whether the approver has approved or rejected the document.
Note
The Outcome out-argument returns an Int32 value corresponding to the index of the outcome - that is, 0 for "Approved" and 1 for "Rejected". These integers are the default values provided in the out-of-the-box SharePoint site column named "Task Outcome."
Now, in order for the workflow to check the outcome of the task, we need to add another If activity and place it following the SingleTask activity, but inside the Then area, as shown in Figure 17. Setting the If condition to "
outcome_0 == 0" tells us whether the document was approved.Figure 17. Adding the IF activity to check the task status.
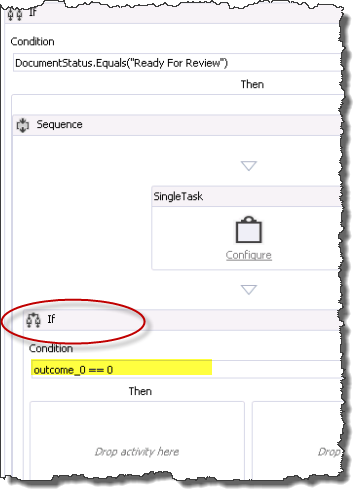
If the approver has set the task to "Approved," we update the document status to "Approved for Publishing," then copy the document file to the Published Documents library. Instead, if the approver has rejected the document, we need to set the document status to "Rejected."
In this new If activity, drag an UpdateListItem activity into the Then box.
Configure the UpdateListItem activity in its property grid such that ItemId is set to "(current item)" and ListId is set to "(current list)", as shown in Figure 18.
Next, with the UpdateListItem activity selected, click the ellipsis button (…) next to the ListItemPropertiesDynamicValue field in the property grid. This action opens a dialog box that allows you to specify which list item properties you want to update.
Figure 18. Setting the list item properties to update.
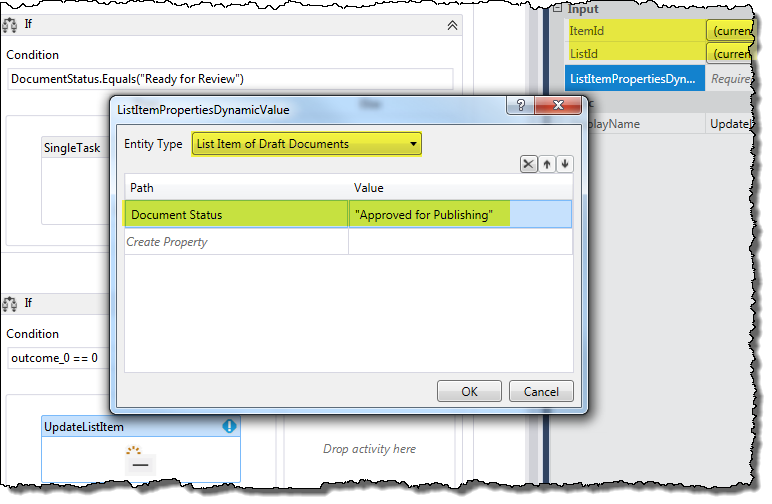
In the dialog box, first use the combo box to set Entity Type to List Item of Draft Documents (shown in Figure 18). Then, in the data grid, click Create Property and from the drop-down list select "Document Status." Then, under the Value column, type "Approved for Publication" (including quotation marks) and click OK.
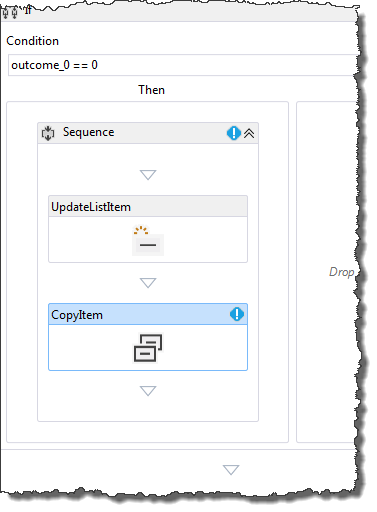
In the Then area of the current If activity, drag a CopyItem activity and place it directly below the UpdateListItem activity, as shown in Figure 19.
Figure 19. Adding a CopyItem activity to the workflow.
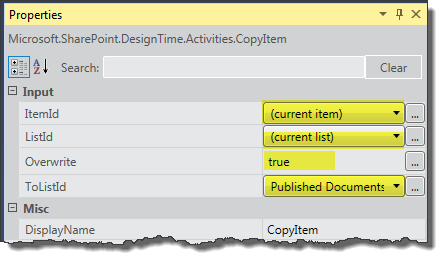
Then, configure properties of the CopyItem activity in the property grid as shown in Figure 20. Property values are highlighted.
Figure 20. Configuring the CopyItem activity.
Note
For the purpose of this walkthrough we are going to assume that all of our published documents come out of the Draft Documents library; therefore, we do not need to worry about controlling for duplicate file names.
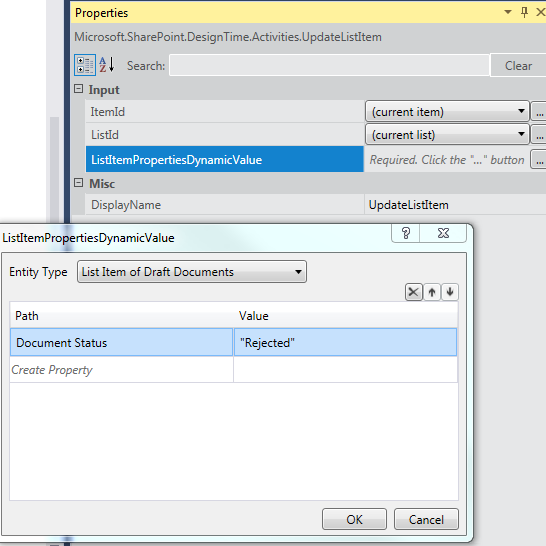
Finally, we need to add an activity to handle the case where the reviewer rejects the document. We do this by adding an UpdateListItem activity to the Else area of our current If activity. Configure this UpdateListItem activity just as you did the prior one in step 9(c), except that now we want to set the document status to "Rejected," as shown in Figure 21.
Figure 21. Configuring properties of UpdateListItem activity for rejected documents.
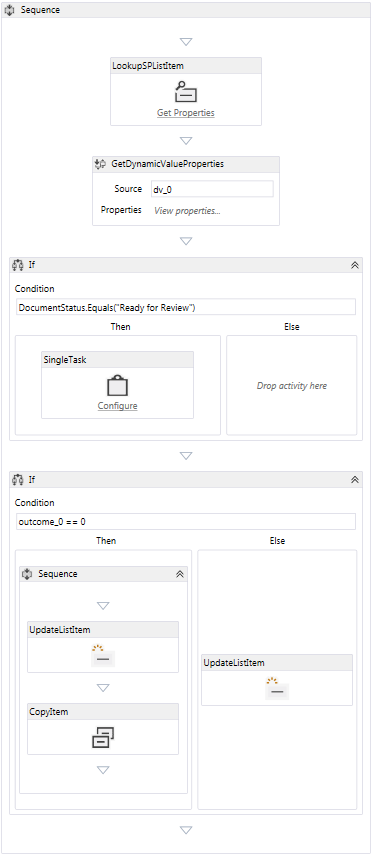
This completes "Creating a SharePoint document approval workflow." The completed workflow is shown in Figure 22.
Figure 22. Completed SharePoint document approval workflow.
Package and deploy the workflow
Following are resources that provide guidance for packaging and deploying your workflow as an SharePoint Add-in:
- Deploying and installing apps for SharePoint: methods and options
- Publish apps for SharePoint
- How to: Create and Deploy Declarative Workflows in Sandboxed Solutions (Using SharePoint Designer 2013)
Caution
SharePoint Add-ins that contain integrated workflows (which can be associated with lists on the parent web) are differentiated from normal workflow apps by changing the following tag to true in the workflowmanifest.xml file in the app package:
<SPIntegratedWorkflow xmlns="http://schemas.microsoft.com/sharepoint/2014/app/integratedworkflow">
    <IntegratedApp>true</IntegratedApp>
</SPIntegratedWorkflow>