Note
Access to this page requires authorization. You can try signing in or changing directories.
Access to this page requires authorization. You can try changing directories.
Learn how to customize the SharePoint Geolocation field type programmatically using client-side rendering.
SharePoint introduces a new field type named Geolocation that enables you to annotate SharePoint lists with location information. In columns of type Geolocation, you can enter location information as a pair of latitude and longitude coordinates in decimal degrees, or retrieve the coordinates of the user's current location from the browser if it implements the W3C Geolocation API. For more information about the Geolocation field, see Integrating location and map functionality in SharePoint.
The Geolocation field type is not available in the default content type of any list or document library in SharePoint. The Geolocation field type is included in SharePoint but isn't visible on the create column page for the list; you must add the Geolocation field type programmatically. For more information, see How to: Add a Geolocation column to a list programmatically in SharePoint.
After you add the Geolocation field type to SharePoint, you can use it to render maps by using Bing Maps. The built-in Geolocation field can render only with Bing Maps. However, you can create a custom field by using the Geolocation field as a parent field type. Custom rendering can be provided through the JSLink property in the client-side rendering framework. The client-side rendering framework is introduced in SharePoint. For more information, see How to: Customize a field type using client-side rendering.
Note
The JSLink property is not supported on Survey or Events lists. A SharePoint calendar is an Events list.
In the procedure of this section, you create a custom field derived from Geolocation field type using client-side rendering..
Prerequisites for creating a custom Geolocation field
You must have the following:
- A server running SharePoint
- Microsoft Visual Studio 2012
- Office Developer Tools for Visual Studio 2012
- Access to a SharePoint list, with sufficient privileges to add a column
Core concepts to know for customizing the Geolocation field
Table 1. Core concepts for extending the Geolocation field type
| Article title | Description |
|---|---|
| Integrating location and map functionality in SharePoint |
Learn how to integrate location information and maps in SharePoint lists and location-based web and mobile apps by using the new Geolocation field, and by creating your own Geolocation-based field types. |
| How to: Customize a field type using client-side rendering |
Learn more about the new client-side rendering introduced in SharePoint. |
| How to: Add a Geolocation column to a list programmatically in SharePoint |
Learn how to add a Geolocation column to a list programmatically in SharePoint. |
Step 1: Set up the Visual Studio project
To set up the custom field project
Start Visual Studio 2012 on the same computer where SharePoint is installed.
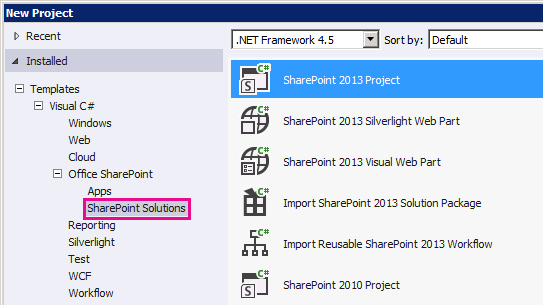
In the New Project dialog box, under Installed templates, choose Visual C#, Office SharePoint, SharePoint Solutions. Choose the SharePoint project type. Figure 1 shows the location of the SharePoint Project template in Visual Studio 2012. Make it a farm solution, not a sandboxed solution.
Figure 1. SharePoint project template in Visual Studio
Specify a name for the project. We are using CustomGeolocationField in this example. Then choose the OK button.
In the SharePoint Customization Wizard, enter the URL for the SharePoint site where you want to deploy your new custom field type.
In Solution Explorer, open the shortcut menu for the project name (in our example, it is CustomGeolocationField), and choose Add, New Item.
In the Add New Item dialog box, under the Code templates, choose Class, and specify the name for the class ( CustomGeolocationField.cs in this example).
In Solution Explorer, open the shortcut menu for the project name, and choose Add, SharePoint mapped folder.
In the Add SharePoint Mapped Folder dialog box, use the tree control to map the folder to TEMPLATE\LAYOUTS, and choose the OK button.
In Solution Explorer, open the shortcut menu for the new LAYOUTS folder (not the project name), and choose Add, New Item.
In the Add New Item dialog box, choose Visual C#, Web, and then choose Javascript File under Templates.
In the Name box, specify the name for the file (CustomGeolocationField in our example), and choose Add.
Repeat step 8 to create another SharePoint mapped folder, and map it to TEMPLATE\XML. Then choose the OK button.
In Solution Explorer, open the shortcut menu for the new XML folder (not the project name), and choose Add, New Item.
In the Add New Item dialog box, choose Visual C#, Data, and then choose XML File under Templates.
In the Name box, specify the name for the file (this example usesfldtypes_CustomGeolocationControl.xml), and choose the Add button.
Step 2: Create a custom field class
A field class is a class whose instances can represent particular fields that are based on your custom field type. This class must inherit from SPField or one of the classes in SharePoint Foundation that derive from it. To enable you to extend or customize the Geolocation field type, this class must inherit from SPFieldGeolocation. For more information about creating field types, see Walkthrough: Creating a Custom Field Type.
Note
In this example, the class and solution are named CustomGeolocationField; you can specify the name of the class and project that you want as you create your Visual Studio project.
To create a custom field class
Open the CustomGeolocationField.cs file, and add a
usingdirective as follows.using System; using Microsoft.SharePoint; using Microsoft.SharePoint.WebControls;Ensure that the namespace is
CustomGeolocationField.Be sure that the class is named
CustomGeolocationField, and change its declaration to specify that it inherits fromSPFieldGeolocation. Add the following required constructors for the class.public class CustomGeolocationField : SPFieldGeolocation { /// <summary> /// Create an instance of CustomGeolocationField object. /// </summary> /// <param name="fields">Field collection</param> /// <param name="fieldName">Name of the field</param> /// public CustomGeolocationField(SPFieldCollection fields, string fieldName) : base(fields, fieldName) { } /// <summary> /// Create an instance of CustomGeolocationField object. /// </summary> /// <param name="fields">Field collection</param> /// <param name="typeName">type name of the field</param> /// <param name="displayName">display name of the field</param> public CustomGeolocationField(SPFieldCollection fields, string typeName, string displayName) : base(fields, typeName, displayName) { }Add the following override of the
JSLinkmethod to the class. CustomGeolocationControl.js is a JavaScript file that you create in the following step. By providing your own JavaScript file, you are overriding the default rendering of Bing Maps. If you do not override this method, the default rendering will be from Bing Maps. TheJSLinkproperty is introduced in SharePoint. For more information about theJSLinkproperty, see How to: Customize a field type using client-side rendering./// <summary> /// Override JSLink property. /// </summary> public override string JSLink { get { return "CustomGeolocationControl.js"; } set { base.JSLink = value; } }The
GetFieldValue()method converts the specified value into a field type value. For more information about theGetFieldValue()method, see GetFieldValue(String). Add the following override of theGetFieldValue()method to theCustomGeolocationFieldclass./// <summary> /// get the field values /// </summary> /// <param name="value"></param> /// <returns></returns> public override object GetFieldValue(string value) { return base.GetFieldValue(value); }Add the following override of the GetValidatedString method to the
CustomGeolocationFieldclass:/// <summary> /// get validated string /// </summary> /// <param name="value"></param> /// <returns></returns> public override string GetValidatedString(object value) { return base.GetValidatedString(value); }
Step 3: Create rendering for the new custom field
Next, you should create the JavaScript file that the JSLink method of the field class points to. This file should define the rendering of the custom field type using the new client-side rendering framework. For more information, see How to: Customize a field type using client-side rendering.
The following example shows the registration logic for registering with the client side rendering framework introduced in SharePoint.
function _registerCustomGeolocationFieldTemplate() {
    var geolocationFieldContext = {};
    geolocationFieldContext.Templates = {};
    geolocationFieldContext.Templates.Fields = {

        'CustomGeolocationField': {
            'View': CustomGeolocationFieldTemplate.RenderGeolocationField,
            'DisplayForm': CustomGeolocationFieldTemplate.SPFieldGeolocation_Display,
            'EditForm': CustomGeolocationFieldTemplate.SPFieldGeolocation_Edit,
            'NewForm': CustomGeolocationFieldTemplate.SPFieldGeolocation_Edit
        }
    };
    SPClientTemplates.TemplateManager.RegisterTemplateOverrides(geolocationFieldContext);
}
In the registration process there are four variables and their respective methods. The client-side rendering framework calls these methods for rendering CustomGeolocationControl.
The following code example creates new rendering for a new custom field for new custom field that is derived from Geolocation.
To create the JavaScript file
Create a text file and specify a name, such as x, give it a .js extension, and save it to the SharePoint-mapped TEMPLATE\LAYOUTS folder. This example uses the name CustomGeolocationControl.js.
Copy the following code into the .js file.
(function () { if (typeof CustomGeolocationFieldTemplate == "object") { return; } window.CustomGeolocationFieldTemplate = (function () { return { SPFieldGeolocation_Display: function (rCtx) { if (rCtx == null || rCtx.CurrentFieldValue == null || rCtx.CurrentFieldValue == '') return ''; var listItem = rCtx['CurrentItem']; var fldvalue = CustomGeolocationFieldTemplate.ParseGeolocationValue(listItem[rCtx.CurrentFieldSchema.Name]); var _myData = SPClientTemplates.Utility.GetFormContextForCurrentField(rCtx); if (_myData == null || _myData.fieldSchema == null) return ''; var _latitude = 0; var _longitude = 0; if (fldvalue != null) { _latitude = fldvalue.latitude; _longitude = fldvalue.longitude; } var result = '<div>'; result += '<span>Latitude:</span><span>' + _latitude + '</span><span>Longitude:</span><span>' + _longitude + '</span>'; result += '</div>'; return result; }, ParseGeolocationValue: function (fieldValue) { if (fieldValue == null || fieldValue == '') return null; var point = new Object(); point.longitude = null; point.latitude = null; point.altitude = null; point.measure = null; var matches = fieldValue.match(/POINT\\s*\\((\\d+(\\.\\d+)?)\\s+(\\d+(\\.\\d+)?)\\s+(\\d+(\\.\\d+)?)\\s+(\\d+(\\.\\d+)?)\\)/i); if (matches != null) { point.longitude = parseFloat(matches[1]); point.latitude = parseFloat(matches[3]); point.altitude = parseFloat(matches[5]); point.measure = parseFloat(matches[7]); } else { matches = fieldValue.match(/POINT\\s*\\((\\d+(\\.\\d+)?)\\s+(\\d+(\\.\\d+)?)\\)/i); if (matches != null) { point.longitude = parseFloat(matches[1]); point.latitude = parseFloat(matches[3]); } } return point; }, SPFieldGeolocation_Edit: function (rCtx) { if (rCtx == null) return ''; var _myData = SPClientTemplates.Utility.GetFormContextForCurrentField(rCtx); if (_myData == null || _myData.fieldSchema == null) return ''; var _latitude = null; var _longitude = null; var _inputId_Latitude = _myData.fieldName + '_' + _myData.fieldSchema.Id + '_$geolocationField_Latitude'; var _inputId_Longitude = _myData.fieldName + '_' + _myData.fieldSchema.Id + '_$geolocationField_Longitude'; var _inputId_Div = _myData.fieldName + '_' + _myData.fieldSchema.Id + '_$geolocationField_Div'; var _latitudeBox = null; var _longitudeBox = null; var _value = _myData.fieldValue != null ? _myData.fieldValue : ''; var listItem = rCtx['CurrentItem']; var fldvalue = CustomGeolocationFieldTemplate.ParseGeolocationValue(listItem[rCtx.CurrentFieldSchema.Name]); if (fldvalue != null) { _latitude = fldvalue.latitude; _longitude = fldvalue.longitude; } var validators = new SPClientForms.ClientValidation.ValidatorSet(); if (_myData.fieldSchema.Required) validators.RegisterValidator(new SPClientForms.ClientValidation.RequiredValidator()); _myData.registerClientValidator(_myData.fieldName, validators); // Post DOM initialization callback. _myData.registerInitCallback(_myData.fieldName, function () { // Initialize the input control references. _latitudeBox = document.getElementById(_inputId_Latitude); _longitudeBox = document.getElementById(_inputId_Longitude); // Set the initial values. if ((_latitudeBox != null && _longitudeBox != null) && (_latitude != null && _longitude != null)) { _latitudeBox.value = _latitude; _longitudeBox.value = _longitude; } }); // On focus call back. _myData.registerFocusCallback(_myData.fieldName, function () { if (_latitudeBox != null) _latitudeBox.focus(); }); // Validation failure handler. _myData.registerValidationErrorCallback(_myData.fieldName, function (errorResult) { SPFormControl_AppendValidationErrorMessage(_inputId_Div, "invalid Geolocation Field"); }); // Register a callback just before submit. _myData.registerGetValueCallback(_myData.fieldName, function () { if (_latitudeBox == null && _longitudeBox == null) return ''; else { _latitude = _latitudeBox.value; _longitude = _longitudeBox.value; if (_latitude != null && _longitude != null) return "Point(" + _longitude + " " + _latitude + ")"; } }); _myData.updateControlValue(_myData.fieldName, _value); var result = '<div width="100%" id=' + STSHtmlEncode(_inputId_Div) + '>'; result += '<div><span>Latitude:</span><input id=' + STSHtmlEncode(_inputId_Latitude) + ' type="text" name="Latitude" /></div>'; result += '<div><span>Longitude:</span><input id=' + STSHtmlEncode(_inputId_Longitude) + ' type="text" name="Longitude" /></div>'; result += '</div>'; return result; }, RenderGeolocationField: function (inCtx, field, listItem, listSchema) { var fldvalue = CustomGeolocationFieldTemplate.ParseGeolocationValue(listItem[field.Name]); var result = ''; if (fldvalue != null) { var result = '<div>'; result += '<span>Latitude:</span><span>' + fldvalue.latitude + '</span><span>Longitude:</span><span>' + fldvalue.longitude + '</span>'; result += '</div>'; } return result; } }; })(); function _registerCustomGeolocationFieldTemplate() { var geolocationFieldContext = {}; geolocationFieldContext.Templates = {}; geolocationFieldContext.Templates.Fields = { 'CustomGeolocationField': { 'View': CustomGeolocationFieldTemplate.RenderGeolocationField, 'DisplayForm': CustomGeolocationFieldTemplate.SPFieldGeolocation_Display, 'EditForm': CustomGeolocationFieldTemplate.SPFieldGeolocation_Edit, 'NewForm': CustomGeolocationFieldTemplate.SPFieldGeolocation_Edit } }; SPClientTemplates.TemplateManager.RegisterTemplateOverrides(geolocationFieldContext); } ExecuteOrDelayUntilScriptLoaded(_registerCustomGeolocationFieldTemplate, 'clienttemplates.js'); })();
Step 4: Create a field type definition
A field type definition is an XML file with a name like fldtypes.xml* that is deployed to %ProgramFiles%\Common Files\Microsoft Shared\web server extensions\15\TEMPLATE\XML. A field definition file contains the information that SharePoint Foundation needs to correctly render the field in list views, and on the Display, Edit, and New forms. Most importantly, the definition contains information about the assembly that contains the compiled field type. For more information about field type definitions, see How to: Create a Custom Field Type Definition.
To create the field type definition
In Visual Studio, build the project. The project is not finished, but you need to build at this time to generate a GUID and a Public Key Token for the assembly.
Open the fldtypes_CustomGeolocationControl.xml file, and replace its contents with the following markup.
<?xml version="1.0" encoding="utf-8" ?>
<FieldTypes>
  <FieldType>
    <Field Name="TypeName">CustomGeolocationField</Field>
    <Field Name="ParentType">Geolocation</Field>
    <Field Name="TypeDisplayName">Custom Geolocation field</Field>
    <Field Name="TypeShortDescription"> Custom Geolocation field </Field>
    <Field Name="UserCreatable">TRUE</Field>
    <Field Name="ShowOnListCreate">TRUE</Field>
    <Field Name="ShowOnSurveyCreate">TRUE</Field>
    <Field Name="ShowOnDocumentLibraryCreate">TRUE</Field>
    <Field Name="ShowOnColumnTemplateCreate">TRUE</Field>
    <Field Name="FieldTypeClass">CustomGeolocationField.CustomGeolocationField,$SharePoint.Project.AssemblyFullName$</Field>
    <Field Name="SQLType">nvarchar</Field>
  </FieldType>
</FieldTypes>
This file defines the custom field type for SharePoint. For details about the purpose and meaning of its elements, see Custom Field Type Definition, FldTypes.xml, FieldTypes Element (Field Types), FieldType Element (Field Types), and Field Element (Field Types). Note that the
<Field Name="FieldTypeClass">element must be entirely on one line.The value of the
<Field Name="FieldTypeClass">element is the fully qualified name of your custom field class followed by a comma and then a Visual Studio token ($SharePoint.Project.AssemblyFullName$). When you compile the project, a copy of this file is created in which the token is replaced by the full four-part name of the assembly. That copy is deployed when you choose Deploy Solution on the Visual Studio Build menu in Visual Studio 2012.
Step 5: Build and test the custom field type
After you deploy a custom field to the SharePoint server, a new custom column is available for you to add to any SharePoint list on the server where the solution is deployed.
Choose the F5 key.
Note
When you choose F5, Visual Studio builds the solution, deploys the solution, and opens the SharePoint website where the solution is deployed.
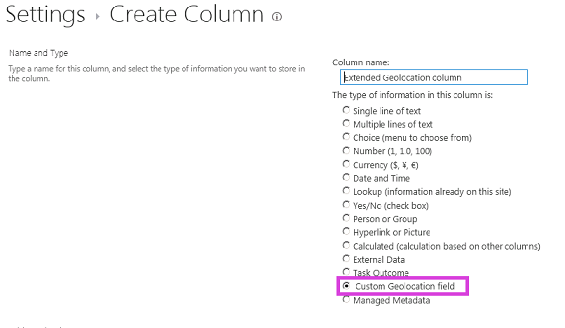
Create a custom list and add a new Custom Geolocation field column.
Add one item to the list, and provide Longitude and Latitude values for the Custom Geolocation column.
Figure 2 shows the create column page with the new custom field type.
Figure 2. Creating a new custom field type column
See also
- Integrating location and map functionality in SharePoint
- How to: Add a Geolocation column to a list programmatically in SharePoint
- How to: Customize a field type using client-side rendering
- SharePoint: Create a Geolocation field that renders maps using Nokia Maps
- How to: Create a Custom Field Type
- Add and Remove Mapped Folders