Note
Access to this page requires authorization. You can try signing in or changing directories.
Access to this page requires authorization. You can try changing directories.
The Core.JavaScriptCustomization sample add-in shows you how to use JavaScript to replace the text value of a SharePoint UI element with a translated text value, which is read from a JavaScript resource file.
Note
You are responsible for maintaining the translated text values in the JavaScript resource file.
Important
JSLink based customizations (client-side rendering) are not supported in modern experiences. This includes modern lists and libraries, including JSLink support in the list view web parts of the modern pages. Client-side rendering is supported in the classic experiences in SharePoint Online or in on-premises.
This code sample uses a provider-hosted add-in to:
- Localize a site page or Quick Launch link title with specific text values.
- Preserve a site page or Quick Launch link title in a primary language, and provide translated versions of the site page and Quick Launch link title in another language at run time.
- Use JavaScript resource files for client-side localization.
- Link a JavaScript file to a SharePoint site by using a custom action.
- Check the UI culture of the site and then load culture-specific text values from a JavaScript resource file.
- Overwrite site page and Quick Launch link titles with culture-specific text values by using jQuery.
Before you begin
To get started, download the Core.JavaScriptCustomization sample add-in from the Office 365 Developer patterns and practices project on GitHub.
Before you run this code sample, complete the following steps.
Configure the language settings on your site
On your team site, choose Settings > Site settings.
In Site Administration, choose Language settings.
On the Language Settings page, in Alternate language(s), choose the alternate languages that your site should support. For example, choose Finnish and French, as shown in the following figure.
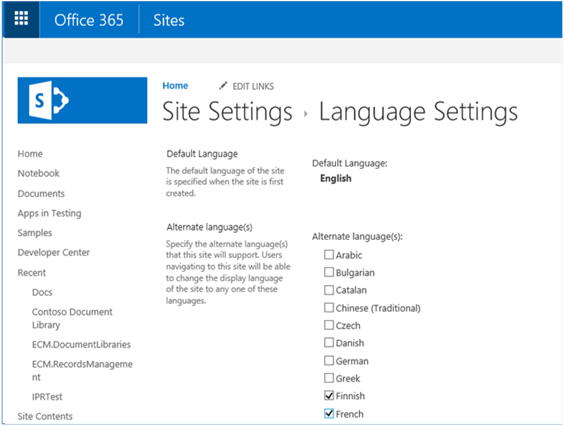
Choose OK.
Set the display language on your user's profile page
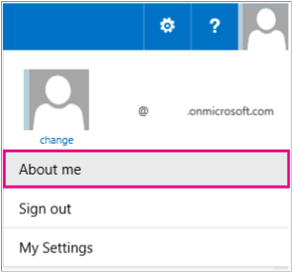
At the top of your Office 365 site, choose your profile picture, and then choose About me.
On the About me page, choose Edit your profile.
Choose the ellipsis (...) for additional options, and then choose Language and Region.
In My Display Languages, choose a new language in the Pick a new language list, and then choose Add. For example, choose Finnish and French. You can move your preferred language up or down by choosing the up and down arrows.
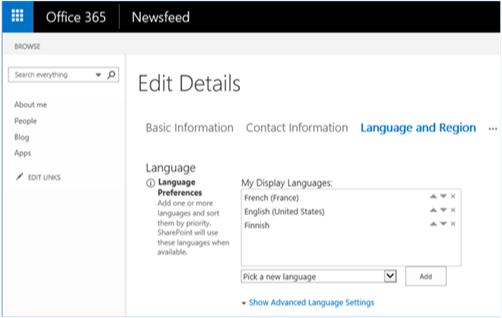
Choose Save all and close.
Note
It might take a few minutes for your site to render in the selected language(s).
Important
The CSOM is periodically updated with new features. If the CSOM provides new features to update site page or Quick Launch link titles, we recommend that you use the new features in the CSOM instead of the options discussed here.
Before you run Scenario 2 of this code sample, complete the following tasks.
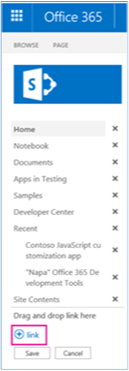
Create a Quick Launch link
On the host web, choose EDIT LINKS.
Choose link.
In Text to display, enter My quicklaunch entry.
In Address, enter the URL of a website.
Choose OK > Save.
Create a site page
- On the host web, choose Site Contents > Site Pages > New.
- In New page name, enter Hello SharePoint.
- Choose Create.
- Enter Test page in the body of the page.
- Choose Save.
Run the Core.JavaScriptCustomization sample app
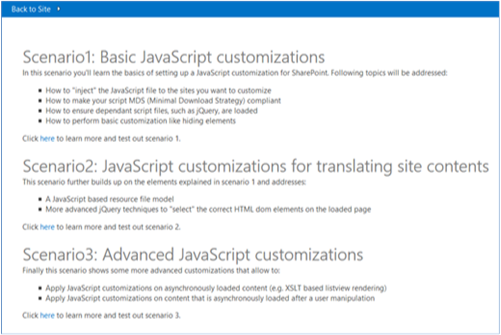
When you run this code sample, a provider-hosted application appears, as shown in the following figure. This article describes Scenario 1 and Scenario 2 because you might use the techniques in these two scenarios to provide localized versions of your site page and Quick Launch link titles.
Scenario 1
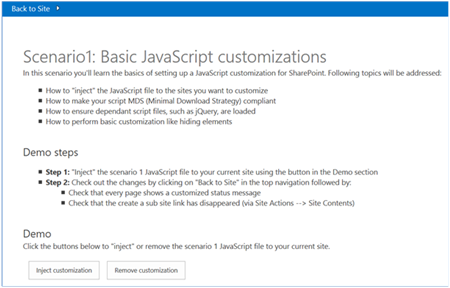
Scenario 1 shows how to add a reference to a JavaScript file on a SharePoint site by using a custom action. Choosing the Inject customization button calls the btnSubmit_Click method in scenario1.aspx.cs. The btnSubmit_Click method calls AddJsLink to add references to JavaScript files by using a custom action on the host web.
The following figure shows the start page for Scenario 1.
Note
The code in this article is provided as-is, without warranty of any kind, either express or implied, including any implied warranties of fitness for a particular purpose, merchantability, or non-infringement.
The AddJSLink method is part of the JavaScriptExtensions.cs file in OfficeDevPnP.Core. AddJSLink requires that you supply a string representing the identifier to assign to the custom action, and a string containing a semicolon delimited list of URLs to the JavaScript files that you want to add to the host web. Note that this code sample adds a reference to Scripts\scenario1.js, which adds a status bar message to the host web.
protected void btnSubmit_Click(object sender, EventArgs e)
{
  var spContext = SharePointContextProvider.Current.GetSharePointContext(Context);
  using (var cc = spContext.CreateUserClientContextForSPHost())
  {
      cc.Web.AddJsLink(Utilities.Scenario1Key, Utilities.BuildScenarioJavaScriptUrl(Utilities.Scenario1Key, this.Request));
  }
}
Note
SharePoint uses Minimal Download Strategy to reduce the amount of data the browser downloads when users navigate between pages on a SharePoint site. In scenario1.js, the following code ensures that whether Minimal Download Strategy is used on your SharePoint site, the RemoteManager_Inject method is always called to run the JavaScript code to add the status bar message to the host web. For more information, see Minimal Download Strategy overview.
if ("undefined" != typeof g_MinimalDownload && g_MinimalDownload && (window.location.pathname.toLowerCase()).endsWith("/_layouts/15/start.aspx") && "undefined" != typeof asyncDeltaManager) {
    // Register script for MDS if possible.
    RegisterModuleInit("scenario1.js", RemoteManager_Inject); //MDS registration
    RemoteManager_Inject(); //non MDS scenario
} else {
    RemoteManager_Inject();
}
Note
Some JavaScript files may depend on other JavaScript files to be loaded first before they can run and complete successfully. The following code construct from RemoteManager_Inject uses the loadScript function in scenario1.js to first load jQuery, and then continue running the remaining JavaScript code.
var jQuery = "https://ajax.aspnetcdn.com/ajax/jQuery/jquery-2.0.2.min.js";
    // Load jQuery first, and then continue running the rest of the code.
    loadScript(jQuery, function () {
    // Add additional JavaScript code here to complete your task.
});
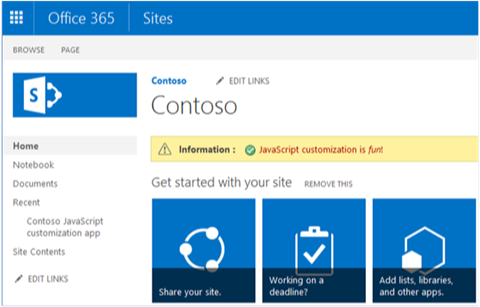
Choose Back to Site. As shown in the following figure, the host web now displays a status bar message that was added by scenario1.js.
Scenario 2
Scenario 2 uses the technique described in Scenario 1 to replace UI text with translated text read from a JavaScript resource file. Scenario 2 replaces the Quick Launch link title (My quicklaunch entry) and site page title (Hello SharePoint) that you created earlier. Scenario 2 attaches a JavaScript file that reads translated text values from variables in culture-specific JavaScript resource files. Scenario 2 then updates the UI.
The following figure shows the start page for Scenario 2.
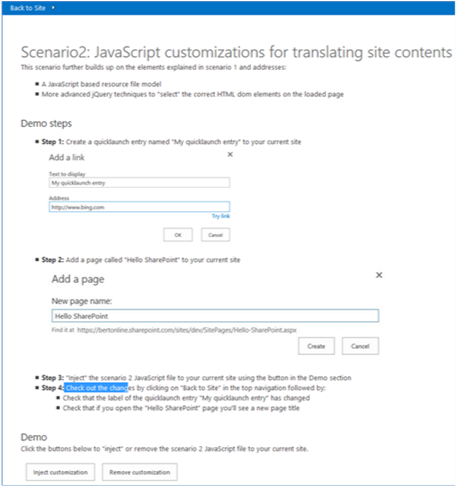
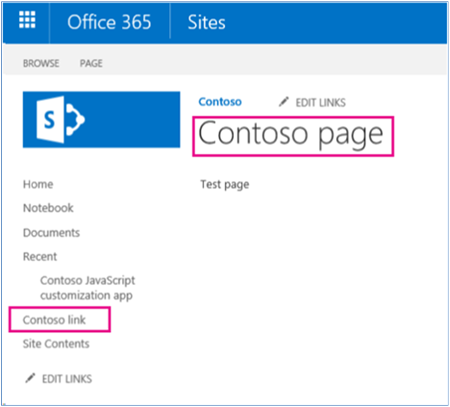
As shown, choosing Inject customization applies the following changes to the site:
The Quick Launch link title My quicklaunch entry is changed to Contoso link.
The Hello SharePoint site page title is changed to Contoso page.
Note
If your values for the Quick Launch link title and site page title differ from those shown in the preceding figure, edit the quickLauch_Scenario2 and pageTitle_HelloSharePoint variables in the JavaScript resource file scenario2.en-us.js or scenario2.nl-nl.js, and then run the code sample again.
The scenario2.en-us.js file stores English (US) culture-specific resources. The scenario2.nl-nl.js file stores Dutch culture-specific resources. If you are testing this code sample by using another language, consider creating another JavaScript resource file that uses the same naming convention.
Similar to Scenario 1, btnSubmit_Click in scenario2.aspx.cs calls AddJsLink to add a reference to the Scripts\scenario2.js file. In scenario2.js, the RemoteManager_Inject function calls the TranslateQuickLaunch function, which performs the following tasks:
- Determines the site's culture by using _spPageContextInfo.currentUICultureName.
- Loads the JavaScript resource file containing culture-specific resources that match the UI culture of the site. For example, if the site's culture was English (United States), the scenario2.en-us.js file is loaded.
- Replaces my quicklaunch entry with the value of the quickLauch_Scenario2 variable read from the JavaScript resource file.
function RemoteManager_Inject() {
    var jQuery = "https://ajax.aspnetcdn.com/ajax/jQuery/jquery-2.0.2.min.js";

    loadScript(jQuery, function () {
        SP.SOD.executeOrDelayUntilScriptLoaded(function () { TranslateQuickLaunch(); }, 'sp.js');
    });
}

function TranslateQuickLaunch() {
    // Load jQuery and if complete, load the JS resource file.
    var scriptUrl = "";
    var scriptRevision = "";
    // Iterate over the scripts loaded on the page to find the scenario2 script. Then use the script URL to dynamically build the URL for the resource file to be loaded.
    $('script').each(function (i, el) {
        if (el.src.toLowerCase().indexOf('scenario2.js') > -1) {
            scriptUrl = el.src;
            scriptRevision = scriptUrl.substring(scriptUrl.indexOf('.js') + 3);
            scriptUrl = scriptUrl.substring(0, scriptUrl.indexOf('.js'));
        }
    })

    var resourcesFile = scriptUrl + "." + _spPageContextInfo.currentUICultureName.toLowerCase() + ".js" + scriptRevision;
    // Load the JS resource file based on the user's language settings.
    loadScript(resourcesFile, function () {

        // General changes that apply to all loaded pages.
        // ----------------------------------------------

        // Update the Quick Launch labels.
        // Note that you can use the jQuery  function to iterate over all elements that match your jQuery selector.
        $("span.ms-navedit-flyoutArrow").each(function () {
            if (this.innerText.toLowerCase().indexOf('my quicklaunch entry') > -1) {
                // Update the label.
                $(this).find('.menu-item-text').text(quickLauch_Scenario2);
                // Update the tooltip.
                $(this).parent().attr("title", quickLauch_Scenario2);
            }
        });

        // Page-specific changes require an IsOnPage call.
        // ----------------------------------------------------------

        // Change the title of the "Hello SharePoint" page.
        if (IsOnPage("Hello%20SharePoint.aspx")) {
            $("#DeltaPlaceHolderPageTitleInTitleArea").find("A").each(function () {
                if ($(this).text().toLowerCase().indexOf("hello sharepoint") > -1) {
                    // Update the label.
                    $(this).text(pageTitle_HelloSharePoint);
                    // Update the tooltip.
                    $(this).attr("title", pageTitle_HelloSharePoint);
                }
            });
        }

    });
}