Note
Access to this page requires authorization. You can try signing in or changing directories.
Access to this page requires authorization. You can try changing directories.
The PnP timer job framework is a set of classes designed to ease the creation of background processes that operate against SharePoint sites. The timer job framework is similar to on-premises full trust code timer jobs (SPJobDefinition). The primary difference between the timer job framework and the full trust code timer job is that the timer job framework only uses client-side APIs and therefore can (and should) be run outside of SharePoint. The timer job framework makes it possible to build timer jobs that operate against SharePoint Online.
After a timer job has been created, it needs to be scheduled and executed. The two most common options are:
- When Microsoft Azure is the hosting platform, timer jobs can be deployed and run as Azure WebJobs.
- When Windows Server is the hosting platform (for example, for on-premises SharePoint), timer jobs can be deployed and run in Windows Scheduler.
For a video introduction to timer jobs, see the video Introduction to the PnP timer job framework, which introduces the timer job framework and demonstrates the simple timer job example.
Simple timer job example
In this section, you will learn how to create a very simple timer job. The goal of this sample is to provide the reader a quick view; later on we provide a more detailed explanation of the timer job framework.
Note
For a more extensive PnP solution with ten individual timer job examples, from "Hello world" samples to actual content expiration jobs, see Core.TimerJobs.Samples.
The following steps describe how to create a simple timer job.
Step 1: Create a Console project and reference PnP Core
Create a new project of the type "console" and reference the PnP Core library by doing one of the following:
Add the Office 365 Developer Patterns and Practices Core NuGet package to your project. There's a NuGet package for v15 (on-premises) and for v16 (Office 365). This is the preferred option.
Add the existing PnP Core source project to your project. This allows you to step into the PnP core code when debugging.
Note
You will be responsible for keeping this code updated with the latest changes added to PnP.
Step 2: Create a timer job class and add your timer job logic
Add a class for the timer job named SimpleJob.
Have the class inherit the TimerJob abstract base class.
In the constructor, give the timer job a name (
base("SimpleJob")) and connect the TimerJobRun event handler.Add your timer job logic to the TimerJobRun event handler.
The result will be similar to the following:
using System;
using System.Collections.Generic;
using System.Linq;
using System.Text;
using System.Threading.Tasks;
using Microsoft.SharePoint.Client;
using OfficeDevPnP.Core.Framework.TimerJobs;

namespace Core.TimerJobs.Samples.SimpleJob
{
    public class SimpleJob: TimerJob
    {
        public SimpleJob() : base("SimpleJob")
        {
            TimerJobRun += SimpleJob_TimerJobRun;
        }

        void SimpleJob_TimerJobRun(object sender, TimerJobRunEventArgs e)
        {
            e.WebClientContext.Load(e.WebClientContext.Web, p => p.Title);
            e.WebClientContext.ExecuteQueryRetry();
            Console.WriteLine("Site {0} has title {1}", e.Url, e.WebClientContext.Web.Title);
        }
    }
}
Step 3: Update Program.cs to use the timer job
The timer job created in the previous step still needs to be executed. To do so, update Program.cs by using the following steps:
Instantiate your timer job class.
Provide the authentication details for the timer job. This example uses the user name and password to authenticate against SharePoint Online.
Add one or more sites for the timer job program to access. This example uses a wild card character in the URL. The timer job runs on all sites that match this wild card URL.
Start the timer job by calling the Run method.
static void Main(string[] args)
{
    // Instantiate the timer job class
    SimpleJob simpleJob = new SimpleJob();

    // The provided credentials need access to the site collections you want to use
    simpleJob.UseOffice365Authentication("user@tenant.onmicrosoft.com", "pwd");

    // Add one or more sites to operate on
    simpleJob.AddSite("https://<tenant>.sharepoint.com/sites/d*");

    // Run the job
    simpleJob.Run();
}
Timer job deployment options
The previous step demonstrates a simple timer job. The next step is to deploy the timer job.
A timer job is an .exe file that must be scheduled on a hosting platform. Depending on the chosen hosting platform, the deployment differs. The following sections describe the two most common hosting platform options:
- Using Azure as the hosting platform.
- Using Windows Server as the hosting platform.
Deploy timer jobs to Azure using Azure WebJobs
Before deploying a timer job, ensure that the job can run without user interaction. The sample in this article prompts the user to provide a password or client secret (see more in the Authentication section), which works while testing but does not work when deployed. The existing samples all allow the user to provide a password or client secret by using the app.config file:
  <appSettings>
    <add key="user" value="user@tenant.onmicrosoft.com"/>
    <add key="password" value="your password goes here!"/>
    <add key="domain" value="Contoso"/>
    <add key="clientid" value="a4cdf20c-3385-4664-8302-5eab57ee6f14"/>
    <add key="clientsecret" value="your clientsecret goes here!"/>
  </appSettings>
After these changes are added to the app.config file, run the timer job from Visual Studio to confirm that it runs without user interaction.
The actual deployment to Azure is based on Azure WebJobs. To deploy this timer job example, follow these steps:
Right-click the project in Visual Studio and choose Publish as Azure WebJob.
Provide a schedule for the timer job, and then choose OK.
Choose Microsoft Azure Websites as a publish target. You'll be asked to sign in to Azure and select the Azure website that will host the timer job (you can also create a new one if that would be needed).
Choose Publish to push the WebJob to Azure.
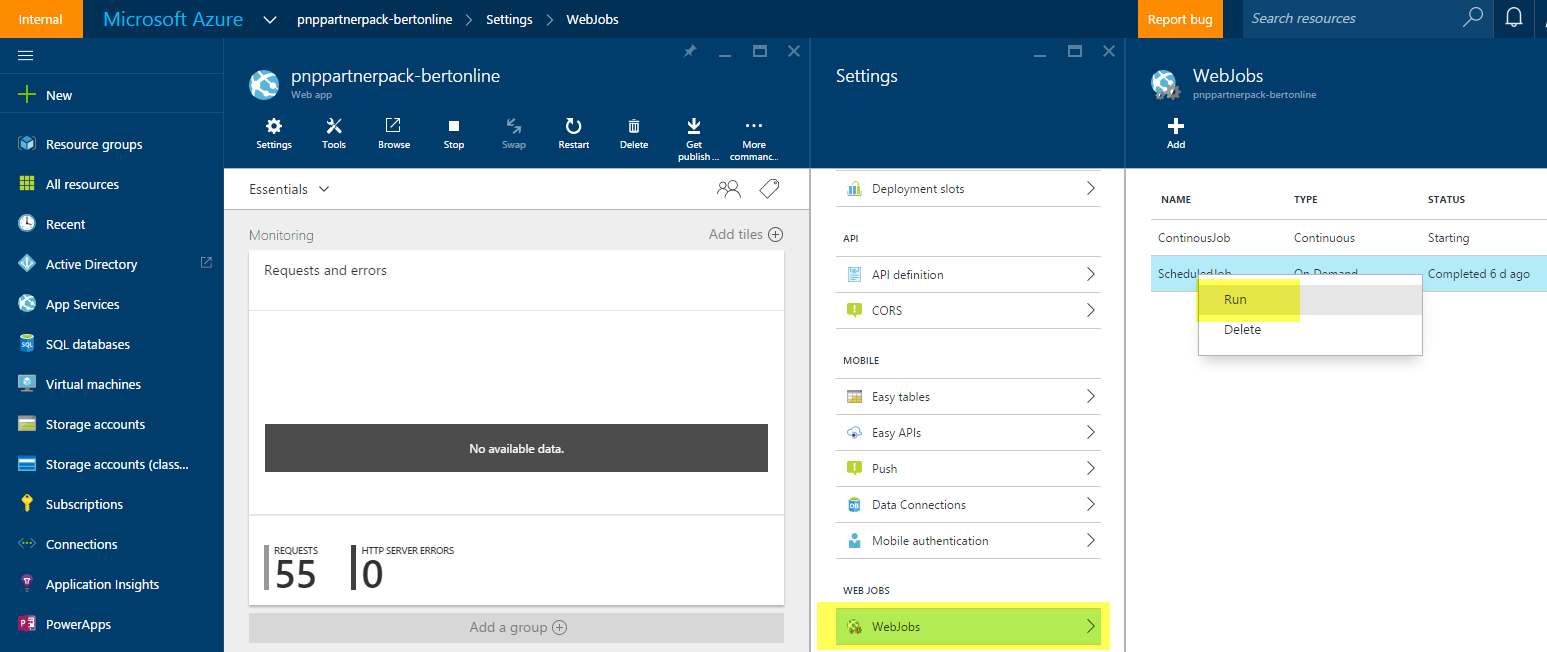
After the timer job has been published, you can trigger the job and check the job execution from Visual Studio or the Azure portal.
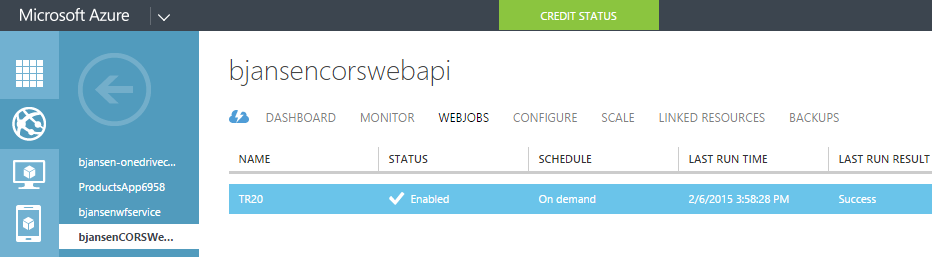
Also, the timer job can be run from the new Azure portal by selecting the job and choosing Run. More details about how to work with WebJobs from the new portal can be found in the article, Run Background tasks with WebJobs in Azure App Service.
Note
For in-depth guidance about deploying an Azure WebJob, see Getting started with Azure WebJobs (timer jobs) for your Office 365 sites.
Deploy timer jobs to Windows Server by using the Windows Scheduler
When deployed to Windows Server, the timer job must run without user interaction.
Modify the app.config file as described in the previous section Deploy timer jobs to Azure using Azure WebJobs.
Copy the release version of your job to the server you want it to run on.
Important
Copy all the relevant assemblies, the .exe file, and the .config file to ensure the job can run on the server without installing any additional files or programs on the server.
Schedule the execution of the timer job. We recommend that you use the built-in Windows Task Scheduler. To use the Windows Task Scheduler:
- Open the Task Scheduler (Control Panel > Task Scheduler).
- Choose Create Task and specify a name and an account that will execute the task.
- Choose Triggers and add a new trigger. Specify the schedule you want for the timer job.
- Choose Actions and choose the action Start a program, select the timer job .exe file, and then set the start in folder.
- Choose OK to save the task.

Timer job framework in-depth
This section details the timer job framework features and how they work.
Structure
The TimerJob class is an abstract base class that contains the following public properties, methods and events:
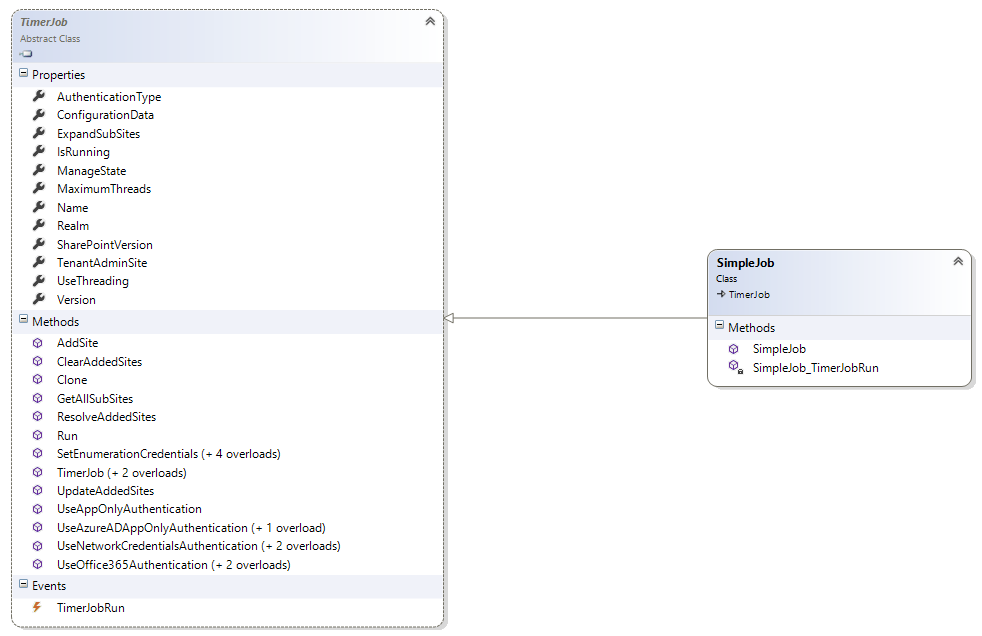
Most properties and methods are explained in more detail in the coming sections. The rest of the properties and methods are described here:
- IsRunning property: Gets a value indicating whether the timer job is executing. Value of true if executing; false if not executing.
- Name property: Gets the name of the timer job. The name is initially set in the timer job constructor.
- SharePointVersion property: Gets or sets the SharePoint version. This property is automatically set based on the version of the loaded Microsoft.SharePoint.Client.dll and in general should not change. You can, however, change this property in case you want to use the v16 CSOM libraries in a v15 (on-premises) deployment.
- Version property: Gets the version of this timer job. The version is initially set in the timer job constructor or defaults to 1.0 when not set via the constructor.
To prepare for a timer job run, you must first configure it:
- Provide authentication settings.
- Provide a scope, which is a list of sites.
- Optionally set timer job properties.
From an execution perspective, the following overall steps are taken when a timer job run is started:
- Resolve sites: Wild card site URLs (for example,
https://tenant.sharepoint.com/sites/d*) are resolved into an actual list of existing sites. If subsite expanding was requested, the resolved sites list is expanded with all subsites. - Create batches of work based on the current treading settings and create one thread per batch.
- The threads execute work batches and call the TimerJobRun event for each site in the list.
Further details on each step can be found in the next sections.
Authentication
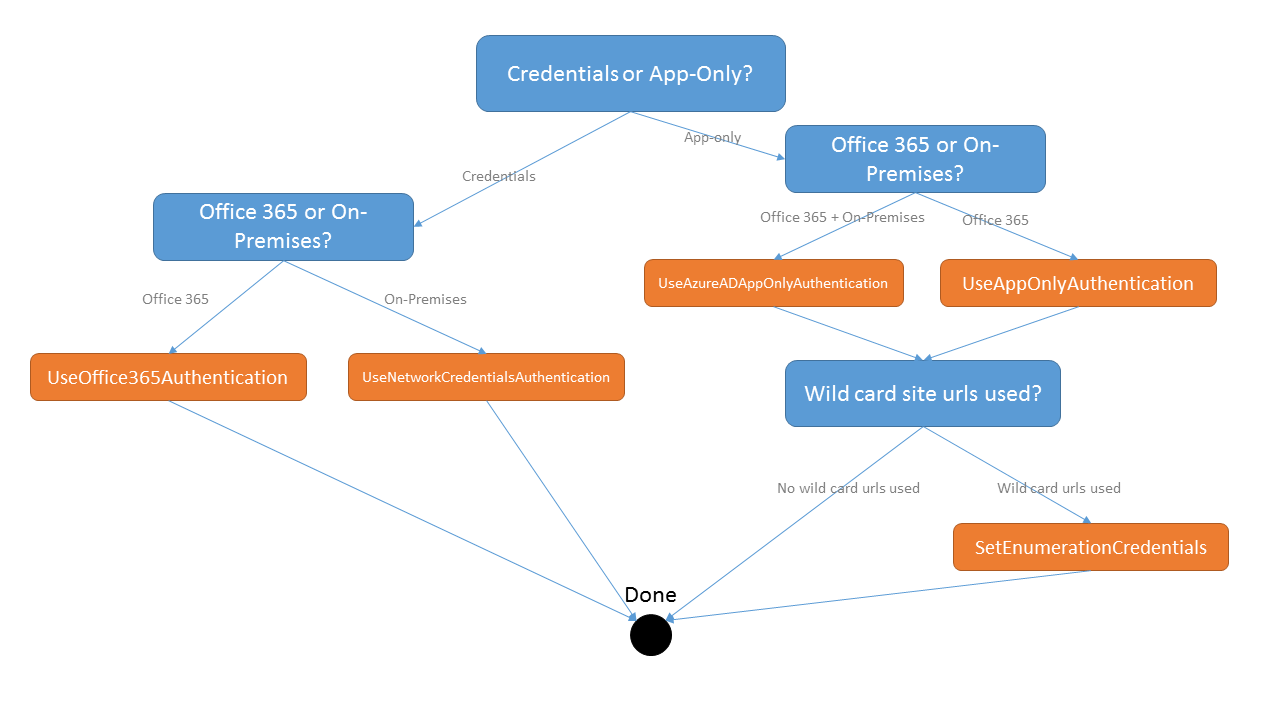
Before a timer job can be used, the timer job needs to know how to authenticate back to SharePoint. The framework currently supports the approaches in the AuthenticationType enum: Office365, NetworkCredentials, and AppOnly. Using the following methods also automatically sets the AuthenticationType property to the appropriate value of Office365, NetworkCredentials, and AppOnly.
The following flowchart shows the steps to take, followed by detailed explanations of each approach.
User credentials
To specify user credentials for running against Office 365, you can use these two methods:
public void UseOffice365Authentication(string userUPN, string password)
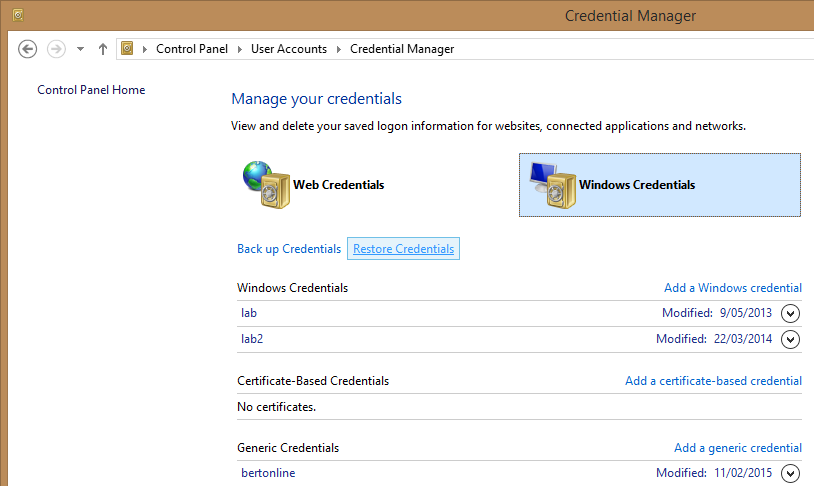
public void UseOffice365Authentication(string credentialName)
The first method accepts a user name and password. The second one allows you to specify a generic credential stored in the Windows Credential Manager. The following screenshot shows the bertonline generic credential. To use that to authenticate the timer job, provide bertonline as the parameter of the second method.
There are similar methods for running against SharePoint on-premises:
public void UseNetworkCredentialsAuthentication(string samAccountName, string password, string domain)
public void UseNetworkCredentialsAuthentication(string credentialName)
App only
App-only authentication is the preferred method because you can grant tenant-scoped permissions. For user credentials, the user account must have the needed permissions.
Note
Certain site resolving logic won't work with app-only authentication. Details can be found in the next section.
To configure the job for app-only authentication, use one of the following methods:
public void UseAppOnlyAuthentication(string clientId, string clientSecret)
public void UseAzureADAppOnlyAuthentication(string clientId, string clientSecret)
The same method can be used for either Office 365 or SharePoint on-premises, which makes timer jobs that use app-only authentication easily transportable between environments.
Note
When you use app-only authentication, your timer job logic fails when APIs are used that do not work with AuthenticationType.AppOnly. Typical samples are the Search API, writing to the taxonomy store, and using the user profile API.
Sites to operate on
When a timer job runs, it needs one or more sites to run against.
Add sites to a timer job
To add sites to a timer job, use the following set of methods:
public void AddSite(string site)
public void ClearAddedSites()
To add a site, specify either a fully qualified URL (for example, https://tenant.sharepoint.com/sites/dev) or a wild card URL.
A wild card URL is a URL that ends with an asterisk (*). Only one single * is allowed and it must be the last character of the URL. A sample wild card URL is https://tenant.sharepoint.com/sites/*, which returns all the site collections under the managed path of that site. For another example, https://tenant.sharepoint.com/sites/dev* returns all site collections where the URL contains dev.
Typically the sites are added by the program that instantiates the timer job object, but if needed, the timer job can take control over the passed list of sites. Do this by adding a method override for the UpdateAddedSitesvirtual method as shown in the following sample:
public override List<string> UpdateAddedSites(List<string> addedSites)
{
    // Let's assume we're not happy with the provided list of sites, so first clear it
    addedSites.Clear();

    // Manually adding a new wildcard Url, without an added URL the timer job will do...nothing
    addedSites.Add("https://bertonline.sharepoint.com/sites/d*");

    // Return the updated list of sites
    return addedSites;
}
Specify enumeration credentials
After adding a wild card URL and setting authentication to app-only, specify the enumeration credentials. Enumeration credentials are used to fetch a list of site collections that are used in the site matching algorithm to return a real list of sites.
To acquire a list of site collections, the timer framework behaves differently between Office 365 (v16) and on-premises (v15):
- Office 365: The Tenant.GetSiteProperties method is used to read the 'regular' site collections; the search API is used to read the OneDrive for Business site collections.
- SharePoint on-premises: The search API is used to read all site collections.
Given that the search API doesn't work with a user context, the timer job falls back to the specified enumeration credentials.
To specify user credentials for running against Office 365, you can use these two methods:
public void SetEnumerationCredentials(string userUPN, string password)
public void SetEnumerationCredentials(string credentialName)
There are similar methods for running against SharePoint on-premises:
public void SetEnumerationCredentials(string samAccountName, string password, string domain)
public void SetEnumerationCredentials(string credentialName)
The first method simply accepts a user name, password, and optionally domain (when in on-premises). The second specifies a generic credential stored in the Windows Credential Manager. See the Authentication section to learn more about the Credential Manager.
Subsite expanding
Often you want the timer job code to be executed against the root site of the site collection and against all the subsites of that site collection. To do this, set the ExpandSubSites property to true. This causes the timer job to expand the subsites as part of the site resolving step.
Override resolved and/or expanded sites
After the timer framework resolves the wild card sites, and optionally expands the subsites, the next step is to process the list of sites. Prior to processing the list of sites, you might want to modify the list of sites. For example, you may want to remove specific sites or add more sites to the list. This can be accomplished by overriding the ResolveAddedSites virtual method. The following sample shows how to override the ResolveAddedSites method to remove one site from the list.
public override List<string> ResolveAddedSites(List<string> addedSites)
{
    // Use default TimerJob base class site resolving
    addedSites = base.ResolveAddedSites(addedSites);

    //Delete the first one from the list...simple change. A real life case could be reading the site scope
    //from a SQL (Azure) DB to prevent the whole site resolving.
    addedSites.RemoveAt(0);

    //Return the updated list of resolved sites...this list will be processed by the timer job
    return addedSites;
}
TimerJobRun event
The timer job framework splits the list of sites into work batches. Each batch of sites is run on its own thread. By default, the framework creates five batches and five threads to run those five batches. See the Threading section to learn more about timer job threading options.
When a thread processes a batch, the TimerJobRun event is triggered by the timer framework and provides all the necessary information to run the timer job. Timer jobs are run as events, so the code must connect an event handler to the TimerJobRun event:
public SimpleJob() : base("SimpleJob")
{
    TimerJobRun += SimpleJob_TimerJobRun;
}

void SimpleJob_TimerJobRun(object sender, TimerJobRunEventArgs e)
{
    // your timer job logic goes here
}
An alternative approach is using an inline delegate as shown here:
public SimpleJob() : base("SimpleJob")
{
    // Inline delegate
    TimerJobRun += delegate(object sender, TimerJobRunEventArgs e)
    {
        // your timer job logic goes here
    };
}
When the TimerJobRun event fires, you receive a TimerJobRunEventArgs object, which provides the necessary information to write the timer job logic. The following attributes and methods are available in this class:
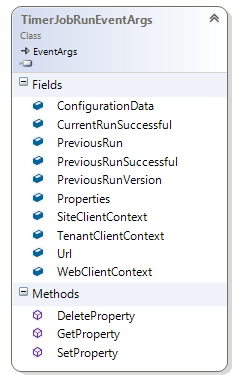
Several of the properties and all of the methods are used in the optional state management feature, which is discussed in the next section. However, the following properties are always available in every event, regardless of the used configuration:
- Url property: Gets or sets the URL of the site for the timer job to operate against. This can be the root site of the site collection, but it can also be a subsite in case site expanding was done.
- ConfigurationData property: Gets or sets additional timer job configuration data (optional). This configuration data is passed along as part of the TimerJobRunEventArgs object.
- WebClientContext property: Gets or sets the ClientContext object for the current URL. This property is a ClientContext object for the site defined in the Url property. This is typically the ClientContext object that you would use in your timer job code.
- SiteClientContext property: Gets or sets the ClientContext object for the root site of the site collection. This property provides access to the root site should the timer job require access to it. For example, the timer job can add a page layout to the master page gallery by using the SiteClientContext property.
- TenantClientContext property: Gets or sets the ClientContext object to work with the Tenant API. This property provides a ClientContext object constructed by using the tenant admin site URL. To use the Tenant API in the timer job TimerJobRun event handler, create a new Tenant object by using this TenantClientContext property.
All ClientContext objects use the authentication information described in the Authentication section. If you've opted for user credentials, ensure that the used account has the needed permissions to operate against the specified sites. When using app-only, it is best to set tenant-scoped permissions to the app-only principal.
State management
When you write timer job logic, you often need to persist state; for example, to record when a site was last processed, or to store data to support your timer job business logic. For this reason, the timer job framework has state management capabilities.
State management stores and retrieves a set of standard and custom properties as a JSON serialized string in the web property bag of the processed site (name = timer job name + "_Properties"). The following are the default properties of the TimerJobRunEventArgs object:
- PreviousRun property: Gets or sets the date and time of the previous run.
- PreviousRunSuccessful property: Gets or sets a value indicating whether the previous run was successful. Note that the timer job author is responsible for flagging a job run as successful by setting the CurrentRunSuccessful property as part of your timer job implementation.
- PreviousRunVersion property: Gets or sets the timer job version of the previous run.
Next to these standard properties, you also have the option to specify your own properties by adding keyword–value pairs to the Properties collection of the TimerJobRunEventArgs object. To make this easier, there are three methods to help you:
- SetProperty adds or updates a property.
- GetProperty returns the value of a property.
- DeleteProperty removes a property from the property collection.
The following code shows how state management can be used:
void SiteGovernanceJob_TimerJobRun(object o, TimerJobRunEventArgs e)
{
    try
    {
        string library = "";

        // Get the number of admins
        var admins = e.WebClientContext.Web.GetAdministrators();

        Log.Info("SiteGovernanceJob", "ThreadID = {2} | Site {0} has {1} administrators.", e.Url, admins.Count, Thread.CurrentThread.ManagedThreadId);

        // grab reference to list
        library = "SiteAssets";
        List list = e.WebClientContext.Web.GetListByUrl(library);

        if (!e.GetProperty("ScriptFileVersion").Equals("1.0", StringComparison.InvariantCultureIgnoreCase))
        {
            if (list == null)
            {
                // grab reference to list
                library = "Style%20Library";
                list = e.WebClientContext.Web.GetListByUrl(library);
            }

            if (list != null)
            {
                // upload js file to list
                list.RootFolder.UploadFile("sitegovernance.js", "sitegovernance.js", true);

                e.SetProperty("ScriptFileVersion", "1.0");
            }
        }

        if (admins.Count < 2)
        {
            // Oops, we need at least 2 site collection administrators
            e.WebClientContext.Site.AddJsLink(SiteGovernanceJobKey, BuildJavaScriptUrl(e.Url, library));
            Console.WriteLine("Site {0} marked as incompliant!", e.Url);
            e.SetProperty("SiteCompliant", "false");
        }
        else
        {
            // We're all good...let's remove the notification
            e.WebClientContext.Site.DeleteJsLink(SiteGovernanceJobKey);
            Console.WriteLine("Site {0} is compliant", e.Url);
            e.SetProperty("SiteCompliant", "true");
        }

        e.CurrentRunSuccessful = true;
        e.DeleteProperty("LastError");
    }
    catch(Exception ex)
    {
        e.CurrentRunSuccessful = false;
        e.SetProperty("LastError", ex.Message);
    }
}
The state is stored as a single JSON serialized property, which means it can be used by other customizations as well. For example, if the timer job wrote the state entry "SiteCompliant=false", a JavaScript routine could prompt the user to act because the timer job determined that the site was incompliant.
Threading
The timer job framework by default uses threads to parallelize work. Threading is used for both the subsite expansion (when requested) and for running the actual timer job logic (TimerJobRun event) for each site. The following properties can be used to control the threading implementation:
- UseThreading property: Gets or sets a value indicating whether threading is used. Defaults to true. Set to false to perform all actions by using the main application thread.
- MaximumThreads property: Gets or sets the number of threads to use for this timer job. Valid values are 2 to 100. The default is 5. Having lots of threads is not necessarily faster than having just a few threads. The optimal number should be acquired via testing by using a variety of thread counts. The default of 5 threads has been found to significantly boost performance in most scenarios.
Throttling
Because a timer job uses threading and timer job operations are typically resource-intensive operations, a timer job run could be throttled. To correctly deal with throttling, the timer job framework and the whole of PnP Core uses the ExecuteQueryRetry method instead of the default ExecuteQuery method.
Note
It is important to use ExecuteQueryRetry in your timer job implementation code.
Concurrency issues - process all subsites of a site collection in the same thread
Timer jobs may have concurrency issues when using multiple threads to process subsites.
Take this example: Thread A processes the first set of subsites from site collection 1, and thread B processes the rest of the subsites from site collection 1. If the timer job processes the subsite and the root site (by using the SiteClientContext object), there could be a concurrency issue because both thread A and thread B process the root site.
To avoid the concurrency issue (without running the timer jobs in a single thread) use the GetAllSubSites method within the timer job.
The following code shows how to use the GetAllSubSites method within a timer job:
public class SiteCollectionScopedJob: TimerJob
{
    public SiteCollectionScopedJob() : base("SiteCollectionScopedJob")
    {
        // ExpandSites *must* be false as we'll deal with that at TimerJobEvent level
        ExpandSubSites = false;
        TimerJobRun += SiteCollectionScopedJob_TimerJobRun;
    }

    void SiteCollectionScopedJob_TimerJobRun(object sender, TimerJobRunEventArgs e)
    {
        // Get all the subsites in the site we're processing
        IEnumerable<string> expandedSites = GetAllSubSites(e.SiteClientContext.Site);

        // Manually iterate over the content
        foreach (string site in expandedSites)
        {
            // Clone the existing ClientContext for the sub web
            using (ClientContext ccWeb = e.SiteClientContext.Clone(site))
            {
                // Here's the timer job logic, but now a single site collection is handled in a single thread which
                // allows for further optimization or prevents race conditions
                ccWeb.Load(ccWeb.Web, s => s.Title);
                ccWeb.ExecuteQueryRetry();
                Console.WriteLine("Here: {0} - {1}", site, ccWeb.Web.Title);
            }
        }
    }
}
Logging
The timer job framework uses the PnP Core logging components because it's part of the PnP Core library. To activate the built-in PnP Core logging, configure it by using the appropriate config file (app.config or web.config). The following example shows the required syntax:
  <system.diagnostics>
    <trace autoflush="true" indentsize="4">
      <listeners>
        <add name="DebugListenter" type="System.Diagnostics.TextWriterTraceListener" initializeData="trace.log" />
        <!--<add name="consoleListener" type="System.Diagnostics.ConsoleTraceListener" />-->
      </listeners>
    </trace>
  </system.diagnostics>
Using the above configuration file, the timer job framework uses the System.Diagnostics.TextWriterTraceListener to write logs to a file called trace.log in the same folder as the timer job .exe. Other trace listeners are available such as:
- ConsoleTraceListener writes logs to the console.
- The method described in Cloud Diagnostics - Take Control of Logging and Tracing in Windows Azure. This method uses Microsoft.WindowsAzure.Diagnostics.DiagnosticMonitorTraceListener. Additional Azure resources can be found here:
It is strongly advised to use the same logging approach for your custom timer job code as you do for the timer job framework. In your timer job code, you can use the PnP Core Log class:
void SiteGovernanceJob_TimerJobRun(object o, TimerJobRunEventArgs e)
{
    try
    {
        string library = "";

        // Get the number of admins
        var admins = e.WebClientContext.Web.GetAdministrators();

        Log.Info("SiteGovernanceJob", "ThreadID = {2} | Site {0} has {1} administrators.", e.Url, admins.Count, Thread.CurrentThread.ManagedThreadId);

        // Additional timer job logic...

        e.CurrentRunSuccessful = true;
        e.DeleteProperty("LastError");
    }
    catch(Exception ex)
    {
        Log.Error("SiteGovernanceJob", "Error while processing site {0}. Error = {1}", e.Url, ex.Message);
        e.CurrentRunSuccessful = false;
        e.SetProperty("LastError", ex.Message);
    }
}