Note
Access to this page requires authorization. You can try signing in or changing directories.
Access to this page requires authorization. You can try changing directories.
Important
The SharePoint Add-In model in SharePoint Online has been deprecated as of November 27th 2023, checkout the full retirement announcement to learn more.
Deprecation means that the feature will not get any new investments, but it's still supported. SharePoint add-in model is retired fully on April 2nd, 2026 and is no longer available after that time. Primary replacement technology for the SharePoint add-in model is SharePoint Framework (SPFx) which continues to be supported also in future.
This is the fifth in a series of articles about the basics of developing SharePoint-hosted SharePoint Add-ins. You should first be familiar with SharePoint Add-ins and the previous articles in this series, which you can find at Get started creating SharePoint-hosted SharePoint Add-ins | Next steps.
Note
If you have been working through this series about SharePoint-hosted add-ins, you have a Visual Studio solution that you can use to continue with this topic. You can also download the repository at SharePoint_SP-hosted_Add-Ins_Tutorials and open the BeforeWebPart.sln file.
In this article, you add a web part to the default page of the Employee Orientation SharePoint Add-in.
Add a web part to a page
In Solution Explorer, open the Default.aspx file.
Because we'll be adding a list view web part to the page that surfaces the New Employees in Seattle list, we no longer need a link to the list view page for the list. Remove the <asp:HyperLink> element from the <asp:Content> element whose ContentPlaceHolderId is
PlaceHolderMain.Inside the same <asp:Content> element, add the following WebPartZone.
  <WebPartPages:WebPartZone runat="server" FrameType="TitleBarOnly"
      ID="HomePage1" Title="loc:full" />
Save and close the file.
In Solution Explorer, open the elements.xml file for the page in the Pages node.
If the File element is self-closing, remove the "/" character from it and add the end tag
</File>.In the File element, add a child AllUsersWebPart element, and set its WebPartZoneID to the ID of the web part zone that you created on the page. The file's contents should now look like the following. This markup tells SharePoint to insert an AllUsersWebPart into the web part zone that is named "HomePage1".
<Elements xmlns="http://schemas.microsoft.com/sharepoint/">
  <Module Name="Pages">
    <File Path="Pages\Default.aspx" Url="Pages/Default.aspx" ReplaceContent="TRUE" >
      <AllUsersWebPart WebPartZoneID="HomePage1" WebPartOrder="1">

      </AllUsersWebPart>
    </File>
  </Module>
</Elements>
Add a CDATA element as a child of the AllUsersWebPart, and then add a webParts element as a child of the CDATA, as shown in the following markup.
<AllUsersWebPart WebPartZoneID="HomePage1" WebPartOrder="1">
  <![CDATA[
    <webParts>

    </webParts>
  ]]>
</AllUsersWebPart>
Add the following webPart markup as a child of the webParts element. This markup adds an XsltListViewWebPart and tells the web part to show the New Employees in Seattle list. Note that the ViewContentTypeId property value is just
0x, not the actual ID of the NewEmployee content type.<webPart xmlns="http://schemas.microsoft.com/WebPart/v3"> <metaData> <type name="Microsoft.SharePoint.WebPartPages.XsltListViewWebPart, Microsoft.SharePoint, Version=15.0.0.0, Culture=neutral, PublicKeyToken=71e9bce111e9429c" /> </metaData> <data> <properties> <property name="ListUrl">Lists/NewEmployeesInSeattle</property> <property name="IsIncluded">True</property> <property name="NoDefaultStyle">True</property> <property name="Title">New Employees in Seattle</property> <property name="PageType">PAGE_NORMALVIEW</property> <property name="Default">False</property> <property name="ViewContentTypeId">0x</property> </properties> </data> </webPart>
Run and test the add-in
Use the F5 key to deploy and run your add-in. Visual Studio makes a temporary installation of the add-in on your test SharePoint site and immediately runs the add-in.
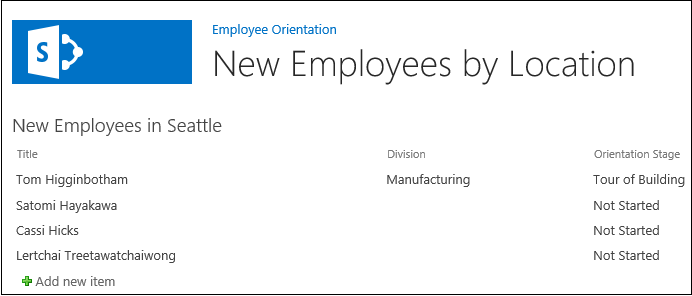
When the add-in's default page opens, the list view web part is on it and the list is displayed.
Figure 1. Default page with list view web part
Try adding new items to the list and editing existing items.
To end the debugging session, close the browser window or stop debugging in Visual Studio. Each time that you press F5, Visual Studio will retract the previous version of the add-in and install the latest one.
You will work with this add-in and Visual Studio solution in other articles, and it's a good practice to retract the add-in one last time when you are done working with it for a while. Right-click the project in Solution Explorer and select Retract.
Next steps
In the next article in this series, you'll add a workflow to a SharePoint-hosted SharePoint Add-in.