Note
Access to this page requires authorization. You can try signing in or changing directories.
Access to this page requires authorization. You can try changing directories.
Important
The SharePoint Add-In model in SharePoint Online has been deprecated as of November 27th 2023, checkout the full retirement announcement to learn more.
Deprecation means that the feature will not get any new investments, but it's still supported. SharePoint add-in model is retired fully on April 2nd, 2026 and is no longer available after that time. Primary replacement technology for the SharePoint add-in model is SharePoint Framework (SPFx) which continues to be supported also in future.
This is the eighth in a series of articles about the basics of developing provider-hosted SharePoint Add-ins. You should first be familiar with SharePoint Add-ins and the previous articles in this series, which you can find at Get started creating provider-hosted SharePoint Add-ins. Next steps
Note
If you have been working through this series about provider-hosted add-ins, you have a Visual Studio solution that you can use to continue with this topic. You can also download the repository at SharePoint_Provider-hosted_Add-Ins_Tutorials and open the BeforeFirstRunLogic.sln file.
In this article, you add code to the start page of the Chain Store SharePoint Add-in that checks to see if the current instance of the add-in is being run for the first time. If it is the first time, your code deploys the Local Employees list and the custom ribbon button.
Create the basic class for deploying SharePoint components
Note
The settings for Startup Projects in Visual Studio tend to revert to defaults whenever the solution is reopened. Always take these steps immediately after reopening the sample solution in this series of articles:
- Right-click the solution node at the top of Solution Explorer, and then select Set startup projects.
- Ensure that all three projects are set to Start in the Action column.
In the ChainStoreWeb project in Solution Explorer, right-click the Utilities folder, and then select Add > Existing Item.
In File Explorer, go to the solution folder, the ChainStoreWeb folder, and then open the Utilities folder.
Select SharePointComponentDeployer.cs, and then select Add.
Open the file SharePointComponentDeployer.cs. It has a static class and two static methods that get and set the add-in's version in the Tenants table of the corporate database. We won't discuss these methods because this series of articles is not intended to teach ASP.NET or SQL Server/Azure programming.
Add the following using statements to the top of the file.
  using System.Web;
  using System.Linq;
  using System.Collections.Generic;
  using Microsoft.SharePoint.Client;
At the top of the
SharePointComponentDeployerclass, add the following two static fields. Both of these are initialized in the Page_Load method of the add-in's start page (you add that code in a later step).internal static SharePointContext sPContext; internal static Version localVersion;Note the following about this code:
- The first field holds the
SharePointContextobject that is needed to make CRUD operations on SharePoint. - The second field holds the version number of the add-in that is installed on the host web. This value is initially different from the default value (0000.0000.0000.0000) that is recorded in the corporate Tenants table when the installation handler registers the tenant. For example, the first version of the add-in will be 1.0.0.0.
- The first field holds the
Create the following static property to hold the version of the add-in that is currently recorded in the corporate Tenants table. It uses the two methods that were already in the file to get and set this value.
internal static Version RemoteTenantVersion
{
    get
    {
        return GetTenantVersion();
    }
    set
    {
        SetTenantVersion(value);
    }
}
Now create the following
IsDeployedproperty.public static bool IsDeployed { get { if (RemoteTenantVersion < localVersion) return false; else return true; } }Note the following about this code:
- The Page_Load method of the add-in's start page uses the value of this property to determine whether the add-in is running for the first time. A false value signals that the add-in has not run before on the current host web, so its components need to be deployed.
- The criterion is whether the version number registered in the Tenants table is lower than the version actually installed. The first time the add-in runs, it is lower. Code that you write in a later step sets the version in the Tenants table to the same version as is actually installed, so when the add-in runs again,
IsDeployedreturns true and the deployment logic does not execute again.
Add the following method to the
SharePointComponentDeployerclass. Note that the last thing the method does is update the registered tenant version in the corporate database (0000.0000.0000.0000) to match the actual version of the add-in on the host web (1.0.0.0). You will complete this method in a later step.internal static void DeployChainStoreComponentsToHostWeb(HttpRequest request) { // TODO4: Deployment code goes here. RemoteTenantVersion = localVersion; }
Note
You may wonder now why the add-in uses version numbers and a "less than" test to determine the answer to a simple yes/no question: "Is the add-in running for the first time?" We could just as well have a simple string field in the Tenants table that is set to not-yet-run in the installation handler, and then changed to already-run-once by the first-run logic after the SharePoint components are deployed.
For the Chain Store add-in, a simple test would work. However, it is generally a good practice to use version numbers because a production add-in is likely to be updated-in-place in the future; that is, updated after it is already installed. When that time comes, your add-in logic needs to be sensitive to more than the two possibilities not-yet-run and already-run-once.
Suppose, for example, that you want to add an additional list to the host web in the upgrade from version 1.0.0.0 to 2.0.0.0. You could do this in an update event handler, or in first-run-after-update logic. Either way, your deployment logic needs to deploy new components, but it also needs to avoid trying to redeploy components that were deployed in a previous version of the add-in. A version number of 1.0.0.0 signals that the components of version 1.0.0.0 have been deployed, but that the first-run-after-update logic has not yet run.
Add the basic startup logic
The SharePoint host web needs to tell the remote web application what version of the add-in it has installed. We use a query parameter to do this.
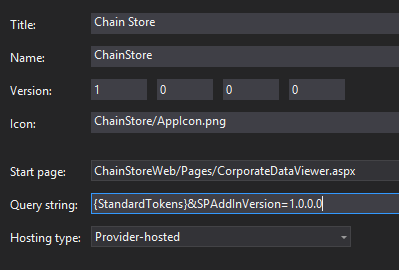
Open the AppManifest.xml file in the ChainStore project. In the designer, you see the placeholder {StandardTokens} as the value of the Query string box. Add the string
"&SPAddInVersion=1.0.0.0"to the end.The manifest designer should look similar to the following. Notice that the version number you pass in the query string has to match the value in the Version box of the designer. If you ever update the add-in, one of your tasks is to raise these two values and keep them the same.
Figure 1. General tab of the manifest designer
Open the CorporateDataViewer.aspx.cs file and add the following code to the Page_Load method, just under the line that initializes the
spContextobject.SharePointComponentDeployer.sPContext = spContext; SharePointComponentDeployer.localVersion = new Version(Request.QueryString["SPAddInVersion"]); if (!SharePointComponentDeployer.IsDeployed) { SharePointComponentDeployer.DeployChainStoreComponentsToHostWeb(Request); }Note the following about this code:
- It begins by setting the two static fields in the static
SharePointComponentDeployerclass. It passes the SharePointContext object because the code in theSharePointComponentDeployercalls into SharePoint, and it uses the query parameter that you added to set thelocalVersionproperty. - It does nothing if
IsDeployedis true; that is, if the first-run logic has already run. Otherwise, it calls the deployment method and passes the ASP.NET Request object.
- It begins by setting the two static fields in the static
Programmatically deploy a SharePoint list
In the SharePointComponentDeployer.cs file, replace the
TODO4with the following line (you create this method in the next step).CreateLocalEmployeesList();Add the following method to the
SharePointComponentDeployerclass.private static void CreateLocalEmployeesList() { using (var clientContext = sPContext.CreateUserClientContextForSPHost()) { var query = from list in clientContext.Web.Lists where list.Title == "Local Employees" select list; IEnumerable<List> matchingLists = clientContext.LoadQuery(query); clientContext.ExecuteQuery(); if (matchingLists.Count() == 0) { // TODO5: Create the list // TODO6: Rename the Title field on the list // TODO7: Add "Added to Corporate DB" field to the list clientContext.ExecuteQuery(); } } }Note the following about this code:
- It has two calls of ExecuteQuery. The first is needed to determine if the list already exists. The second does the work of creating the list.
- The ClientContext.LoadQuery method is similar to the ClientContext.Load method except that instead of bringing an entity such as a list down to the client, it brings down the enumerable results of a query.
Replace
TODO5with the following code.ListCreationInformation listInfo = new ListCreationInformation(); listInfo.Title = "Local Employees"; listInfo.TemplateType = (int)ListTemplateType.GenericList; listInfo.Url = "Lists/Local Employees"; List localEmployeesList = clientContext.Web.Lists.Add(listInfo);Note the following about this code:
- The ListCreationInformation class is similar to the ListItemCreationInformation class that you saw in an earlier article in this series. It is a lightweight class more suitable for sending information from the web application to SharePoint than the full List class.
- There are many types of list templates, such as the Tasks type for a "to do" list and the Events type for a calendar. The Local Employees list is based on the simplest: the Generic type.
- The ListCreationInformation.Url property holds the URL of the list relative to the host web. By specifying
"Lists/LocalEmployees", the code is setting the full URL of the list tohttps://{SharePointDomain}/hongkong/_layouts/15/start.aspx#/Lists/Local%20Employees.
Replace
TODO6with the following code, which changes the public name of the "Title" field (column) from "Title" to "Name." This is what you did on the List Settings page when you created the list manually.Field field = localEmployeesList.Fields.GetByInternalNameOrTitle("Title"); field.Title = "Name"; field.Update();You also manually created a field named Added to Corporate DB. To do that programmatically, add the following code in place of
TODO7.localEmployeesList.Fields.AddFieldAsXml("<Field DisplayName='Added to Corporate DB'" +"Type='Boolean'>" + "<Default>FALSE</Default></Field>", true, AddFieldOptions.DefaultValue);Note the following about this code:
- The key properties of the field are specified with an XML blob. This is a legacy of SharePoint's architecture, where websites, lists, fields, content types, and most other kinds of SharePoint components are defined as XML. In this case, we specify the display name, data type, and default value of the field.
- The second parameter determines whether the field is visible in the default view of the list. We set it to true.
- The third parameter determines what content types the field is added to. Passing DefaultValue means that it is only added to the list's default content type.
Recall that the Added to Corporate DB is No (that is, false) by default, but the custom ribbon button in the add-in sets it to Yes after it adds the employee to the corporate database. This system works best only if users cannot manually change the value of the field. To ensure that they don't, make the field invisible in the forms for creating and editing items on the Local Employees list. We do this by adding two more attributes to the first parameter, as shown in the following code.
localEmployeesList.Fields.AddFieldAsXml("<Field DisplayName='Added to Corporate DB'"
                                     + " Type='Boolean'"
                                     + " ShowInEditForm='FALSE' "
                                     + " ShowInNewForm='FALSE'>"
                                     + "<Default>FALSE</Default></Field>",
                                     true,
                                     AddFieldOptions.DefaultValue);
The entire
CreateLocalEmployeesListshould now look like the following.private static void CreateLocalEmployeesList() { using (var clientContext = sPContext.CreateUserClientContextForSPHost()) { var query = from list in clientContext.Web.Lists where list.Title == "Local Employees" select list; IEnumerable<List> matchingLists = clientContext.LoadQuery(query); clientContext.ExecuteQuery(); if (matchingLists.Count() == 0) { ListCreationInformation listInfo = new ListCreationInformation(); listInfo.Title = "Local Employees"; listInfo.TemplateType = (int)ListTemplateType.GenericList; listInfo.Url = "LocalEmployees"; List localEmployeesList = clientContext.Web.Lists.Add(listInfo); Field field = localEmployeesList.Fields.GetByInternalNameOrTitle("Title"); field.Title = "Name"; field.Update(); localEmployeesList.Fields.AddFieldAsXml("<Field DisplayName='Added to Corporate DB'" + " Type='Boolean'" + " ShowInEditForm='FALSE' " + " ShowInNewForm='FALSE'>" + "<Default>FALSE</Default></Field>", true, AddFieldOptions.DefaultValue); clientContext.ExecuteQuery(); } } }
Temporarily remove the custom button from the project
For technical reasons that we'll discuss in the next article, the custom button we created cannot be installed without modification when it is being put on the ribbon of a list that is programmatically deployed. We'll remove it temporarily from the project so that we can test our first-run logic. We'll bring it back in the next article.
- In Solution Explorer, in the ChainStore project, right-click the AddEmployeeToCorpDB node, and then select Exclude from Project.
Request permission to manage lists on the host web
Because the add-in now adds a list to the host web, not just items to an existing list, we need to escalate the permissions that the add-in requests from Write to Manage:
- In Solution Explorer, open the AppManifest.xml file in the ChainStore project.
- On the Permissions tab, leave the Scope value at Web, but in the Permission field, select Manage from the drop-down.
- Save the file.
Run the add-in and test the first-run logic
Open the Site Contents page of the Hong Kong SAR store's website, and then remove the Local Employees list.
Use the F5 key to deploy and run your add-in. Visual Studio hosts the remote web application in IIS Express and hosts the SQL database in SQL Express. It also makes a temporary installation of the add-in on your test SharePoint site and immediately runs the add-in. You are prompted to grant permissions to the add-in before its start page opens.
When the add-in's start page opens, select the Back to Site link on the chrome control at the top.
Go to the Site Contents page. The Local Employees list is present because your first-run logic added it.
Note
If the list is not there or you have other indications that the first-run code is not executing, it may be that the Tenants table is not being reverted to an empty state when you select F5. The most common cause of this is that the ChainCorporateDB project is no longer set as a startup project in Visual Studio. See the note near the top of this article for how to fix this. Also be sure that you've configured the database to be rebuilt as described in Configure Visual Studio to rebuild the corporate database with each debugging session.
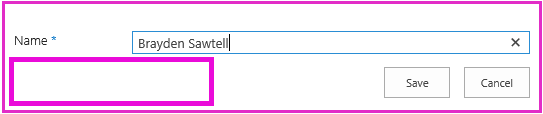
Open the list and add an item. Note that on the new item form, the Added to Corporate DB field is no longer present, so it cannot be manually set. This is true of the edit item form as well.
Figure 2. New item form for the Local Employees list
Use the browser's back button to go back to the add-in's start page.
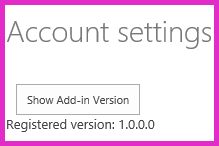
Select the gear icon on the chrome control at the top, and then select Account settings.
On the Account settings page, select the Show Add-in Version button. The version shows as 1.0.0.0 because the first-run logic changed it.
Figure 3. Account settings page
To end the debugging session, close the browser window or stop debugging in Visual Studio. Each time you select F5, Visual Studio retracts the previous version of the add-in and installs the latest one.
You will work with this add-in and Visual Studio solution in other articles, and it's a good practice to retract the add-in one last time when you are done working with it for a while. Right-click the project in Solution Explorer and select Retract.
Next steps
In the next article, you'll see how to get the custom button for the Local Employee ribbon back into the add-in now that the list is being deployed programmatically: Programmatically deploy a custom button in the provider-hosted add-in.