Note
Access to this page requires authorization. You can try signing in or changing directories.
Access to this page requires authorization. You can try changing directories.
Important
The SharePoint Add-In model in SharePoint Online has been deprecated as of November 27th 2023, checkout the full retirement announcement to learn more.
Deprecation means that the feature will not get any new investments, but it's still supported. SharePoint add-in model is retired fully on April 2nd, 2026 and is no longer available after that time. Primary replacement technology for the SharePoint add-in model is SharePoint Framework (SPFx) which continues to be supported also in future.
This is the second in a series of articles about the basics of developing SharePoint-hosted SharePoint Add-ins. You should first be familiar with the topic SharePoint Add-ins and the overview article in this series:
Note
If you have been working through this series about SharePoint-hosted add-ins, you have a Visual Studio solution that you can use to continue with this topic. You can also download the repository at SharePoint_SP-hosted_Add-Ins_Tutorials and open the BeforeColumns.sln file.
You'll find it a lot easier to develop SharePoint-hosted SharePoint Add-ins if you are familiar with how users deploy and install your add-ins. So, in this article, we'll take a brief break from coding to create and use an add-in catalog, and then install the add-in you've been working on.
Create an add-in catalog
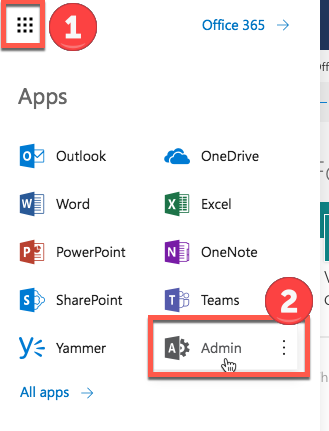
Sign in to your Office 365 subscription as an administrator. Select the add-in launcher icon, and then select the Admin tile.
Figure 1. Office 365 add-in launcher
In the Admin Center, expand the Admin centers node in the task pane, and then select SharePoint.
In the SharePoint Admin Center, select apps in the task pane.
On the apps page, select App Catalog. (If there is already an add-in catalog site collection in the subscription, it opens and you are finished. You cannot create more than one add-in catalog in a subscription.)
On the App Catalog Site page, select OK to accept the default option and create a new app catalog site.
In the Create App Catalog Site Collection dialog, specify the title and website address of your app catalog site. We recommend that you include "catalog" in the title and URL to make it memorable and distinguishable in the SharePoint Admin Center.
Specify a Time Zone and set yourself as the Administrator.
Set the Storage Quota to the lowest possible value (currently 110, but that can change), because the packages you upload to this site collection are very small.
Set the Server Resource Quota to 0 (zero), and then select OK. (The server resource quota is related to throttling poorly performing sandboxed solutions, but you won't be installing any sandboxed solutions on your add-in catalog site.)
As the site collection is being created, SharePoint takes you back to the SharePoint Admin Center. After a few minutes, you'll see that the collection has been created.
Package the add-in and upload it to the catalog
- Open the Visual Studio solution, right-click the project node in Solution Explorer, and then select Publish.
- In the Publish pane, select Package the add-in. The add-in is packaged and saved as an
*.appfile in the solution's \bin\debug\web.publish\1.0.0.0 folder. - Open your add-in catalog site in a browser, and then select SharePoint Add-ins in the navigation bar.
- The SharePoint Add-ins catalog is a standard SharePoint asset library. Upload the add-in package to it using any of the methods of uploading files to SharePoint libraries.
Install the add-in as end users do
- Navigate to any website in the SharePoint Online subscription and open the Site Contents page.
- Select add an add-in to open the Your Add-ins page.
- Find the Employee Orientation add-in in the Add-ins you can add section, and select its tile.
- Select Trust It in the consent dialog. The Site Contents page automatically opens and the add-in appears with a notation that it is installing. After it installs, users can select the tile to run the add-in.
Important
It might take up to 24 hours for add-ins to be available for consumption once installed. During that time, users can receive a "The redirect URI specified in the request does not match the redirect URIs configured for the application" AADSTS50011 error. If you need to shortcut that time and you have administrative permissions in your tenant, you can add that URL to the Application mentioned in the error ('00000003-0000-0ff1-ce00-000000000000') using Microsoft Graph Powershell.
For example: let's assume you get the "AADSTS50011 The redirect URI https://contoso-79d42f062409ae.sharepoint.com/_forms/default.aspx specified in the request does not match the redirect URIs configured for the application '00000003-0000-0ff1-ce00-000000000000'." when accessing the add-in.
Top make the add-in immediately available, an user with admin rights can run the following script in PowerShell:
Connect-MgGraph -Scopes Application.ReadWrite.All
$sharepointPrincipal = Get-MgServiceprincipal -Filter "AppId eq '00000003-0000-0ff1-ce00-000000000000'"
$sharepointPrincipal | fl
$replyUrls = $sharepointPrincipal.ReplyUrls
$replyUrls += "https://contoso-79d42f062409ae.sharepoint.com/_forms/default.aspx"
Update-MgServiceprincipal -ServicePrincipalId $sharepointPrincipal.Id -ReplyUrls $replyUrls
Remove the add-in
To continue enhancing the same SharePoint Add-in in Visual Studio (see Next steps), remove the add-in with these steps:
- In the Site Contents page, move the cursor over the add-in so that the callout button ... appears.
- Select the callout button, and then select REMOVE on the callout.
- Navigate back to your add-in catalog site and select SharePoint Add-ins in the navigation bar.
- Highlight the add-in and select manage on the task bar just above the list, and then select Delete on the manage menu.
Next steps
We strongly recommend that you continue with this series about SharePoint-hosted add-ins before you go on to the more advanced topics. Next, we get back to coding in Add custom columns to a SharePoint-hosted SharePoint Add-in.