Note
Access to this page requires authorization. You can try signing in or changing directories.
Access to this page requires authorization. You can try changing directories.
Important
The SharePoint Add-In model in SharePoint Online has been deprecated as of November 27th 2023, checkout the full retirement announcement to learn more.
Deprecation means that the feature will not get any new investments, but it's still supported. SharePoint add-in model is retired fully on April 2nd, 2026 and is no longer available after that time. Primary replacement technology for the SharePoint add-in model is SharePoint Framework (SPFx) which continues to be supported also in future.
This is the sixth in a series of articles about the basics of developing provider-hosted SharePoint Add-ins. You should first be familiar with SharePoint Add-ins and the previous articles in this series, which you can find at Get started creating provider-hosted SharePoint Add-ins.
Note
If you have been working through this series about provider-hosted add-ins, you have a Visual Studio solution that you can use to continue with this topic. You can also download the repository at SharePoint_Provider-hosted_Add-Ins_Tutorials and open the BeforeAdd-inPart.sln file.
In this article, you add a special kind of web part called an add-in part to the SharePoint Add-in. The add-in part exposes the add-in's order form on a SharePoint page.
Create the add-in part
Note
The settings for Startup Projects in Visual Studio tend to revert to defaults whenever the solution is reopened. Always take these steps immediately after reopening the sample solution in this series of articles:
- Right-click the solution node at the top of Solution Explorer, and then select Set startup projects.
- Ensure that all three projects are set to Start in the Action column.
In Solution Explorer, right-click the ChainStore project, and then select Add > New Item.
Select Client web part (Host Web), give it the name Place Order, and then select Add. ("Client web part" is another name for "add-in part".)
On the next page of the wizard, select the second option: Select or enter the URL of an existing webpage for the client web part content.
In the drop-down list, select the URL for the OrderForm.aspx page, and then select Finish.
An elements.xml file that defines the add-in part is added to the project and opened.
In the ClientWebPart element, change the following attributes to these values:
Attribute Value Title Place Order Description Form to place an order DefaultHeight 320 Leave all the other attributes with their defaults and save the file.
Run the add-in and test the add-in part
Use the F5 key to deploy and run your add-in. Visual Studio hosts the remote web application in IIS Express and hosts the SQL database in SQL Express. It also makes a temporary installation of the add-in on your test SharePoint site and immediately runs the add-in. You are prompted to grant permissions to the add-in before its start page opens.
When the add-in's start page opens, the add-in has been deployed, and the Place Order add-in part is available for users to add to any web part area on any SharePoint page on the Hong Kong SAR store's website. Follow these steps to add it to the home page:
Select Back to Site on the chrome control at the top of the start page to open the home page of the Hong Kong SAR store.
On the ribbon, open the Page tab and select Edit.
After the page is in edit mode, open the Insert tab on the ribbon, and then select Add-in Part (the button may still be called App Part).
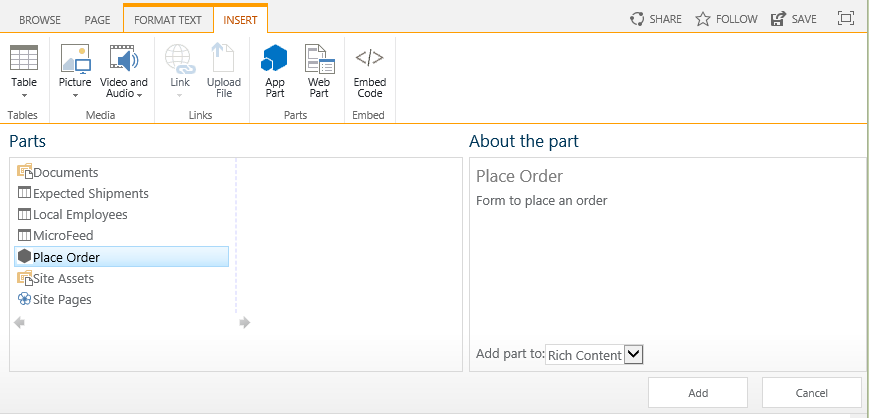
On the web part insertion control that opens, select the Place Order add-in part. The control looks similar to the following.
Figure 1. SharePoint's web part insertion control
Select somewhere in one of the web part zones of the form to set the location where the add-in part will go.
Select Add on the web part insertion control. The Place Order add-in part is added to the web part zone.
On the ribbon, select Save.
The order form now appears on the page, and it has the look-and-feel of the rest of the page. It should look like the following.
Figure 2. Place Order add-in part
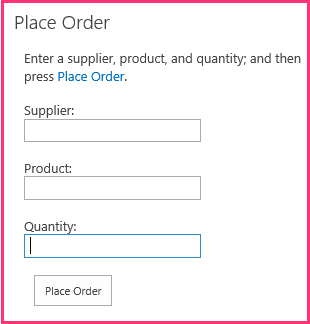
Enter values for Supplier, Product, and Quantity, and then select Place Order. Nothing appears to happen, but an order is entered in the corporate database. Optionally, you can empty the fields of the add-in part by refreshing the page.
Use the browser's back button until you are back at the Chain Store add-in's start page, and then select Show Orders. Your new order is listed.
To end the debugging session, close the browser window or stop debugging in Visual Studio. Each time you select F5, Visual Studio retracts the previous version of the add-in and installs the latest one.
You will work with this add-in and Visual Studio solution in other articles, and it's a good practice to retract the add-in one last time when you are done working with it for a while. Right-click the project in Solution Explorer and select Retract.
Next steps
The add-in depends on two lists that you created manually; you don't want your users to have to do that. In the next article, you begin the process of automatically creating these lists. The first major step is to create custom handlers for the event of installing an add-in: Handle add-in events in the provider-hosted add-in.