Note
Access to this page requires authorization. You can try signing in or changing directories.
Access to this page requires authorization. You can try changing directories.
SharePoint assets can be provisioned as part of the SharePoint Framework solution, and are deployed to SharePoint sites when the solution is installed on it.
Note
*.sppkg packages that contain SharePoint assets cannot be tenant deployed from the tenant application catalog, and cannot be used in a site application catalog.
Before you start, complete the procedures in the following articles to ensure that you understand the basic flow of creating a custom client-side web part:
You can also follow these steps by watching this video on the Microsoft 365 Platform Communtiy (PnP) YouTube Channel:
Create a new web part project
Create a new project directory in your favorite location:
md asset-deployment-webpartGo to the project directory:
cd asset-deployment-webpartCreate a new client-side web part solution by running the Yeoman SharePoint Generator:
yo @microsoft/sharepointWhen prompted, enter the following values (select the default option for all prompts omitted below):
What is your solution name?: asset-deployment-webpart
Which type of client-side component to create?: WebPart
What is your Web part name?: AssetDeployment
Which template would you like to use?: No JavaScript framework
At this point, Yeoman installs the required dependencies and scaffolds the solution files. This might take a few minutes. Yeoman scaffolds the project to include your AssetDeployment web part as well.
Next, execute the following to open the web part project in Visual Studio Code:
code .
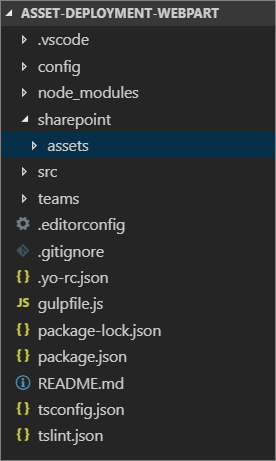
Create folder structure for your SharePoint assets
We first need to create an assets folder where we place all feature framework assets used to provision SharePoint structures when a package is installed.
Create a folder called sharepoint to the root of the solution.
Create a folder called assets as a subfolder for the created sharepoint folder.
Your solution structure should look like the following picture:
Create feature framework files for initial deployment
To provision SharePoint assets to sites with feature framework elements, we need to create needed XML files to the asset folder. Supported elements for the SharePoint Framework solution packages are following:
- Fields / site columns
- Content types
- List instances
- List instances with custom schema
Add an elements.xml file for SharePoint definitions
In the following steps, we define the needed structure to be provisioned.
Create a new file elements.xml in the sharepoint\assets folder.
Copy the following XML structure into elements.xml.
<?xml version="1.0" encoding="utf-8"?>
<Elements xmlns="http://schemas.microsoft.com/sharepoint/">

    <Field ID="{060E50AC-E9C1-4D3C-B1F9-DE0BCAC300F6}"
            Name="SPFxAmount"
            DisplayName="Amount"
            Type="Currency"
            Decimals="2"
            Min="0"
            Required="FALSE"
            Group="SPFx Columns" />

    <Field ID="{943E7530-5E2B-4C02-8259-CCD93A9ECB18}"
            Name="SPFxCostCenter"
            DisplayName="Cost Center"
            Type="Choice"
            Required="FALSE"
            Group="SPFx Columns">
        <CHOICES>
        <CHOICE>Administration</CHOICE>
        <CHOICE>Information</CHOICE>
        <CHOICE>Facilities</CHOICE>
        <CHOICE>Operations</CHOICE>
        <CHOICE>Sales</CHOICE>
        <CHOICE>Marketing</CHOICE>
        </CHOICES>
    </Field>

    <ContentType ID="0x010042D0C1C200A14B6887742B6344675C8B"
            Name="Cost Center"
            Group="SPFx Content Types"
            Description="Sample content types from web part solution">
        <FieldRefs>
            <FieldRef ID="{060E50AC-E9C1-4D3C-B1F9-DE0BCAC300F6}" />
            <FieldRef ID="{943E7530-5E2B-4C02-8259-CCD93A9ECB18}" />
        </FieldRefs>
    </ContentType>

    <ListInstance
            CustomSchema="schema.xml"
            FeatureId="00bfea71-de22-43b2-a848-c05709900100"
            Title="SPFx List"
            Description="SPFx List"
            TemplateType="100"
            Url="Lists/SPFxList">
    </ListInstance>

</Elements>
There are a few things to take note of from this XML:
- We're provisioning two fields to the site, a content type and a list instance with custom schema.
- Definitions use standard Feature Framework schema, which is well known to SharePoint developers.
- Custom fields are being referenced in the introduced content type.
- We use the
CustomSchemaattribute in theListInstanceelement to define a provisioning time schema.xml file for the list. This way the list is still based on the out-of-the-box list template (normal custom list '100' in this case), but we can define an alternative provisioning definition during initial provisioning. - When provisioning list instances using Features, you must provide the ID of the Feature associated with the particular list definition. Using the
FeatureIdattribute you're supposed to provide the ID of the Feature, which contains the List Definition. As an example: if you’re provisioning an instance of a custom list the FeatureId attribute should be set to{00bfea71-de22-43b2-a848-c05709900100}.
For more detail on the Feature element manifest schema, see: Using Features in SharePoint Foundation.
Add a schema.xml file for defining list structure
In the previous step, we referenced the schema.xml file in the CustomSchema attribute of the ListInstance element, so we need to include that file in our package.
Create a new file schema.xml in the sharepoint\assets folder.
Copy the following XML structure into schema.xml.
<List xmlns:ows="Microsoft SharePoint" Title="Basic List" EnableContentTypes="TRUE" FolderCreation="FALSE" Direction="$Resources:Direction;" Url="Lists/Basic List" BaseType="0" xmlns="http://schemas.microsoft.com/sharepoint/">
  <MetaData>
    <ContentTypes>
      <ContentTypeRef ID="0x010042D0C1C200A14B6887742B6344675C8B" />
    </ContentTypes>
    <Fields></Fields>
    <Views>
      <View BaseViewID="1" Type="HTML" WebPartZoneID="Main" DisplayName="$Resources:core,objectiv_schema_mwsidcamlidC24;" DefaultView="TRUE" MobileView="TRUE" MobileDefaultView="TRUE" SetupPath="pages\viewpage.aspx" ImageUrl="/_layouts/images/generic.png" Url="AllItems.aspx">
        <XslLink Default="TRUE">main.xsl</XslLink>
        <JSLink>clienttemplates.js</JSLink>
        <RowLimit Paged="TRUE">30</RowLimit>
        <Toolbar Type="Standard" />
        <ViewFields>
          <FieldRef Name="LinkTitle"></FieldRef>
          <FieldRef Name="SPFxAmount"></FieldRef>
          <FieldRef Name="SPFxCostCenter"></FieldRef>
        </ViewFields>
        <Query>
          <OrderBy>
            <FieldRef Name="ID" />
          </OrderBy>
        </Query>
      </View>
    </Views>
    <Forms>
      <Form Type="DisplayForm" Url="DispForm.aspx" SetupPath="pages\form.aspx" WebPartZoneID="Main" />
      <Form Type="EditForm" Url="EditForm.aspx" SetupPath="pages\form.aspx" WebPartZoneID="Main" />
      <Form Type="NewForm" Url="NewForm.aspx" SetupPath="pages\form.aspx" WebPartZoneID="Main" />
    </Forms>
  </MetaData>
</List>
There are a few things to take note of from this XML:
- The custom content type deployed by using the elements.xml file is referenced in the
ContentTypeRefelement. - Custom fields called
SPFxAmountandSPFxCostCenterare referenced in theFieldRefelement.
For more information about the Schema.xml schema, see: Understanding Schema.xml Files.
Ensure that definitions are taken into use in build pipeline
At this point, we've created the files for provisioning SharePoint assets using the Feature schema from the solution when it's deployed. The next step is to include them in the SharePoint package *.sppkg file.
Open package-solution.json from the config folder.
The package-solution.json file defines the package metadata as shown in the following code:
Ensure the new Feature Framework files included in the SharePoint Package.
Include a Feature Framework feature definition for the solution package. Include a JSON definition for the needed feature in the solution structure as demonstrated in the following code:
{
  "$schema": "https://developer.microsoft.com/json-schemas/spfx-build/package-solution.schema.json",
  "solution": {
    //...
    "version": "1.0.0.0",
    "includeClientSideAssets": true,
    "isDomainIsolated": false,
    // >>> START
    //     add the following to the package-solution.json file
    "features": [{
      "title": "asset-deployment-webpart-client-side-solution",
      "description": "asset-deployment-webpart-client-side-solution",
      "id": "00000000-0000-0000-0000-000000000000",     // <-- Update new GUID
      "version": "1.0.0.0",
      "assets": {
        "elementManifests": [
          "elements.xml"
        ],
        "elementFiles":[
          "schema.xml"
        ]
      }
    }]
    // <<< END
  },
  "paths": {
    "zippedPackage": "solution/asset-deployment-webpart.sppkg"
  }
}
There are a few things to take note of from this XML:
- Make sure you define a unique GUID for the
idproperty in thefeatureproperty. - You can technically have multiple features in the package because the
featuresproperty is an array. However, this isn't recommended. - elements.xml is referenced under
elementManifestsso that it's properly packaged for the feature definition as an element manifest file. - You can have multiple elements.xml files in the definition, and they would be executed in the order they're mentioned in the JSON definition. Typically, you should avoid using multiple elements.xml files because this adds unnecessary complexity. You can define all needed assets in a single elements.xml file.
Deploy and test asset provisioning
Now you're ready to deploy the solution to SharePoint. Because we're provisioning assets directly to the SharePoint sites when the solution is installed, you can't test the capability in a local or online Workbench.
In the console, execute the following command to package your client-side solution that contains the web part to get the basic structure ready for packaging:
gulp bundleExecute the following command to create the solution package:
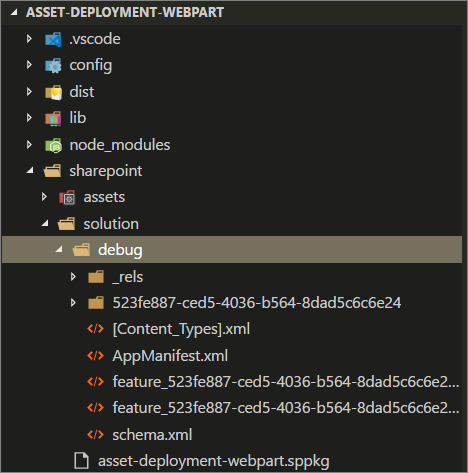
gulp package-solutionThe command creates the asset-deployment-webpart.sppkg package in the sharepoint/solution folder.
Before testing the package in SharePoint, let's quickly have a look on the default structures created for the package around the defined feature framework elements.
Move back to the Visual Studio Code side and expand the sharepoint/solution/debug folder, which contains the raw XML structures to be included in the actual *.sppkg package.
Deploy the package that was generated to the app catalog.
In the browser, navigate to your tenant's app catalog.
Upload or drag and drop the asset-deployment-webpart.sppkg located in the sharepoint/solution folder to the app catalog. SharePoint displays a dialog and asks you to trust the client-side solution to deploy.
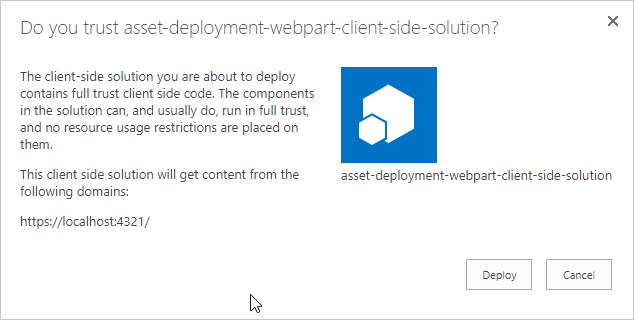
Note
SharePoint validates the published package when it's deployed. You only see the trust dialog if the package is valid for deployment. You can also see the status around this validation from the Valid App Package column in the app catalog.
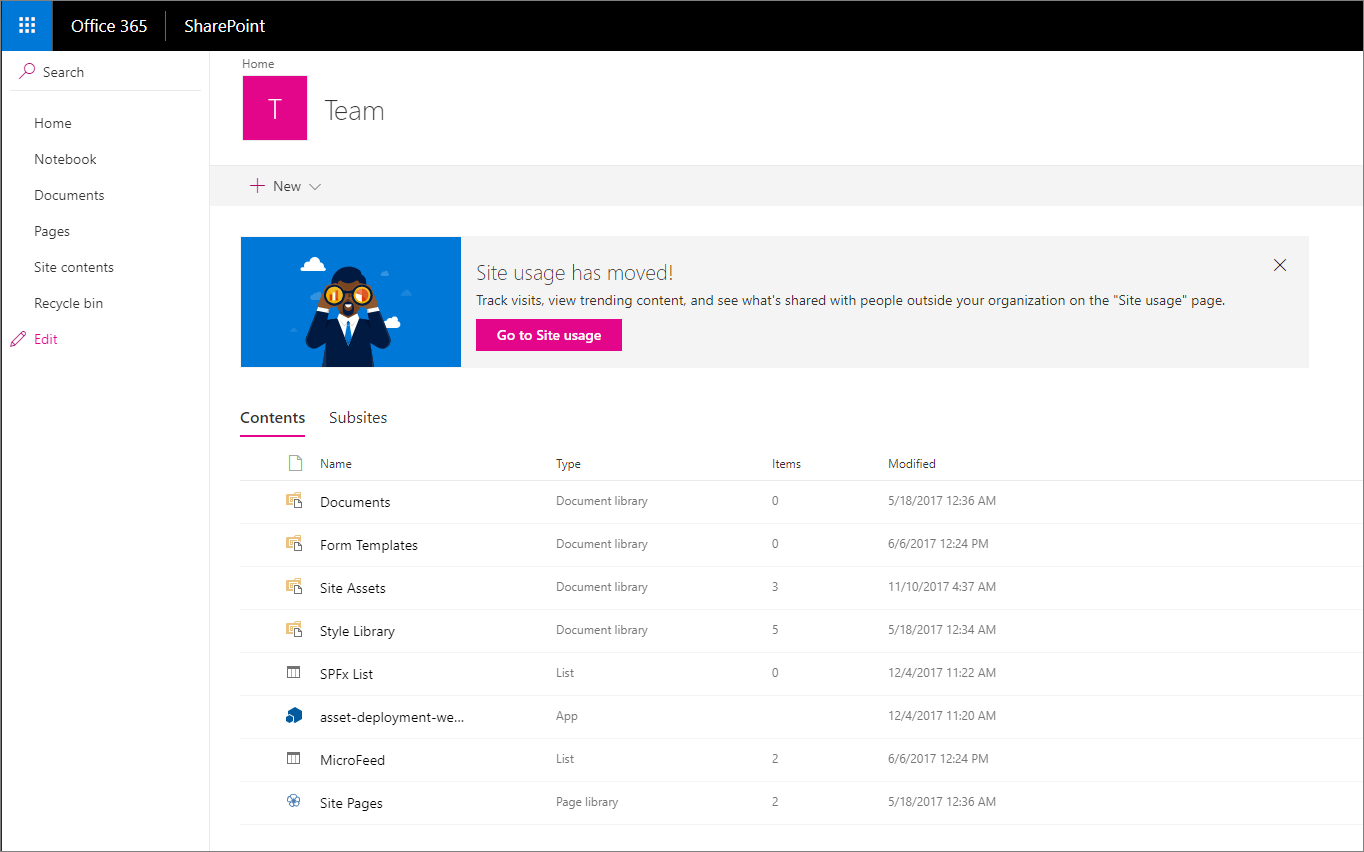
Go to the site where you want to test the SharePoint asset provisioning. This could be any site collection in the tenant where you deployed this solution package.
Select the gear icon on the top nav bar on the right, and then select Add an app to go to your Apps page.
In the Search box, enter deployment, and then select ENTER to filter your apps.
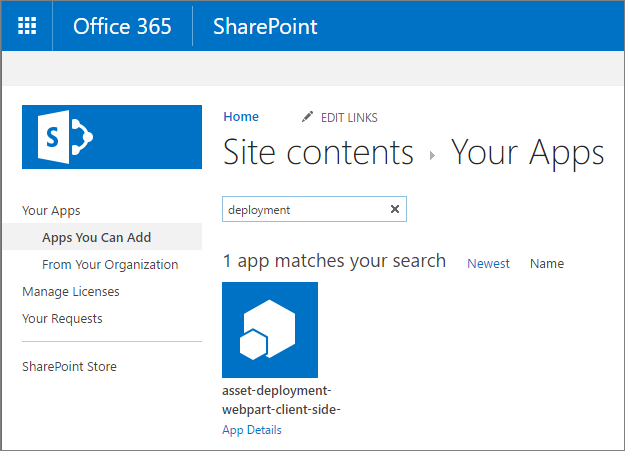
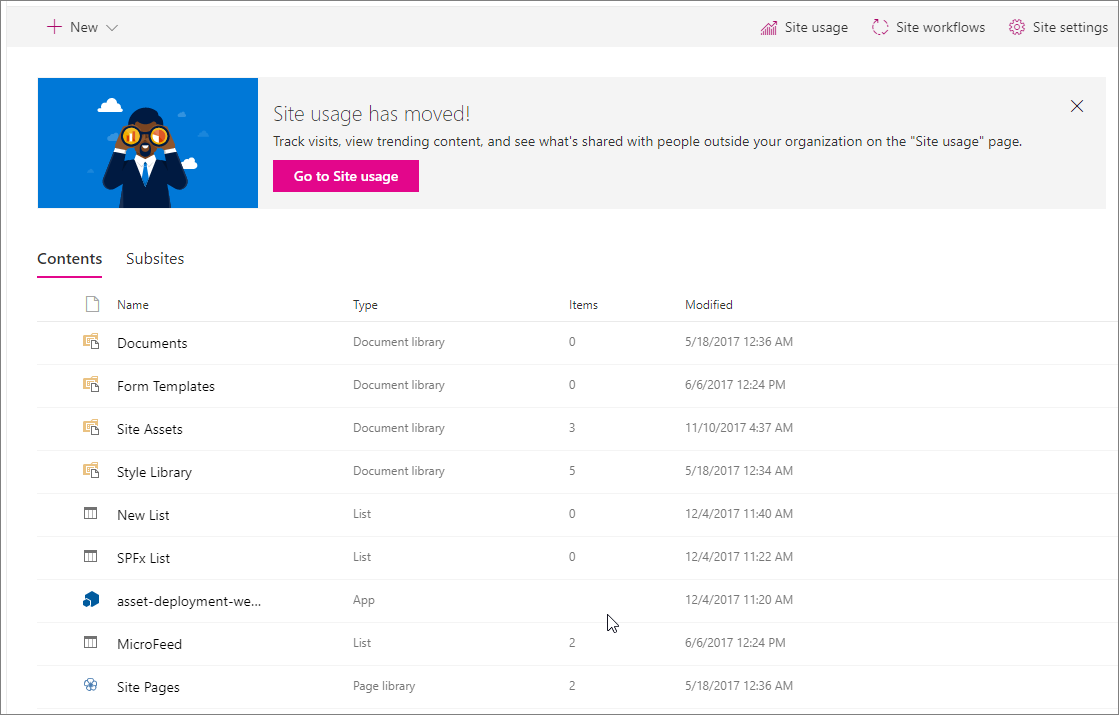
Select the asset-deployment-webpart-client-side-solution app to install the app on the site. When installation is completed, refresh the page by selecting F5. Notice how the custom SPFx List has been provisioned to site as part of the solution package deployment.
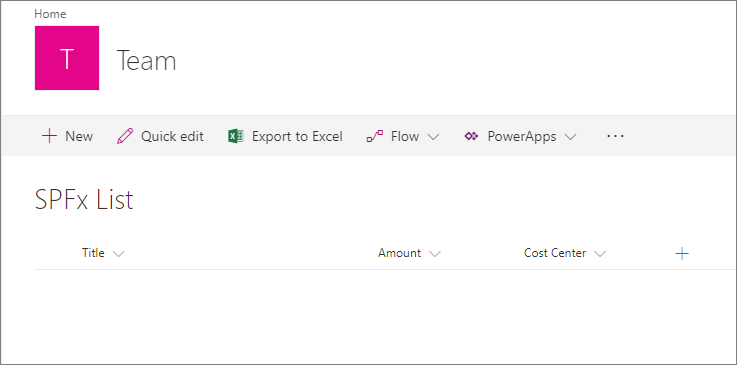
Select SPFx List to move to the list. Notice how the custom fields Amount and Cost Center are visible automatically in the default view of the list.
Define upgrade actions for new version
Whenever you build a new version of your SharePoint Framework solution, you might have some required changes on the provisioned SharePoint assets. You can take advantage of the Feature Framework upgrade action support when a new version of the package is being deployed.
SharePoint Framework solutions do support the following Feature Framework upgrade action definitions:
- ApplyElementManifest
- AddContentTypeField
For more information on the Feature Framework upgrade action definitions, see: SharePoint Add-ins update process.
Add a new element.xml file for the new version
Go back to your solution in Visual Studio Code.
Create a new file elements-v2.xml in the sharepoint\assets folder.
Copy the following XML structure into elements-v2.xml, which defines a new SharePoint list to be provisioned with a title of New List.
<?xml version="1.0" encoding="utf-8"?>
<Elements xmlns="http://schemas.microsoft.com/sharepoint/">
  <ListInstance
    FeatureId="00bfea71-de22-43b2-a848-c05709900100"
    Title="New List"
    Description="New list provisioned from v2"
    TemplateType="100"
    Url="Lists/NewList">
  </ListInstance>
</Elements>
Important
Don't change the GUID in this XML. This points to the GUID where the list type is defined.
We also need a definition for actual Feature Framework upgrade actions, so create a new file upgrade-actions-v2.xml in the sharepoint\assets folder.
Copy the following XML structure into upgrade-actions-v2.xml. Notice that the feature GUID reference in the path refers to the automatically created folder under the sharepoint/solution/debug folder and has to be updated based on your solution. This GUID also matches the GUID of the feature, which we defined in the package-solution.json file.
<ApplyElementManifests>
  <ElementManifest Location="{feature-guid}\elements-v2.xml" />
</ApplyElementManifests>
Important
The {feature-guid} should match the GUID of the feature you added to the package-solution.json file.
Deploy the new version to SharePoint
Next, we need to update both the solution version and the feature version responsible for the asset provisioning.
Important
The solution version indicates for SharePoint that there's a new version of the SharePoint Framework solution available. The feature version ensures that the upgrade actions are executed accordingly when the solution package is upgraded in the existing site(s).
Open package-solution.json from the config folder and update the version values for both the solution and the feature to
2.0.0.0.We also need to include elements-v2.xml under the elementManifest section, and need to include the upgradeActions element with a pointer to the created upgrade-actions-v2.xml file.
Here's the complete package-solution.json file with needed changes. Notice that identifiers for your solution could be slightly different, so concentrate on adding only the missing pieces.
{
  "$schema": "https://developer.microsoft.com/json-schemas/spfx-build/package-solution.schema.json",
  "solution": {
    //...
    "version": "2.0.0.0",
    "includeClientSideAssets": true,
    "isDomainIsolated": false,
    "features": [{
      "title": "asset-deployment-webpart-client-side-solution",
      "description": "asset-deployment-webpart-client-side-solution",
      "id": "{feature-guid}",
      "version": "2.0.0.0",
      "assets": {
        "elementManifests": [
          "elements.xml",
          "elements-v2.xml"
        ],
        "elementFiles":[
          "schema.xml"
        ],
        "upgradeActions":[
          "upgrade-actions-v2.xml"
        ]
      }
    }]
    //...
  }
}
Important
Notice that we also included the elements-v2.xml under the elementManifest section. This ensures that when you install this package to a clean site as a version 2.0, the end result will match the upgraded packages.
In the console window, execute the following command to repackage your client-side solution that contains the web part so that we get the basic structure ready for packaging:
gulp bundleExecute the following command to create the solution package:
gulp package-solutionThe command creates a new version of the solution package in the sharepoint/solution folder. Notice that you can easily confirm from the sharepoint/solution/debug folder that the updated XML files are included in the solution package.
Next you need to deploy the new version that was generated to the app catalog. Go to your tenant's app catalog.
Upload or drag and drop the asset-deployment-webpart.sppkg located in the sharepoint/solution folder to the app catalog. SharePoint requests that you confirm overriding the existing version.
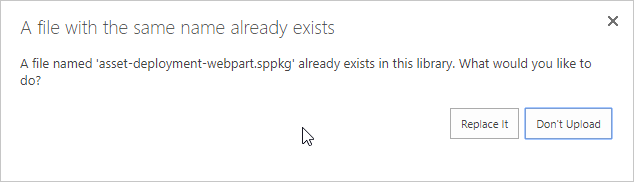
Select Replace It to update the latest version to the app catalog.
Select Deploy to trust the latest version.
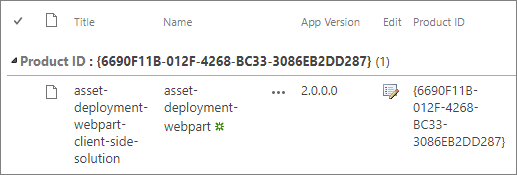
Notice that the App Version column for the asset-deployment-webpart-client-side-solution is now updated to be 2.0.0.0.
Update an existing instance in the site
With the package been updated in the app catalog, we can move to the SharePoint content site and do the upgrade for the existing instance.
Go to the site where you deployed the first version of the SharePoint Framework solution.
Go to the Site Contents page.
Select Details from the context menu of the asset-deployment-webpart-client-side-solution solution.
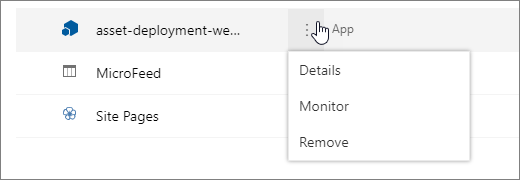
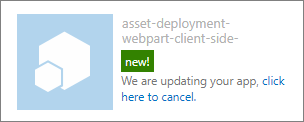
This presents the current details around the installed SharePoint Framework solution. This page also now shows the text as There is a new version of this app. Get it now to indicate that there's a new version available.

Select the GET IT button to start the update process for the package.

If you move to the classic experience, you can see more details on the actual upgrade action being applied for the SharePoint Framework solution.
Note
Because the SharePoint Framework uses the same app infrastructure as SharePoint Add-ins, the status for the upgrade indicates that the update can happen for an add-in or an app.
The update can take a while, but when the solution status changes to normal again, refresh the site contents page to confirm that a new list called New List has been successfully provisioned as part of the update process.
Now we've successfully upgraded this instance to the latest version. This Feature Framework option for SharePoint asset provisioning similar to the SharePoint Add-in model. The key difference is that the assets are being provisioned directly to a normal SharePoint site, because there's no concept called app or add-in web with SharePoint Framework solutions.