Note
Access to this page requires authorization. You can try signing in or changing directories.
Access to this page requires authorization. You can try changing directories.
One of the frequently used jQuery plug-ins is DataTables. With DataTables, you can easily build powerful data overviews of data coming from both SharePoint and external APIs.
Note
The SharePoint Framework (SPFx) used a gulp-based toolchain from SPFx v1.0 - v1.21.1. SPFx v1.22 transitioned to a new Heft-based toolchain, replacing the gulp-based toolchain.
This article was originally authoring using a SPFx version that used the gulp-based toolchain. We're in the process of updating all affected articles and tutorials (including this page). Due to the number of articles and the age of SPFx, this will take time. At this time, this article has not yet been updated.
Until the article has been validated, it's likely the steps on this page will work by simply replacing the gulp command with the Heft-based equivalent commands. For example, some commands remain unchanged (such as package-solution), some were replaced (such as gulp serve is now heft start), and some command arguments changed (such as --ship is now --production).
Refer to the following page for more information on the the Heft commands and the corresponding gulp commands: Understanding the Heft-based toolchain (how it works).
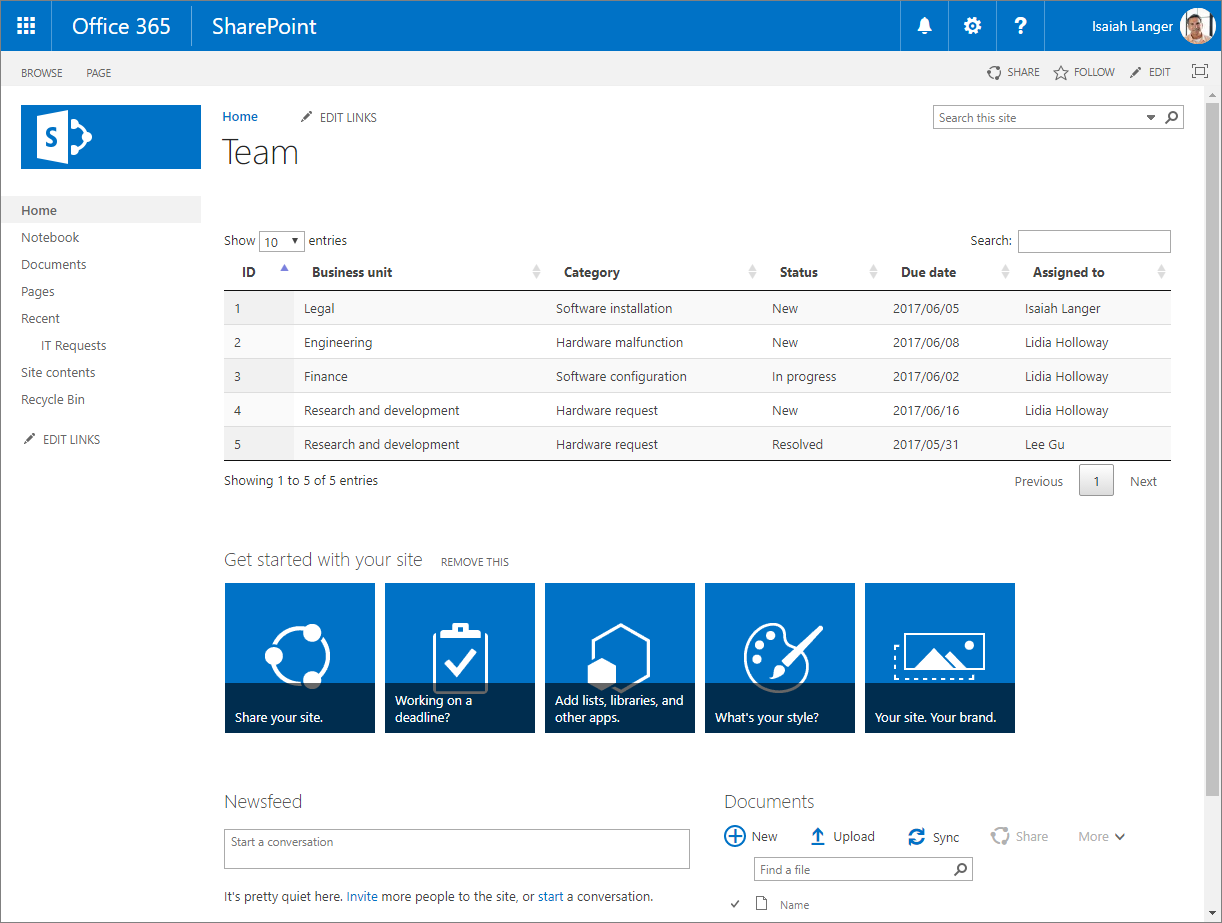
List of IT requests built using the Script Editor web part
To illustrate the process of migrating a SharePoint customization using DataTables to the SharePoint Framework, use the following solution that shows an overview of IT support requests retrieved from a SharePoint list.
The solution is built by using the standard SharePoint Script Editor web part. Following is the code used by the customization.
<script src="https://code.jquery.com/jquery-1.12.4.js"></script>
<script src="https://cdn.datatables.net/1.10.15/js/jquery.dataTables.js"></script>
<script src="https://momentjs.com/downloads/moment.min.js"></script>
<link rel="stylesheet" type="text/css" href="https://cdn.datatables.net/1.10.15/css/jquery.dataTables.min.css" />
<table id="requests" class="display" cellspacing="0" width="100%">
  <thead>
    <tr>
      <th>ID</th>
      <th>Business unit</th>
      <th>Category</th>
      <th>Status</th>
      <th>Due date</th>
      <th>Assigned to</th>
    </tr>
  </thead>
</table>
<script>
  // UMD
  (function(factory) {
    "use strict";

    if (typeof define === 'function' && define.amd) {
      // AMD
      define(['jquery'], function ($) {
        return factory( $, window, document );
      });
    }
    else if (typeof exports === 'object') {
      // CommonJS
      module.exports = function (root, $) {
        if (!root) {
          root = window;
        }

        if (!$) {
          $ = typeof window !== 'undefined'
            ? require('jquery')
            : require('jquery')( root );
        }

        return factory($, root, root.document);
      };
    } else {
      // Browser
      factory(jQuery, window, document);
    }
  }
  (function($, window, document) {
    $.fn.dataTable.render.moment = function (from, to, locale) {
      // Argument shifting
      if (arguments.length === 1) {
        locale = 'en';
        to = from;
        from = 'YYYY-MM-DD';
      } else if (arguments.length === 2) {
        locale = 'en';
      }

      return function (d, type, row) {
        var m = window.moment(d, from, locale, true);

        // Order and type get a number value from Moment, everything else
          // sees the rendered value
          return m.format(type === 'sort' || type === 'type' ? 'x' : to);
        };
      };
    }));
</script>
<script>
$(document).ready(function() {
  $('#requests').DataTable({
    'ajax': {
      'url': "../_api/web/lists/getbytitle('IT Requests')/items?$select=ID,BusinessUnit,Category,Status,DueDate,AssignedTo/Title&$expand=AssignedTo/Title",
      'headers': { 'Accept': 'application/json;odata=nometadata' },
      'dataSrc': function(data) {
        return data.value.map(function(item) {
          return [
            item.ID,
            item.BusinessUnit,
            item.Category,
            item.Status,
            new Date(item.DueDate),
            item.AssignedTo.Title
          ];
        });
      }
    },
    columnDefs: [{
      targets: 4,
      render: $.fn.dataTable.render.moment('YYYY/MM/DD')
    }]
  });
});
</script>
First, the customization loads the libraries it uses: jQuery, DataTables, and Moment.js.
Next, it specifies the structure of the table used to present the data.
After creating the table, it wraps Moment.js into a DataTables plug-in so that dates displayed in the table can be formatted.
Finally, the customization uses DataTables to load and present the list of IT support requests. The data is loaded by using AJAX from a SharePoint list.
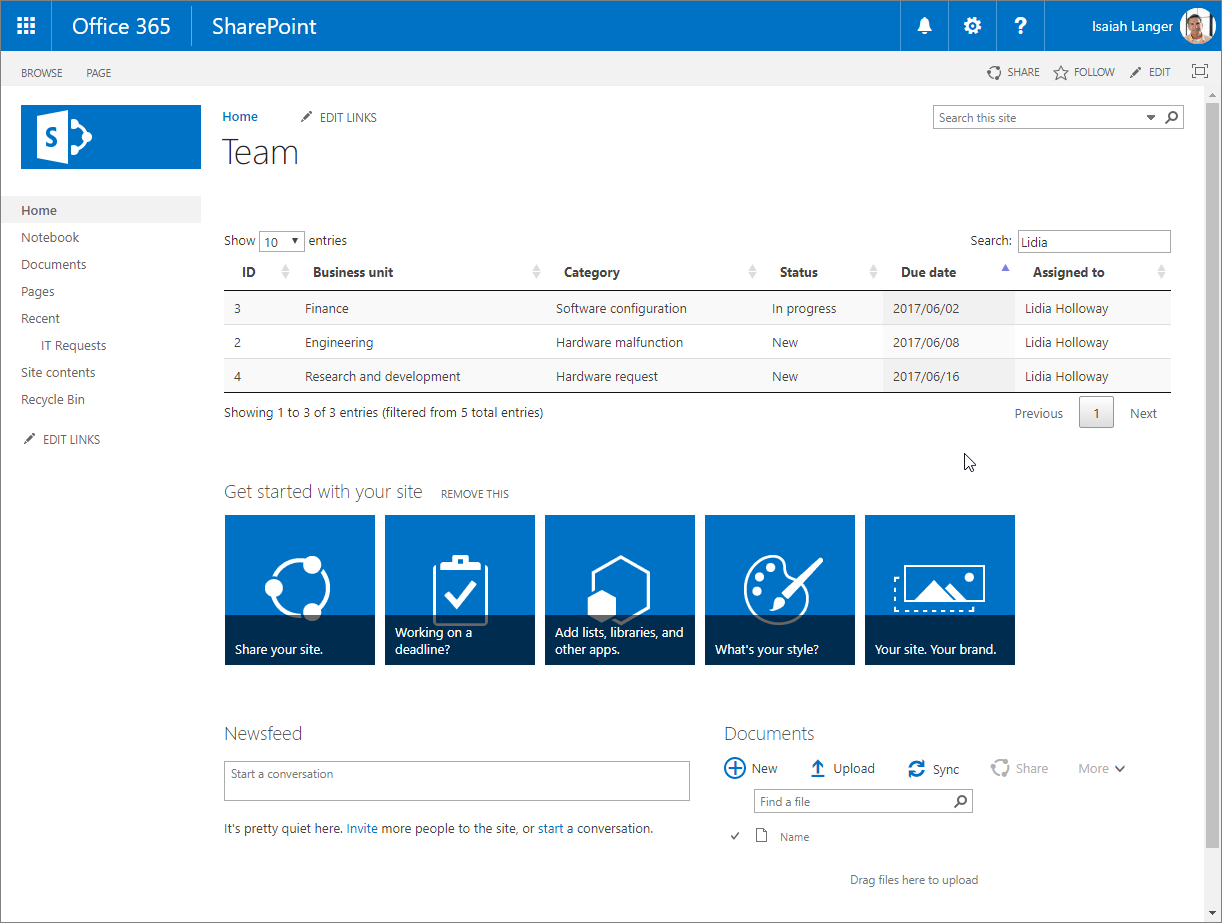
Thanks to using DataTables, end users get a powerful solution where they can easily filter, sort, and page through the results without any additional development effort.
Migrate the IT requests overview solution from the Script Editor web part to the SharePoint Framework
Transforming this customization to the SharePoint Framework offers a number of benefits such as more user-friendly configuration and centralized management of the solution. Following is a step-by-step description of how you would migrate the solution to the SharePoint Framework. First, you'll migrate the solution to the SharePoint Framework with as few changes to the original code as possible. Later, you'll transform the solution's code to TypeScript to benefit from its development-time type safety features.
Note
The source code of the project in the different stages of migration is available at Tutorial: Migrate jQuery and DataTables solution built using Script Editor web part to SharePoint Framework.
Create new SharePoint Framework project
Start by creating a new folder for your project:
md datatables-itrequestsNavigate to the project folder:
cd datatables-itrequestsIn the project folder, run the SharePoint Framework Yeoman generator to scaffold a new SharePoint Framework project:
yo @microsoft/sharepointWhen prompted, enter the following values (select the default option for all prompts omitted below):
- What is your solution name?: datatables-itrequests
- Which type of client-side component to create?: Web Part
- What is your Web part name?: IT requests
- What is your Web part description?: Shows overview of IT support requests
- Which framework would you like to use?: No JavaScript framework
Open your project folder in your code editor. In this tutorial, you'll use Visual Studio Code.
Load JavaScript libraries
Similar to the original solution built using the Script Editor web part, first you need to load the JavaScript libraries required by the solution. In SharePoint Framework this usually consists of two steps: specifying the URL from which the library should be loaded, and referencing the library in the code.
Specify the URLs from which libraries should be loaded. In the code editor, open the ./config/config.json file, and change the
externalssection to:{ // .. "externals": { "jquery": { "path": "https://code.jquery.com/jquery-1.12.4.min.js", "globalName": "jQuery" }, "datatables.net": { "path": "https://cdn.datatables.net/1.10.15/js/jquery.dataTables.min.js", "globalName": "jQuery", "globalDependencies": [ "jquery" ] }, "moment": "https://cdnjs.cloudflare.com/ajax/libs/moment.js/2.27.0/moment.min.js" }, // .. }This serves two purposes:
- When the SharePoint Framework build toolchain creates the bundle for the web part, it will ignore any
importorrequirestatements for these three packages and not include their source in the bundle. Without these, webpack (the tool used to create the bundle) would import these JavaScript libraries in the resulting SPFx component bundle. - The SharePoint Framework build toolchain will add these three packages as dependencies in the component's manifest. This tells the SharePoint Framework's module loader to ensure these libraries have been loaded on the page before loading the component's bundle.
Note
For more information on referencing external libraries in SharePoint Framework projects, see Add an external library to your SharePoint client-side web part.
- When the SharePoint Framework build toolchain creates the bundle for the web part, it will ignore any
Open the ./src/webparts/itRequests/ItRequestsWebPart.ts file, and after the last
importstatement add:import 'jquery'; import 'datatables.net'; import 'moment';
Define data table
As in the original solution, the next step is to define the structure of the table used to display the data.
In the code editor, open the ./src/webparts/itRequests/ItRequestsWebPart.ts file, and change the render() method to:
export default class ItRequestsWebPart extends BaseClientSideWebPart<IItRequestsWebPartProps> {
  public render(): void {
    this.domElement.innerHTML = `
      <link rel="stylesheet" type="text/css" href="https://cdn.datatables.net/1.10.15/css/jquery.dataTables.min.css" />
      <table id="requests" class="display ${styles.itRequests}" cellspacing="0" width="100%">
        <thead>
          <tr>
            <th>ID</th>
            <th>Business unit</th>
            <th>Category</th>
            <th>Status</th>
            <th>Due date</th>
            <th>Assigned to</th>
          </tr>
        </thead>
      </table>`;
  }
  // ...
}
Register Moment.js plugin for DataTables
The next step is to define the Moment.js plug-in for DataTables so that dates in the table can be formatted.
In the ./src/webparts/itRequests folder, create a new file named moment-plugin.js, and paste the following code:
// UMD
(
  function (factory) {
    "use strict";

    if (typeof define === 'function' && define.amd) {
      // AMD
      define(['jquery'], function ($) {
        return factory($, window, document);
      });
    } else if (typeof exports === 'object') {
      // CommonJS
      module.exports = function (root, $) {
        if (!root) {
          root = window;
        }

        if (!$) {
          $ = typeof window !== 'undefined'
            ? require('jquery')
            : require('jquery')(root);
        }

        return factory($, root, root.document);
      };
    } else {
      // Browser
      factory(jQuery, window, document);
    }
  }

  (function ($, window, document) {
    $.fn.dataTable.render.moment = function (from, to, locale) {
      // Argument shifting
      if (arguments.length === 1) {
        locale = 'en';
        to = from;
        from = 'YYYY-MM-DD';
      } else if (arguments.length === 2) {
        locale = 'en';
      }

      return function (d, type, row) {
        var moment = require('moment');
        var m = moment(d, from, locale, true);

        // Order and type get a number value from Moment, everything else
        // sees the rendered value
        return m.format(type === 'sort' || type === 'type' ? 'x' : to);
      };
    };
  })
);
For the web part to load the plug-in, it has to reference the newly created moment-plugin.js file. In the code editor, open the ./src/webparts/itRequests/ItRequestsWebPart.ts file, and after the last
importstatement add:import './moment-plugin';
Initialize DataTables and load data
The last step is to include the code that initializes the data table and loads the data from SharePoint.
In the ./src/webparts/itRequests folder, create a new file named script.js, and paste the following code:
$(document).ready(function () {
  $('#requests').DataTable({
    'ajax': {
      'url': "../../_api/web/lists/getbytitle('IT Requests')/items?$select=ID,BusinessUnit,Category,Status,DueDate,AssignedTo/Title&$expand=AssignedTo/Title",
      'headers': { 'Accept': 'application/json;odata=nometadata' },
      'dataSrc': function (data) {
        return data.value.map(function (item) {
          return [
            item.ID,
            item.BusinessUnit,
            item.Category,
            item.Status,
            new Date(item.DueDate),
            item.AssignedTo.Title
          ];
        });
      }
    },
    columnDefs: [{
      targets: 4,
      render: $.fn.dataTable.render.moment('YYYY/MM/DD')
    }]
  });
});
Note
Make sure to use internal name (or static name) of columns in $select and $expend parameters.
To reference this file in the web part, in the code editor, open the ./src/webparts/itRequests/ItRequestsWebPart.ts file, and add
require('./script');to the end of therender()method. Therender()method should look like the following:export default class ItRequestsWebPart extends BaseClientSideWebPart<IItRequestsWebPartProps> { public render(): void { this.domElement.innerHTML = ` <link rel="stylesheet" type="text/css" href="https://cdn.datatables.net/1.10.15/css/jquery.dataTables.min.css" /> <table id="requests" class="display ${styles.itRequests}" cellspacing="0" width="100%"> <thead> <tr> <th>ID</th> <th>Business unit</th> <th>Category</th> <th>Status</th> <th>Due date</th> <th>Assigned to</th> </tr> </thead> </table>`; require('./script'); } // ... }Verify that the web part is working as expected in the command line by executing:
gulp serve --nobrowser
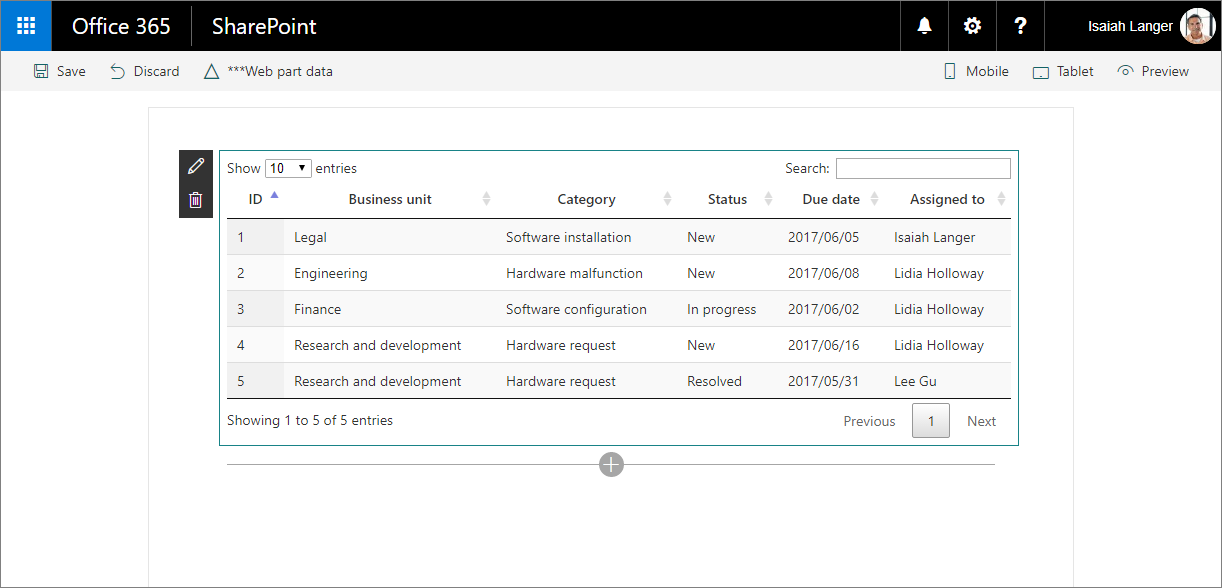
Because the web part loads its data from SharePoint, you've to test the web part by using the hosted SharePoint Framework Workbench. Navigate to https://{your-tenant-name}.sharepoint.com/_layouts/workbench.aspx and add the web part to the canvas. You should now see the IT requests displayed by using the DataTables jQuery plug-in.
Add support for configuring the web part through web part properties
In the previous steps, you migrated the IT requests solutions from the Script Editor web part to the SharePoint Framework. While the solution already works as expected, it doesn't use any of the SharePoint Framework benefits. The name of the list from which IT requests are loaded is included in the code, and the code itself is plain JavaScript, which is harder to refactor than TypeScript.
The following steps illustrate how to extend the existing solution to allow users to specify the name of the list to load the data from. Later, you transform the code to TypeScript to benefit from its type safety features.
Define web part property for storing the name of the list
Define a web part property to store the name of the list from which IT requests should be loaded. In the code editor, open the ./src/webparts/itRequests/ItRequestsWebPart.manifest.json file, and rename the default
descriptionproperty tolistNameand clear its value.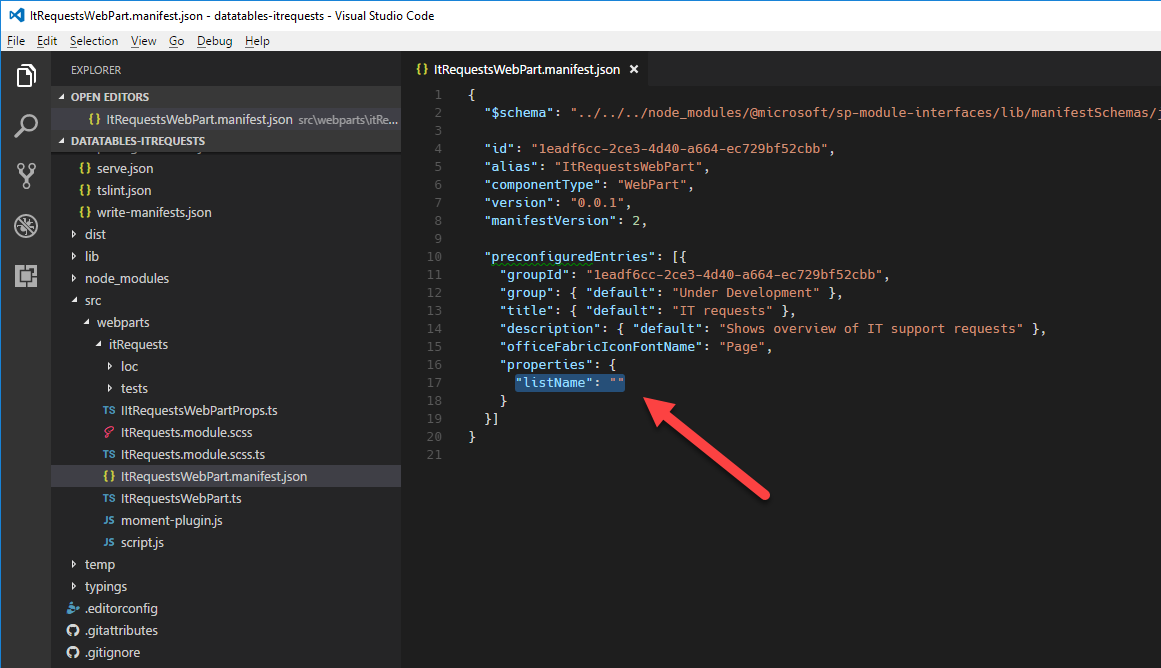
Update the web part properties interface to reflect the changes in the manifest. In the code editor, open the ./src/webparts/itRequests/IItRequestsWebPartProps.ts file, and change its contents to:
export interface IItRequestsWebPartProps {
  listName: string;
}
Update the display labels for the
listNameproperty. Open the ./src/webparts/itRequests/loc/mystrings.d.ts file, and change its contents to:declare interface IItRequestsStrings { PropertyPaneDescription: string; BasicGroupName: string; ListNameFieldLabel: string; } declare module 'itRequestsStrings' { const strings: IItRequestsStrings; export = strings; }Open the ./src/webparts/itRequests/loc/en-us.js file, and change its contents to:
define([], function() {
  return {
    "PropertyPaneDescription": "IT Requests settings",
    "BasicGroupName": "Data",
    "ListNameFieldLabel": "List name"
  }
});
Update the web part to use the newly defined property. In the code editor, open the ./src/webparts/itRequests/ItRequestsWebPart.ts file, and change the
getPropertyPaneConfiguration()method to:export default class ItRequestsWebPart extends BaseClientSideWebPart<IItRequestsWebPartProps> { // ... protected getPropertyPaneConfiguration(): IPropertyPaneConfiguration { return { pages: [{ header: { description: strings.PropertyPaneDescription }, groups: [{ groupName: strings.BasicGroupName, groupFields: [ PropertyPaneTextField('listName', { label: strings.ListNameFieldLabel }) ] }] }] }; } protected get disableReactivePropertyChanges(): boolean { return true; } }
To prevent the web part from reloading as users type the name of the list, you also configured the web part to use the non-reactive property pane by adding the disableReactivePropertyChanges() method and setting its return value to true.
Use the configured name of the list to load the data from
Initially, the name of the list from which the data should be loaded was embedded in the REST query. Now that users can configure this name, the configured value should be injected into the REST query before loading the data. The easiest way to do that is by moving the contents of the script.js file to the main web part file.
In the code editor, open the ./src/webparts/itRequests/ItRequestsWebPart.ts file, and change the
render()method to:var $: any = (window as any).$; export default class ItRequestsWebPart extends BaseClientSideWebPart<IItRequestsWebPartProps> { public render(): void { this.domElement.innerHTML = ` <link rel="stylesheet" type="text/css" href="https://cdn.datatables.net/1.10.15/css/jquery.dataTables.min.css" /> <table class="display ${styles.itRequests}" cellspacing="0" width="100%"> <thead> <tr> <th>ID</th> <th>Business unit</th> <th>Category</th> <th>Status</th> <th>Due date</th> <th>Assigned to</th> </tr> </thead> </table>`; $(document).ready(() => { $('table', this.domElement).DataTable({ 'ajax': { 'url': `../../_api/web/lists/getbytitle('${escape(this.properties.listName)}')/items?$select=ID,BusinessUnit,Category,Status,DueDate,AssignedTo/Title&$expand=AssignedTo/Title`, 'headers': { 'Accept': 'application/json;odata=nometadata' }, 'dataSrc': function (data) { return data.value.map(function (item) { return [ item.ID, item.BusinessUnit, item.Category, item.Status, new Date(item.DueDate), item.AssignedTo.Title ]; }); } }, columnDefs: [{ targets: 4, render: $.fn.dataTable.render.moment('YYYY/MM/DD') }] }); }); } // ... }Instead of referencing the code from the script.js file, all of its contents are a part of the web part's
rendermethod. In the REST query, you can now replace the fixed name of the list with the value of thelistNameproperty that holds the name of the list as configured by the user. Before using the value, it's being escaped by using the lodash'sescapefunction to disallow script injection.At this point, the bulk of the code is still written using plain JavaScript. To avoid build issues with the
$jQuery variable, you had to define it asanytype before the class definition. Later, when transforming the code to TypeScript, you replace it with a proper type definition.As you've moved the contents of the script.js file into the main web part file, the script.js is no longer necessary, and you can delete it from the project.
To verify that the web part is working as expected, run the following in the command line:
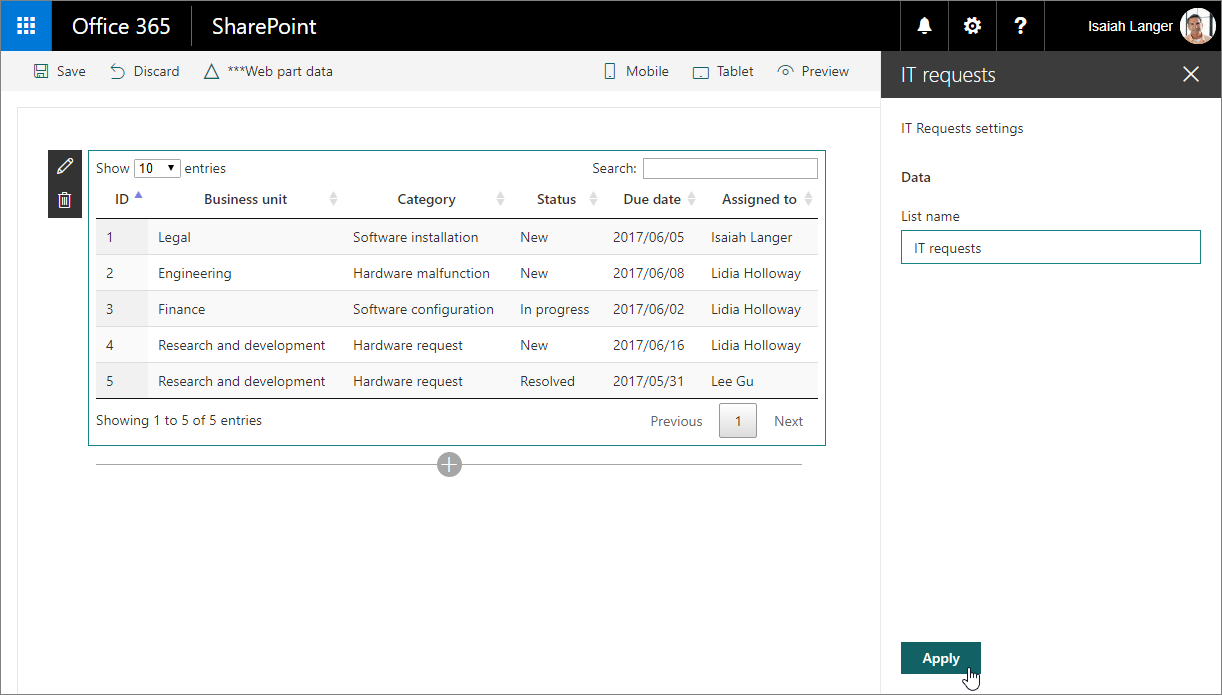
gulp serve --nobrowserNavigate to the hosted Workbench and add the web part to the canvas. Open the web part property pane, specify the name of the list with IT requests, and select the Apply button to confirm the changes.
You should now see IT requests displayed in the web part.
Transform the plain JavaScript code to TypeScript
Using TypeScript over plain JavaScript offers a number of benefits. Not only is TypeScript easier to maintain and refactor, but it also allows you to catch errors earlier. The following steps describe how you would transform the original JavaScript code to TypeScript.
Add type definitions for used libraries
To function properly, TypeScript requires type definitions for the different libraries used in the project. Type definitions are often distributed as npm packages in the @types namespace.
Install type definitions for jQuery and DataTables by executing the following in the command line:
npm install @types/jquery@1.10.34 @types/datatables.net@1.10.15 --save-dev --save-exactTip
In this example, we are specifying the exact version of the NPM package we want to install. This will ensure that NPM installs a type declaration package that matches the version of jQuery and the datatables library we are using in our project.
The
--save-devargument tells NPM to save the references to these two packages in thedevDependenciescollection in the package.json file. TypeScript declarations are only needed in development, which is why we don't want them in thedependenciescollection.The
--save-exactargument tells NPM to add references to the specific version in the package.json file and not add the notation to enable automatic upgrades to a more recent version.Type definitions for Moment.js are distributed together with the Moment.js package. Even though you're loading Moment.js from a URL, to use its typings, you still need to install the Moment.js package in the project.
Install the Moment.js package by executing the following in the command line:
npm install moment@2.27.0 --save-exact
Update package references
To use types from the installed type definitions, you've to change how you reference libraries.
In the code editor, open the ./src/webparts/itRequests/ItRequestsWebPart.ts file, and change the
import 'jquery';statement to:import * as $ from 'jquery';Having defined
$as jQuery, you can now remove the local definition of$that you added previously:var $: any = (window as any).$;
Update main web part files to TypeScript
Now that you've type definitions for all libraries installed in the project, you can start transforming the plain JavaScript code to TypeScript.
Define an interface for the IT request information that you retrieve from the SharePoint list. In the code editor, open the ./src/webparts/itRequests/ItRequestsWebPart.ts file, and just above the web part class, add the following code snippet:
interface IRequestItem {
  ID: number;
  BusinessUnit: string;
  Category: string;
  Status: string;
  DueDate: string;
  AssignedTo: { Title: string; };
}
Next, in the web part class, change the
render()method to:export default class ItRequestsWebPart extends BaseClientSideWebPart<IItRequestsWebPartProps> { public render(): void { this.domElement.innerHTML = ` <link rel="stylesheet" type="text/css" href="https://cdn.datatables.net/1.10.15/css/jquery.dataTables.min.css" /> <table class="display ${styles.itRequests}" cellspacing="0" width="100%"> <thead> <tr> <th>ID</th> <th>Business unit</th> <th>Category</th> <th>Status</th> <th>Due date</th> <th>Assigned to</th> </tr> </thead> </table>`; $('table', this.domElement).DataTable({ 'ajax': { 'url': `../../_api/web/lists/getbytitle('${escape(this.properties.listName)}')/items?$select=ID,BusinessUnit,Category,Status,DueDate,AssignedTo/Title&$expand=AssignedTo/Title`, 'headers': { 'Accept': 'application/json;odata=nometadata' }, 'dataSrc': (data: { value: IRequestItem[] }): any[][] => { return data.value.map((item: IRequestItem): any[] => { return [ item.ID, item.BusinessUnit, item.Category, item.Status, new Date(item.DueDate), item.AssignedTo.Title ]; }); } }, columnDefs: [{ targets: 4, render: ($.fn.dataTable.render as any).moment('YYYY/MM/DD') }] }); } // ... }Notice how the AJAX request, to retrieve the data from the SharePoint list, is now typed and helps you ensure you're referring to correct properties when passing them into an array to DataTables. The data structure used by DataTables to represent a row in the table is an array of mixed types, so for simplicity it was defined as
any[]. Using theanytype in this context isn't bad, because the data returned inside thedataSrcproperty is used internally by DataTables.As you're updating the
render()method, you've also added two more changes. First, you removed theidattribute from the table. This allows you to place multiple instances of the same web part on the page. Also, you removed the reference to the$(document).ready()function, which isn't necessary because the DOM of the element where the data table is rendered is set before the DataTables initiation code.
Update the Moment.js DataTables plugin to TypeScript
The last piece of the solution that needs to be transformed to TypeScript is the Moment.js DataTables plug-in.
Rename the ./src/webparts/itRequests/moment-plugin.js file to ./src/webparts/itRequests/moment-plugin.ts so that it's processed by the TypeScript compiler.
Open the moment-plugin.ts file in the code editor, and replace its contents with:
import * as $ from 'jquery';
import * as moment from 'moment';

/* tslint:disable:no-function-expression */
($.fn.dataTable.render as any).moment = function (from: string, to: string, locale: string): (d: any, type: string, row: any) => string {
/* tslint:enable */
  // Argument shifting
  if (arguments.length === 1) {
    locale = 'en';
    to = from;
    from = 'YYYY-MM-DD';
  } else if (arguments.length === 2) {
    locale = 'en';
  }

  return (d: any, type: string, row: any): string => {
    let m: moment.Moment = moment(d, from, locale, true);

    // Order and type get a number value from Moment, everything else
    // sees the rendered value
    return m.format(type === 'sort' || type === 'type' ? 'x' : to);
  };
};
You start with loading references to jQuery and Moment.js to let TypeScript know what the corresponding variables refer to. Next, you define the plug-in function. Usually in TypeScript you use the arrow notation for functions (
=>). In this case, however, because you need access to theargumentsproperty, you've to use the regular function definition. To prevent tslint from reporting a warning about not using the arrow notation, you can explicitly disable theno-function-expressionrule around the function definition.To confirm that everything is working as expected, in the command line, execute:
gulp serve --nobrowserNavigate to the hosted Workbench and add the web part to the canvas. Although visually nothing has changed, the new code base uses TypeScript and its type definitions to help you maintain the solution.