Note
Access to this page requires authorization. You can try signing in or changing directories.
Access to this page requires authorization. You can try changing directories.
There are a number of steps by which you can create a packaged SharePoint list template that contains in-built custom flows. The objective is to assemble and register a packaged file that contains the site script actions needed to create the list and the flows, and a Dataverse solution archive (zip) that contains the flow definitions.
Once you have your source SharePoint list set up and are ready to work on integrating flows with it, and on assembling a template with these components, perform the following the steps:
Obtaining solution zip file
Sign in to Power Automate portal by launching https://flow.microsoft.com/ (or choose Integrate > Power Automate > See your flows" in the SharePoint Portal).
Create a new Dataverse solution by referring to Overview of solution-aware flows.
For an introduction to Dataverse solutions, see Solution concepts.
Add a new flow or customize existing flows to this solution by referring to Create a cloud flow in a solution.
Ensure that your flows use connection references for each trigger and action that you use. For more information on how to use a connection reference, see Use a connection reference in a solution.
Once you're satisfied with the contents of your solution (including any connection references or environment variables you wish to set up), export and download it to a disk.
Extract all files from the zip file into a separate folder.
Browse into the folder's Workflows subfolder.
Open each flow-related .json file and then search and replace all instances of the following elements:
- The URL of the SharePoint site that the original list resided in: Replace with {ContextSharePointSiteUrl}.
- The ID of the original SharePoint list: Replace with {ContextSharePointListId}.
For example:
[Before replacements]
"parameters": {
   "dataset": "https://microsoft.sharepoint-df.com/teams/AlinTest ",
   "table": "d6ac2804-7a1c-4cd4-98c8-56b85a9294b7"
            }
For example:
[After replacements]
"parameters": {
   "dataset": "{ContextSharePointSiteUrl}",
   "table": "{ContextSharePointListId}"
            }
Save the changes and close all file editors that you've opened for these files.
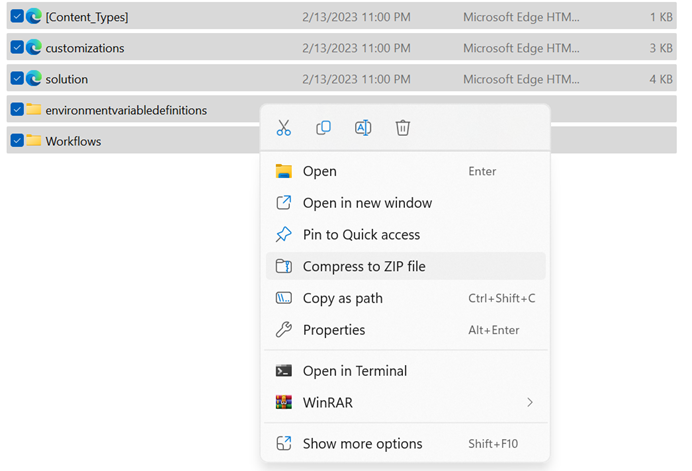
Go back to the root folder of the solution; select all files (solution.xml, customizations.xml, and so on) and folders; right-click and choose Compress to ZIP file from the context menu.
You can keep this resulting zip file, and you can also choose to discard the original solution zip file that earlier downloaded (as specified in Step 6 of this procedure).

Obtaining the site script action file (manifest.json)
Important
Prior to performing the steps in this section, ensure that you've tested your prototype list and flows to your satisfaction.
Ensure you've installed SharePoint Online Management Shell on your computer.
Launch SharePoint Online Management Shell.
Run the following command to connect to the tenant's admin service:
[Connect-SPOService](/powershell/module/sharepoint-online/connect-sposervice) -Url <Link to SPO admin portal> -Credential <full username of the admin user>Run the following command to extract a site script file from the target list:
[Get-SPOSiteScriptFromList](/powershell/module/sharepoint-online/get-spositescriptfromlist) -ListUrl <full URL of the target list> | Out-File manifest.json
- Open the manifest.json file in your favorite text (or code) editor and manually add an action with the verb "importBusinessApps," the relative path of your solution file inside the overall template package and the target listName (in this case, the title of the listName binding). This value should be the same as the listName property of the "CreateSPList" action.
For example:

Assembling the final SharePoint package zip file
- Ensure that the solution zip file and the manifest.json file (from previous step) are in the same folder location.
- Select these two files; right-click and then select Compress to ZIP file (or Send to > ZIP file, depending on the OS).
Registering the new template as a list design
To upload the zip file (created in Assembling the final SharePoint package zip file) as a site script package, run the following command in the same management shell window:
$pkg = Add-SPOSiteScriptPackage -Title "<script title>" -Description "<script description>" -ContentPath '<relative path to zip file from previous step>'Note
Inclusion of the Description property in the command is optional.
Take a peek at the new package by printing out its properties through the following command:
"$pkg"The output should contain an Id property which is needed in the following steps.
Note
(Optional) Run
Get-SPOListDesignto ensure you're not adding a duplicate with the same title/description, or to inspect what's already there.Run the following command:
Add-SPOListDesign -Title "<list design title>" -Description "<list design description>" -SiteScripts $pkg.IdIf the list design was successfully created, you should be able to view it in the From your organization" area of the Create List dialog.