Note
Access to this page requires authorization. You can try signing in or changing directories.
Access to this page requires authorization. You can try changing directories.
Migrating your on-premises file share content to Microsoft 365 lets you collaborate with innovative Office apps, intelligent cloud services, world-class security, and the rich features offered in Microsoft SharePoint, Teams, and OneDrive. Migration Manager helps you get there.
With the ability to set up multiple servers as "agents", Migration Manager lets you scale your migration project as much as you need. Migration Manager is located in the SharePoint Admin Center and guides you through the setup of your agents and the creation of your tasks. You can specify global or task level settings, view all-up task progress, and download aggregated summary and task-level reports. Migration Manager also provides advanced features such as grouping agents to optimize performance, conduct prescans, and implement file exclusion metrics.
Tip
In addition to file shares, use Migration Manager to migrate content from other cloud providers including Google Workspace, Box, Dropbox, and Egynte. Learn more at Where are you migrating from?
How does it work?
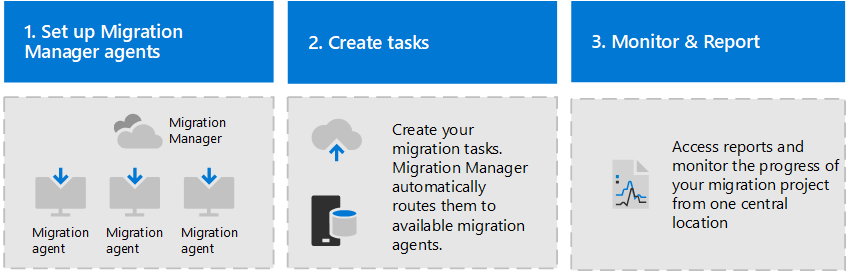
Setup migration agents. Download and install a lightweight agent on each computer or virtual machine you want to connect to Migration Manager. The agent runs as a service and authenticates to both your Microsoft 365 destination and your on-premises source.
Create tasks & migrate. Create a task by entering the URL of the network file share that you want to migrate (your source) and the URL or account of the SharePoint site, OneDrive account, or Microsoft Teams site where you're migrating your content (your destination), or upload a CSV file for multiple user migrations. Your tasks are automatically assigned to the next available agent in the assigned agent group.
Monitor and report. Monitor progress across all agents, download summaries of migration jobs, and download detailed data on each individual migration.
File size migration limit
We support files up to 250 GB in size for file share to Microsoft 365 migrations.
Prerequisites & permissions
| Requirement | Notes |
|---|---|
| System requirements | Migration Manager system requirements |
| Endpoints | Migration Manager required endpoints. Make sure your computer or VM has the required endpoints open. |
| SMB 2.0 | For file share migration, the server hosting the source data must support SMB 2.0 or higher |
| Access to the destination | You must either be a Global admin or a OneDrive/SharePoint admin on the Microsoft 365 tenant where you want to migrate your content. |
| Access to the source | Windows credentials that have read access to any of the network file shares you plan to migrate. |
Note
When using Migration Manager to migrate content to non-English SharePoint sites, make sure the site title does not include non-English characters.