Note
Access to this page requires authorization. You can try signing in or changing directories.
Access to this page requires authorization. You can try changing directories.
On the Drive migrations tab, review the destination paths of the tasks that you moved to the migrations list, making sure they're correct. A task can't be migrated without a destination indicated. Once you start migrating content to a destination, the destination can't be modified.
Single destination edits
If a destination is missing on a migration task (equals a Drive in Google), highlight the row and update the value.
- Highlight the row, a panel displays. Under Destination, select Edit to open the "Edit destination" panel.
- You have the choice of selecting a OneDrive, SharePoint, or Teams path as a destination. Depending on your selection:
- For OneDrive, enter the OneDrive URL or email address and the location/folder name
- For SharePoint, enter the site URL and location
- For Teams, select the team and the channel
- Select Save path.
Note
- If the task contains Google Forms, the "Edit destination" panel will prompt you to update an additional value called "Forms destination". Enter the email address of the destination user in Microsoft 365 where you want to store the Forms files.
- Destinations might not be visible on the UI due to admin access limitations, multi-geo tenant issues, recent site creation delays, or special characters in the destination path, etc. If you cannot locate a destination in the "Edit destination" panel, please upload the destination using a CSV file as described in the next section.
Upload destinations using a CSV file
If there are many destinations to edit, you can choose to upload a bulk destinations CSV file.
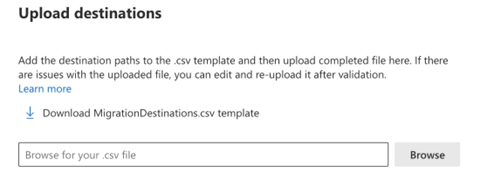
- Select Upload destinations from the menu bar to activate the upload destinations panel.
- Download the CSV template to your computer. The template lists all never-run migration tasks.
- Input your destinations in the correct destination path format by adding to or modifying the "Destination path (to be added/modified)" column in the downloaded CSV template. Save your file as a .csv file with any name you wish.
- Select the Browse button to upload the file you saved. The destinations are validated upon uploading. The validation process may take a while and a validation report is generated if issues are found. We strongly recommend you complete the validation.
- Ensure all destinations pass the validation, then select Save.
Note
- The "Forms destination" column is required to successfully migrate Google Forms. In the CSV file, if a task (row) contains Google Forms, the "Forms destination" column will display the message "Forms destination required, please input an email as the Forms destination". Replace this message with the email address of the destination user in Microsoft 365 where you want to store the Forms files.
- Rows with vacant destination paths are skipped in the validation process.
Destination path format
| Type | Format | Example |
|---|---|---|
| SharePoint URL | https://<tenant>.sharepoint.com/sites/<site name>/<library name>/<optional folder name> | https://contoso.sharepoint.com/sites/sitecollection/Shared Documents https://contoso.sharepoint.com/sites/sitecollection/Shared Documents/SubFolder |
| OneDrive UPN | name@example.com | user@contoso.onmicrosoft.com |
| OneDrive URL | https://<tenant name>-my.sharepoint.com/personal/<user principal name>/Documents/<optional folder name> | https://contoso-my.sharepoint.com/personal/user_contoso_onmicrosoft_com/Documents https://contoso-my.sharepoint.com/personal/user_contoso_onmicrosoft_com/Documents/SubFolder |
Pre-provision OneDrive
If you choose OneDrive as the destination, pre-provision OneDrive for users in your organization before migration. Otherwise, the OneDrive destinations aren't going to pass validation, causing migrations to fail.