Skype for Business Server 2015 Resource Kit Tools Documentation
This article describes the tools in the Skype for Business Server 2015 Resource Kit, including the purpose of each tool, and examples of its use. The Skype for Business Server 2015 Resource Kit helps to make routine tasks easier for IT administrators who deploy and manage Skype for Business Server 2015. For example, the Web Conf Data tool can be used to easily control data that is uploaded by users during an online meeting. The SEFAUtil tool can be used to set up delegate call forwarding and answering for users. We encourage IT administrators to use these tools to more effectively manage Skype for Business Server 2015.
Installation of the Resource Kit Tools
To install the Skype for Business Server 2015 Resource Kit, download OCSReskit.msi from the Download Center.
Run OCSResKit.msi to do a simple installation. The .msi installs all the tools in the following path: %Program Files%\Skype for Business Server 2015\ResKit. Tools that are self-contained executables are in this folder. Tools that also have supporting files are in their own subfolders.
Supported Environments
The Skype for Business Server 2015 Resource Kit should be installed on a server that meets the specifications required for Skype for Business Server 2015, usually one being used to run Skype for Business Server 2015.
Resource Kit Tools Overview
The following is a list of the tools that are provided in the Skype for Business Server 2015 Resource Kit. A description of each tool, including the requirements and example usage is covered in the following sections.
ABSConfig
The Address Book Service Configuration tool (ABSConfig) is an administrative tool that helps administrators customize Address Book Service configuration in Skype for Business Server 2015. This tool also enables Skype for Business Server 2015 administrators to restore the default Address Book Service settings.
Description
ABSConfig is a graphical user interface application that enables administrators to configure Active Directory Domain Services attributes that are related to Address Book Service.
The primary scenarios for the tool are the following:
To enable administrators to map attributes in Active Directory Domain Services to the attributes for Skype for Business Server 2015.
To enable administrators to specify the Active Directory Domain Services attribute to be included or excluded in the Address Book Service files.
To enable administrators to restore, default Address Book Service settings.
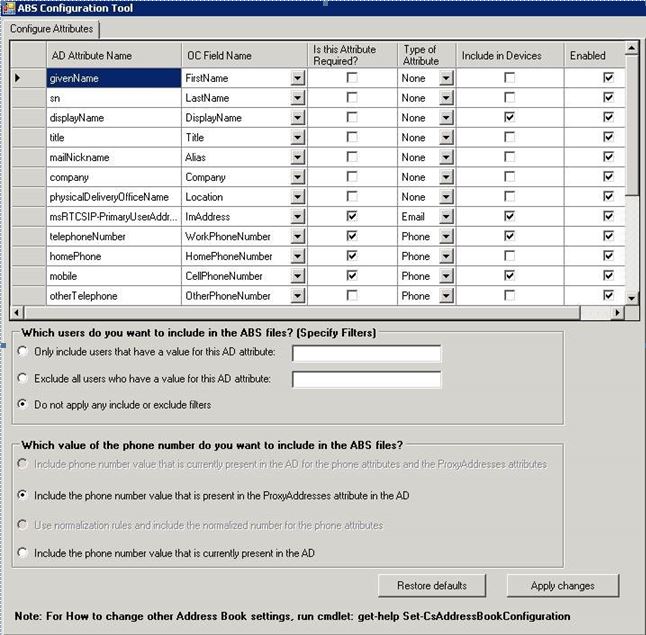
The ABSConfig tool can be started by using the ABSConfig.exe file. The tool opens to the Configure Attributes tab. This table has options to map Active Directory Domain Services attributes to the attribute fields for Skype for Business Server 2015 and to specify which users to include or exclude in Address Book Service files based on specific attribute filters. It also has options to customize which value of the phone number to be included in the Address Book file. The Restore Defaults option enables administrators to restore Address Book Service settings to default values.
Note
Re-mapping of AD attributes to different OC Field Names will only work for Address Book File Download, and is not supported by Address Book Web Query.
Output
ABSConfig stores the Address Book Service configuration in the database.
Path: %ProgramFiles%\Skype for Business Server 2015\Reskit
Purpose
ABSConfig provides a quick and easy way to customize Skype for Business Server 2015 Address Book Service.
Requirements
Computer
ABSConfig can be run only from a domain-joined computer that has Skype for Business Server 2015 installed. In the case of Skype for Business Server 2015, Enterprise Edition, this tool can be run on any Front-End servers that have the Address Book Service enabled during setup.
Network
The computer should be able to connect to the Front-End pool and back-end database.
Software
The following software components must be installed before running the ABSConfig tool:
- Skype for Business Server 2015
Users
Administrators who have the permissions required to update the Skype for Business Server 2015 deployment.
Examples
ABSConfig can be started by typing ABSConfig.exe at a command prompt. Shown below is the ABSConfig tool user interface.
Summary
The ABSConfig tool provides administrators a quick and easy to use tool to customize Skype for Business Server 2015 Address Book Service.
Bandwidth Policy Service Monitor
The Bandwidth Policy Service Monitor tool is intended to allow administrators to view a list of the following:
All the configured Skype for Business Server 2015 Bandwidth Policy services (Authentication and Core) in the topology
The connections that each service makes to other Bandwidth Policy services and to the Edge servers
All the links that are configured in the Network configuration document and real-time bandwidth usage as reported by each of the Bandwidth Policy services
Description
The Bandwidth Policy Service Monitor tool is implemented as a GUI-based application. Administrators start the tool by running PDPMonUI.exe.
When the tool starts, it attempts to discover the list of Bandwidth Policy services in the topology. After the initial update is done, the pane to the left of the window is populated with a list of services that are grouped by the clusters that they belong to.
When administrators select a particular Bandwidth Policy Service, the pane on the right displays the information about that particular service. That pane also has two main tabs that display information.
Machine Info Tab
The Machine Info tab shows the details of the Bandwidth Policy Service that is selected and the list and state of all the connections that are made by the selected Bandwidth Policy Service to other services.
Topology Info Tab
The Topology Info tab shows a list of all the links that are configured in the Network configuration settings. For each link, the audio and video bandwidth capacity is displayed. Additionally, the currently utilized bandwidth is displayed, both in Kbps and as a percentage of the capacity. The tool uses color-coding to highlight links that have utilization that is close to the capacity—this allows administrators to quickly isolate such links.
Note
If the Bandwidth Policy Service Monitor tool experiences failure when it connects to any of the configured Bandwidth Policy services, the information in the Machine Info and the Topology Info tabs won't be populated. However, it is possible that the tool might connect initially but subsequently lose its connection to the service. In such cases, administrators might see outdated information. There is a Last Updated time stamp on each of the tabs that can allow administrators to see when the data was last updated for a particular Bandwidth Policy Service.
Output
There is no command-line output; the program output is contained within the main graphical user interface (GUI).
Purpose
The purpose of the Bandwidth Policy Service Monitor tool is to allow administrators visibility into the state of each of the Bandwidth Policy services that are defined in the topology. In addition, administrators can see real-time bandwidth usage for all the links that are defined in the Network configuration document.
Requirements
The Bandwidth Policy Service Monitor tool needs to be run on a computer that is part of the Skype for Business Server topology.
Summary
The Bandwidth Policy Service Monitor tool can be a valuable resource to administrators so they can inspect the state of all the Bandwidth Policy services in the topology—and more importantly—they can obtain real-time bandwidth utilization for the links that are defined in the Network configuration settings.
Bandwidth Utilization Analyzer
Bandwidth Utilization Analyzer is a tool that creates reports about various views of bandwidth consumption by the UC endpoints across WAN links in the enterprise network. These reports can be used to understand the current bandwidth consumption pattern and to aid in bandwidth capacity planning.
Description
Bandwidth Utilization Analyzer is implemented as a GUI-based application. This tool generates reports specifically for audio utilization across the network and helps with capacity planning. It also iterates on the bandwidth capacity that is assigned to various links.
Output
Bandwidth Utilization Analyzer provides graphical plots of bandwidth capacity and utilization for audio for all the WAN links that are configured in the system.
Purpose
In any voice and video deployment, it's critical to monitor and understand the trend of bandwidth utilization of media traffic across the enterprise network. The Bandwidth Utilization Analyzer tool allows an administrator to achieve just that. This tool does the following:
Generates specific reports for audio utilization across the network
Helps with more effective capacity planning and iteration on the bandwidth capacity that is assigned to various links
Bandwidth Utilization Analyzer can generate graphical plots of bandwidth capacity and utilization reports; they are as follows:
All the WAN links in the enterprise network
Filtered by selected WAN links that have been chosen
Filtered by WAN links that have exceeded link capacity
Filtered by WAN links that have been under-utilizing the provisioned bandwidth
Filter by WAN links that have been reaching critical levels (a bandwidth utilization that is greater than 90% of bandwidth capacity of the WAN link)
Filtered by WAN link type—network-site links, interregional links, and links within a site
Filtered by network region
Applications
Bandwidth Utilization Analyzer has the following two applications (tools):
WanLinkLogCollector.exe This tool enables its user to input the required information.
BandwidthUtilizationAnalyzer.xlsm A Microsoft Excel spreadsheet software report is automatically launched by WanLinkLogCollector.exe. This application allows the user to apply filters to the report as shown later in this article.
Phases of Using Bandwidth Utilization Analyzer
There are two phases when using Bandwidth Utilization Analyzer:
Collect logs, which are performed by using WanLinkLogCollector.exe
Customize reports, which are performed by using BandwidthUtilizationAnalyzer.xlsm
Important
We strongly recommend that BandwidthUtilizationAnalyzer.xlsm not be manually launched by end users.
Starting Bandwidth Utilization Analyzer
Start WanLinkLogCollector.exe at the command prompt or by using Windows Explorer.
Using WanLinkLogCollector.exe
There are three steps to using WanLinkLogCollector.exe:
Log the timeline Provide the timeline that the report needs to be generated for
Specify the file directories Provide file location information
Collect the logs and launch the report viewer Execute the command to generate the report
Step 1 - Log the timeline
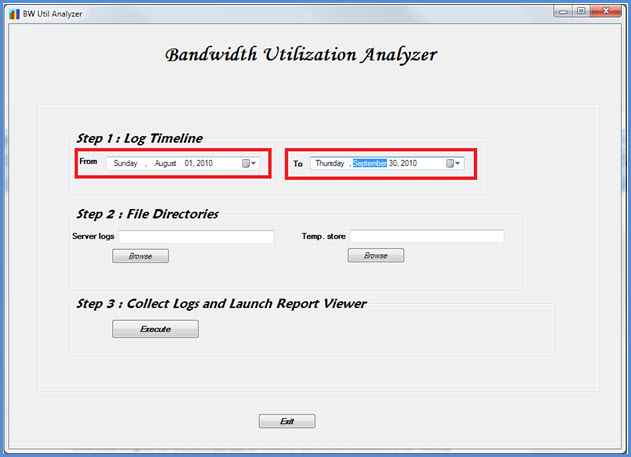
Logging the timeline allows the tool user to specify the following as shown in the figure below.
Start date This is the start date of the timeline that the report is to be generated for; for example, August 1, 2010.
End date This is the end date of the timeline that the report is to be generated for; for example, September 30, 2010.
Step 2 - Specify the file directories
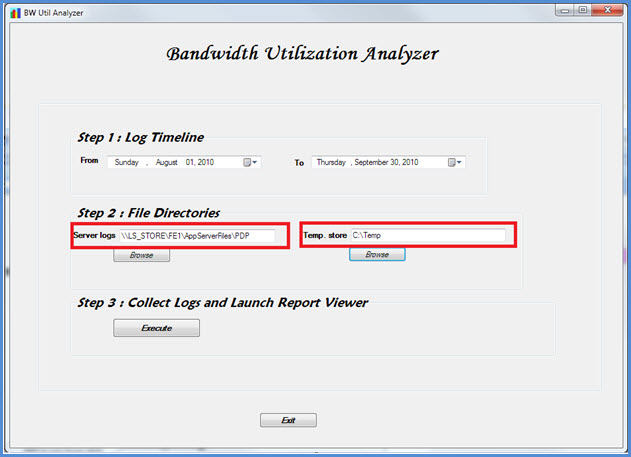
The following file directories can be specified by the user as shown.
Server log files location The folder location where Bandwidth policy server logs are stored. This is typically in <fileserver>\<choice of FE>\AppServerFiles\PDP.
Temporary file storage location The temporary file location where intermediate files are stored while the report is being generated.
Note
Ensure that sufficient file access to the server logs and the temporary file store folder is provided to the tool user.
Step 3 - Collect the logs and start the report viewer
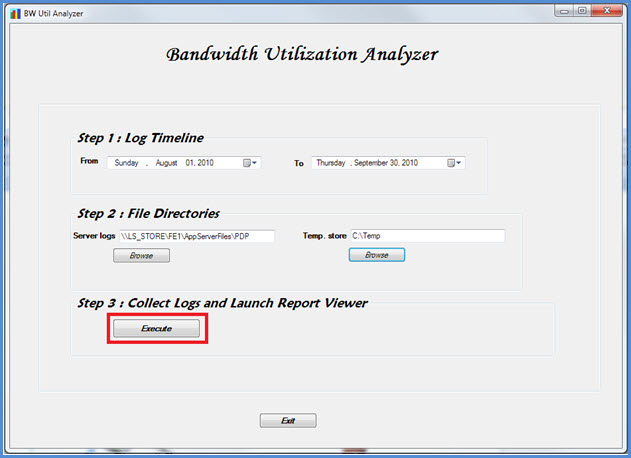
To collect the logs and start the report viewer, click Execute as shown below. This step collects the required data.
When the input validation is successful, the message shown below is displayed.
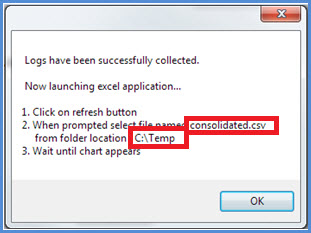
Click OK. BandwidthUtilizationAnalyzer.xlsm is automatically started. Follow the instructions in the message box. For details, see Using BandwidthUtilizationAnalyzer.xlsm in the next section.
Using BandwidthUtilizationAnalyzer.xlsm
When BandwidthUtilizationAnalyzer.xlsm is automatically started, click Refresh as shown below.
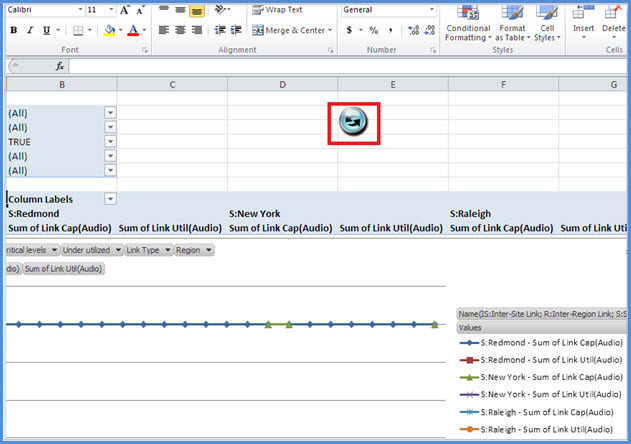
When a file folder is opened, select consolidated.csv from the location that is specified in the message box as shown below. It also shows the location as C:\Temp.
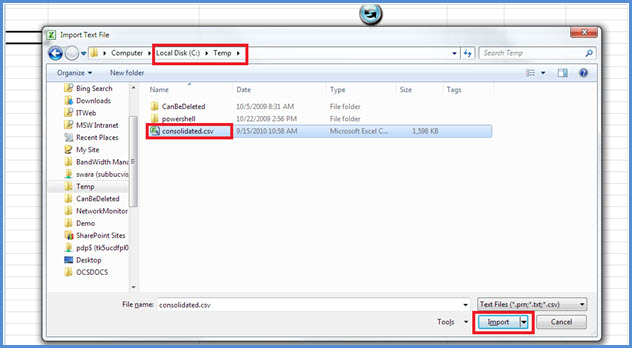
Click Import.
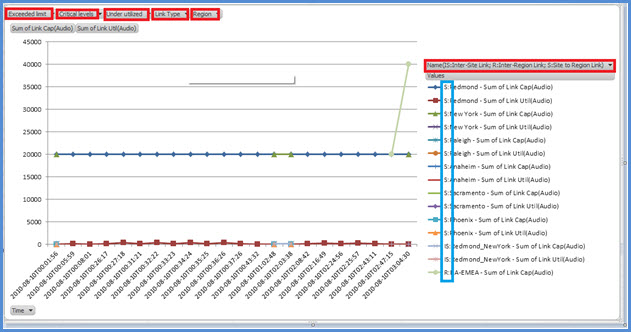
The graphical plot is automatically generated. It is available when the working-in-the-background pointer disappears.
Applying Filters to the Report View
The filters that can be applied to the report view as shown below are described as follows:

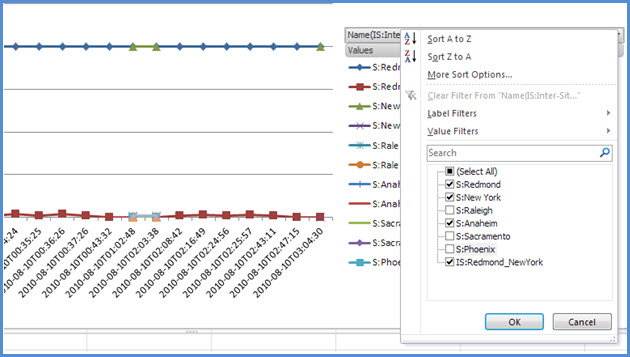
Name Filter by WAN links (the filter is on the right side of the graph). The prefix denotes the following link types; see the vertical (blue) box:
S Site The WAN link from a network site to a network region
IS Inter-Site The WAN link between two network sites
R Inter-Region The WAN link between two network region
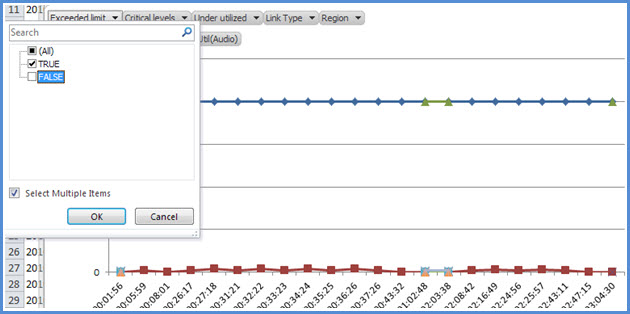
Exceeded limit Filter by WAN links whose bandwidth utilization is more than the bandwidth capacity
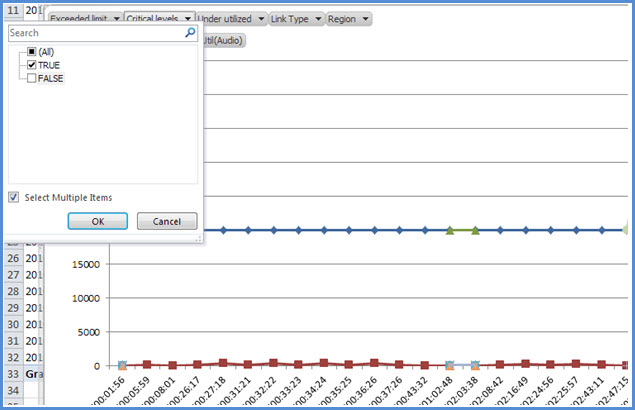
Critical levels Filter by WAN links whose bandwidth utilization has reached 90% or more than the bandwidth capacity
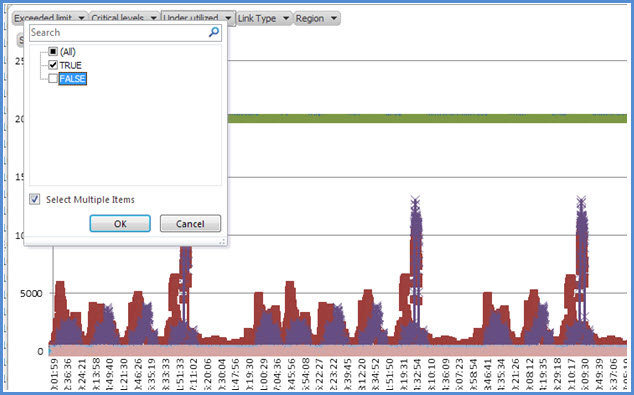
Under-utilized Filter by WAN links whose bandwidth utilization has been less than 25% of the bandwidth capacity
Link type Filter by the following WAN links types:
Network site type
Inter-site type
Inter-Region link type
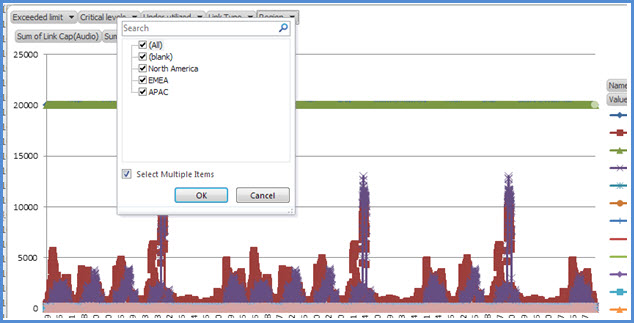
Region Filter by network region
The following figures show the previously described filters.
Filter by Name. Select the list of links that need to be displayed in the graph.
Filter by Exceeded limit. Select True to enforce the filter.
Filter by Critical levels. Select True to enforce the filter.
Filter by Under utilized. Select True to enforce the filter.
Filter by Link Type. Select the type or types that need to be displayed.
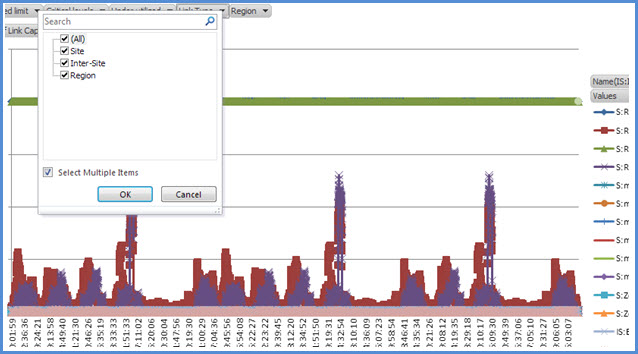
Filter by Region. Select a list of regions whose links need to be displayed.
Requirements
The .NET Framework 3.5
Microsoft Excel 2010 or Excel 2007
Summary
Bandwidth Utilization Analyzer is used to plot the audio bandwidth utilization for UC traffic across the network. This tool can be used to report the utilization of video bandwidth on the network as well.
Call Parkometer
Call Parkometer is a command-line application that provides easy access to the Call Park orbit database.
Description
Call Parkometer is a tool to track currently parked calls. It also collects statistics about orbits and Call Park Server (CPS) usage. This command-line tool provides both read and write-access to the CPS orbit SQL Server database from a local or remotely connected computer.
All options are mutually exclusive. Command-line syntax is as follows:
-o parameter—lists all orbit ranges configured for this pool.
-n parameter—lists all currently used orbits in this pool. The information displayed is as follows:
SIP Uniform Resource Identifier (URI) of the parkee and parker.
Host name of the CPS where the call is parked.
Time stamp of when the call was parked.
-f parameter—lists the number of currently free orbits in the pool.
-r <n> parameter—lists the <n> last parked calls. The information displayed is as follows:
Parkee SIP URI.
Parker SIP URI.
Host name of the CPS where the call was parked.
Time stamp of when the call was retrieved or dropped.
-t<n> parameter - tests reserving an orbit in the database to show the randomness of the assigned orbit numbers.
Output
Depending on the input parameters that are specified at a command prompt, Call Parkometer displays the following output:
All orbit ranges that are configured for this pool
Currently parked calls
Number of free (available) orbits
Recently parked calls
Reserved orbits for testing uniform and random orbit values
Purpose
The purpose of the CPS tool is to provide command-line access to the CPS database. The administrator can view the CPS usage and determine the number of orbits assigned to a pool.
Requirements
There are no requirements if this tool is run on the same computer that is running CPS. If this tool is run on a remote computer, the SQL Server database used by Skype for Business Server 2015 must be configured to allow remote access. Call Parkometer must be configured with a SQL Server database connection string to connect to the pool's SQL Server. This SQL Server database connection string is defined in the configuration file, parkometer.exe.config. It must be placed in the same directory where parkometer.exe is located. The following XML file is an example of a parkometer.exe.config. The parameters that must be configured are user name (for example, mydomain\Administrator), password (for example, mypassword), and host name (for example, myserver).
<?xml version="1.0" encoding="utf-8" ?>
<configuration>
  <appSettings>
   <add key="SQL" value="server=myserver\RTC;
database=cpsdyn;
User Id=mydomain\Administrator;
Password=mypassword.;
Integrated Security=false;"/>
  </appSettings>
</configuration>
Examples
Deployed orbit ranges: the -o parameter lists all orbit ranges that are configured for this pool as shown

Currently parked calls: the -n parameter lists all currently used orbits on this pool as shown

Number of free orbits: the -f parameter lists the number of currently free orbits in the pool as shown

Recently parked calls: the -r <n> parameter lists the <n> last parked calls as shown
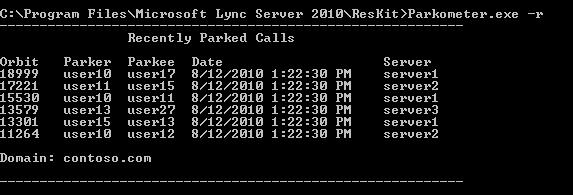
Test orbit reservation: the -t <n> parameter tests reserving an orbit in the database as shown

Summary
Call Parkometer is a command-line tool that provides detailed information about the Call Park Server.
DBAnalyze
Description
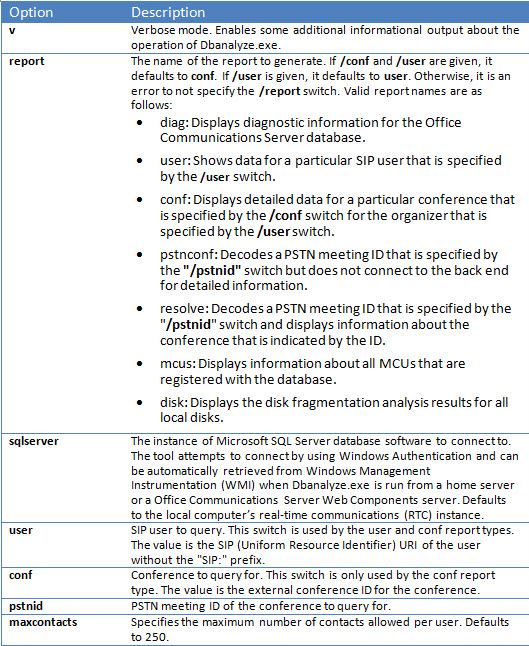
DBAnalyze is a command-line tool that helps administrators to gather analysis reports about the Skype for Business Server 2015 databases. DBAnalyze has the following modes: diagnostic, user data, conference, MCUs, and disk fragmentation:
Diagnostic mode Creates a report that includes information about tables (number of records, fragmentation, data size, and index size), data and log file sizes, the last back-up time, contact distribution among servers that are running Microsoft Office Communications Server, the average number of permissions, contacts, containers, subscriptions, publications, endpoints per user, any improperly homed users, users that can't be routed, the average number of conferences organized per user, scheduled conferences, active conferences, and the database version.
Note
Running diagnostic mode can affect server performance.
User data mode Reports contact, container, subscription, publication, permission, and contact-group data for a specified user or for users who have that user in their contact and permission lists. This mode also reports summary data for conferences that a user organizes or is invited to.
Conference mode Reports detailed data for a specific conference, including all schedule-time details for the conference, the invitee list, the list of media types allowed for the conference, active MCUs (multipoint control units), the active participant list, and each participant's signaling state.
Decode Meeting ID Decodes a public switched telephone network (PSTN) meeting ID that is specified by the /pstnid switch but does not connect to the back end for detailed information.
Resolve conference Decodes a PSTN meeting ID that is specified by the /pstnid switch and displays information about the conference indicated by the ID.
MCUs mode Reports the ID, media type, URL, heartbeat status, conference load, and participant load for each MCU in the pool.
Disk fragmentation mode Displays the fragmentation status of all disks.
This tool can be used to diagnose various problems or to assist administrators with capacity planning. For example, if most of the users homed on server A choose users homed on server B as their contacts, the administrator can move the users on server A to server B to reduce cross-server traffic.
Output
This tool outputs predefined reports about the Skype for Business Server 2015 database. Path: %ProgramFiles%\Skype for Business Server 2015\Reskit
Purpose
To install Dbanalyze.exe, copy it to a local folder and then run the tool. To use the tool, run the following command from the command line. dbanalyze.exe [/v] [/report:value] [/sqlserver:value] [/user:user@domain.com] [/conf:value][/pstnid:Value] [/maxcontacts:value] The descriptions for the command-line options are shown below.
Requirements
Computer DBAnalyze can be run only from a domain-joined computer that has Skype for Business Server 2015 installed.
Network The computer should be able to connect to the back-end database.
Software Skype for Business Server 2015 software components must be installed before running DBAnalyze.
UsersThe table below shows the administrators who have the necessary permissions to access Skype for Business Server 2015 databases.
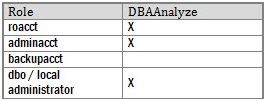
Note
A local administrator account is required for /report:disk mode.
Examples
The following are examples of valid Dbanalyze.exe commands:
dbanalyze.exe /report:diag
dbanalyze.exe /report:user /user:usera@domainb.com
dbanalyze.exe /report:conf /user:bob@example.com /conf:1W9J71SKSX2X
dbanalyze.exe /report:resolve /pstnid:12345
dbanalyze.exe /report:mcus
dbanalyze.exe /report:disk
Summary
DBAnalyzer provides administrators a quick and easy to analyze Skype for Business Server 2015 databases.
Import Storage Service Data
The ImportStorageServiceData resource kit tool allows for reimporting Queue and Endpoint data that was flushed out of the Storage Service (LYSS) back into the Storage Service.
Description
The data flushed out of the Storage Service could have been automatic (periodic) based on Queue Item status or database size. It could have happened due to the manual invocation of the pool failover cmdlet, or the StorageServiceFullFlush cmdlet (which the pool failover cmdlet invokes). Note that data should ideally not be reimported if any of the Storage Service (LYSS ) database sizes on the front ends is above the normal level, because doing so will likely just cause more data to be exported back out. Furthermore, any problems that could have contributed to errors that caused the Storage Service Queue to grow should first be resolved (for example Exchange endpoint errors, network issues, or other problems).
Scenario 1: during pool failover, files may be flushed out from storage service for each front end. After failover is completed, the tool should be run to reimport the data.
Scenario 2: data is being flushed automatically each day or in response to Storage Service database exceeding certain size thresholds (for example 60%, 80%, 90% full). This automatically flushed data should be reimported routinely by the administrator. In the above situation, if the monitoring SCOM pack is not deployed, there are events for Skype for Business Server Storage Service relating to data being flushed from the Storage Service. Event IDs of 32075 (full flush operation is started), 32076 (full flush has completed), 32082 (maintenance level flush started), 32083 (maintenance level flush complete), 32089 (flush occurred due to filling up of database). Note these event Ids correspond to the RTM release. When an administrator sees these events, it means that there are files that have been flushed out. This data should routinely be imported back using this tool, for example once per week.
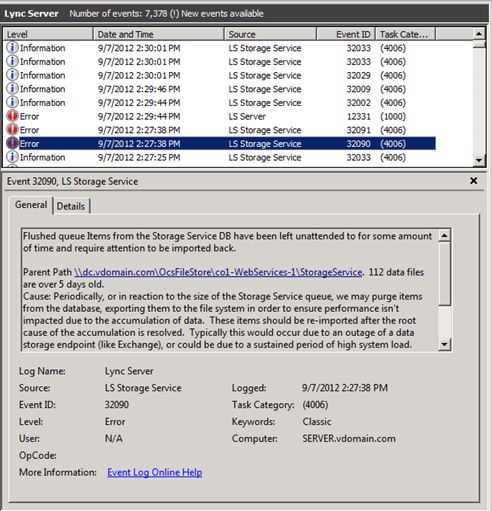
For the Online Service release, if health monitoring SCOM pack for Skype for Business Server is deployed, there are new alerts that may be raised which ask the administrator to reimport the flushed data back into Storage Service. There will be a corresponding event in the event log on the Front-End server that triggered the alert. The event will give a description of the Parent path under which the flushed data files are located, and how many files there are which meet the alert criteria. The alert criteria is that there are X or more files under the particular parent path that are at least Y days old (where X and Y are preset within the StorageService but can be overridden by changing the APPCONFIG file.)Two examples of events that can trigger the health alert are shown below, with the difference being their parent path. One possibility is under Web service file share, while the other possibility is the local Application Data directory of each front end. (for example c:\ProgramData\Microsoft\Skype for Business Server 2015\StorageService). The administrator will then run this reskit tool.
This tool will increase CPU and IO load on the front end it is running on, and other front ends, in the situation that the data is not owned by the front end that the tool is executed on. We recommend running this tool when front ends are not under heavy CPU and IO load, for example outside of peak hours. Secondly, this tool can 2 to 3 minutes to import one data file. Keep this in mind when estimating how long tool will be running. The verbose log file generated by the tool will by default appear on the File Store. Delete it if there are no errors reported, because the log file can be tens of MB or more.
Requirements
Install the Skype for Business Server 2015 Resource Kit tools. The tool runs on domain-joined machines where Skype for Business Server and Skype for Business Server Management Shell are installed. The tool uses a cmdlet from the management shell to identify all the Front-End servers in the pool. Secondly, the tool must be executed from a machine in the pool that has the RtcLocal database installed. This database is used by the tool to retrieve the location of the WEBSERVICE file share for the pool. Additionally, before using the tool, each Front-End server must first enable Windows PowerShell Remoting using Enable-PSRemoting on each Front-End server, and the machine that the tool is executed from. Otherwise, remote Windows PowerShell commands from this tool will fail. Windows PowerShell Remoting can be turned off on all Front-End servers in the pool after it is finished. Finally, the account or credential invoking the tool must have read/write permission to the webservice file share for the pool they are executing this tool on. Otherwise the tool will fail with IO Permission errors.
Note
On Windows Server 2012, Windows PowerShell Remoting is enabled by default, but not on the Windows Server 2008 operating system.
Examples
>  C:\StorageService>ImportStorageServiceData.exe
Description:
This tool will re-import Storage Service (LYSS) flushed queue data back in.  For a pool: you are required to run this tool on a machine inside the pool which has the Lync Server Management Shell installed.  Additionally, all front end machines need to have Windows Powershell Remoting enabled before executing this tool by executing Enable-PSRemoting.  Also, please ensure that all Storage Service instance DB Size are at the 'Normal' level (verify this by viewing Eventlog events). Otherwise re-importing may cause data to be flushed out again if any Storage Service instance DB size level goes above 'Normal'.
Usage: Default behavior is to Import data from web service file share as well as any files on all Front End machines in pool.
Additional Options:
-Verbose                    : Turn verbose output on.

-StorageServiceHostName     : Host Name of Storage Service WCF endpoint.  ( Default=localhost netnamedpipe binding. )

-FileSharePath              : Import only all data from just under the UNC path specified.

ActivityID: cc3b62ff-bb66-4e61-a6e2-96cb3626315c. <-- Use this to correlate with StorageService trace logs if troubleshooting.
Type Server name (TCP binding) or press <enter> for localhost (NamePipe binding):
Using NetNamedPipeBinding...
OnTopologyChanged Event received
Web Service File Share: \\dc.vdomain.com\OcsFileStore\co1-WebServices-1\StorageService

Front Ends:
server.vdomain.com
server2.vdomain.com
server1.vdomain.com
server3.vdomain.com
Looking under directory: \\dc.vdomain.com\OcsFileStore\co1-WebServices-1\StorageService for exported data.
# Files found: 8
Starting Import for file:\\dc.vdomain.com\OcsFileStore\co1-WebServices-1\StorageService\DataExport\2
0120910\SERVER.vdomain.com\944f5724c65c5f93900dc1c8c898b102__0.xml
Items deserialized: 20

All items in file were enqueued successfully, will try to delete file: \\dc.vdomain.com\OcsFileStore\co1-WebServices-1\StorageService\DataExport\20120910\SERVER.vdomain.com\944f5724c65c5f93900dc1c8c898b102__0.xml

All items in file failed to enqueue so file will not be deleted.  File path: \\dc.vdomain.com\OcsFileStore\co1-WebServices-1\StorageService\DataExport\20120910\SERVER.vdomain.com\944f5724c65c5f93900dc1c8c898b102__0.xml

Summary for file \\dc.vdomain.com\OcsFileStore\co1-WebServices-1\StorageService\DataExport\20120910\SERVER.vdomain.com\944f5724c65c5f93900dc1c8c898b102__0.xml: succeeded: 20, failed: 0

Starting Import for file:\\dc.vdomain.com\OcsFileStore\co1-WebServices-1\StorageService\DataExport\20120910\SERVER1.vdomain.com\17d5435ae40259f7bbdf1866776386e4__0.xml
Items deserialized: 20

[cc3b62ff-bb66-4e61-a6e2-96cb3626315c] Send EnqueueMessages to redirected, targetServer=server1.vdomain.com, queueItems=20

All items in file were enqueued successfully, will try to delete file: \\dc.vdomain.com\OcsFileStore\co1-WebServices-1\StorageService\DataExport\20120910\SERVER1.vdomain.com\17d5435ae40259f7bbdf1866776386e4__0.xml

All items in file failed to enqueue so file will not be deleted.  File path: \\dc.vdomain.com\OcsFileStore\co1-WebServices-1\StorageService\DataExport\20120910\SERVER1.vdomain.com\17d5435ae40259f7bbdf1866776386e4__0.xml

Summary for file \\dc.vdomain.com\OcsFileStore\co1-WebServices-1\StorageService\DataExport\20120910\
SERVER1.vdomain.com\17d5435ae40259f7bbdf1866776386e4__0.xml: succeeded: 20, failed: 0

Starting Import for file:\\dc.vdomain.com\OcsFileStore\co1-WebServices-1\StorageService\DataExport\20120910\SERVER1.vdomain.com\904f6c9b8ac951ae8b3c86684d3832e4__0.xml

Items deserialized: 20
[cc3b62ff-bb66-4e61-a6e2-96cb3626315c] Send EnqueueMessages to redirected, targetServer=server1.vdomain.com, queueItems=20

All items in file were enqueued successfully, will try to delete file: \\dc.vdomain.com\OcsFileStore
\co1-WebServices-1\StorageService\DataExport\20120910\SERVER1.vdomain.com\904f6c9b8ac951ae8b3c86684d
3832e4__0.xml

All items in file failed to enqueue so file will not be deleted.  File path: \\dc.vdomain.com\OcsFil
eStore\co1-WebServices-1\StorageService\DataExport\20120910\SERVER1.vdomain.com\904f6c9b8ac951ae8b3c
86684d3832e4__0.xml

Summary for file \\dc.vdomain.com\OcsFileStore\co1-WebServices-1\StorageService\DataExport\20120910\
SERVER1.vdomain.com\904f6c9b8ac951ae8b3c86684d3832e4__0.xml: succeeded: 20, failed: 0

Starting Import for file:\\dc.vdomain.com\OcsFileStore\co1-WebServices-1\StorageService\DataExport\2
0120910\SERVER2.vdomain.com\69844a271e6c5633a1f2b46a42287dd6__0.xml

Items deserialized: 20

[cc3b62ff-bb66-4e61-a6e2-96cb3626315c] Send EnqueueMessages to redirected, targetServer=server2.vdom
ain.com, queueItems=20

All items in file were enqueued successfully, will try to delete file: \\dc.vdomain.com\OcsFileStore
\co1-WebServices-1\StorageService\DataExport\20120910\SERVER2.vdomain.com\69844a271e6c5633a1f2b46a42
287dd6__0.xml

All items in file failed to enqueue so file will not be deleted.  File path: \\dc.vdomain.com\OcsFil
eStore\co1-WebServices-1\StorageService\DataExport\20120910\SERVER2.vdomain.com\69844a271e6c5633a1f2
b46a42287dd6__0.xml

Summary for file \\dc.vdomain.com\OcsFileStore\co1-WebServices-1\StorageService\DataExport\20120910\
SERVER2.vdomain.com\69844a271e6c5633a1f2b46a42287dd6__0.xml: succeeded: 20, failed: 0

Starting Import for file:\\dc.vdomain.com\OcsFileStore\co1-WebServices-1\StorageService\DataExport\2
0120910\SERVER3.vdomain.com\3313935458e35b9b9759e08a15d251e6__0.xml

Items deserialized: 20

[cc3b62ff-bb66-4e61-a6e2-96cb3626315c] Send EnqueueMessages to redirected, targetServer=server3.vdom
ain.com, queueItems=1

All items in file were enqueued successfully, will try to delete file: \\dc.vdomain.com\OcsFileStore
\co1-WebServices-1\StorageService\DataExport\20120910\SERVER3.vdomain.com\3313935458e35b9b9759e08a15
d251e6__0.xml

All items in file failed to enqueue so file will not be deleted.  File path: \\dc.vdomain.com\OcsFil
eStore\co1-WebServices-1\StorageService\DataExport\20120910\SERVER3.vdomain.com\3313935458e35b9b9759
e08a15d251e6__0.xml

Summary for file \\dc.vdomain.com\OcsFileStore\co1-WebServices-1\StorageService\DataExport\20120910\
SERVER3.vdomain.com\3313935458e35b9b9759e08a15d251e6__0.xml: succeeded: 20, failed: 0

Starting Import for file:\\dc.vdomain.com\OcsFileStore\co1-WebServices-1\StorageService\DataExport\2
0120910\SERVER3.vdomain.com\4501e04eae4856059346949ff817c220__0.xml
Items deserialized: 20
[cc3b62ff-bb66-4e61-a6e2-96cb3626315c] Send EnqueueMessages to redirected, targetServer=server3.vdom
ain.com, queueItems=1
All items in file were enqueued successfully, will try to delete file: \\dc.vdomain.com\OcsFileStore
\co1-WebServices-1\StorageService\DataExport\20120910\SERVER3.vdomain.com\4501e04eae4856059346949ff8
17c220__0.xml
All items in file failed to enqueue so file will not be deleted.  File path: \\dc.vdomain.com\OcsFil
eStore\co1-WebServices-1\StorageService\DataExport\20120910\SERVER3.vdomain.com\4501e04eae4856059346
949ff817c220__0.xml

Summary for file \\dc.vdomain.com\OcsFileStore\co1-WebServices-1\StorageService\DataExport\20120910\
SERVER3.vdomain.com\4501e04eae4856059346949ff817c220__0.xml: succeeded: 20, failed: 0
Starting Import for file:\\dc.vdomain.com\OcsFileStore\co1-WebServices-1\StorageService\DataExport\2
0120910\SERVER3.vdomain.com\5ad77443ad955a22a876749be66d5317__0.xml

Items deserialized: 20
[cc3b62ff-bb66-4e61-a6e2-96cb3626315c] Send EnqueueMessages to redirected, targetServer=server3.vdom
ain.com, queueItems=20
All items in file were enqueued successfully, will try to delete file: \\dc.vdomain.com\OcsFileStore
\co1-WebServices-1\StorageService\DataExport\20120910\SERVER3.vdomain.com\5ad77443ad955a22a876749be6
6d5317__0.xml
All items in file failed to enqueue so file will not be deleted.  File path: \\dc.vdomain.com\OcsFil
eStore\co1-WebServices-1\StorageService\DataExport\20120910\SERVER3.vdomain.com\5ad77443ad955a22a876
749be66d5317__0.xml
Summary for file \\dc.vdomain.com\OcsFileStore\co1-WebServices-1\StorageService\DataExport\20120910\
SERVER3.vdomain.com\5ad77443ad955a22a876749be66d5317__0.xml: succeeded: 20, failed: 0
Starting Import for file:\\dc.vdomain.com\OcsFileStore\co1-WebServices-1\StorageService\DataExport\2
0120910\SERVER3.vdomain.com\a11e27ae439a582288d4657eda86b565__0.xml
Items deserialized: 20
[cc3b62ff-bb66-4e61-a6e2-96cb3626315c] Send EnqueueMessages to redirected, targetServer=server3.vdom
ain.com, queueItems=20
All items in file were enqueued successfully, will try to delete file: \\dc.vdomain.com\OcsFileStore
\co1-WebServices-1\StorageService\DataExport\20120910\SERVER3.vdomain.com\a11e27ae439a582288d4657eda
86b565__0.xml
All items in file failed to enqueue so file will not be deleted.  File path: \\dc.vdomain.com\OcsFil
eStore\co1-WebServices-1\StorageService\DataExport\20120910\SERVER3.vdomain.com\a11e27ae439a582288d4
657eda86b565__0.xml
Summary for file \\dc.vdomain.com\OcsFileStore\co1-WebServices-1\StorageService\DataExport\20120910\
SERVER3.vdomain.com\a11e27ae439a582288d4657eda86b565__0.xml: succeeded: 20, failed: 0
All files have been imported into Storage Service for path: \\dc.vdomain.com\OcsFileStore\co1-WebSer
vices-1\StorageService
Importing files for: server.vdomain.com
No files founds.
Importing files for: server2.vdomain.com
No files founds.
Importing files for: server1.vdomain.com
No files founds.
Importing files for: server3.vdomain.com
No files founds.
Writing log: \\dc.vdomain.com\OcsFileStore\co1-WebServices-1\StorageService\ImportStorageServiceData
Log20120910_1609SS
Tool has finished execution.
>  C:\StorageService>
LCSSync
The LCSSync tool helps to deploy Skype for Business Server 2015 communications software in a multi-forest environment. This tool is used to synchronize users and groups from different user forests as an Active Directory Domain Services contact object to a central forest where Skype for Business Server 2015 is installed.
Description
LCSSync uses the synchronized Active Directory Domain Services contact objects in the central forest to enable users for Skype for Business Server. To provide single sign in, the primary user account must be mapped to the Active Directory Domain Services contact object in the central forest for Skype for Business Server 2015. This tool helps perform that mapping. This tool provides templates for creating Management Agents in the Microsoft Identity Integration Server.
Summary
The LCSSync tool helps to deploy Skype for Business Server 2015 in a multi-forest environment.
Lookup User Console
The LookupUserConsole tool displays internal Skype for Business Server routing information about specific users. This information may be useful to Microsoft support personal in diagnosing deployment and routing problems.
Description
Executing LookupUserConsole.exe will open a command prompt that accepts SIP addresses and attempts to display internal Skype for Business Server routing information relating them. Type exit to quit the LookupUserConsole tool.
Requirements
Install the Skype for Business Server 2015 Resource Kit. The tool runs on domain-joined machines where Skype for Business Server is installed.
Examples
C:\Program Files\Skype for Business Server 2015\ResKit>LookupUserConsole.exe
> sip:john.doe@vdomain.com

  Execution time (ms):                            171.094
  Exeuction result:                               Success
  SIP URI:                                        sip:john.doe@vdomain.com
  User info:
    SID:                                          S-1-5-21-2831376166-29632525...    Display name:                                     John Doe
    Grouping ID:                                  00000000-0000-0000-0000-...
    Line URI:                                     <null>
    Policy assignment:                            TenantId={00000000--0000-000....
    SIP enabled:                                  True
    UC enabled:                                   False
    Tenant ID:                                    00000000-0000-0000-0000-...  Cluster info:
    Active cluster:                               pool0.vdomain.com
    Backup registrar cluster:                     <null>
    Deployment location:                          <null>
    Home Front-End FQDN:                          SERVER.vdomain.com
    Primary Registrar cluster:                    pool0.vdomain.com
    Remote Director external SIP FQDN:            <null>
    Remote Director internal SIP FQDN:            <null>
    Remote Director Web FQDN:                     <null>
    Routing group ID:                             4501e04e-ae48-5605-9346...
    Service tag ID:                               1266953005
    User Front-End resolved:                      True
    User in local forest:                         True
    User in remote forest:                        False
    User in split domain:                         False
    User-Services cluster:                        pool0.vdomain.com

> sip:nouser@vdomain.com

  Execution time (ms):                            948.7574
  Exeuction result:                               UserDoesNotExist

> exit
MsTurnPing
The MSTurnPing tool allows an administrator of Skype for Business Server 2015 communications software to check the status of the servers running the Audio/Video Edge, Audio/Video Authentication services, and the servers that are running Bandwidth Policy Services in the topology.
Description
The MSTurnPing tool allows an administrator of Skype for Business Server 2015 communications software to check the status of the servers running the Audio/Video Edge, Audio/Video Authentication services, and the servers that are running Bandwidth Policy Services in the topology.
The tool allows the administrator to perform the following tests:
A/V Edge Server test: The tool performs tests against all A/V Edge Servers in the topology by doing the following:
Verifying that the Skype for Business Server Audio/Video Authentication service is started and can issue proper credentials.
Verifying that the Skype for Business Server Audio/Video Edge service is started and can allocate the resources on the external edge successfully.
Bandwidth Policy Service test: The tool performs tests against all the servers that are running the Bandwidth Policy Services in the topology by doing the following:
Verifying that the Skype for Business Server Bandwidth Policy Service (Authentication) is started and can issue proper credentials.
Verifying that the Skype for Business Server Bandwidth Policy Service (Core) is started and can perform the bandwidth check successfully.
This tool must be run from a computer that is part of the topology and has the local store installed.
Output
The tool outputs the results of each of the operations.
If the AudioVideoEdgeServer test is performed, the tool outputs are the following:
The test results of the computers that provide the Skype for Business Server 2015 Audio/Video Authentication service in the topology
The test results of the computers that provide the Skype for Business Server 2015 Audio/Video Edge service in the topology
If the BandwidthPolicyServer test is performed, the tool outputs are the following:
The test results of the computers that provide the Skype for Business Server 2015 Bandwidth Policy Service (Authentication) in the topology
The test results of the computers that provide the Skype for Business Server 2015 Bandwidth Policy Service (Core) in the topology
Requirements
This tool must be run from a computer that is in the topology and that has the local store.
The tool must be run as an administrator who has access to the local store.
Examples
The following is an example of the tool input.
MsTurnPing -ServerRole AudioVideoEdgeServer

MsTurnPing -ServerRole BandwidthPolicyServer
Summary
This tool can be a valuable resource to Skype for Business Server 2015 administrators who want to check the status of the servers that are running audio/video and bandwidth policy services.
Network Configuration Viewer
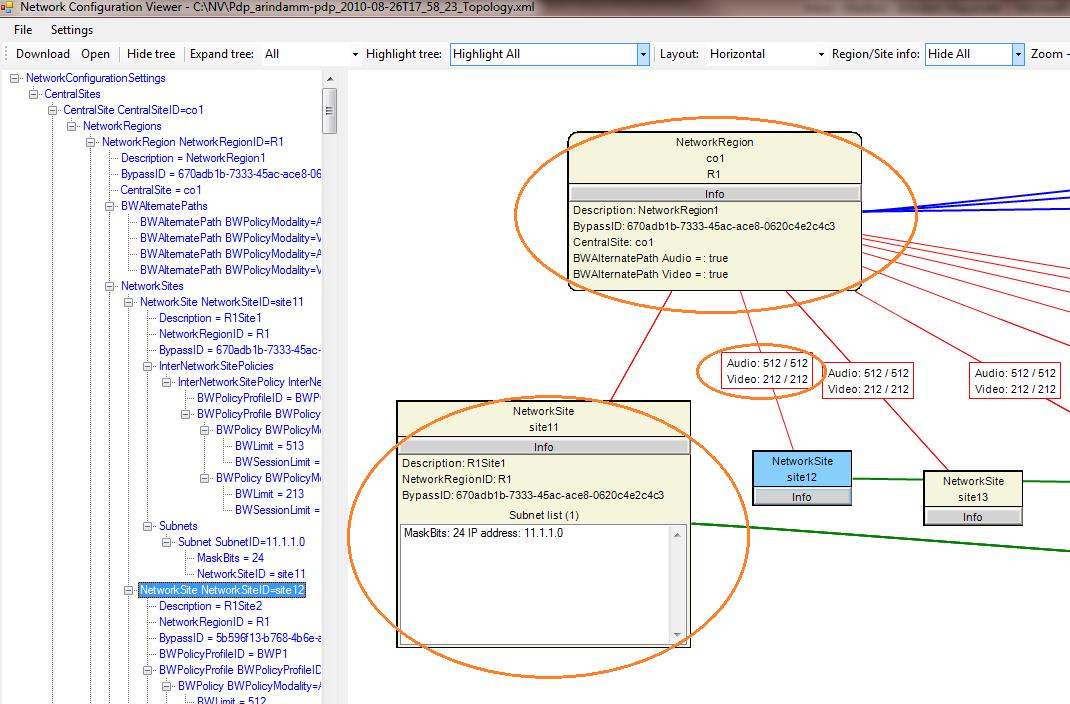
Network Configuration Viewer can be used by Skype for Business Server 2015 communications software administrators to view call admission control (CAC) network topology for an enterprise that is provisioned to allow real-time communication sessions, such as voice or video calls based on specified bandwidth capacity. Skype for Business Server 2015 administrators defines CAC policies, which are enforced by the Bandwidth Policy services that are installed with Skype for Business Server 2015.
Description
Network Configuration Viewer (NetworkConfigurationViewer.exe) allows administrators to perform the following tasks:
Load and view CAC network topology from a Skype for Business Server 2015 deployment in a graphical format.
Load and view CAC network topology from a Bandwidth Policy Server log file in a graphical format.
Save and store CAC network topology in an XML format on the disk.
Save and store CAC network topology diagram in JPG or BMP format.
View CAC network topology configuration data.
View CAC network topology in a tree-view style.
Define custom connectors for CAC network topology links (for example, site-to-region, region-to-region, and site-to-site links).
View CAC network topology site information, region Information, and provisioned bandwidth policies and network links.
Purpose
View enterprise CAC network topology links in a graphical interface.
Examples
Load and view CAC network topology from a Skype for Business Server 2015 deployment in a graphical format: Skype for Business Server 2015 administrators can load and view CAC network topology configuration on any Skype for Business Server 2015 computer by using the Download Network Configuration option as shown in the figure below. The tool will fail to download or view such a configuration when deployed on a computer that does not have connectivity to the Skype for Business Server 2015 configuration store.

Load and View CAC network topology from a Bandwidth Policy server log file in a graphical format: Skype for Business Server 2015 Bandwidth Policy servers saves the CAC network topology as a part of the logging mechanism under the Skype for Business Server 2015 file share location. Skype for Business Server 2015 administrators can view such a file in a graphical format by using the Open Network Configuration option as shown below.

Save and store CAC network topology in an XML format on the disk: Skype for Business Server 2015 administrators can save the CAC network topology configuration file in an XML format by using the Save a copy of Network Configuration option as shown below. The saved configuration file can then be used offline for graphical viewing purposes.

Save and Store CAC network topology diagram in JPG or BMP format: Skype for Business Server 2015 administrators can save the CAC network topology configuration in a graphical format (JPG and BMP file formats) by using the Save Network Configuration diagram as picture option as shown below.

View CAC network topology configuration data:Skype for Business Server 2015 administrators can view related network configuration data such as network regions, network sites, bandwidth profiles, and site subnet IP addresses in a textual format by using the View Network Configuration data option as shown below.

View CAC network topology in a tree-view style: Skype for Business Server 2015 administrators can view related network configuration data in a graphical tree view style by using the control panel on the left side of the tool window as shown below.
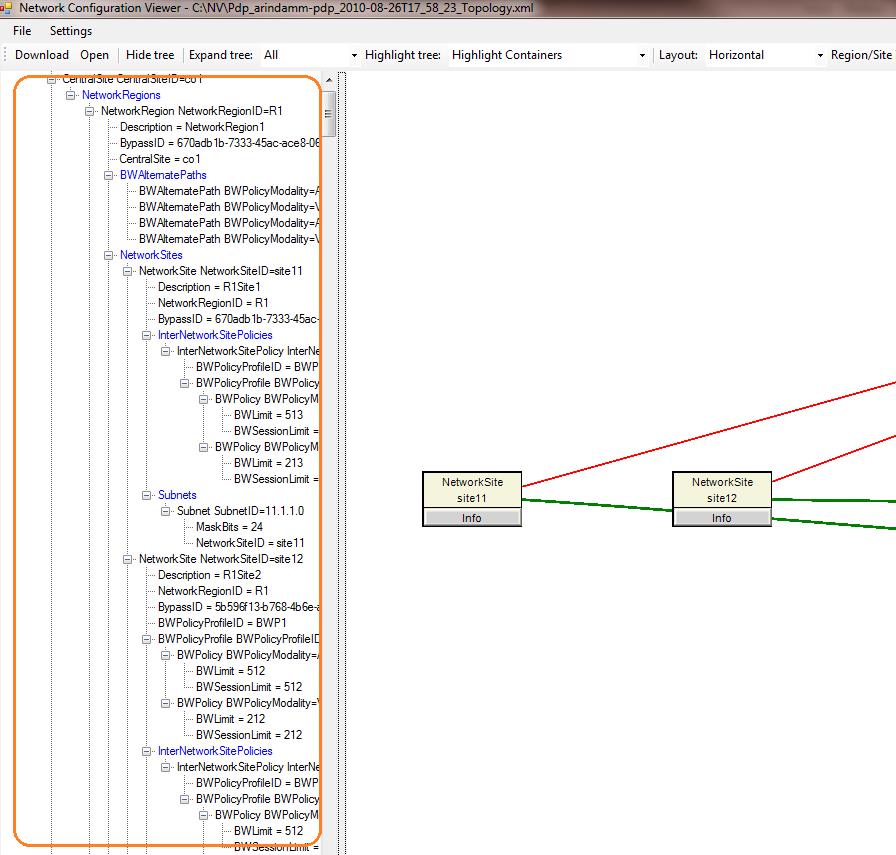
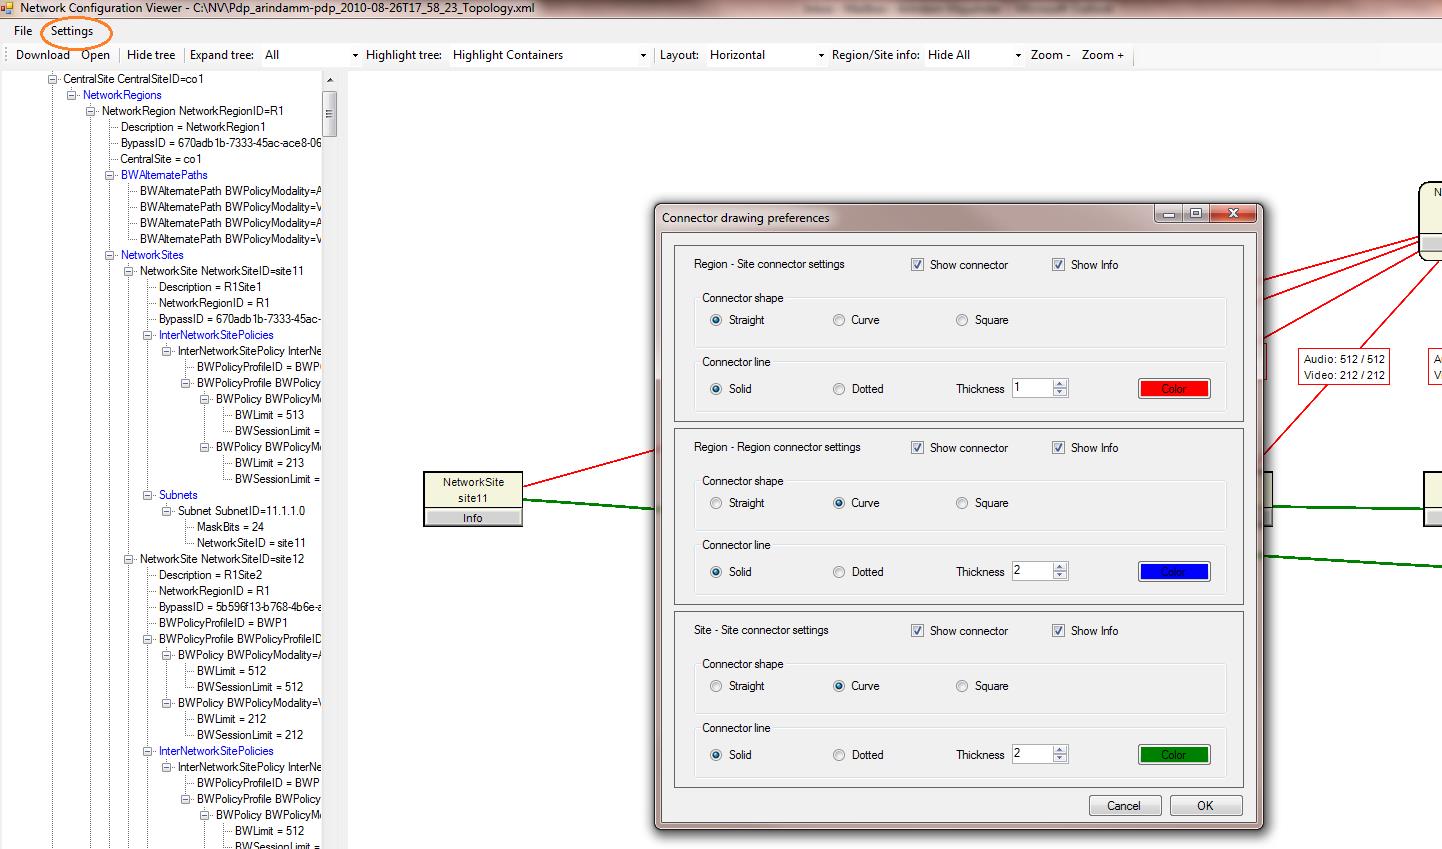
Define custom connectors for CAC network topology links (such as site-to-region, region-to-region, and site-to-site links): Skype for Business Server 2015 administrators can define custom graphical connectors for CAC network configuration WAN links by using the Settings option as shown below. This helps differentiate between various types of network links that are provisioned in the network configuration.
View CAC network topology site information, region information, and provisioned bandwidth policies: Skype for Business Server 2015 administrators can view related CAC network region information, site information, and CAC bandwidth provisioning information by using options shown below. (For example, click Info in a network region or network site object.)
Summary
This tool can be a valuable resource to Skype for Business Server 2015 administrators who would like to view CAC network topology for their deployment in a graphical format.
Response Group Agent Live
The Response Group application gives agents the ability to access useful real-time information using its built-in Web service. Unfortunately, no graphical view of this data is available outside the application. The Response Group Agent Live Resource Kit tool solves this issue by providing a simple and graphical way to access this information, enhanced with real-time Skype for Business communications software information such as the presence of other agents.
Description
Response Group Agent Live is a Windows application that provides sign-in and sign-out functionality and some real-time information (such as group membership and current number of calls) to Response Group agents. It is meant to be an enhanced version of the Agent Groups page (accessible from Skype for Business.
Purpose
The Response Group application queues incoming calls, and then routes them to agent groups. To make informed decisions about which calls to service, agents can access real-time information about their agent groups, such as what other agents are available and how many calls are waiting in each queue. This information, initially accessible only through the Response Group service, is made available in an intuitive way by Response Group Agent Live.
Features
The Response Group Agent Live tool is built on the Response Group service and the Skype for Business Server 2015 SDK. It provides Response Group agents the information and capabilities that are available from the Response Group service (such as group membership, presence of other agents, and number of waiting calls).
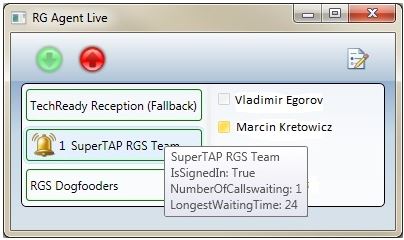
The figure below illustrates the main interface of Response Group Agent Live.
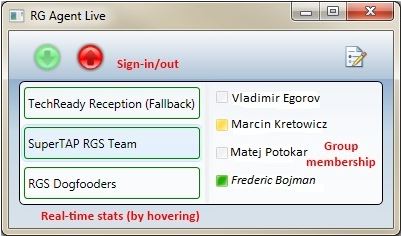
The following three main features are available for agents in Response Group Agent Live:
Sign-in/out: Contrary to the Agent Groups page (accessible from Skype for Business Server 2015), Response Group Agent Live allows only agents to sign in or out of all agent groups at once. This application provides three quick ways for agents to sign in or out:
Click the Sign-in/out (green and red) buttons within the application.
Right-click the system tray icon, and select sign in or sign out.
Using configurable keyboard shortcuts.
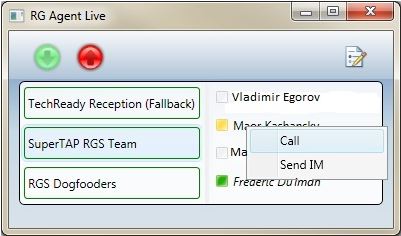
Group membership: When an agent group is selected, Response Group Agent Live displays the list of agents in this group in the right pane. If Skype for Business Server 2015 is running on the same computer as this application, presence information and the contact card are displayed in the Response Group Agent Live. Agents can send an IM or call other agents directly from there.
Real-time statistics: Response Group Agent Live provides real-time statistics for all agent groups. The update frequency is one minute. When a call is answered by a Response Group, a visual indicator is added next to the group name with the current number of queued calls. Pausing the pointer over a group also displays the longest waiting time.
Requirements
Response Group Agent Live requires the .NET Framework 4.0. In addition, to take advantage of the presence and contact card features, Skype for Business must be installed locally (and be running).
Configuration
Response Group Agent Live can be customized to individual preferences by using the Options dialog box in the application. In addition, the administrator can define the default host address by editing directly the defaultHostAddress property of the RGAgentLive.exe.config file.
The figure below illustrates the Options dialog box that agents can use to configure the host address and shortcut keys. This dialog is accessed by clicking the Options button on the top right of the main interface.
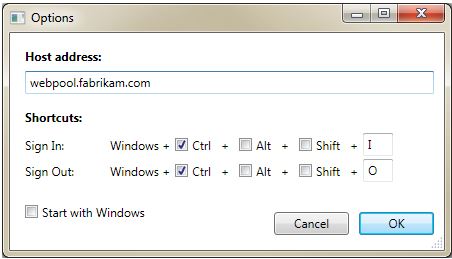
The following three different settings can be customized in the Response Group Agent Live configuration:
Host address: This is typically the web pool FQDN belonging to the agent's home pool. The exact Response Group service address is automatically derived in the background from this information (by appending the right path after the host).
Shortcuts: The exact shortcuts to sign-in/out can be customized. The only limitation is that both shortcuts must contain the "Windows Logo" key (in addition to at least another key).
Start with Windows: The application can be configured to start automatically with Windows.
Examples
The figure below illustrates how to call or send an IM to another agent by right-clicking the contact in the right pane.
The figure below illustrates how Response Group Agent Live displays the current number of calls in the queue and the longest waiting time among all these incoming calls.
Summary
Fast sign in and sign out, group membership, and basic real-time statistics are interesting Response Group agent features that are only available outside the application from the Response Group service. With the Response Group Agent Live Resource Kit tool, Skype for Business Server 2015 administrators can provide their agents with a Windows application that allows them to perform tasks in a faster and graphical way.
SEFAUtil
SEFAUtil (secondary extension feature activation) is a command-line tool that enables Skype for Business Server 2015 communications software administrators and helpdesk agents to configure delegate-ringing, call-forwarding, simultaneous ringing, team-call settings and group call pickup on behalf of a Skype for Business Server 2015 user. The tool also allows administrators to query the call-routing settings that are published for a particular user. The SEFAUtil tool allows the administrator to enable/disable/modify call forwarding or simultaneously ringing on behalf of the user. The administrator can specify the target (in the form of a SIP URI) or use a target that has already been published by the user. This tool also allows administrators to add or remove delegates or team-call group members on behalf of the user. This tool is built on Microsoft Unified Communications Managed API (UCMA) 3.0 and requires that administrators create a trusted application in the Central Management store for SEFAUtil.
SEFAUtil (secondary extension feature activation) enables Skype for Business Server 2015 administrators and helpdesk agents to configure delegate-ringing, call-forwarding, simultaneous ringing, team-call settings and group call pickup on behalf of a Skype for Business Server 2015 user. This tool also allows administrators to query the call-routing settings that are published for a particular user.
Description
The current version of SEFAUtil is only a command-line tool; there is no supporting graphical user interface. This tool is based on Microsoft Unified Communications Managed API (UCMA) 3.0. The features in this tool allow administrators and helpdesk agents to do the following:
View all call routing settings for a user (includes call-forwarding, delegation, simultaneous ringing, team-call, and group call pickup)
Enable/disable/modify call-forwarding setting (includes destination and no-answer timer)
Enable/disable/modify call-forwarding immediate configurations
Enable/disable/modify delegation settings
Enable/disable/modify team-call group settings
Note
New in Skype for Business Server 2015 SEFAUtil tool
Enable/disable/modify simultaneous ringing settings (includes destination)
Note
New in Skype for Business Server 2015 SEFAUtil tool
Enable/disable/modify group call pickup settings
Caution
New in Skype for Business Server 2015 SEFAUtil tool
This tool has the following limitations:
Supported only for users homed in a Skype for Business Server pool
Bulk-edit of call routing settings for several users is not supported
Output
The current version of this tool provides output only in the Command Prompt window. For details, see the Examples section later in this document.
Purpose
Following are some of the key scenarios where this tool may be used:
Bob is an executive and has been moved to Skype for Business Server telephony. He has delegation on his existing PBX system. As part of the move to Skype for Business Server 2015, the administrator is able to configure Bob's routing to reflect his pre-existing delegation configuration.
Alice is traveling and realizes that she is expecting an important call from one of her customers. However, she is in a hotel and has no access to a computer. She calls the helpdesk and requests that they forward to her mobile number all the calls made to her work number. The helpdesk personnel are able to do the configuration on her behalf.
Joe's calls to his work number are going to his mobile voicemail whenever he is at work; however, things appear to be working correctly in most other locations. The helpdesk technician is able to view Joe's routing configuration and discovers that Joe has simultaneous ringing configured to his mobile phone. The technician asks Joe about the mobile coverage at his office and is able to determine that the simultaneous ringing rule is what is causing the calls to go to Joe's mobile voicemail when his network coverage is poor.
Mike is a new employee at Contoso and he's joining a new team on which all members are configured for team-call, when being enabled for Skype for Business Server 2015, the administrator is able to set his team-call group settings to include all his new team members, additionally, the administrator adds Mike as a team-call group member for each of the members in his team.
A customer service practice in the human resources department at Contoso is to provide personal service for all callers since the first call. Given that all members of the department sit very close to each other, having all phones ringing at the same time with team-call is disruptive for the team. To provide the best service without disrupting the team members, the Skype for Business Server 2015 administrator takes advantage of the Group Call Pickup capability. The administrator adds all department members to a pickup group and communicates to the department the pickup group number. When Samantha is absent from her desk, Joe notices her phone ringing and he proceeds to answer the call from his desk.
Requirements
The SEFAUtil tool can be run only on a computer that is a part of a Trusted Application Pool. UCMA 3.0 must be installed on that computer. To run the tool, a new Trusted Application with the SEFAUtil application ID must be created on that pool.
Creating a new Trusted Application for the SEFAUtil tool
The SEFAUTil tool can be run only on a computer that is part of a trusted application pool. If needed, adding a pool as a new trusted application pool can be done via the Skype for Business Server Management Shell with the following cmdlet:
New-CsTrustedApplicationPool -id <Pool FQDN> -Registrar <Pool Registrar FQDN> -site Site:<Pool Site>Note
UCMA 3.0 must be installed on any computer that will be used to run the SEFAUtil tool.
A trusted application needs to be defined in the topology for the SEFAUtil tool. To define SEFAUtil as a new trusted application, use the Skype for Business Server Management Shell and execute the following cmdlet:
New-CsTrustedApplication -ApplicationId sefautil -TrustedApplicationPoolFqdn <Pool FQDN> -Port 7489Note
A different port can be used if needed.
Note
Pool FQDN: The FQDN of the server or pool that will host the SEFAUtil application (usually a Skype for Business Front End server > or pool). Pool Registrar FQDN: The FQDN of the Skype for Business Front End server or pool associated with this application pool. Pool Site: The Site ID of the site on which this pool is homed.
The topology changes need to be enabled. Enabling the topology changes can be done via the Skype for Business Server Management Shell by executing the following cmdlet:
Enable-CsToplogyIf needed, install the Skype for Business Server 2015 Resource Kit Tools in the server that will be used to run the SEFAUtil tool (the server must be part of a trusted application pool).
Verify the SEFAUtil is running correctly. To do this, run the tool from a windows command prompt with administrator privileges to display the call forwarding settings of a user in the deployment. By default the tool will be located in: "...\Program Files\Skype for Business Server 2015\Reskit". To display the call forwarding settings of a user, use the following command:
SEFAUtil.exe <user SIP address> /server:<Skype for Business Server/Pool FQDN>The call forwarding settings of the user should be displayed.
Group Call Pickup
Group Call Pickup requires additional configuration in Skype for Business Server 2015 for the capability to be fully enabled. Before assigning pickup groups to users, refer to the Group Call Pickup product documentation for the planning and deployment steps of this capability.
Examples
Display Current Call Handling Settings
The following command displays the call handling for the user. SEFAUtil.exe /server:SfBS2015server.contoso.com katarina@contoso.com
Note
This example uses the /server switch to specify the Skype for Business Server to connect to.
Output
User Aor: sip:katarina@contoso.com
Display Name: Katarina Larsson
UM Enabled: True
Simulring enabled: False
User Ring time: 00:00:20
Call Forward No Answer to: voicemail
Set the Call Forward/No Answer Destination
This example sets the call forward/no answer destination and the ring delay. Here, the /server switch is not provided; SEFAUtil attempts to autodiscover the Skype for Business Server 2015.
SEFAUtil.exe /server:SfBserver.contoso.com sip:katarina@contoso.com /enablefwdnoanswer /callanswerwaittime:30 /setfwddestination:+14255550126@contoso.com;user=phone
Output
User Aor: sip:katarina@contoso.com
Display Name: Katarina Larsson
UM Enabled: True
Simulring enabled: False
User Ring time: 00:00:30
Call Forward No Answer to: sip:+14255550126@contoso.com;user=phone
Enable Call Forwarding Immediately
This example immediately enables call-forwarding to another user.
SEFAUtil.exe sip:katarina@contoso.com /enablefwdimmediate /setfwddestination:anders@contoso.com
Output
User Aor: sip:katarina@contoso.com
Display Name: Katarina Larsson
UM Enabled: True
Simulring enabled: False
Forward immediate to: sip:anders@contoso.com
Disable Call Forwarding Immediately
This example immediately disables call forwarding.
SEFAUtil.exe /server:SfBserver.contoso.com katarina@contoso.com /disablefwdimmediate
Output
User Aor: sip:katarina@contoso.com
Display Name: Katarina Larsson
UM Enabled: True
Simulring enabled: False
User Ring time: 00:00:30
Call Forward No Answer to: voicemail
Add a User as a Delegate and Set Up Simultaneous Ringing of Delegates
This example adds a user as a delegate and sets up simultaneous ringing of delegates.
SEFAUtil.exe /server:SfBserver.contoso.com sip:katarina@contoso.com /adddelegate:joe@contoso.com /simulringdelegates
Output
User Aor: sip:katarina@contoso.com
Display Name: Katarina Larsson
UM Enabled: True
Simultaneously Ringing Delegates: sip:joe@contoso.com
Change Simultaneous Ringing Rule of Delegates
This example changes the simultaneous ringing rule that was set in the previous example to the delayed ringing rule.
SEFAUtil.exe /server:SfBserver.contoso.com sip:katarina@contoso.com /delayringdelegates:10
Output
User Aor: sip:katarina@contoso.com
Display Name: Katarina Larsson
UM Enabled: True
Simulring enabled: False
Delay Ringing Delegates (delay:10 seconds): sip:joe@contoso.com
Remove the Delegate
This example removes the delegate.
Note
When the last delegate is removed, delegate ringing is automatically disabled.
SEFAUtil.exe /server:SfBserver.contoso.com sip:katarina@contoso.com /removedelegate:joe@contoso.com
Output
User Aor: sip:katarina@contoso.com
Display Name: Katarina Larsson
UM Enabled: True
Simulring enabled: False
User Ring time: 00:00:30
Call Forward No Answer to: voicemail
Add a Delegate and Set Up the Call-Forward to Delegates Rule
This example adds a delegate and sets up the call-forward to delegates rule.
SEFAUtil.exe /server:SfBserver.contoso.com sip:katarina@contoso.com /adddelegate:anders@contoso.com /fwdtodelegates
Output
User Aor: sip:katarina@contoso.com
Display Name: Katarina Larsson
UM Enabled: True
Forwarding calls to Delegates: sip:anders@contoso.com
Enable Simultaneous Ringing and Set a Destination Number
This example enables simultaneous ringing and sets a simultaneous ringing destination number.
SEFAUtil.exe /server:SfBserver.contoso.com sip:katarina@contoso.com /setsimulringdestination:+14255550126 /enablesimulring
Note
To change the simultaneous ringing destination number of a user that has already simultaneous ringing enabled, keep the command with the /enablesimulring switch, otherwise the destination number will not be changed.
Output
User Aor: sip:katarina@contoso.com
Display Name: Katarina Larsson
UM Enabled: True
Simulring enabled: True
Simul_Ringing to: sip:+14255550126@contoso.com;user=phone
Disable Simultaneous Ringing
This example disables simultaneous ringing.
SEFAUtil.exe /server:SfBserver.contoso.com sip:katarina@contoso.com /disablesimulring
Output
User Aor: sip:katarina@contoso.com
Display Name: Katarina Larsson
UM Enabled: True
Simulring enabled: False
User Ring time: 00:00:30
Call Forward No Answer to: voicemail
Add a Team Member for Team-Call and Set up Simultaneous Ringing to the Team-Call Members Group
This example adds a team member to the team-call group of a user and enables simultaneous ringing to the team-call group.
SEFAUtil.exe /server:SfBserver.contoso.com sip:katarina@contoso.com /addteammember:anders@contoso.com /simulringteam
Note
Adding a member to the team-call group of a user will automatically switch the simultaneous ringing settigs of the users to simultaneous ring his team-call group.
Output
User Aor: sip:katarina@contoso.com
Display Name: Katarina Larsson
UM Enabled: True
Team ringing enabled. Team: sip:anders@contoso.com
Remove a Member from the Team-Call Group
This example removes a team member of the team-call group of a user.
SEFAUtil.exe /server:SfBserver.contoso.com sip:katarina@contoso.com /removeteammember:anders@contoso.com
Note
If the member being removed is the only member of the team-call group, simultaneously ringing to the team-call group will be automatically disabled.
Output
User Aor: sip:katarina@contoso.com
Display Name: Katarina Larsson
UM Enabled: True
User Ring time: 00:00:30
Call Forward No Answer to: voicemail
Set the Delayed Ring to the Team-Call Group
This example changes the delayed ring to the team-call group time setting.
SEFAUtil.exe /server:SfBserver.contoso.com sip:katarina@contoso.com /delayringteam:5
Output
User Aor: sip:katarina@contoso.com
Display Name: Katarina Larsson
UM Enabled: True
Delay Ringing Team (delay:5 seconds). Team: sip:anders@contoso.com
Enable Team-Call
This example enables team-call for a given user.
SEFAUtil.exe /server:SfBserver.contoso.com sip:katarina@contoso.com /simulringteam
Note
If the team-call group of the user has no members, team-call won't be enabled.
Output
Disable Team-Call
This example disables team-call for a given user.
SEFAUtil.exe /server:SfBserver.contoso.com sip:katarina@contoso.com /disableteamcall
Output
User Aor: sip:katarina@contoso.com
Display Name: Katarina Larsson
UM Enabled: True
User Ring time: 00:00:30
Call Forward No Answer to: voicemail
Enable Group Call Pickup and Assign a Pickup Group to a User
This example assigns a pickup group to a user and enables Group Call Pickup.
SEFAUtil.exe /server:SfBserver.contoso.com sip:katarina@contoso.com /enablegrouppickup:199
Output
User Aor: sip:katarina@contoso.com
Display Name: Katarina Larsson
UM Enabled: True
Group Pickup Orbit: sip:199;phone-context=user-default@contoso.com;user=phone
Disable Group Call Pickup
This example disables Group Call Pickup for a given user.
SEFAUtil.exe /server:SfBserver.contoso.com sip:katarina@contoso.com /disablegrouppickup
Note
When you disable Group Call Pickup for a user, the group number that was assigned to the user is not retained. If you subsequently want to re-enable Group Call Pickup for that user, you must assign the group number again with the /enablegrouppickup switch.
User Aor: sip:katarina@contoso.com
Display Name: Katarina Larsson
UM Enabled: True
SYSPrep.ps1
Description
SYSPrep.ps1 is a Windows PowerShell script that will install the following Skype for Business Server 2015 prerequisites on your Windows Server 2008 operating system machine.
Microsoft .NET Framework 4.5
Microsoft SQL Server Express
Windows PowerShell version 3.0
Visual C++ 2010 Redistributable
Internet Information Server Updates
Windows Identity Foundation
Skype for Business Server 2015 Core files
While the script name is similar to the System Preparation Tool for the Microsoft Windows operating systems, they are different. This script will only install the required prerequisites for Skype for Business Server 2015. Once those prerequisites are installed, the Windows SYSPrep tool can then be used to create an image of the server.
Requirements
Prior to running the SYSPrep.ps1 script, you must copy the prerequisite files to a local folder on the Windows Server 2008 operating system machine (for example D:\Setup). This folder must also include a copy of the Skype for Business Server 2015 files, specifically Setup.exe. The prerequisite files can be downloaded from the following locations:
| Prerequisite | Location |
|---|---|
| Microsoft .NET Framework 4.5 |
https://go.microsoft.com/?linkid=9816306 |
| Microsoft SQL Server Express 2008 R2 |
https://www.microsoft.com/download/details.aspx?id=30438 |
| Windows PowerShell version 3.0 |
https://www.microsoft.com/download/details.aspx?id=34595 |
| Visual C++ 2010 Redistributable |
https://support.microsoft.com/en-us/topic/the-latest-supported-visual-c-downloads-2647da03-1eea-4433-9aff-95f26a218cc0 |
| Internet Information Server Updates |
https://www.microsoft.com/download/details.aspx?id=34869 |
| Windows Identity Foundation |
https://www.microsoft.com/download/details.aspx?id=17331 |
| Skype for Business Server 2015 Setup.exe |
Copy from Skype for Business Server 2015 media |
Parameter
The -SetupFolder parameter takes as an argument the directory location of the prerequisite files
Examples
To run the SYSPrep.ps1 script and install the Skype for Business Server 2015 prerequisites, run the following command from an elevated command prompt:
./SysPrep.PS1 -SetupFolder D:\Setup
Unassigned Number Announcements Migration
The Unassigned Number Announcements Migration tool enables a Skype for Business Server 2015 administrator to move the unassigned numbers configuration that is serviced by the announcement application from a source Skype for Business Server or Pool to a destination Skype for Business Server or Pool.
Description
The Unassigned Number Announcements Migration tool is a Windows PowerShell script that moves the unassigned numbers configuration serviced by the announcement application of a source server or pool to a different server or pool.
When executed, the Unassigned Number Announcements Migration script will perform the following operations:
Move all the audio files used by the unassigned number announcements of the announcement application hosted in the source server or pool to the file store of the destination server or pool.
Note
The audio files are removed from the source pool once they're copied to the destination pool.
Move all unassigned number announcements configured for the announcement application hosted in the source server or pool to the destination server or pool.
Reassign all the unassigned number ranges that are serviced by the announcement application hosted in the source server or pool to the destination server or pool.
After successfully running the script, all the unassigned number ranges that were serviced by the announcement application hosted in the source server or pool will now be serviced with the same configuration by the destination server or pool.
Output
The Move-CsAnnouncementConfiguration script indicates in the Skype for Business Server Management Shell window from where it's executed the success or failure of the migration operation.
If the execution of the operation is interrupted by any error, the unassigned number ranges that were successfully moved to the destination will remain in the destination in an operational form and the rest of the unassigned number ranges to be migrated will remain in the source as well in an operational form. To fully migrate the rest of the configuration, rerun the script after addressing the error.
Purpose
The Unassigned Number Announcements Migration script can be used in the following three scenarios:
Migrating configuration settings to a new version of Skype for Business Server: Contoso is in the process of migrating to Skype for Business Server 2015 and as part of the migration process the Skype for Business Server administrator would like to move the unassigned numbers configuration serviced by the announcement application from the Lync Server 2013 deployment to the new Skype for Business Server 2015 deployment. To move the configuration settings, the Skype for Business Server administrator uses the Unassigned Number Announcements Migration tool.
Rolling back a deployment from Skype for Business Server 2015 to Lync Server 2013: Due unexpected factors, Contoso has to roll back the migration to the new Skype for Business Server 2015 deployment. To minimize disruptions to the service, the Skype for Business Server administrator uses the Unassigned Number Announcements Migration tool to roll back the configuration from the Skype for Business Server 2015 deployment to the Lync Server 2013 deployment.
Moving data between deployments: Contoso is in the process of replacing all the servers of one pool with newer servers. Their strategy is to deploy a new Skype for Business Server 2015 pool, move all the data from the old to the new pool, and then deprecate the old pool. Once the new pool is deployed, the Unassigned Number Announcements Migration tool is used to move the configuration from the old pool to the new one.
Requirements
The following are the main requirements needed to successfully run the tool:
The script must be run from a computer that has Skype for Business Server Management Shell installed.
The announcement application has to be successfully deployed in the source and destination Skype for Business Servers or Pools.
Move-CsAnnouncementConfiguration script
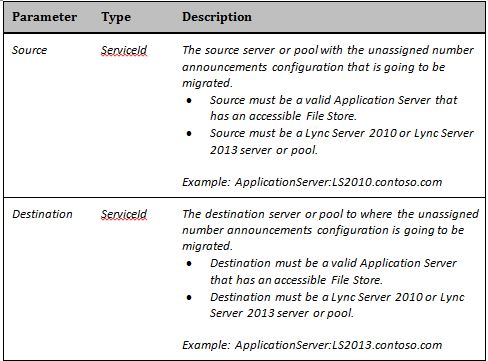
The Move-CsAnnouncementConfiguration script requires the two parameters that are described in the table below.
Examples
Moving the Unassigned Number Announcements Configuration from a Lync Server 2013 Pool to a Skype for Business Server 2015 Pool
This example moves the unassigned number announcements from the source pool (Lync Server 2013) to the destination pool (Skype for Business Server 2015).
Move-CsAnnouncementConfiguration.ps1 -Source LS2013Pool.contoso.com -Destination SfBS2015Pool.contoso.com
Moving the Unassigned Number Announcements Configuration from a Skype for Business Server 2015 Pool to a Lync Server 2013 Pool
This example moves the unassigned number announcements from the source pool (Skype for Business Server 2015) to the destination pool (Lync Server 2013).
Move-CsAnnouncementConfiguration.ps1 -Source SfBS2015Pool.contoso.com -Destination LS2013Pool.contoso.com
Web Conf Data
The Web Conf Data Tool allows an administrator of Skype for Business Server 2015 communications software to have more control over the data associated with an organizer's Web conferences. Scenarios include the ability to delete a specific user's meeting data based on a time stamp criteria.
Description
This tool allows the administrator to perform the following operations:
Find all Web conferencing data associated with a single user.
Delete all Web conferencing data associated with a single user.
Delete all Web conferencing data associated with a single user that is older than a certain date.
Move all Web conferencing data associated with a single user when that user is moved from one pool to another.
Note
The Resource Kit Tools for Lync Server 2010 supported moving all Web conferencing data associated with a single user when that user is moved from one pool to another. That functionality is now deprecated from this tool in favor of the MoveConferenceData parameter. For details about this parameter, see the Move-CsUser cmdlet.
The tool deletes meeting data only for meetings that are inactive. Active meetings (or meetings in sessions) cannot be deleted.
This tool must be run from a computer that is in the same pool as the target user. The user whose meeting content data is being managed by this tool must be homed in the same user pool.
Output
This tool outputs the results of each of the operations:
If a query is performed, the tool outputs the list of all inactive meeting data folders that have that user as an organizer.
If a delete is performed, the tool outputs the list of all meeting data folders whose data will be deleted.
Requirements
The tool needs to be run in the same pool where the organizer is currently homed.
The tool must be run using administrator privileges with access to the Content File Store.
Examples
The following table describes the parameters, some of which are used in the examples.
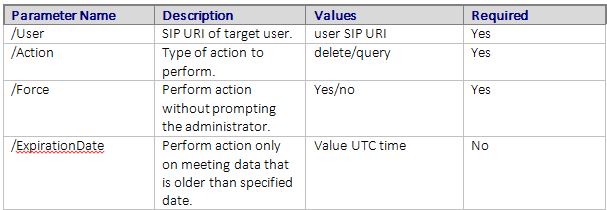
WebConfDataTool.exe /User:user0@contoso.com /Action:query ""/ExpirationDate:08/09/2010 12:00:00""
The preceding example shows how a query command would work. The output of such a command would be a list of all meeting content folders that would be affected by this tool.
WebConfDataTool.exe /User:user0@contoso.com /Action:delete
The preceding is an example of a delete command. The delete command will remove all inactive meeting folders from this user.
Summary
This tool can be a valuable resource to administrators who need more precise control over conference meeting data.