Note
Access to this page requires authorization. You can try signing in or changing directories.
Access to this page requires authorization. You can try changing directories.
Applies to: ![]() SQL Server
SQL Server ![]() SSIS Integration Runtime in Azure Data Factory
SSIS Integration Runtime in Azure Data Factory
This tutorial shows you how to deploy a SQL Server Integration Services (SSIS) project to the SSIS Catalog in Azure SQL Database, run a package in the Azure-SSIS Integration Runtime, and monitor the running package.
Prerequisites
Before you start, make sure you have version 17.2 or later of SQL Server Management Studio. To download the latest version of SSMS, see Download SQL Server Management Studio (SSMS).
Also make sure that you have set up the SSISDB database in Azure and provisioned the Azure-SSIS Integration Runtime. For info about how to provision SSIS on Azure, see Deploy SQL Server Integration Services packages to Azure.
For Azure SQL Database, get the connection info
To run the package on Azure SQL Database, get the connection information you need to connect to the SSIS Catalog database (SSISDB). You need the fully qualified server name and login information in the procedures that follow.
- Log in to the Azure portal.
- Select SQL Databases from the left-hand menu, and then select the SSISDB database on the SQL databases page.
- On the Overview page for your database, review the fully qualified server name. To see the Click to copy option, hover over the server name.
- If you forget your Azure SQL Database server login information, navigate to the SQL Database server page to view the server admin name. You can reset the password if necessary.
Connect to the SSISDB database
Use SQL Server Management Studio to connect to the SSIS Catalog on your Azure SQL Database server. For more info and screenshots, see Connect to the SSISDB Catalog database on Azure.
Here are the two most important things to remember. These steps are described in the following procedure.
- Enter the fully qualified name of the Azure SQL Database server in the format mysqldbserver.database.windows.net.
- Select
SSISDBas the database for the connection.
Important
An Azure SQL Database server listens on port 1433. If you are attempting to connect to an Azure SQL Database server from within a corporate firewall, this port must be open in the corporate firewall for you to connect successfully.
Open SQL Server Management Studio.
Connect to the server. In the Connect to Server dialog box, enter the following information:
Setting Suggested value Description Server type Database Engine This value is required. Server name The fully qualified server name The name should be in this format: mysqldbserver.database.windows.net. If you need the server name, see Connect to the SSISDB Catalog database on Azure. Authentication SQL Server Authentication You can't connect to Azure SQL Database with Windows authentication. Login The server admin account The account that you specified when you created the server. Password The password for your server admin account The password that you specified when you created the server. Connect to the SSISDB database. Select Options to expand the Connect to Server dialog box. In the expanded Connect to Server dialog box, select the Connection Properties tab. In the Connect to database field, select or enter
SSISDB.Then select Connect. The Object Explorer window opens in SSMS.
In Object Explorer, expand Integration Services Catalogs and then expand SSISDB to view the objects in the SSIS Catalog database.
Deploy a project with the Deployment Wizard
To learn more about deploying packages and about the Deployment Wizard, see Deploy Integration Services (SSIS) Projects and Packages and Integration Services Deployment Wizard.
Note
Deployment to Azure only supports the project deployment model.
Start the Integration Services Deployment Wizard
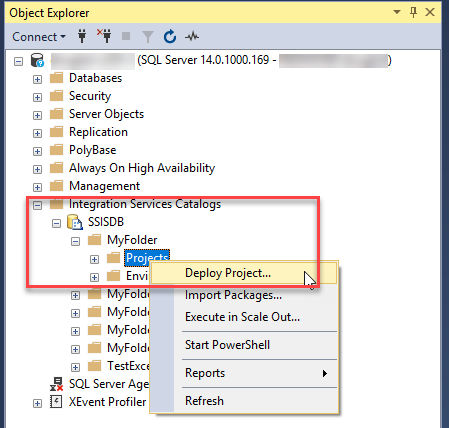
In Object Explorer in SSMS, with the Integration Services Catalogs node and the SSISDB node expanded, expand a project folder.
Select the Projects node.
Right-click on the Projects node and select Deploy project. The Integration Services Deployment Wizard opens. You can deploy a project from an SSIS Catalog database or from the file system.
Deploy a project with the Deployment Wizard
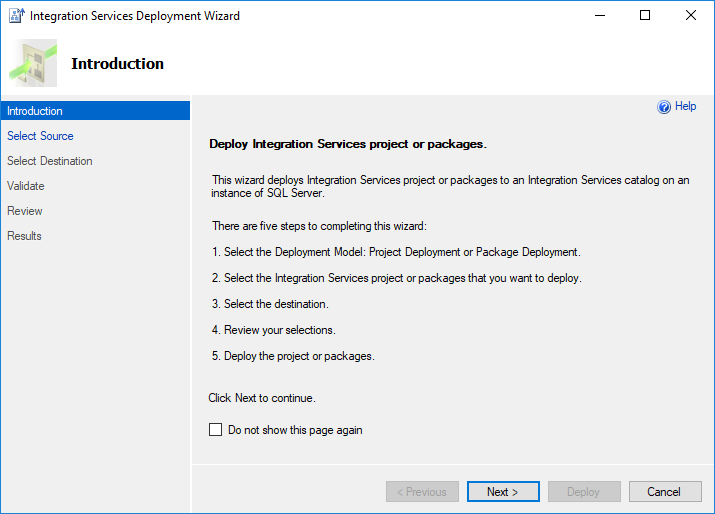
On the Introduction page of the Deployment Wizard, review the introduction. Select Next to open the Select Source page.
On the Select Source page, select the existing SSIS project to deploy.
- To deploy a project deployment file that you created, select Project deployment file and enter the path to the .ispac file.
- To deploy a project that resides in an SSIS catalog, select Integration Services catalog, and then enter the server name and the path to the project in the catalog. Only projects that reside in SSISDB hosted by SQL Server can be redeployed in this step.
- Select Next to see the Select Destination page.
On the Select Destination page, select the destination for the project.
- Enter the fully qualified server name in the format
<server_name>.database.windows.net. - Provide authentication information, and then select Connect.
- Then select Browse to select the target folder in SSISDB.
- Then select Next to open the Review page. (The Next button is enabled only after you select Connect.)
- Enter the fully qualified server name in the format
On the Review page, review the settings you selected.
- You can change your selections by selecting Previous, or by selecting any of the steps in the left pane.
- Select Deploy to start the deployment process.
Note
If you get the error message There is no active worker agent. (.Net SqlClient Data Provider), make sure the Azure-SSIS Integration Runtime is running. This error occurs if you try to deploy while the Azure-SSIS IR is in a stopped state.
After the deployment process is complete, the Results page opens. This page displays the success or failure of each action.
- If the action failed, select Failed in the Result column to display an explanation of the error.
- Optionally, select Save Report... to save the results to an XML file.
- Select Close to exit the wizard.
Deploy a project with PowerShell
To deploy a project with PowerShell to SSISDB on Azure SQL Database, adapt the following script to your requirements. The script enumerates the child folders under $ProjectFilePath and the projects in each child folder, then creates the same folders in SSISDB and deploys the projects to those folders.
This script requires SQL Server Data Tools version 17.x or SQL Server Management Studio installed on the computer where you run the script.
# Variables
$ProjectFilePath = "C:\<folder>"
$SSISDBServerEndpoint = "<servername>.database.windows.net"
$SSISDBServerAdminUserName = "<username>"
$SSISDBServerAdminPassword = "<password>"

# Load the IntegrationServices Assembly
[System.Reflection.Assembly]::LoadWithPartialName("Microsoft.SqlServer.Management.IntegrationServices") | Out-Null;

# Store the IntegrationServices Assembly namespace to avoid typing it every time
$ISNamespace = "Microsoft.SqlServer.Management.IntegrationServices"

Write-Host "Connecting to server ..."

# Create a connection to the server
$sqlConnectionString = "Data Source=" + $SSISDBServerEndpoint + ";User ID="+ $SSISDBServerAdminUserName +";Password="+ $SSISDBServerAdminPassword + ";Initial Catalog=SSISDB"
$sqlConnection = New-Object System.Data.SqlClient.SqlConnection $sqlConnectionString

# Create the Integration Services object
$integrationServices = New-Object $ISNamespace".IntegrationServices" $sqlConnection

# Get the catalog
$catalog = $integrationServices.Catalogs['SSISDB']

write-host "Enumerating all folders..."

$folders = ls -Path $ProjectFilePath -Directory

if ($folders.Count -gt 0)
{
    foreach ($filefolder in $folders)
    {
        Write-Host "Creating Folder " + $filefolder.Name + " ..."

        # Create a new folder
        $folder = New-Object $ISNamespace".CatalogFolder" ($catalog, $filefolder.Name, "Folder description")
        $folder.Create()

        $projects = ls -Path $filefolder.FullName -File -Filter *.ispac
        if ($projects.Count -gt 0)
        {
            foreach($projectfile in $projects)
            {
                $projectfilename = $projectfile.Name.Replace(".ispac", "")
                Write-Host "Deploying " + $projectfilename + " project ..."

                # Read the project file, and deploy it to the folder
                [byte[]] $projectFileContent = [System.IO.File]::ReadAllBytes($projectfile.FullName)
                $folder.DeployProject($projectfilename, $projectFileContent)
            }
        }
    }
}

Write-Host "All done."
Run a package
In Object Explorer in SSMS, select the package that you want to run.
Right-click and select Execute to open the Execute Package dialog box.
In the Execute Package dialog box, configure the package execution by using the settings on the Parameters, Connection Managers, and Advanced tabs.
Select OK to run the package.
Monitor the running package in SSMS
To view the status of currently running Integration Services operations on the Integration Services server, such as deployment, validation, and package execution, use the Active Operations dialog box in SSMS. To open the Active Operations dialog box, right-click SSISDB, and then select Active Operations.
You can also select a package in Object Explorer, right-click and select Reports, then Standard Reports, then All Executions.
For more info about how to monitor running packages in SSMS, see Monitor Running Packages and Other Operations.
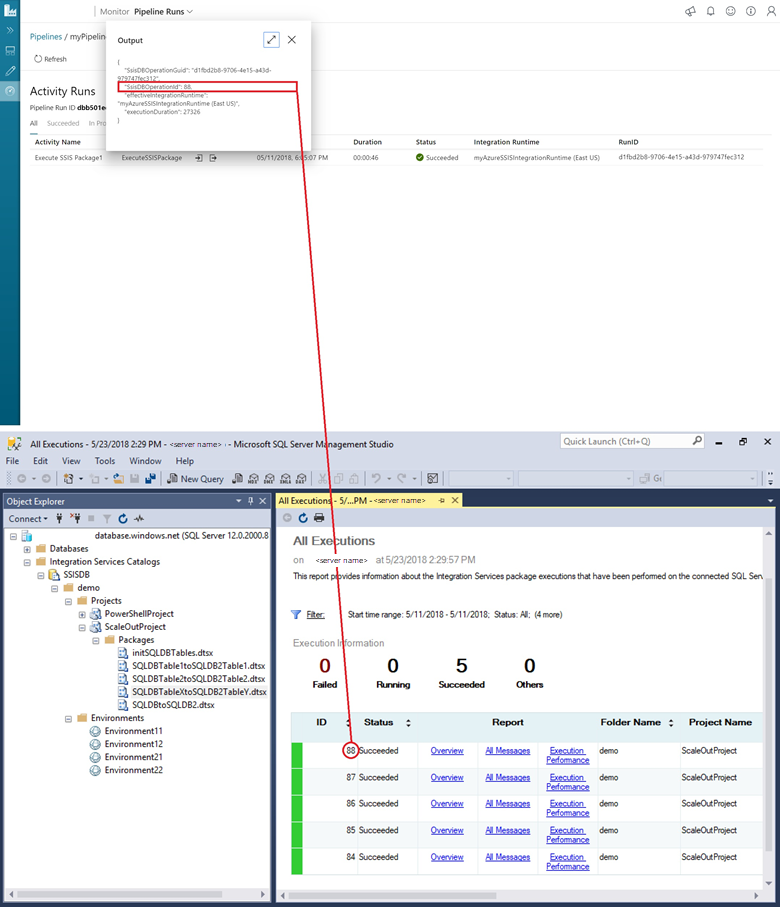
Monitor the Execute SSIS Package activity
If you're running a package as part of an Azure Data Factory pipeline with the Execute SSIS Package activity, you can monitor the pipeline runs in the Data Factory UI. Then you can get the SSISDB execution ID from the output of the activity run, and use the ID to check more comprehensive execution logs and error messages in SSMS.
Monitor the Azure-SSIS Integration Runtime
To get status info about the Azure-SSIS Integration Runtime in which packages are running, use the following PowerShell commands. For each of the commands, provide the names of the Data Factory, the Azure-SSIS IR, and the resource group.
For more info, see Monitor Azure-SSIS integration runtime.
Get metadata about the Azure-SSIS Integration Runtime
Get-AzDataFactoryV2IntegrationRuntime -DataFactoryName $DataFactoryName -Name $AzureSsisIRName -ResourceGroupName $ResourceGroupName
Get the status of the Azure-SSIS Integration Runtime
Get-AzDataFactoryV2IntegrationRuntime -Status -DataFactoryName $DataFactoryName -Name $AzureSsisIRName -ResourceGroupName $ResourceGroupName
Next steps
- Learn how to schedule package execution. For more info, see Schedule SSIS package execution on Azure