Note
Access to this page requires authorization. You can try signing in or changing directories.
Access to this page requires authorization. You can try changing directories.
Applies to:  SQL Server on Linux
This tutorial walks you through manually enabling Microsoft Entra ID authentication for SQL Server running in containers. Because Azure Arc doesn't currently support container workloads for this scenario, you can configure Microsoft Entra ID authentication directly, for standalone containers and Kubernetes deployments.
For all other deployment scenarios, you should configure Microsoft Entra ID authentication through Azure Arc.
Prerequisites
Microsoft Entra ID is configured for your tenant.
SQL Server can reach Microsoft Entra ID endpoints.
A Microsoft Entra application is registered.
Follow the directions in Tutorial: Set up Microsoft Entra authentication for SQL Server with app registration, and upload the certificate to the created registered application, that you create in the first step of the tutorial.
A supported SQL Server Linux container image.
Access to Docker or a Kubernetes cluster with
kubectl.
Overview of the configuration
Deployment models require:
A certificate associated with the Microsoft Entra application
SQL Server configured with:
- Certificate path
- Microsoft Entra application (client) ID
- Microsoft Entra tenant ID
At least one Microsoft Entra login created in SQL Server.
The difference between environments is how the certificate and configuration are supplied:
- Containers: environment variables or mounted files
- Kubernetes: ConfigMaps and Secrets
Create the certificate
You need a certificate for SQL Server to authenticate to Microsoft Entra ID. For production environments, use a certificate issued by a trusted Certificate Authority (CA).
In this example, you can create a self-signed certificate using OpenSSL.
Create a self-signed certificate with the following command, and follow the prompts on-screen:
openssl req -x509 -newkey rsa:4096 \
  -keyout mssql-entra-id-key.pem \
  -out mssql-entra-id-cert.pem \
  -days 365 -nodes
Verify the files:
ls -lrt | grep mssql-entra-idHere's the result set.
-rw------- 1 user user 3272 Sep 11 19:13 mssql-entra-id-key.pem
-rw-rw-r-- 1 user user 2139 Sep 11 19:13 mssql-entra-id-cert.pem
Convert the certificate to
.pfx. Leave the export password empty.openssl pkcs12 \ -inkey mssql-entra-id-key.pem \ -in mssql-entra-id-cert.pem \ -nodes -export \ -out mssql-entra-id.pfxImportant
If you use an export password, SQL Server fails to start.
Verify the files:
ls -lrt | grep mssql-entra-idHere's the result set.
-rw------- 1 user user 3272 Sep 11 19:13 mssql-entra-id-key.pem
-rw-rw-r-- 1 user user 2139 Sep 11 19:13 mssql-entra-id-cert.pem
-rw-rw-r-- 1 user user 2139 Sep 11 19:14 mssql-entra-id.pfx
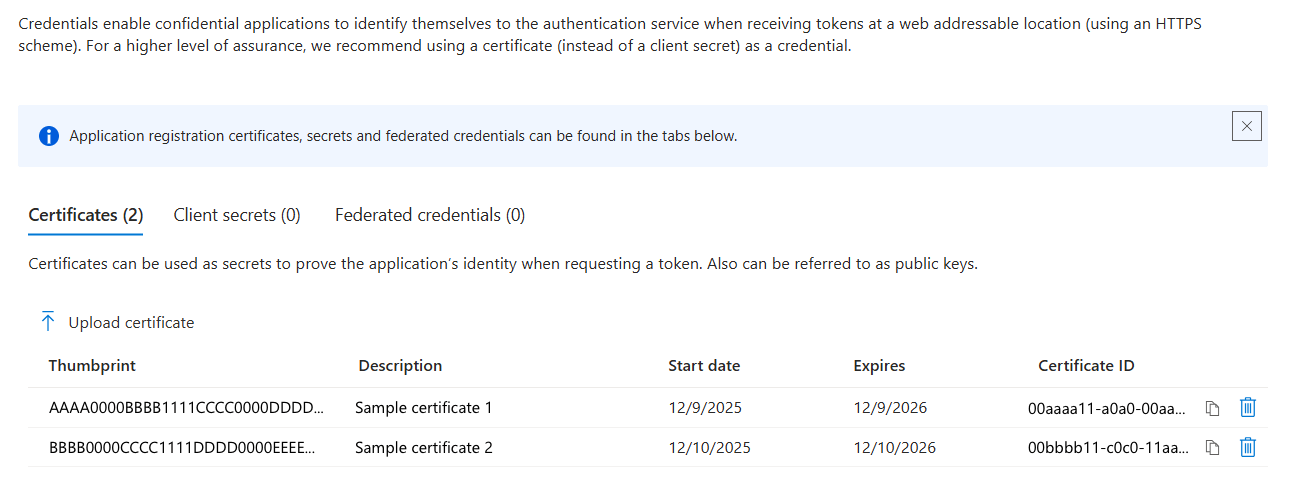
Upload the public certificate to the registered Microsoft Entra application. If you obtain a trusted certificate from a CA, upload that instead.
Configure SQL Server containers (standalone)
Run SQL Server in a container with Microsoft Entra authentication enabled:
docker run --name sql2025-entra \
  -e ACCEPT_EULA=Y \
  -e MSSQL_SA_PASSWORD='<password>' \
  -e MSSQL_AAD_CLIENT_ID='<client-id>' \
  -e MSSQL_AAD_PRIMARY_TENANT='<tenant-id>' \
  -e MSSQL_AAD_CERTIFICATE_FILE_PATH='/var/opt/mssql/mssql-entra-id.pfx' \
  -p 1433:1433 \
  -v /tmp/sqlcontainer/mssql-entra-id.pfx:/var/opt/mssql/mssql-entra-id.pfx:ro \
  -d mcr.microsoft.com/mssql/server:2025-latest
Verify inside the container:
docker exec -it <container-id> bash
cat /var/opt/mssql/log/errorlog | grep Entra
Here's the result set.
Microsoft Entra ID authentication is enabled. This is an informational message only; no user action is required.
Continue to the step to create the Microsoft Entra logins.
Configure SQL Server containers on Kubernetes
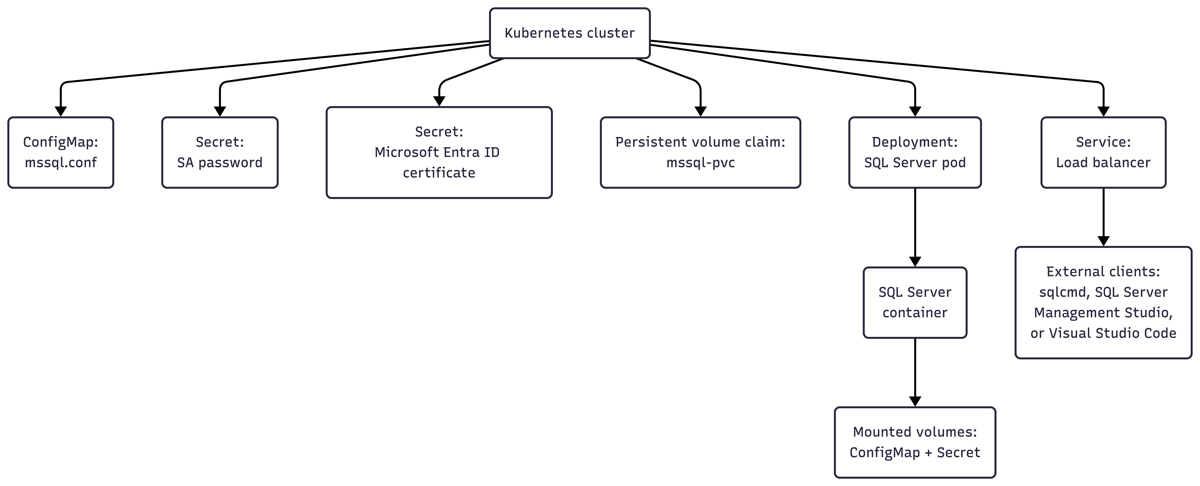
The following diagram describes the steps for this deployment.
Step 1: Create a Secret for the certificate
Encode the
.pfxfile:base64 -w0 mssql-entra-id.pfxCreate
mssql-entra-cert.yaml:apiVersion: v1 kind: Secret metadata: name: mssql-entra-cert type: Opaque data: mssql-entra-id: <BASE64_ENCODED_CERT>Apply the Secret:
kubectl apply -f mssql-entra-cert.yaml
Step 2: Create the SA password secret
The following command creates the sa account password that you use to sign into your SQL Server deployment. Replace <password> with a strong password.
Note
Your password should follow the SQL Server default password policy. By default, the password must be at least eight characters long and contain characters from three of the following four sets: uppercase letters, lowercase letters, base-10 digits, and symbols. Passwords can be up to 128 characters long. Use passwords that are as long and complex as possible.
kubectl create secret generic mssql \
  --from-literal=MSSQL_SA_PASSWORD=<password>
Step 3: Create the ConfigMap for mssql.conf
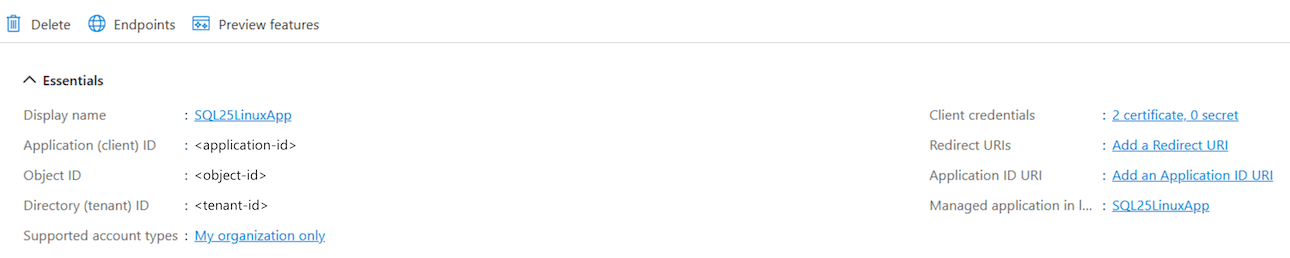
In this step, replace aadclientid with the client ID, and aadprimarytenant with the tenant ID of the registered application in Microsoft Entra ID. You can get these details from the Azure portal.
Create a ConfigMap file named
mssql-conf.yaml:apiVersion: v1 kind: ConfigMap metadata: name: mssql-conf data: mssql.conf: | [EULA] accepteula = Y [sqlagent] enabled = false [licensing] azurebilling = false [network] aadcertificatefilepath = /var/opt/mssql/mssql-entra-id.pfx aadclientid = <client-id> aadprimarytenant = <tenant-id>Apply the ConfigMap:
kubectl apply -f mssql-conf.yaml
Step 4: Deploy SQL Server
In this step, you deploy SQL Server 2025 (17.x) and enable Microsoft Entra ID authentication. You must mount the ConfigMap and Secret into the SQL Server container, and use a supported SQL Server Linux image (for example, mcr.microsoft.com/mssql/server:2025-latest).
Make sure that the certificate file path in mssql.conf matches the mounted path, and the container runs with the required filesystem permissions.
Create a file called
mssql-deployment.yamlwith the following contents:apiVersion: apps/v1 kind: Deployment metadata: name: mssql-2025 labels: app: mssql-2025 spec: replicas: 1 selector: matchLabels: app: mssql-2025 template: metadata: labels: app: mssql-2025 spec: securityContext: fsGroup: 10001 containers: - name: mssql image: mcr.microsoft.com/mssql/server:2025-latest imagePullPolicy: IfNotPresent ports: - name: tds containerPort: 1433 env: - name: ACCEPT_EULA value: "Y" - name: MSSQL_SA_PASSWORD valueFrom: secretKeyRef: name: mssql key: MSSQL_SA_PASSWORD - name: MSSQL_PID value: "Developer" volumeMounts: - name: mssql-conf mountPath: /var/opt/mssql/mssql.conf subPath: mssql.conf readOnly: true - name: mssql-entra-cert mountPath: /var/opt/mssql/mssql-entra-id.pfx subPath: mssql-entra-id readOnly: true volumes: - name: mssql-conf configMap: name: mssql-conf items: - key: mssql.conf path: mssql.conf - name: mssql-entra-cert secret: secretName: mssql-entra-cert items: - key: mssql-entra-id path: mssql-entra-id.pfxApply the deployment:
kubectl apply -f mssql-deployment.yaml
Step 5: Create a service
In this step, you create a load balancer service to connect to SQL Server.
Create the service file named
mssql-service.yaml.apiVersion: v1 kind: Service metadata: name: mssql labels: app: mssql-2025 spec: type: LoadBalancer selector: app: mssql-2025 ports: - name: tds port: 1433 targetPort: 1433Apply the service:
kubectl apply -f mssql-service.yaml
Continue to the step to create the Microsoft Entra logins.
Create Microsoft Entra logins
Important
If IPv6 is enabled on your server or container, make sure IPv6 endpoints are reachable and routable, or authentication to Microsoft Entra ID might fail. For more information, see IPv6 connectivity with Microsoft Entra authentication.
Connect to the SQL Server container using SQL Server Management Studio (SSMS), with the
saaccount and password you configured previously.Create your Microsoft Entra-based login:
CREATE LOGIN [user@contoso.com]
    FROM EXTERNAL PROVIDER;
Optionally, add the Microsoft Entra account to the sysadmin fixed server role, so that you can disable the
saaccount. For more information, see Disable the SA account as a best practice in the next section.EXECUTE sp_addsrvrolemember @loginame = 'user@contoso.com', @rolename = 'sysadmin';
You can now authenticate using Microsoft Entra ID with password, integrated authentication, or multifactor authentication (MFA).
Disable the SA account as a best practice
Important
You need these credentials for later steps. Be sure to write down the user ID and password that you enter here.
When you connect to your SQL Server instance using the system administrator (sa) account for the first time after installation, it's important for you to follow these steps, and then immediately disable the sa account as a security best practice.
Create a new login, and make it a member of the sysadmin server role.
Depending on whether you have a container or non-container deployment, enable Windows authentication, and create a new Windows-based login and add it to the sysadmin server role.
Otherwise, create a login using SQL Server authentication, and add it to the sysadmin server role.
Connect to the SQL Server instance using the new login you created.
Disable the
saaccount, as recommended for security best practice.