Note
Access to this page requires authorization. You can try signing in or changing directories.
Access to this page requires authorization. You can try changing directories.
Applies to: ![]() SQL Server on Linux
SQL Server on Linux
This tutorial explains how to configure SQL Server on Linux containers to support Active Directory authentication, also known as integrated authentication. For an overview, see Active Directory authentication for SQL Server on Linux.
Note
For current guidance about network configuration, refer to the documentation for your operating system (OS).
This tutorial consists of the following tasks:
- Install adutil
- Join Linux host to Active Directory domain
- Create an Active Directory user for SQL Server and set the Service Principal Name (SPN) using the adutil tool
- Create the SQL Server service keytab file
- Create the
mssql.confandkrb5.conffiles to be used by the SQL Server container - Mount the config files and deploy the SQL Server container
- Create Active Directory-based SQL Server logins using Transact-SQL
- Connect to SQL Server using Active Directory authentication
Prerequisites
The following are required before configuring Active Directory authentication:
- Have an Active Directory Domain Controller (Windows) in your network.
- Install adutil on a Linux host machine, which is joined to a domain. Follow the Install adutil section for details.
Container deployment and preparation
To set up your container, you need to know in advance the port that will be used by the container on the host. The default port, 1433, might be mapped differently on your container host. For this tutorial, port 5433 on the host will be mapped to port 1433 of the container. For more information, see our quickstart, Quickstart: Run SQL Server Linux container images with Docker.
When you register Service Principal Names (SPN), you can use the hostname of the machine or the name of the container. However, you should configure it according to what you'd like to see, when you connect to the container externally.
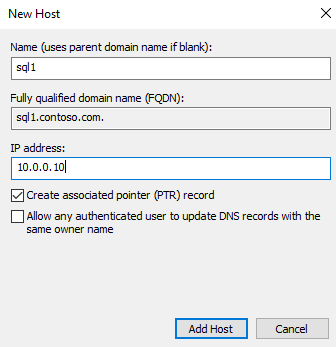
Make sure there's a forwarding host (A) entry added in Active Directory for the Linux host IP address, mapping to the name of the SQL Server container. In this tutorial, the IP address of sql1 host machine is 10.0.0.10, and my SQL Server container name is sql1. Add the forwarding host entry in Active Directory, as shown in the screenshot. The entry ensures that when users connect to sql1.contoso.com, it reaches the right host.
For this tutorial, we're using an environment in Azure with three virtual machines (VMs). One VM acting as the Windows domain controller (DC), with the domain name contoso.com. The Domain Controller is named adVM.contoso.com. The second machine is a Windows machine called winbox, running Windows 10 desktop, which is used as a client box and has SQL Server Management Studio (SSMS) installed. The third machine is an Ubuntu 18.04 LTS machine named sql1, which hosts the SQL Server containers. All machines are joined to the contoso.com domain. For more information, see Join SQL Server on a Linux host to an Active Directory domain.
Note
Joining the host container machine to the domain isn't mandatory, as you can see later in this article.
Install adutil
To install adutil, follow the steps in Introduction to adutil - Active Directory utility, on a host machine that is joined to the domain.
Create Active Directory user, SPNs, and SQL Server service keytab
If you don't want the container host to be part of the domain, and didn't follow the steps to join the machine to the domain, you should follow these steps on another Linux machine that is already part of the Active Directory domain:
Create an Active Directory user for SQL Server and set the SPN using adutil.
Create and configure the SQL Server service keytab file.
Copy the mssql.keytab file that was created to the host machine that will run the SQL Server container, and configure the container to use the copied mssql.keytab. Optionally, you can also join your Linux host that will run the SQL Server container to the Active Directory domain and follow these steps on the same machine.
Create Active Directory user for SQL Server and set Service Principal Name with adutil
Enabling Active Directory authentication on SQL Server on Linux containers requires the following steps to be run on a Linux machine that is part of the Active Directory domain.
Obtain or renew the Kerberos TGT (ticket-granting ticket) using the
kinitcommand. Use a privileged account for thekinitcommand. The account needs to have permission to connect to the domain, and also should be able to create accounts and SPNs in the domain.In this example script, a privileged user called
privilegeduser@CONTOSO.COMhas already been created on the domain controller.kinit privilegeduser@CONTOSO.COMUsing adutil, create the new user that will be used as the privileged Active Directory account by SQL Server. Replace
<password>with a valid password.adutil user create --name sqluser --distname CN=sqluser,CN=Users,DC=CONTOSO,DC=COM --password '<password>'Passwords might be specified in any of the three ways:
- Password flag:
--password <password> - Environment variables -
ADUTIL_ACCOUNT_PWD - Interactive input
The precedence of password entry methods follows the order of options listed above. The recommended options are to provide the password using Environment variables or interactive input, as they more secure compared to the password flag.
You can specify the name of the account using the distinguished name (
-distname) as shown above, or you can also use the Organizational Unit (OU) name as well. The OU name (--ou) takes precedence over distinguished name in case you specify both. You can run the below command for more details:adutil user create --help- Password flag:
Register SPNs to the user created above. You can use the host machine name instead of the container name if desired, depending on how you'd like the connection to look externally. In this tutorial, port
5433is used instead of1433. This is the port mapping for the container. Your port number could be different.adutil spn addauto -n sqluser -s MSSQLSvc -H sql1.contoso.com -p 5433addautowill create the SPNs automatically, provided sufficient privileges are present for the kinit account.-n: Name of the account the SPNs will be assigned to.-s: The service name to use for generating SPNs. In this case, it's for SQL Server service, and hence the service name is MSSQLSvc.-H: The hostname to use for generating SPNs. If not specified, the local host's FQDN will be used. Provide the FQDN for the container name as well. In this case, the container name issql1and the FQDN issql1.contoso.com.-p: The port to use for generating SPNs. If not specified, SPNs are generated without a port. Connections will only work in this case when the SQL Server is listening to the default port,1433.
Create SQL Server service keytab file
Create the keytab file that contains entries for each of the four SPNs created previously, and one for the user. The keytab file will be mounted to the container, so it can be created at any location on the host. You can safely change this path, as long as the resulting keytab is mounted correctly when using docker/podman to deploy the container.
To create the keytab for all the SPNs, we can use the createauto option. Replace <password> with a valid password.
adutil keytab createauto -k /container/sql1/secrets/mssql.keytab -p 5433 -H sql1.contoso.com --password '<password>' -s MSSQLSvc
-k: Path where you would like themssql.keytabfile to be created. In the previous example, the directory/container/sql1/secretsshould already exist on the host.-p: The port to use for generating SPNs. If not specified, SPNs are generated without a port.-H: The hostname to use for generating SPNs. If not specified, the local host's FQDN is used. Provide the FQDN for the container name as well. In this case, the container name issql1and the FQDN issql1.contoso.com.-s: The service name to use for generating SPNs. In this case, it's for SQL Server service, and hence the service name is MSSQLSvc.--password: This is the password of the privileged Active Directory user account that was created earlier.-eor--enctype: Encryption types for the keytab entry. Use a comma-separated list of values. If not specified, an interactive prompt is presented.
When given a choice to choose the encryption types, you can choose more than one. For this example, we chose aes256-cts-hmac-sha1-96 and arcfour-hmac. Ensure you choose an encryption type supported by the host and domain.
If you'd like to non-interactively choose the encryption type, you can specify your choice of encryption type with the -e argument in the above command. For additional help on the adutil commands, run the following command.
adutil keytab createauto --help
Caution
arcfour-hmac is a weak encryption and not a recommended encryption type to be used in a production environment.
To create the keytab for the user, the command is as follows. Replace <password> with a valid password.
adutil keytab create -k /container/sql1/secrets/mssql.keytab -p sqluser --password '<password>'
-k: Path where you would like themssql.keytabfile to be created. In the previous example, the directory/container/sql1/secretsshould already exist on the host.-p: Principal to add to the keytab.
The adutil keytab create/autocreate doesn't overwrite the previous files; it appends to the file if already present.
Ensure the keytab created has the right permissions set when deploying the container.
chmod 440 /container/sql1/secrets/mssql.keytab
At this point, you can copy mssql.keytab from the current Linux host to the Linux host where you would deploy the SQL Server container, and follow the rest of the steps on the Linux host that will run the SQL Server container. If the above steps were performed on the same Linux host where the SQL Server containers will be deployed, then follow the next steps as well on the same host.
Create config files to be used by the SQL Server container
Create an
mssql.conffile with the settings for Active Directory. This file can be created anywhere on the host and needs to be mounted correctly during the docker run command. In this example, we placed this filemssql.confunder/container/sql1, which is our container directory. The content of themssql.confis shown as follows:[network] privilegedadaccount = sqluser kerberoskeytabfile = /var/opt/mssql/secrets/mssql.keytabprivilegedadaccount: Privileged Active Directory user to use for Active Directory authentication.kerberoskeytabfile: The path in the container where themssql.keytabfile will be located.
Create a
krb5.conffile, like the following sample. The casing matters in these files.[libdefaults] default_realm = CONTOSO.COM default_keytab_name = /var/opt/mssql/secrets/mssql.keytab default_ccache_name = "" [realms] CONTOSO.COM = { kdc = adVM.contoso.com admin_server = adVM.contoso.com default_domain = CONTOSO.COM } [domain_realm] .contoso.com = CONTOSO.COM contoso.com = CONTOSO.COMCopy all files,
mssql.conf,krb5.conf,mssql.keytabto a location that will be mounted to the SQL Server container. In this example, these files are placed on the host at the following locations:mssql.confandkrb5.confat/container/sql1/.mssql.keytabis placed at the location/container/sql1/secrets/.Make sure there's enough permission on these folders for the user running the docker/podman command. When the container starts, the user needs access to the folder path created. In this example, we provided the below permissions given to the folder path:
sudo chmod 755 /container/sql1/
Mount config files and deploy SQL Server container
Run your SQL Server container, and mount the correct Active Directory configuration files that were previously created:
Important
The SA_PASSWORD environment variable is deprecated. Use MSSQL_SA_PASSWORD instead.
sudo docker run -e "ACCEPT_EULA=Y" -e "MSSQL_SA_PASSWORD=<password>" \
-p 5433:1433 --name sql1 \
-v /container/sql1:/var/opt/mssql \
-v /container/sql1/krb5.conf:/etc/krb5.conf \
-d mcr.microsoft.com/mssql/server:2019-latest
Caution
Your password should follow the SQL Server default password policy. By default, the password must be at least eight characters long and contain characters from three of the following four sets: uppercase letters, lowercase letters, base-10 digits, and symbols. Passwords can be up to 128 characters long. Use passwords that are as long and complex as possible.
When running container on LSM (Linux Security Module) like SELinux enabled hosts, you need to mount the volumes using the Z option, which tells docker to label the content with a private unshared label. For more information, see configure the SE Linux label.
Our example would contain the following commands. Replace <password> with a valid password.
sudo docker run -e "ACCEPT_EULA=Y" -e "MSSQL_SA_PASSWORD=<password>" -p 5433:1433 --name sql1 \
-v /container/sql1:/var/opt/mssql/ \
-v /container/sql1/krb5.conf:/etc/krb5.conf \
--dns-search contoso.com \
--dns 10.0.0.4 \
--add-host adVM.contoso.com:10.0.0.4 \
--add-host contoso.com:10.0.0.4 \
--add-host contoso:10.0.0.4 \
-d mcr.microsoft.com/mssql/server:2019-latest
- The files
mssql.confandkrb5.confare located at the host file path/container/sql1. - The
mssql.keytabthat was created is located on the host file path/container/sql1/secrets. - Because our host machine is on Azure, the Active Directory details need to be appended to the
docker runcommand in the same order. In our example, the domain controlleradVMis in the domaincontoso.com, with an IP address of10.0.0.4. The domain controller runs DNS and KDC.
Create Active Directory-based SQL Server logins using Transact-SQL
Connect to the SQL Server container. Using the following commands, create the login and confirm that it exists.
Note
You can connect to an instance of SQL Server using any familiar SQL Server client tool, such as sqlcmd, SQL Server Management Studio (SSMS), or the MSSQL extension for Visual Studio Code.
CREATE LOGIN [contoso\amvin]
    FROM WINDOWS;

SELECT name
FROM sys.server_principals;
Connect to SQL Server with Active Directory authentication
You can connect to an instance of SQL Server using any familiar SQL Server client tool, such as sqlcmd, SQL Server Management Studio (SSMS), or the MSSQL extension for Visual Studio Code.
Sign in to the SQL Server with Windows credentials using the SQL Server name and port number (name could be the container name or the host name). For our example, the server name would be sql1.contoso.com,5433.
The following command shows how to connect to your container with sqlcmd.
sqlcmd -E -S 'sql1.contoso.com,5433'
Resources
- Understand Active Directory authentication for SQL Server on Linux and containers
- Troubleshoot Active Directory authentication for SQL Server on Linux and containers