Note
Access to this page requires authorization. You can try signing in or changing directories.
Access to this page requires authorization. You can try changing directories.
Applies to: ![]() SQL Server on Linux
SQL Server on Linux
This article explains how to configure NFS storage for a failover cluster instance (FCI) on Linux.
NFS, or network file system, is a common method for sharing disks in the Linux world but not the Windows one. Similar to iSCSI, NFS can be configured on a server or some sort of appliance or storage unit as long as it meets the storage requirements for SQL Server.
Important NFS server information
The source hosting NFS (either a Linux server or something else) must be using/compliant with version 4.2 or later. Earlier versions don't work with SQL Server on Linux.
When configuring the folders to be shared on the NFS server, make sure they follow these guidelines general options:
rwto ensure that the folder can be read from and written tosyncto ensure guaranteed writes to the folder- Don't use
no_root_squashas an option; it's considered a security risk - Make sure the folder has full rights (
777) applied
Ensure that your security standards are enforced for accessing. When configuring the folder, make sure that only the servers participating in the FCI should see the NFS folder. In the following example, a modified /etc/exports on a Linux-based NFS solution is shown, where the folder is restricted to FCIN1 and FCIN2.
# /etc/exports: the access control list for filesystems which may be exported
#               to NFS clients. See export(5).
#
/var/nfs/fci1   FCIN1(rw,sync) FCIN2(rw,sync)
Instructions
Choose one of the servers that will participate in the FCI configuration. It doesn't matter which one.
Check to see that the server can see the mounts on the NFS server.
sudo showmount -e <IPAddressOfNFSServer><IPAddressOfNFSServer>is the IP address of the NFS server that you're going to use.
For system databases or anything stored in the default data location, follow these steps. Otherwise, skip to Step 4.
Ensure that SQL Server is stopped on the server that you're working on.
sudo systemctl stop mssql-server
sudo systemctl status mssql-server
Switch fully to be the superuser.
sudo -iSwitch to be the
mssqluser.su mssqlCreate a temporary directory to store the SQL Server data and log files.
mkdir <TempDir><TempDir>is the name of the folder. The following example creates a folder named/var/opt/mssql/tmp.
mkdir /var/opt/mssql/tmpCopy the SQL Server data and log files to the temporary directory.
cp /var/opt/mssql/data/* <TempDir><TempDir>is the name of the folder from the previous step.
Verify that the files are in the directory.
ls TempDir<TempDir>is the name of the folder from the previous step.
Delete the files from the existing SQL Server data directory.
rm - f /var/opt/mssql/data/*Verify that the files have been deleted.
ls /var/opt/mssql/dataType exit to switch back to the root user.
Mount the NFS share in the SQL Server data folder.
mount -t nfs4 <IPAddressOfNFSServer>:<FolderOnNFSServer> /var/opt/mssql/data -o nfsvers=4.2,timeo=14,intr<IPAddressOfNFSServer>is the IP address of the NFS server that you're going to use<FolderOnNFSServer>is the name of the NFS share. The following example syntax matches the NFS information from Step 2.
mount -t nfs4 10.201.202.63:/var/nfs/fci1 /var/opt/mssql/data -o nfsvers=4.2,timeo=14,intrCheck to see that the mount was successful by issuing mount with no switches.
mountHere's the expected output.
10.201.202.63:/var/nfs/fcil on /var/opt/mssql/data type nfs4 (rw,relatime,vers=4.2,rsize=524288,wsize=524288,namlen=255,hard, proto=tcp,port=0,timeo=14, retrans=2,sec=sys,clientaddr=10.201.202.128,local lock=none, addr=10.201.202.63)Switch to the
mssqluser.su mssqlCopy the files from the temporary directory /var/opt/mssql/data.
cp /var/opt/mssql/tmp/* /var/opt/mssqldataVerify the files are there.
ls /var/opt/mssql/dataEnter
exitto not bemssql.Enter
exitto not be root.Start SQL Server. If everything was copied correctly and security applied correctly, SQL Server should show as started.
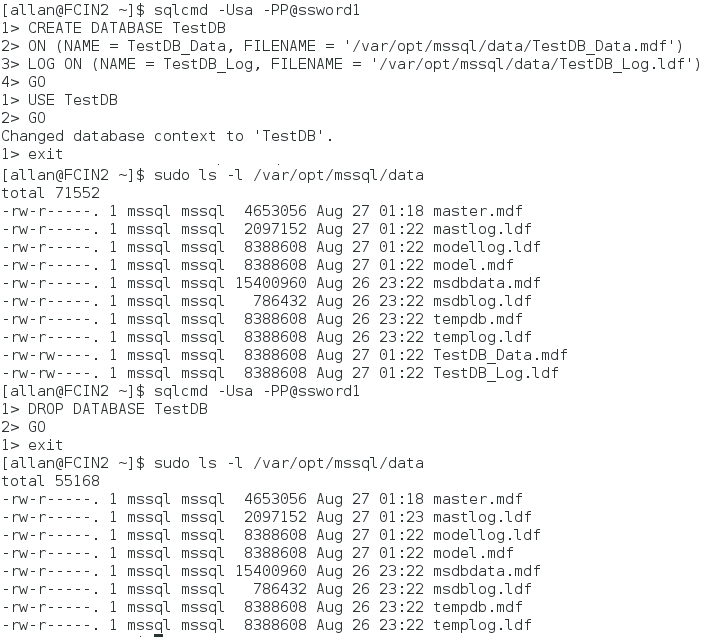
sudo systemctl start mssql-server
sudo systemctl status mssql-server
Create a database to test that security is set up properly. The following example shows that being done via Transact-SQL. It can also be done via SQL Server Management Studio (SSMS).
Stop SQL Server and verify that it has shut down.
sudo systemctl stop mssql-server
sudo systemctl status mssql-server
If you aren't creating any other NFS mounts, unmount the share. If you're creating other mounts, don't unmount.
sudo umount <IPAddressOfNFSServer>:<FolderOnNFSServer> <FolderToMountIn><IPAddressOfNFSServer>is the IP address of the NFS server that you're going to use<FolderOnNFSServer>is the name of the NFS share<FolderMountedIn>is the folder created in the previous step.
For things other than system databases, such as user databases or backups, follow these steps. If only using the default location, skip to Step 5.
Switch to be the superuser.
sudo -iCreate a folder that will be used by SQL Server.
mkdir <FolderName><FolderName>is the name of the folder. The folder's full path needs to be specified if not in the right location.
The following example creates a folder named
/var/opt/mssql/userdata.mkdir /var/opt/mssql/userdataMount the NFS share in the folder that was created in the previous step.
mount -t nfs4 <IPAddressOfNFSServer>:<FolderOnNFSServer> <FolderToMountIn> -o nfsvers=4.2,timeo=14,intr<IPAddressOfNFSServer>is the IP address of the NFS server that you're going to use<FolderOnNFSServer>is the name of the NFS share<FolderToMountIn>is the folder created in the previous step.
The following example mounts the NFS share.
mount -t nfs4 10.201.202.63:/var/nfs/fci2 /var/opt/mssql/userdata -o nfsvers=4.2,timeo=14,intrCheck to see that the mount was successful by issuing mount with no switches.
Type exit to no longer be the superuser.
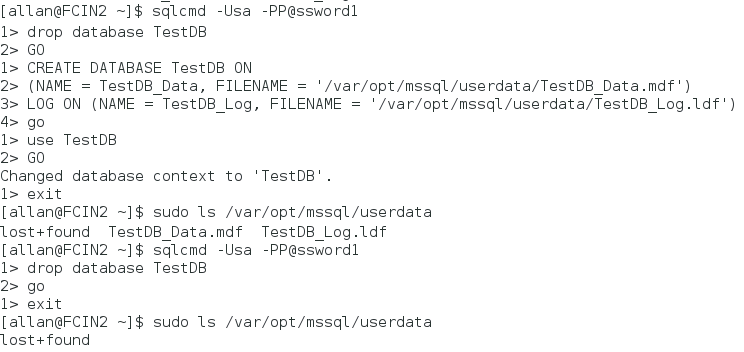
To test, create a database in that folder. The following example uses sqlcmd to create a database, switch context to it, verify the files exist at the OS level, and then deletes the temporary location. You can use SSMS.
Unmount the share
sudo umount <IPAddressOfNFSServer>:<FolderOnNFSServer> <FolderToMountIn><IPAddressOfNFSServer>is the IP address of the NFS server that you're going to use<FolderOnNFSServer>is the name of the NFS share<FolderMountedIn>is the folder created in the previous step.
Repeat the steps on the other nodes.