Note
Access to this page requires authorization. You can try signing in or changing directories.
Access to this page requires authorization. You can try changing directories.
Applies to: ![]() SQL Server on Linux
SQL Server on Linux
This article explains how to configure SMB storage for a failover cluster instance (FCI) on Linux.
In the non-Windows world, SMB is also referred to as a Common Internet File System (CIFS) share and implemented via Samba. In the Windows world, accessing an SMB share is done this way: \\SERVERNAME\SHARENAME. For Linux-based SQL Server installations, the SMB share must be mounted as a folder.
Important source and server information
Here are some tips and notes for successfully using SMB:
- The SMB share can be on Windows, Linux, or even from an appliance as long as it's using SMB 3.0 or later versions. For more information on Samba and SMB 3.0, see SMB 3.0 to see if your Samba implementation is compliant with SMB 3.0.
- The SMB share should be highly available.
- Security must be set properly on the SMB share. Below is an example from
/etc/samba/smb.conf, whereSQLDatais the name of the share.
[SQLData]
path=/var/smb/SQLData
read only = no
browseable = yes
guest ok = no
writeable = yes
valid users = SQLSambaUser
Instructions
Choose one of the servers that will participate in the FCI configuration. It doesn't matter which one.
Get information about the
mssqluser.sudo id mssqlNote the
uid,gid, and groups.Execute
sudo smbclient -L //NameOrIP/ShareName -U User.<NameOrIP>is the DNS name or IP address of the server hosting the SMB share.<ShareName>is the name of the SMB share.
For system databases, or anything stored in the default data location, follow these steps. Otherwise skip to step 5.
Ensure that SQL Server is stopped on the server that you're working on.
sudo systemctl stop mssql-server
sudo systemctl status mssql-server
Switch fully to be the superuser.
sudo -iSwitch to be the
mssqluser.su mssqlCreate a temporary directory to store the SQL Server data and log files.
mkdir <TempDir><TempDir>is the name of the folder. The following example creates a folder named/var/opt/mssql/tmp.
mkdir /var/opt/mssql/tmpCopy the SQL Server data and log files to the temporary directory.
cp /var/opt/mssql/data/* <TempDir><TempDir>is the name of the folder from the previous step.
Verify that the files are in the directory.
ls <TempDir><TempDir> is the name of the folder from Step d.
Delete the files from the existing SQL Server data directory.
rm - f /var/opt/mssql/data/*Verify that the files have been deleted.
ls /var/opt/mssql/dataType exit to switch back to the root user.
Mount the SMB share in the SQL Server data folder. This example shows the syntax for connecting to a Windows Server-based SMB 3.0 share.
Mount -t cifs //<ServerName>/<ShareName> /var/opt/mssql/data -o vers=3.0,username=<UserName>,password=<Password>,domain=<domain>,uid=<mssqlUID>,gid=<mssqlGID>,file_mode=0777,dir_mode=0777<ServerName>is the name of the server with the SMB share<ShareName>is the name of the share<UserName>is the name of the user to access the share<Password>is the password for the user<domain>is the name of Active Directory<mssqlUID>is the UID of themssqluser<mssqlGID>is the GID of themssqluser
Check to see that the mount was successful by issuing mount with no switches.
mountSwitch to the
mssqluser.su mssqlCopy the files from the temporary directory
/var/opt/mssql/data.cp /var/opt/mssql/tmp/* /var/opt/mssql/dataVerify the files are there.
ls /var/opt/mssql/dataEnter
exitto not bemssql.Enter
exitto not beroot.Start SQL Server. If everything was copied correctly and security applied correctly, SQL Server should show as started.
sudo systemctl start mssql-server
sudo systemctl status mssql-server
To test further, create a database to ensure the permissions are fine. The following example uses Transact-SQL; you can use SSMS.
Stop SQL Server and verify it's shut down. If you're going to be adding or testing other disks, don't shut down SQL Server until those disks are added and tested.
sudo systemctl stop mssql-server
sudo systemctl status mssql-server
Only if finished, unmount the share. If not, unmount after finishing testing/adding any additional disks.
sudo umount //<IPAddressorServerName>/<ShareName /<FolderMountedIn><IPAddressOrServerName>is the IP address or name of the SMB host<ShareName>is the name of the share<FolderMountedIn>is the name of the folder where SMB is mounted
For things other than system databases, such as user databases or backups, follow these steps. If only using the default location, skip to Step 14.
Switch to be the superuser.
sudo -iCreate a folder that will be used by SQL Server.
mkdir <FolderName><FolderName> is the name of the folder. The folder's full path needs to be specified if not in the right location. The following example creates a folder named
/var/opt/mssql/userdata.mkdir /var/opt/mssql/userdataMount the SMB share in the SQL Server data folder. This example shows the syntax for connecting to a Samba-based SMB 3.0 share.
Mount -t cifs //<ServerName>/<ShareName> <FolderName> -o vers=3.0,username=<UserName>,password=<Password>,uid=<mssqlUID>,gid=<mssqlGID>,file_mode=0777,dir_mode=0777<ServerName>is the name of the server with the SMB share<ShareName>is the name of the share<FolderName>is the name of the folder created in the last step<UserName>is the name of the user to access the share<Password>is the password for the user<mssqlUID>is the UID of themssqluser<mssqlGID>is the GID of themssqluser.
Check to see that the mount was successful by issuing mount with no switches.
Type exit to no longer be the superuser.
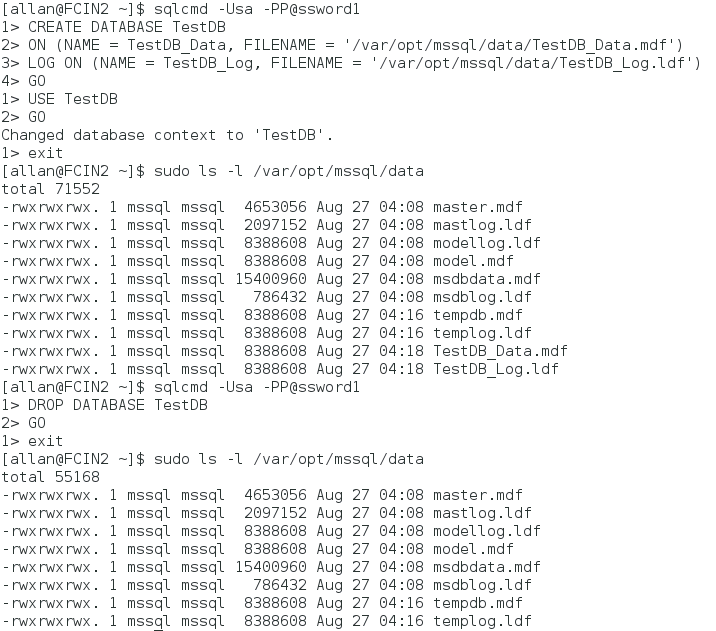
To test, create a database in that folder. The following example uses sqlcmd to create a database, switch context to it, verify the files exist at the OS level, and then deletes the temporary location. You can use SSMS.
Unmount the share
sudo umount //<IPAddressorServerName>/<ShareName> /<FolderMountedIn><IPAddressOrServerName>is the IP address or name of the SMB host<ShareName>is the name of the share<FolderMountedIn>is the name of the folder where SMB is mounted.
Repeat the steps on the other node(s).
You're now ready to configure the FCI.