Note
Access to this page requires authorization. You can try signing in or changing directories.
Access to this page requires authorization. You can try changing directories.
Applies to: ![]() SQL Server 2016 (13.x)
SQL Server 2016 (13.x) ![]() SQL Server 2017 (14.x)
SQL Server 2017 (14.x) ![]() SQL Server 2019 (15.x) on Linux
SQL Server 2019 (15.x) on Linux
Python integration is available in SQL Server 2017 and later, when you include the Python option in a Machine Learning Services (In-Database) installation.
Note
Currently this article applies to SQL Server 2016 (13.x), SQL Server 2017 (14.x), SQL Server 2019 (15.x), and SQL Server 2019 (15.x) for Linux only.
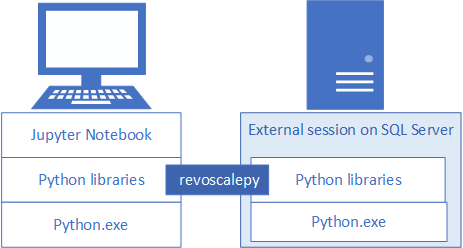
To develop and deploy Python solutions for SQL Server, install Microsoft's revoscalepy and other Python libraries your development workstation. The revoscalepy library, which is also on the remote SQL Server instance, coordinates computing requests between both systems.
In this article, learn how to configure a Python development workstation so that you can interact with a remote SQL Server enabled for machine learning and Python integration. After completing the steps in this article, you will have the same Python libraries as those on SQL Server. You will also know how to push computations from a local Python session to a remote Python session on SQL Server.
To validate the installation, you can use built-in Jupyter Notebooks as described in this article, or link the libraries to PyCharm or any another IDE that you normally use.
Tip
For a video demonstration of these exercises, see Run R and Python remotely in SQL Server from Jupyter Notebooks.
Commonly used tools
Whether you are a Python developer new to SQL, or a SQL developer new to Python and in-database analytics, you will need both a Python development tool and a T-SQL query editor such as SQL Server Management Studio (SSMS) to exercise all of the capabilities of in-database analytics.
For Python development, you can use Jupyter Notebooks, which come bundled in the Anaconda distribution installed by SQL Server. This article explains how to start Jupyter Notebooks so that you can run Python code locally and remotely on SQL Server.
SSMS is a separate download, useful for creating and running stored procedures on SQL Server, including those containing Python code. Almost any Python code that you write in Jupyter Notebooks can be embedded in a stored procedure. You can step through other quickstarts to learn about SSMS and embedded Python.
1 - Install Python packages
Local workstations must have the same Python package versions as those on SQL Server, including the base Anaconda 4.2.0 with Python 3.5.2 distribution, and Microsoft-specific packages.
An installation script adds three Microsoft-specific libraries to the Python client. The script installs:
- revoscalepy is used to define data source objects and the compute context.
- microsoftml providing machine learning algorithms.
- azureml applies to operationalization tasks associated with a standalone server context and might be of limited use for in-database analytics.
Download an installation script. On the appropriate following GitHub page, select Download raw file.
Install-PyForMLS.ps1 installs version 9.2.1 of the Microsoft Python packages. This version corresponds to a default SQL Server instance.
Install-PyForMLS.ps1 installs version 9.3 of the Microsoft Python packages.
Open a PowerShell window with elevated administrator permissions (right-click Run as administrator).
Go to the folder in which you downloaded the installer and run the script. Add the
-InstallFoldercommand-line argument to specify a folder location for the libraries. For example:cd {{download-directory}} .\Install-PyForMLS.ps1 -InstallFolder "C:\path-to-python-for-mls"
If you omit the install folder, the default is %ProgramFiles%\Microsoft\PyForMLS.
Installation takes some time to complete. You can monitor progress in the PowerShell window. When setup is finished, you have a complete set of packages.
Tip
We recommend the Python for Windows FAQ for general purpose information on running Python programs on Windows.
2 - Locate executables
Still in PowerShell, list the contents of the installation folder to confirm that Python.exe, scripts, and other packages are installed.
Enter
cd \to go to the root drive, and then enter the path you specified for-InstallFolderin the previous step. If you omitted this parameter during installation, the default iscd %ProgramFiles%\Microsoft\PyForMLS.Enter
dir *.exeto list the executables. You should see python.exe, pythonw.exe, and uninstall-anaconda.exe.
On systems having multiple versions of Python, remember to use this particular Python.exe if you want to load revoscalepy and other Microsoft packages.
Note
The installation script does not modify the PATH environment variable on your computer, which means that the new python interpreter and modules you just installed are not automatically available to other tools you might have. For help on linking the Python interpreter and libraries to tools, see Install an IDE.
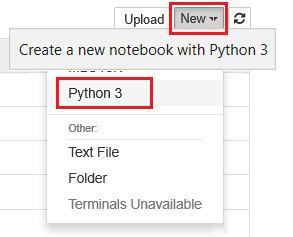
3 - Open Jupyter Notebooks
Anaconda includes Jupyter Notebooks. As a next step, create a notebook and run some Python code containing the libraries you just installed.
At the PowerShell prompt, still in the
%ProgramFiles%\Microsoft\PyForMLSdirectory, open Jupyter Notebooks from the Scripts folder:.\Scripts\jupyter-notebookA notebook should open in your default browser at
https://localhost:8889/tree.Another way to start is double-click jupyter-notebook.exe.
Select New and then select Python 3.
Enter
import revoscalepyand run the command to load one of the Microsoft-specific libraries.Enter and run
print(revoscalepy.__version__)to return the version information. You should see 9.2.1 or 9.3.0. You can use either of these versions with revoscalepy on the server.Enter a more complex series of statements. This example generates summary statistics using rx_summary over a local data set. Other functions get the location of the sample data and create a data source object for a local .xdf file.
import os
from revoscalepy import rx_summary
from revoscalepy import RxXdfData
from revoscalepy import RxOptions
sample_data_path = RxOptions.get_option("sampleDataDir")
print(sample_data_path)
ds = RxXdfData(os.path.join(sample_data_path, "AirlineDemoSmall.xdf"))
summary = rx_summary("ArrDelay+DayOfWeek", ds)
print(summary)
The following screenshot shows the input and a portion of the output, trimmed for brevity.

4 - Get SQL permissions
To connect to an instance of SQL Server to run scripts and upload data, you must have a valid login on the database server. You can use either a SQL login or integrated Windows authentication. We generally recommend that you use Windows integrated authentication, but using the SQL login is simpler for some scenarios, particularly when your script contains connection strings to external data.
At a minimum, the account used to run code must have permission to read from the databases you are working with, plus the special permission EXECUTE ANY EXTERNAL SCRIPT. Most developers also require permissions to create stored procedures, and to write data into tables containing training data or scored data.
Ask the database administrator to configure the following permissions for your account, in the database where you use Python:
- EXECUTE ANY EXTERNAL SCRIPT to run Python on the server.
- db_datareader privileges to run the queries used for training the model.
- db_datawriter to write training data or scored data.
- db_owner to create objects such as stored procedures, tables, functions. You also need db_owner to create sample and test databases.
If your code requires packages that are not installed by default with SQL Server, arrange with the database administrator to have the packages installed with the instance. SQL Server is a secured environment and there are restrictions on where packages can be installed. Ad hoc installation of packages as part of your code is not recommended, even if you have rights. Also, always carefully consider the security implications before installing new packages in the server library.
5 - Create test data
If you have permissions to create a database on the remote server, you can run the following code to create the Iris demo database used for the remaining steps in this article.
5-1 - Create the irissql database remotely
from mssql_python import connect

# creating a new db to load Iris sample in
new_db_name = "irissql"
connection_string = "Server=localhost;Database={0};Trusted_Connection=Yes;"
                        # you can also swap Trusted_Connection for UID={your username};PWD={your password}
conn = connect(connection_string.format("master"))
conn.setautocommit(True)
conn.cursor().execute("IF EXISTS(SELECT * FROM sys.databases WHERE [name] = '{0}') DROP DATABASE {0}".format(new_db_name))
conn.cursor().execute("CREATE DATABASE " + new_db_name)
conn.close()

print("Database created")
5-2 - Import Iris sample from SkLearn
from sklearn import datasets
import pandas as pd

# SkLearn has the Iris sample dataset built in to the package
iris = datasets.load_iris()
df = pd.DataFrame(iris.data, columns=iris.feature_names)
5-3 - Use Revoscalepy APIs to create a table and load the Iris data
from revoscalepy import RxSqlServerData, rx_data_step

# Example of using RX APIs to load data into SQL table. You can also do this with mssql-python
table_ref = RxSqlServerData(connection_string=connection_string.format(new_db_name), table="iris_data")
rx_data_step(input_data = df, output_file = table_ref, overwrite = True)

print("New Table Created: Iris")
print("Sklearn Iris sample loaded into Iris table")
6 - Test remote connection
Before trying this next step, make sure you have permissions on the SQL Server instance and a connection string to the Iris sample database. If the database doesn't exist and you have sufficient permissions, you can create a database using these inline instructions.
Replace the connection string with valid values. The sample code uses "Server=localhost;Database=irissql;Trusted_Connection=Yes;" but your code should specify a remote server, possibly with an instance name, and a credential option that maps to a database login.
6-1 Define a function
The following code defines a function that you will send to SQL Server in a later step. When executed, it uses data and libraries (revoscalepy, pandas, matplotlib) on the remote server to create scatter plots of the iris data set. It returns the bytestream of the .png back to Jupyter Notebooks to render in the browser.
def send_this_func_to_sql():
    from revoscalepy import RxSqlServerData, rx_import
    from pandas.tools.plotting import scatter_matrix
    import matplotlib.pyplot as plt
    import io

    # remember the scope of the variables in this func are within our SQL Server Python Runtime
    connection_string = "Driver=SQL Server;Server=localhost;Database=irissql;Trusted_Connection=Yes;"

    # specify a query and load into pandas dataframe df
    sql_query = RxSqlServerData(connection_string=connection_string, sql_query = "select * from iris_data")
    df = rx_import(sql_query)

    scatter_matrix(df)

    # return bytestream of image created by scatter_matrix
    buf = io.BytesIO()
    plt.savefig(buf, format="png")
    buf.seek(0)

    return buf.getvalue()
6-2 Send the function to SQL Server
In this example, create the remote compute context and then send the execution of the function to SQL Server with rx_exec. The rx_exec function is useful because it accepts a compute context as an argument. Any function that you want to execute remotely must have a compute context argument. Some functions, such as rx_lin_mod support this argument directly. For operations that don't, you can use rx_exec to deliver your code in a remote compute context.
In this example, no raw data had to be transferred from SQL Server to the Jupyter Notebook. All computations occur within the Iris database and only the image file is returned to the client.
from IPython import display
import matplotlib.pyplot as plt
from revoscalepy import RxInSqlServer, rx_exec

# create a remote compute context with connection to SQL Server
sql_compute_context = RxInSqlServer(connection_string=connection_string.format(new_db_name))

# use rx_exec to send the function execution to SQL Server
image = rx_exec(send_this_func_to_sql, compute_context=sql_compute_context)[0]

# only an image was returned to my jupyter client. All data remained secure and was manipulated in my db.
display.Image(data=image)
The following screenshot shows the input and scatter plot output.

7 - Start Python from tools
Because developers frequently work with multiple versions of Python, setup does not add Python to your PATH. To use the Python executable and libraries installed by setup, link your IDE to Python.exe at the path that also provides revoscalepy and microsoftml.
Command line
When you run Python.exe from %ProgramFiles%\Microsoft\PyForMLS (or whatever location you specified for the Python client library installation), you have access to the full Anaconda distribution plus the Microsoft Python modules, revoscalepy and microsoftml.
- Go to
%ProgramFiles%\Microsoft\PyForMLSand execute Python.exe. - Open interactive help:
help(). - Type the name of a module at the help prompt:
help> revoscalepy. Help returns the name, package contents, version, and file location. - Return version and package information at the help> prompt:
revoscalepy. Press Enter a few times to exit help. - Import a module:
import revoscalepy.
Jupyter Notebooks
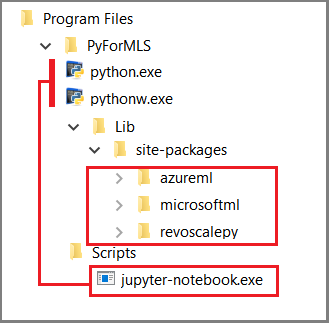
This article uses built-in Jupyter Notebooks to demonstrate function calls to revoscalepy. If you are new to this tool, the following screenshot illustrates how the pieces fit together and why it all "just works".
The parent folder %ProgramFiles%\Microsoft\PyForMLS contains Anaconda plus the Microsoft packages. Jupyter Notebooks is included in Anaconda, under the Scripts folder, and the Python executables are autoregistered with Jupyter Notebooks. Packages found under site-packages can be imported into a notebook, including the three Microsoft packages used for data science and machine learning.
If you are using another IDE, you will need to link the Python executables and function libraries to your tool. The following sections provide instructions for commonly used tools.
Visual Studio
If you have Python in Visual Studio, use the following configuration options to create a Python environment that includes the Microsoft Python packages.
| Configuration setting | value |
|---|---|
| Prefix path | %ProgramFiles%\Microsoft\PyForMLS |
| Interpreter path | %ProgramFiles%\Microsoft\PyForMLS\python.exe |
| Windowed interpreter | %ProgramFiles%\Microsoft\PyForMLS\pythonw.exe |
For help with configuring a Python environment, see Managing Python environments in Visual Studio.
PyCharm
In PyCharm, set the interpreter to the Python executable installed.
In a new project, in Settings, select Add Local.
Enter
%ProgramFiles%\Microsoft\PyForMLS\.
You can now import revoscalepy, microsoftml, or azureml modules. You can also choose Tools > Python Console to open an interactive window.