Note
Access to this page requires authorization. You can try signing in or changing directories.
Access to this page requires authorization. You can try changing directories.
Applies to: ![]() SQL Server - Windows only
SQL Server - Windows only ![]() Azure SQL Managed Instance
Azure SQL Managed Instance
Important
Master Data Services (MDS) is removed in SQL Server 2025 (17.x) Preview. We continue to support MDS in SQL Server 2022 (16.x) and earlier versions.
This article describes a solution for Master Data Service (MDS) hosted on Always On Availability Group configuration. The article describes how to install and configure SQL 2016 Master Data Services on a SQL 2016 Always On Availability group (AG). The main purpose of this solution is to improve high availability and disaster recovery of MDS backend data hosted on a SQL Server database.
Introduction
This article describes a solution for Master Data Service (MDS) hosted on an Always On Availability Group configuration. The article describes how to install and configure SQL 2016 MDS on a SQL 2016 Always On Availability group (AG). The main purpose of this solution is to improve high availability and disaster recovery of MDS backend data hosted on a SQL Server database.
To implement the solution, you need to complete the following tasks covered in this article.
The above sections will briefly introduce the technologies, followed by instructions. For detailed information about the technologies, please review the documents linked to in each section.
This solution described in this article is built on top of an AG, in which each database has multiple synchronous or asynchronous replicas. Only one replica accepts the transaction (accepts user requests). This is the primary replica.
Each replica has its own storage, so there is no centralized shared storage in this solution. When there is a software failure or a hardware failure affecting the primary replica, the primary replica can be failed over to a synchronous or asynchronous replica either automatically or manually based on the configuration and situations. This guarantees high availability of the database with minimum interruption to the users.
Asynchronous replicas are usually hosted on a data center that is remote from the primary replica data center. In case of disaster scenarios, the primary replica can be failed over to another data center. This guarantees disaster recovery of the database.
For demonstration purpose, the solution described in this article uses the following versions of software. Older versions should work the same with potentially minor differences.
- Windows Server 2012R2 with Server Failover cluster
- SQL Server 2016 with Master Data Service feature
Also, the solution uses two VMs, MDS-HA1 and MDS-HA2, to host two replicas. As long as it is supported by an AG, MDS does not limit how many replicas you can use.
This article assumes that you have basic knowledge about Windows Server, Windows Server Failover Cluster, AGs, and SQL Server MDS.
What is not covered
This document does not cover the following:
How to make IIS, the web server hosting the Master data service UI, highly available and recoverable after a disaster. MDS does not impose any particular requirement on IIS, so the standard techniques to make IIS highly available and load balancing can work here as well.
How to use a SQL Server Always On failover cluster instance (FCI) to support high availability (HA) on the MDS backend. SQL Server failover clustering is a different HA solution and is officially supported by SQL Server, and it does work with MDS.
How to use a hybrid solution of an FCI and an AG to support HA on the MDS backend. The hybrid solution does work with MDS.
Design Consideration
Figure 1 shows a typical configuration used mostly in an AG. In the primary data center, there are two replicas with a synchronous commit relationship, and both replicas have the VOTE privilege. This is mainly used to improve HA in case the primary replica fails.
In the Disaster Recovery Data Center, there is a secondary replica with an asynchronous commit relationship with the primary. This data center is usually in a Geo Region different than the primary data center. The secondary replica does not have VOTE privilege.
This configuration is used to achieve recovery in case the primary data center is in a disaster, such as a fire, earthquake, etc. The configuration achieves both HA and disaster recover with relatively low cost.
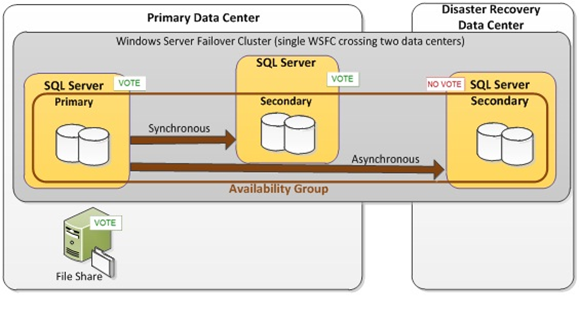
Figure 1. A Typical Always On Availability Group Configuration
If you don't need to consider disaster recovery, you don't need to have a replica in a second data center. If you need to improve HA, then you could have more synchronous replicas in the same primary data center with.
So it is important to consider your scenarios and requirements, and choose how many asynchronous and synchronous replicas you need, and which data center you should put them in.
Windows Server Failover Cluster (WSFC)
This section covers the following tasks.
As shown in Figure 1 in the previous section, the solution described in this article includes Windows Server Failover Cluster (WSFC). We need to setup WSFC because AGs depend on WSFC for failure detection and failover.
WSFC is a feature to improve high availability of applications and services. It consists of a group of independent Windows Server instances with Microsoft Failover Cluster Service running on those instances. The Windows Server instances (or nodes as they are called sometimes) are connected so that they can communicate with each other, and the failure detection is possible. WSFC provide failure detection and failover functionalities. If a node or a service fails in the cluster, then the failure is detected, and another node automatically or manually begins to provide the services hosted on the failed node. As such, users only experience minimum disruptions in services, and service availability is improved.
Prerequisites
The Windows Server operating system is installed on all instances, and all updates are patched.
Note
It is highly recommended that you install the same Windows version and the same feature set on all the instances to avoid any potential incompatibility issues.
Install Failover Cluster Feature
Complete the following steps for each Windows Server instance to install the WSFC feature on each instance. You need administrator permissions.
Open Server Manager in Windows Server, and click Add Roles and Features in the right pane. This will launch the Add Roles and Feature Wizard.
Click Next until you get to the Features page.
Select the Failover Clustering checkbox, and then click Next to finish the installation. See Figure 2.
If you're asked for confirmation to Add features that are required for Failover clustering, click Add Features. See Figure 3.
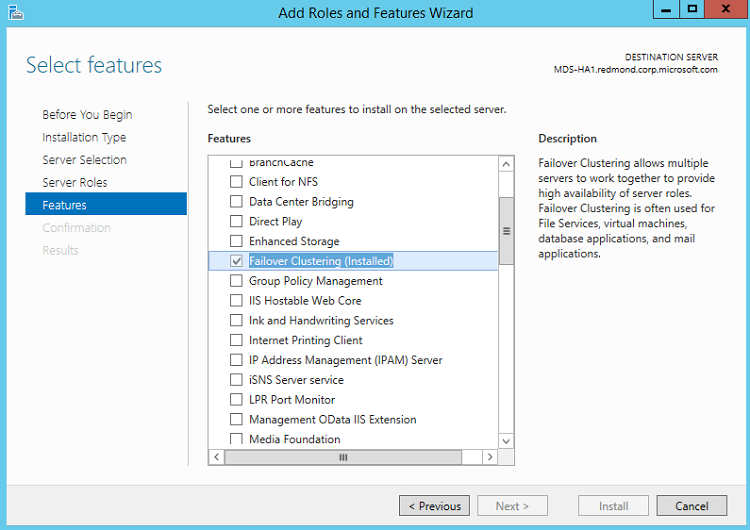
Figure 2
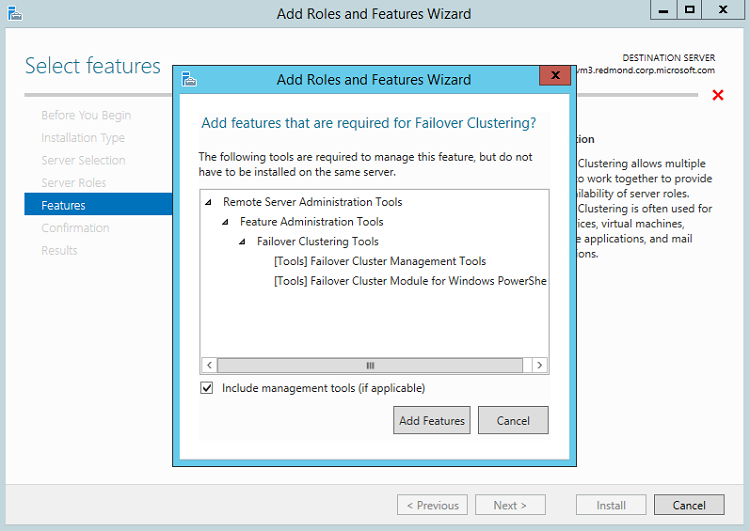
Figure 3
On the Confirmation page, click Install to install the failover clustering feature.
On the Result page, make sure everything has been installed successfully without errors and warnings.
Create a Windows Server Failover Cluster
After the WSFC feature is installed on all instances, you can configure WSFC. You should only need to do this on one node.
Open Server Manager in Windows Server, and click Failover Cluster Manager on the Tool menu at the top right corner to launch the manager.
In Failover Cluster Manager, click Validate Configuration in the right pane. See Figure 4.

Figure 4
In the Validate a Configuration Wizard, click Next.
In the Select Servers or a Cluster dialog box, add the server names that will host SQL Server, and then click Next. See Figure 5.
In this example we added two instances, MDS-HA1 and MDS-HA2.
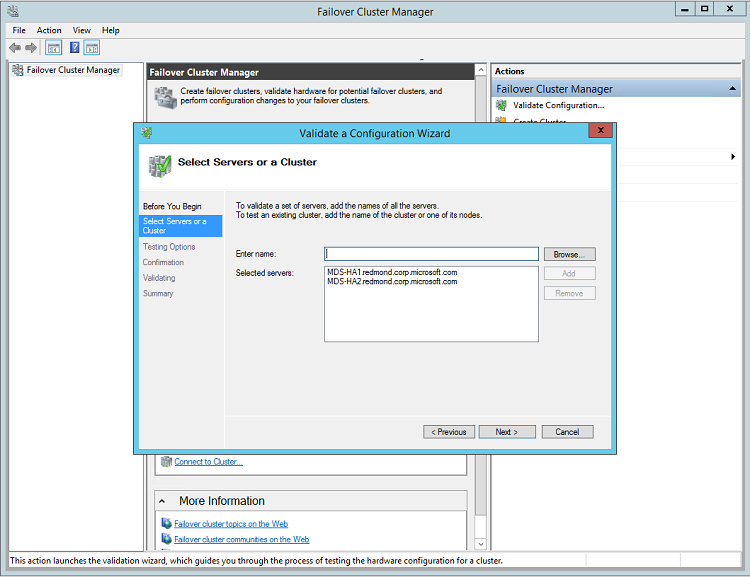
Figure 5
On the Testing Options page, click Run all tests, and then click Next.
Click Next to finish the validation.
The Validating page shows you the progress, and the Summary page shows you the validation summary. See Figures 6 and 7.
On the Summary page, check for any warning or error messages.
Errors must be fixed. However, warnings may not be an issue. A warning message means that "the tested item might meet the requirement, but there is something you should check". For example, figure 7 shows a "validate disk access latency" warning, that may be due to the disk being busy on other tasks temporarily, and you may ignore it. You should check the online document for each warning and error message for more details. See Figure 7.
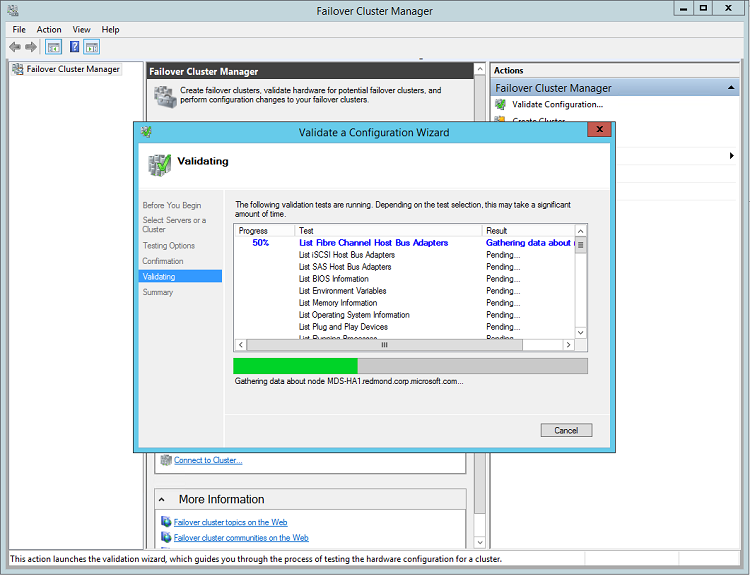
Figure 6
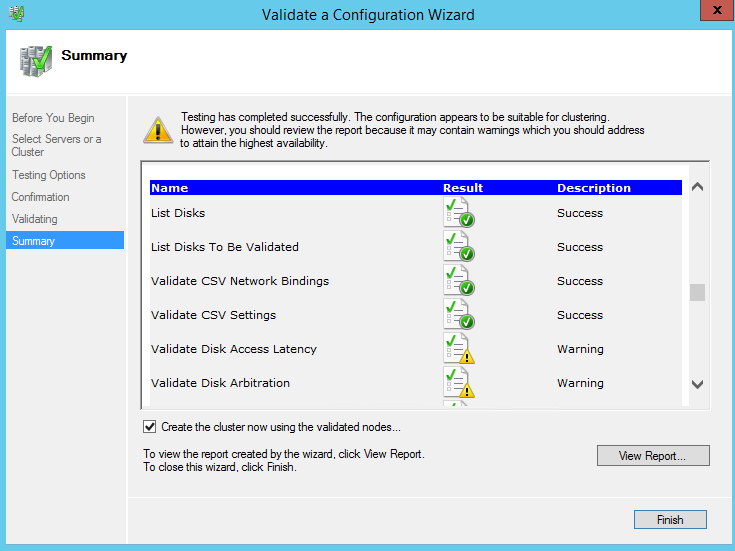
Figure 7
On the Summary page, confirm that the Create the cluster now using the validated nodes checkbox is selected, and then click Finish to start the Create Cluster Wizard.
In the Create Cluster Wizard, click Next.
On the Access Point for Administering the Cluster page, enter the WSFC cluster name, and then click Next. In this example, we use "MDS-HA" as the cluster name. See Figure 8.
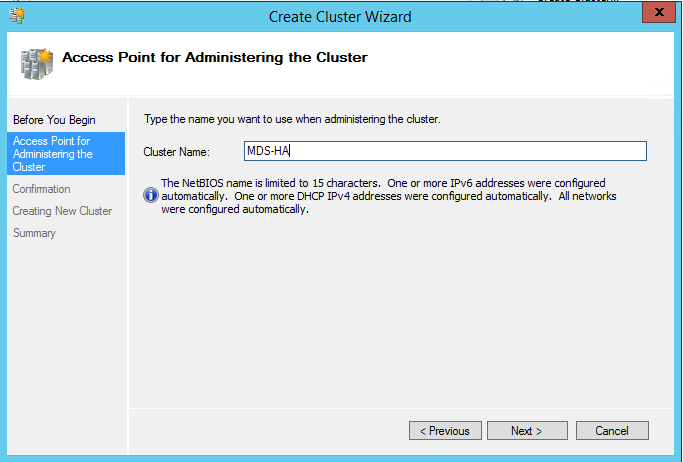
Figure 8
- Continue to click Next to finish creating the cluster. The Summary of Cluster MDS-HA section displays the cluster information. See Figure 9.
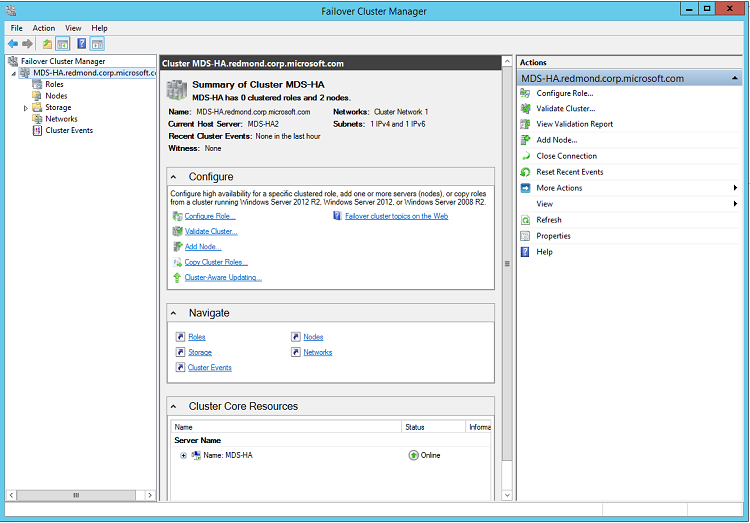
Figure 9
If you need to add a node later, click Add Node action in the right pane in Failover Cluster Manager.
Notes:
The WSFC feature may not be available on all Windows Server editions. Make sure that your edition has this feature.
Make sure you have the proper permissions to setup WSFC in the active directory. If there are any issue, see Failover Cluster Step-by-Step Guide: Configure Accounts in Active Directory.
For more detailed information about WSFC, see Failover Clusters.
SQL Server Always On Availability Group
This section covers the following tasks.
Always On has two features to provide high availability and disaster recovery for MDS, both are built on top of WSFC.
Always On Availability Group (AG)
Always On Failover Cluster Instance (FCI).
An AG provides database-level availability. The AG (a set of user databases) and its virtual network name are registered as resources in WSFC.
FCIs provide instance-level high availability. The SQL Server service and its related services are registered as resources in WSFC. Also, the FCI solution requires symmetrical shared disk storage, such as SAN or SMB file shares, which must be available to all nodes in the WFC cluster.
Prerequisites
Install SQL Server on all nodes. For more information, see Install SQL Server 2016.
(Recommended) Install the exact same SQL Server feature set and version on every node. In particular, MDS must be installed.
(Recommended) Use the same configuration on every SQL Server instance. In particular, the same server collation must be configured on all SQL Server instances.
(Recommended) Use the same service account to run every SQL Server instance. Otherwise, you will have to grant permission on each SQL Server instance to make sure the SQL Server instances can communicate with each other.
Confirm that the Windows firewall setting allows the SQL Server instances to communicate with each other.
Enable SQL Server Always On Availability Groups on Every SQL Server Instance
In the SQL Server Configuration Manager click SQL Server service in the left pane, right-click SQL Server in the right pane, and then click Properties. See Figure 10.
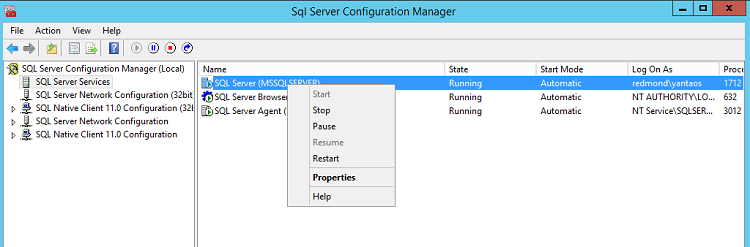
Figure 10
In the SQL Server (MSSQLSERVER) Properties dialog box, click the Always On High Availability tab, and then select the Enable Always On Availability Groups check box. When a value displays in the Windows failover cluster name text box, click OK to continue. See Figure 11.
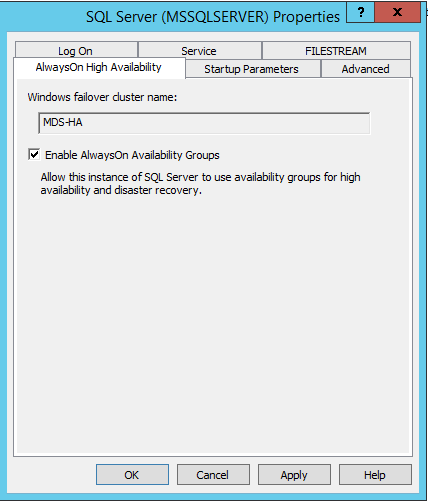
Figure 11
When a warning page displays, click OK to continue. See Figure 12.
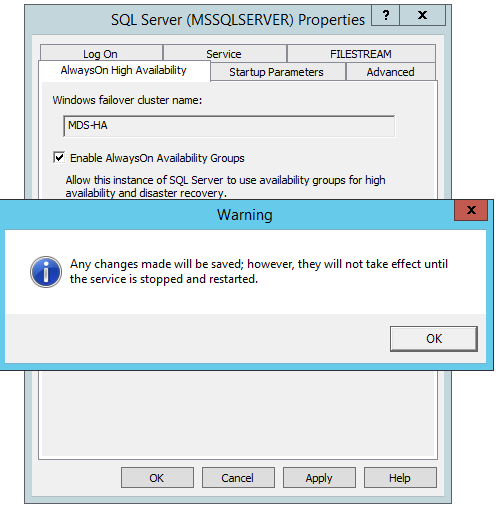
Figure 12
Click Restart, to restart the SQL Server service and make this change effective. See Figure 10.
Note
You can change the service account running the SQL Server service using the SQL Server Configuration Manager. Click the Log On tab in the SQL Server (MSSQLSERVER) Properties dialog box. See Figure 11.
Create an Availability Group
After the AG feature is enabled in all SQL Server instances, you create a new AG that contains the MDS database on one node.
AG can only be created on existing databases. So either you create a MDS database on one node, or create a temporary database and then drop the temporary database. In this example, we create an emptyMDS database and create an AG on this MDS database.
Launch SQL Server Management Studio (SSMS) on a node, and connect to the local SQL Server instance with appropriate credentials.
In SSMS, open a new query window and run the following script to create an empty database. Replace C:\temp with the location you want to use to perform a full backup.
CREATE DATABASE MDS\_Sample
GO
BACKUP DATABASE MDS\_Sample TO DISK='C:\\temp'
GO
Note
A full database backup is necessary for creating the AG on this database.
In the Object Explorer, expand the Always On High Availability folder and click New Availability Group Wizard to launch the New Availability Group Wizard. See Figure 13.
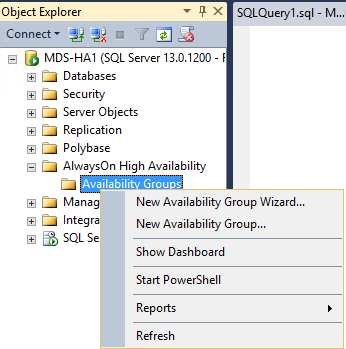
Figure 13
In the New Availability Group wizard, click Next to display the Specify Name page. Type a name for the AG, and then click Next. See Figure 14.
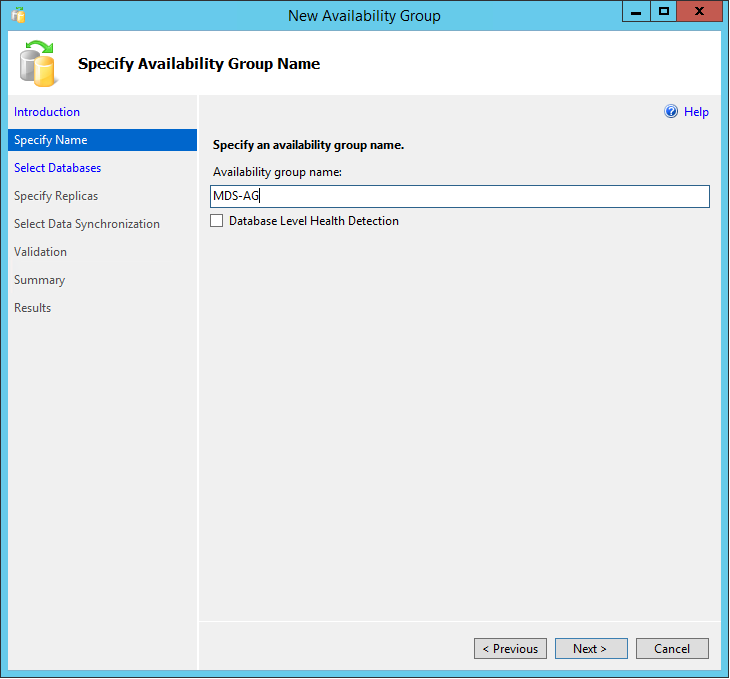
Figure 14
Click the database you just created on the Select Database page, and then click Next. See Figure 15.
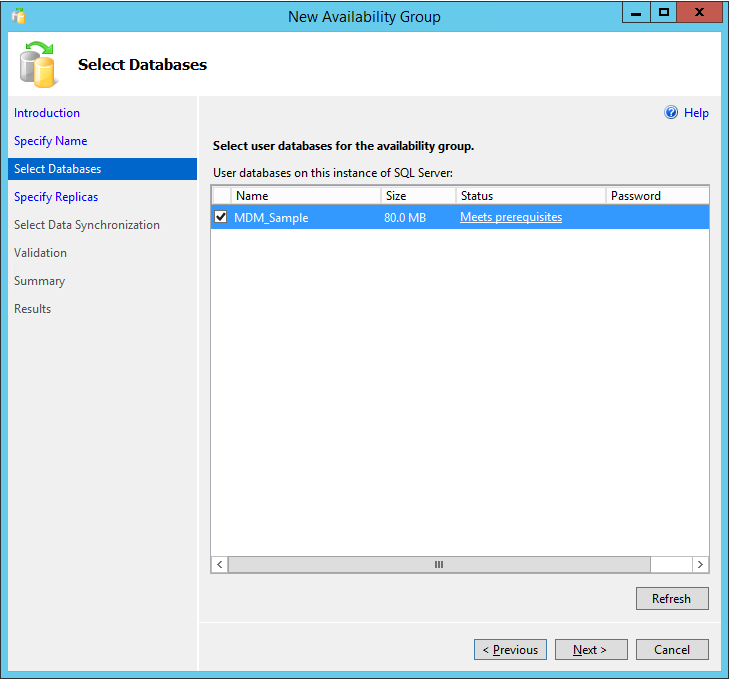
Figure 15
On the Specify Replicas page, add another replica by clicking Add Replica. This page already lists the current, local SQL Server instances as a replica. See Figure 16.
In the Connect to Server dialog box, add the appropriate credentials and click Connect.
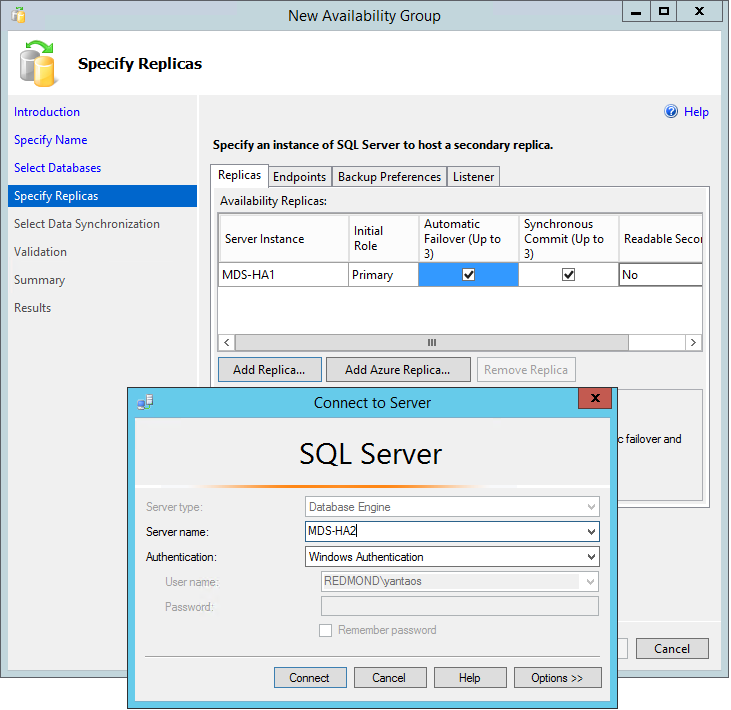
Figure 16
Now you should see two replicas in the list. Repeat this step to add other nodes as replicas. See Figure 17.
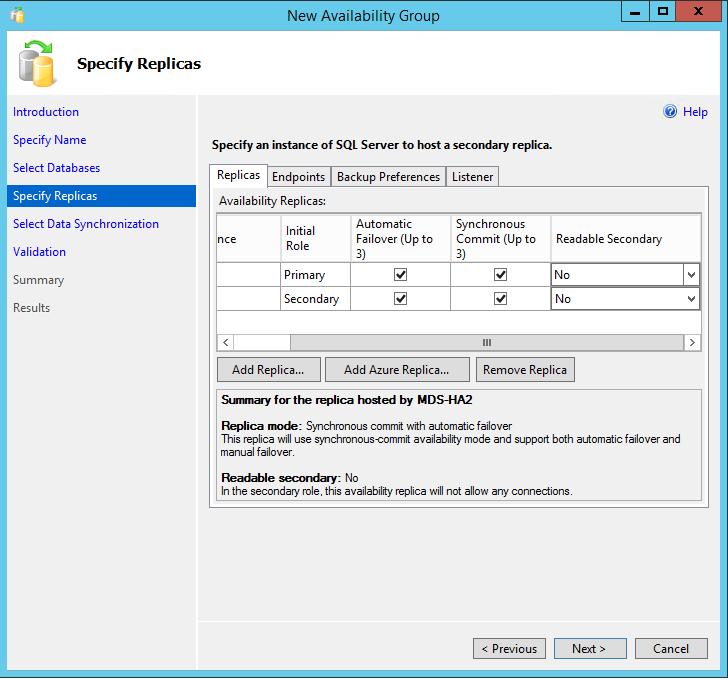
Figure 17
For each replica, configure the following Synchronous Commit, Automatic Failover, and Readable Secondary settings. See Figure 17.
Synchronous Commit: This guarantees that if a transaction is committed on the primary replica of a database, then the transaction is also committed on all other synchronous replicas. Asynchronous commit does not guarantee this, and it may lag behind the primary replica.
You should usually enable synchronous commit only when the two nodes are in the same data center. If they are in different data centers, synchronous commit may slow down the database performance. If this checkbox is not selected, then asynchronous commit is used.
Automatic Failover: When the primary replica is down, the AG will automatically failover to its secondary replica when automatic failover is selected. This can only be enabled on the replicas with synchronous commits.
Readable Secondary: By default, users cannot connect to any secondary replicas. This will enable users to connect to the secondary replica with read-only access.
On the Specify Replicas page, click the Listener tab and do the following. See Figure 18.
a. Click Create an availability group listener to set up an availability group listener for the MDS database connection.
b. Enter a listener DNS Name, such as MDSSQLServer.
c. Enter the default SQL port,1433, in the Port text box.
d. Enter DHCP in the Network Mode text box, and then click Next to continue.
Note
Optionally, you can choose "Static IP" as the Network Mode and enter a static IP. You can also enter a port other than 1433.

Figure 18
On the Select Data Synchronization page, click Full, and specify a network share that every node can access. Click Next to continue. See Figure 19.
This network share will be used to store the database backup to create secondary replicas. If this is not available for your organization, choose another data synchronization preference. Refer to SQL Server 2016 Always On Availability Group on how to use other options to create secondary replicas. The figure 17 also lists other options.
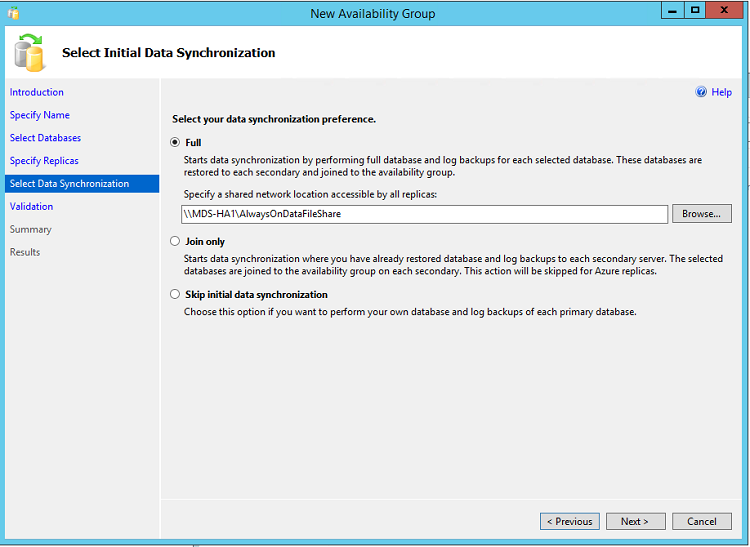
Figure 19
On the Validation page, make sure all validations pass successfully, and correct any errors. Click Next to continue.
On the Summary page, review all the configuration settings and click Finish. This will create the availability group and configure it.
On the Result page, confirm that all necessary steps were completed.
Validation and Test the Availability Group
Open SSMS and connect to the listener DNS name you just created in the Create an Availability Group section. In this example, it is MDSSQLServer.
In Object Explorer, expand the Always On High Availability folder, right-click the AG you just created in the Create an Availability Group section, and then click Show Dashboard. See Figure 20. The status of the new AG and its replicas appears.
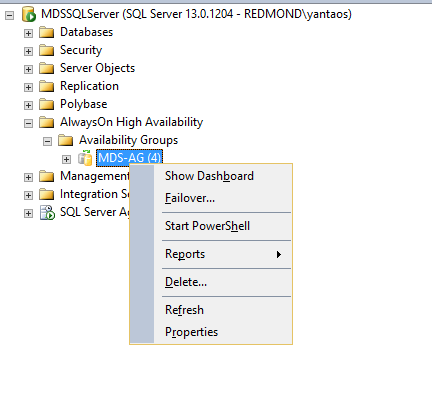
Figure 20
Click Failover to do a failover to a synchronous replica and an asynchronous replica. This is to verify that failover happens correctly without issues.
The AG setup is completed.
For more information about Always On Availability Groups, see SQL Server 2016 Always On Availability Groups.
Configure MDS to Run on an WSFC Node
This solution presented in this article only requires the MDS backend database running on WSFC. Other parts of MDS, such as web applications and MDS configuration manager, can be run either on the node in WSFC or outside WSFC, as long as MDS can connect to the AG.
Open Master Data Service Configuration Manager on one node, click Database Configuration, and then click Create Database to launch the Create Database Wizard.
On the Database Server page, type the AG listener DNS name in the SQL Server instance text box, click Test Connection, and then click Next. See Figure 21.

Figure 21
On the Database page, type the name of the database that you created in the Create an Availability Group section, and then click Next. See Figure 22.
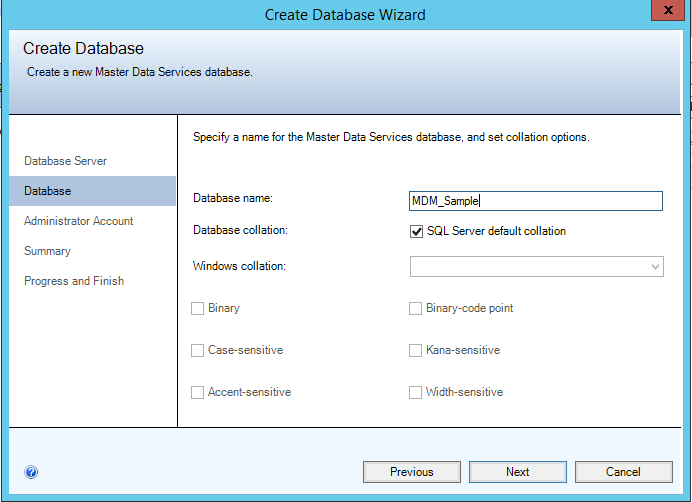
Figure 22
Complete the Create Database Wizard. For more information, see Master Data Services Installation and Configuration.
Click Web Applications in Master Data Service Configuration Manager to configure the Web Application, and then click Apply to apply the settings to MDS. See Figure 23. For more information, see Master Data Services Installation and Configuration.
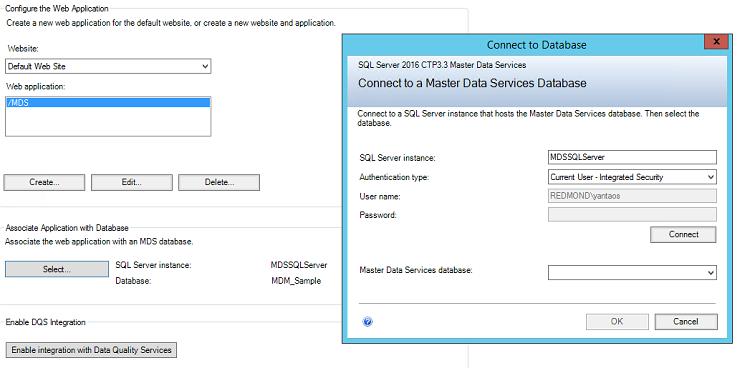
Figure 23
The MDS setup is completed. You can repeat the above steps to set up MDS to run on all nodes. The backend database is the same on the same AG.
If previously you created a temporary database (see Create an Availability Group section) to create an AG, then you should drop the temporary database
For more information about Master Data Service, refer to Master Data Services.
Conclusion
In this white paper, we have seen how to set up and configure the Master Data Services backend database as part of an AG. This configuration provides high availability and disaster recovery on the Master Data Services backend database. To implement this configuration, you need to install and configure Windows Server Failover Cluster, AG, and Master Data Services.
Feedback Comments
Did this paper help you? Please give us your feedback by clicking Comments at the top of the article.
Your feedback will help us improve the quality of white papers we release.