Provision enclave-enabled keys
Applies to: ![]() SQL Server 2019 (15.x) and later - Windows only
SQL Server 2019 (15.x) and later - Windows only ![]() Azure SQL Database
Azure SQL Database
This article describes how to provision enclave-enabled keys that support computations inside server-side secure enclaves used for Always Encrypted with secure enclaves.
The general guidelines and processes for managing Always Encrypted keys apply when you provision enclave-enabled keys. This article address details specific to Always Encrypted with secure enclaves.
To provision an enclave-enabled column master key using SQL Server Management Studio or PowerShell, make sure the new key supports enclave computations. This will cause the tool (SSMS or PowerShell) to generate the CREATE COLUMN MASTER KEY statement that sets the ENCLAVE_COMPUTATIONS in the columns master key metadata in the database. For more information, see CREATE COLUMN MASTER KEY (Transact-SQL).
The tool will also digitally sign the column master properties with the column master key, and it will store the signature in the database metadata. The signature prevents malicious tampering with the ENCLAVE_COMPUTATIONS setting. The SQL client drivers verify the signatures before allowing the enclave use. This provides security administrators with control over which column data can be computed inside the enclave.
The ENCLAVE_COMPUTATIONS is immutable, meaning, you can't change it once you define the column master key in the metadata. To enable enclave computations using a column encryption key, that a given column master key encrypts, you need to rotate the column master key and replace it with an enclave-enabled column master key. See Rotate enclave-enabled keys.
Note
Currently, both SSMS and PowerShell support enclave-enabled column master keys stored in Azure Key Vault or Windows Certificate Store. Hardware security modules (using CNG or CAPI) are not supported.
To create an enclave-enabled column encryption key, you need to ensure that you select an enclave-enabled column master key to encrypt the new key.
The following sections provide more details on how to provision enclave-enabled keys using SSMS and PowerShell.
Provision enclave-enabled keys using SQL Server Management Studio
In SQL Server Management Studio you can provision:
- An enclave-enabled column master key using the New Column Master Key dialog.
- An enclave-enabled column encryption key using the New Column Encryption Key dialog.
The Always Encrypted Wizard also allows you to create an enclave-enabled column master key and an enclave-enabled column encryption key.
Make sure you have installed the latest general availability (GA) version of SQL Server Management Studio (SSMS).
Provision enclave-enabled column master keys with the New Column Master Key dialog
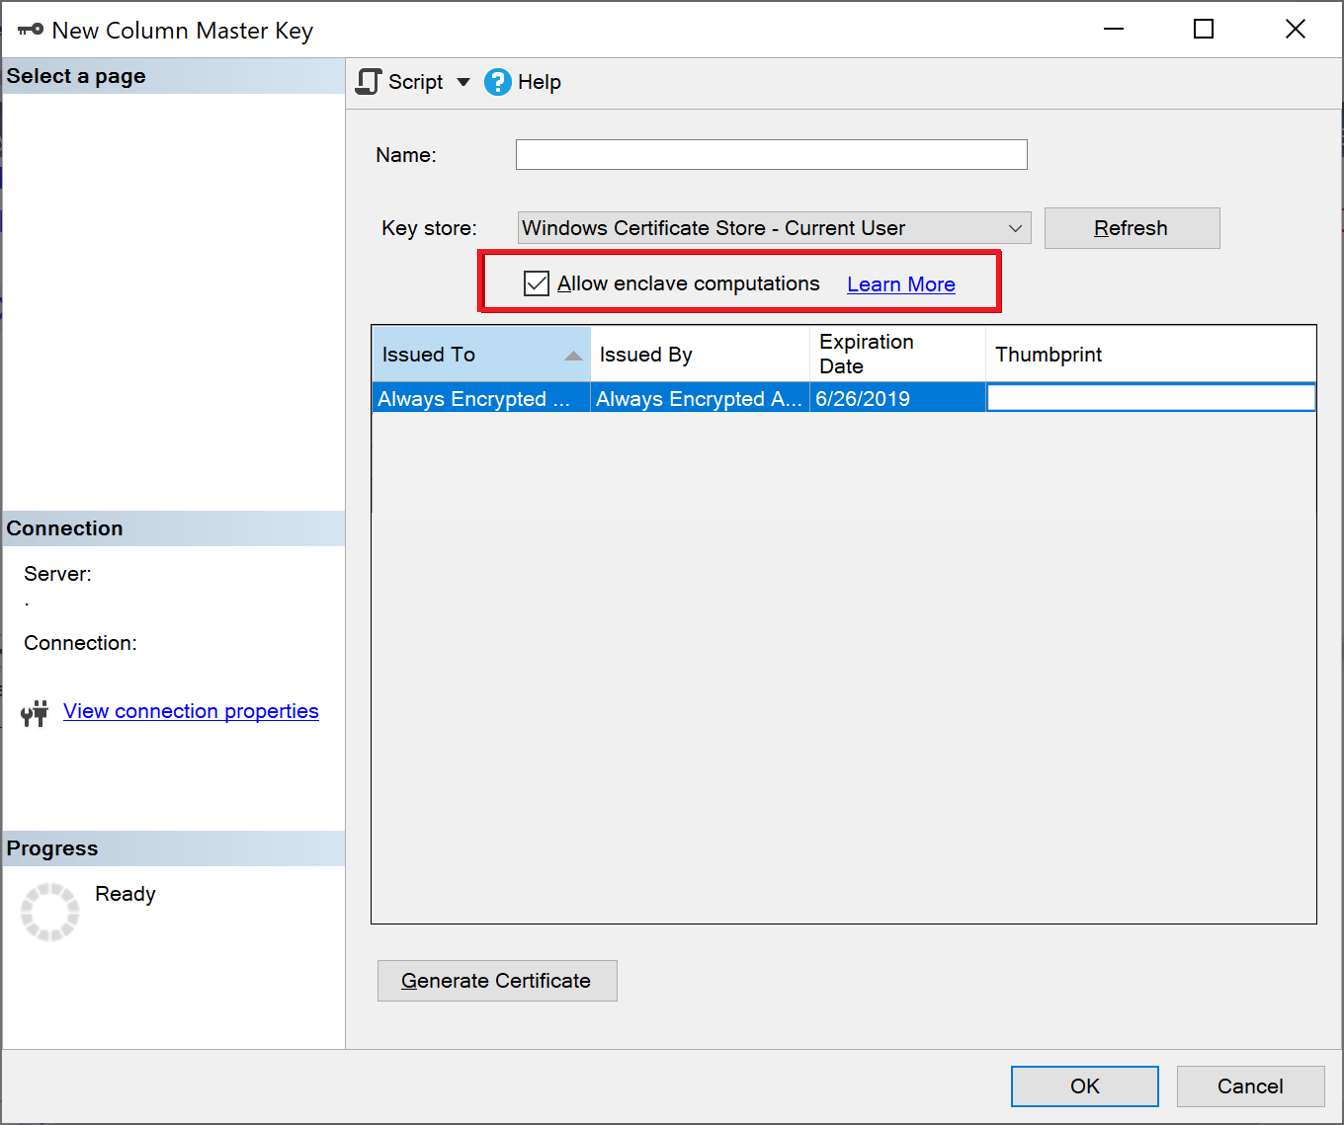
To provision an enclave-enabled column master key, follow the steps in Provision Column Master Keys with the New Column Master Key Dialog. Make sure you select Allow enclave computations. See the below screenshot:
Note
The Allow enclave computations checkbox appears only if a secure enclave is configured for your database. If you are using SQL Server, see Configure the secure enclave in SQL Server. If you are using Azure SQL Database, see Enable Always Encrypted with secure enclaves for your Azure SQL Database.
Tip
To check if a column master key is enclave-enabled, right-click on it in Object Explorer and select Properties. If the key is enclave-enabled, Enclave Computations: Allowed appears in the window showing the properties of the key. Alternativelly, you can use the sys.column_master_keys (Transact-SQL) view.
Provision enclave-enabled column encryption keys with the New Column Encryption Key dialog
To provision an enclave-enabled column encryption key, follow the steps in Provision Column Encryption Keys with the New Column Encryption Key Dialog. When selecting a column master key, make sure it is enclave-enabled.
Tip
To check if a column encryption key is enclave-enabled, right-click on it in Object Explorer and select Properties. If the key is enclave-enabled, Enclave Computations: Allowed appears in the window showing the properties of the key.
Provision enclave-enabled keys using PowerShell
To provision enclave-enabled keys using PowerShell, you need the SqlServer PowerShell module version 22 or higher.
In general, PowerShell key provisioning workflows (with and without role separation) for Always Encrypted, described in Provision Always Encrypted Keys using PowerShell also apply to enclave-enabled keys. This section describes details specific to enclave-enabled keys.
The SqlServer PowerShell module extends the New-SqlCertificateStoreColumnMasterKeySettings and New-SqlAzureKeyVaultColumnMasterKeySettings cmdlets with the -AllowEnclaveComputations parameter to allow you to specify a column master key that is enclave-enabled during the provisioning process. Either cmdlet creates a local object containing properties of a column master key (stored in Azure Key Vault or in the Windows Certificate Store). If specified, the -AllowEnclaveComputations property marks the key as enclave-enabled in the local object. It also causes the cmdlet to access the referenced column master key (in Azure Key Vault or in Windows Certificate Store) to digitally sign the properties of the key. Once you create a settings object for a new enclave-enabled column master key, you can use it in a subsequent invocation of the New-SqlColumnMasterKey cmdlet to create a metadata object describing the new key in the database.
Provisioning enclave-enabled column encryption keys is no different from provisioning column encryption keys that aren't enclave-enabled. You just need to make sure that a column master key used to encrypt the new column encryption key is enclave-enabled.
Note
The SqlServer PowerShell module does not currently support provisioning enclave-enabled keys stored in hardware security modules (using CNG or CAPI).
Example - provision enclave-enabled keys using Windows Certificate Store
The below end-to-end example shows how to provision enclave-enabled keys, storing the column master key stored in Windows Certificate Store. The script is based on the example in Windows Certificate Store without Role Separation (Example). Important to note is the use of the -AllowEnclaveComputations parameter in the New-SqlCertificateStoreColumnMasterKeySettings cmdlet, which is the only difference between the workflows in the two examples.
# Create a column master key in Windows Certificate Store.
$cert = New-SelfSignedCertificate -Subject "AlwaysEncryptedCert" -CertStoreLocation Cert:CurrentUser\My -KeyExportPolicy Exportable -Type DocumentEncryptionCert -KeyUsage DataEncipherment -KeySpec KeyExchange

# Import the SqlServer module.
Import-Module "SqlServer" -MinimumVersion 22.0.50

# Connect to your database.
$serverName = "<server name>"
$databaseName = "<database name>"
# Change the authentication method in the connection string, if needed.
$connStr = "Server = " + $serverName + "; Database = " + $databaseName + "; Integrated Security = True"
$database = Get-SqlDatabase -ConnectionString $connStr

# Create a SqlColumnMasterKeySettings object for your column master key
# using the -AllowEnclaveComputations parameter.
$cmkSettings = New-SqlCertificateStoreColumnMasterKeySettings -CertificateStoreLocation "CurrentUser" -Thumbprint $cert.Thumbprint -AllowEnclaveComputations

# Create column master key metadata in the database.
$cmkName = "CMK1"
New-SqlColumnMasterKey -Name $cmkName -InputObject $database -ColumnMasterKeySettings $cmkSettings

# Generate a column encryption key, encrypt it with the column master key and create column encryption key metadata in the database.
$cekName = "CEK1"
New-SqlColumnEncryptionKey -Name $cekName  -InputObject $database -ColumnMasterKey $cmkName
Example - provision enclave-enabled keys using Azure Key Vault
The below end-to-end example shows how to provision enclave-enabled keys, storing the column master key in a key vault in Azure Key Vault. The script is based on the example in Azure Key Vault without Role Separation (Example). It's important to note two differences between the workflow for enclave-enabled keys compared to the keys that aren't enclave-enabled.
- In the below script, the New-SqlCertificateStoreColumnMasterKeySettings uses the
-AllowEnclaveComputationsparameter to make the new column master key enclave-enabled. - The below script uses the Get-AzAccessToken cmdlet to obtain an access token for key vaults. This is necessary, because the New-SqlAzureKeyVaultColumnMasterKeySettings needs to have access to the Azure Key Vault to sign the properties of the column master key.
# Create a column master key in Azure Key Vault.
Import-Module "SqlServer" -MinimumVersion 22.0.50
Import-Module Az.Accounts -MinimumVersion 2.2.0
Connect-AzAccount
$SubscriptionId = "<Azure SubscriptionId>"
$resourceGroup = "<resource group name>"
$azureLocation = "<datacenter location>"
$akvName = "<key vault name>"
$akvKeyName = "<key name>"
$azureCtx = Set-AzConteXt -SubscriptionId $SubscriptionId # Sets the context for the below cmdlets to the specified subscription.
New-AzResourceGroup -Name $resourceGroup -Location $azureLocation # Creates a new resource group - skip, if your desired group already exists.
New-AzKeyVault -VaultName $akvName -ResourceGroupName $resourceGroup -Location $azureLocation # Creates a new key vault - skip if your vault already exists.
Set-AzKeyVaultAccessPolicy -VaultName $akvName -ResourceGroupName $resourceGroup -PermissionsToKeys get, create, delete, list, wrapKey,unwrapKey, sign, verify -UserPrincipalName $azureCtx.Account
$akvKey = Add-AzKeyVaultKey -VaultName $akvName -Name $akvKeyName -Destination "Software"

# Connect to your database.
$serverName = "<server name>"
$databaseName = "<database name>"
# Change the authentication method in the connection string, if needed.
$connStr = "Server = " + $serverName + "; Database = " + $databaseName + "; Integrated Security = True"
$database = Get-SqlDatabase -ConnectionString $connStr

# Obtain an access token for key vaults.
$keyVaultAccessToken = (Get-AzAccessToken -ResourceUrl https://vault.azure.net).Token

# Create a SqlColumnMasterKeySettings object for your column master key.
$cmkSettings = New-SqlAzureKeyVaultColumnMasterKeySettings -KeyURL $akvKey.ID -AllowEnclaveComputations -KeyVaultAccessToken $keyVaultAccessToken

# Create column master key metadata in the database.
$cmkName = "CMK1"
New-SqlColumnMasterKey -Name $cmkName -InputObject $database -ColumnMasterKeySettings $cmkSettings

# Generate a column encryption key, encrypt it with the column master key and create column encryption key metadata in the database.
$cekName = "CEK1"
New-SqlColumnEncryptionKey -Name $cekName -InputObject $database -ColumnMasterKey $cmkName -KeyVaultAccessToken $keyVaultAccessToken
Next steps
- Run Transact-SQL statements using secure enclaves
- Configure column encryption in-place using Always Encrypted with secure enclaves
- Enable Always Encrypted with secure enclaves for existing encrypted columns
- Develop applications using Always Encrypted with secure enclaves
See also
Feedback
Coming soon: Throughout 2024 we will be phasing out GitHub Issues as the feedback mechanism for content and replacing it with a new feedback system. For more information see: https://aka.ms/ContentUserFeedback.
Submit and view feedback for