Install Extensions in SQL Server Management Studio (SSMS)
Applies to: ![]() SQL Server
SQL Server ![]() Azure SQL Database
Azure SQL Database ![]() Azure SQL Managed Instance
Azure SQL Managed Instance ![]() Azure Synapse Analytics
Azure Synapse Analytics
SQL Server Management Studio (SSMS) extensions are created with C# through the "Visual Studio extension development" workload in Visual Studio. SSMS 18.x is built on the Visual Studio 2017 shell and is subject to the limitations of that environment.
Extension installation in SSMS 18.x can be achieved by deploying the VSIX through Visual Studio or an independent managed package installer. The Visual Studio deployment is outlined below.
Note
SQL Server Management Studio extensions cannot be installed via VSIXInstaller under SSMS 18.x.
Visual Studio deployment of an extension for SSMS 18.x
Manual extension installation is accomplished by copying the associated extension files (VSIX) into the default SSMS extensions folder. SSMS automatically checks this folder for extensions at launch. The VSIX deployment can be completed by Visual Studio at project build time.
Locate your SSMS installation and default extensions folder. With default SSMS installation settings, the folder location is
C:\Program Files (x86)\Microsoft SQL Server Management Studio 18\Common7\IDE\Extensions\.Launch Visual Studio as administrator.
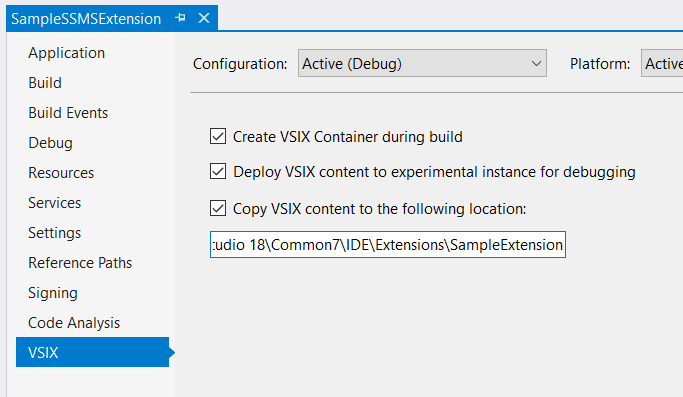
The file copy process can be completed by Visual Studio at build time by checking the "Copy VSIX content to the following location" checkbox in the VSIX tab of the project's properties window. In the textbox below the checkbox, enter the folder location above with a folder for this extension appended. For example:
C:\Program Files (x86)\Microsoft SQL Server Management Studio 18\Common7\IDE\Extensions\SampleExtension
Build the extension project, a successful build will transfer the extension files to the SSMS extension folder.
Launch SSMS and test the extension's functionality.
Feedback
Coming soon: Throughout 2024 we will be phasing out GitHub Issues as the feedback mechanism for content and replacing it with a new feedback system. For more information see: https://aka.ms/ContentUserFeedback.
Submit and view feedback for