Events
Take the Microsoft Learn AI Skills Challenge
Sep 24, 11 PM - Nov 1, 11 PM
Elevate your skills in Microsoft Fabric and earn a digital badge by November 1.
Register nowThis browser is no longer supported.
Upgrade to Microsoft Edge to take advantage of the latest features, security updates, and technical support.
Applies to: ![]() Azure SQL Database
Azure SQL Database
Get started using SQL Server Management Studio (SSMS) to connect to your Azure SQL Database and run some Transact-SQL (T-SQL) commands.
Note
While Microsoft Entra ID is the new name for Azure Active Directory (Azure AD), to prevent disrupting existing environments, Azure AD still remains in some hardcoded elements such as UI fields, connection providers, error codes, and cmdlets. In this article, the two names are interchangeable.
The article demonstrates the following steps:
Note
In December 2021, releases of SSMS prior to 18.6 will no longer authenticate to Database Engines through Microsoft Entra multifactor authentication (MFA). To continue utilizing MFA, you need SSMS 18.6 or later.
Connectivity to Azure Analysis Services through Microsoft Entra multifactor authentication requires SSMS 18.5.1 or later.
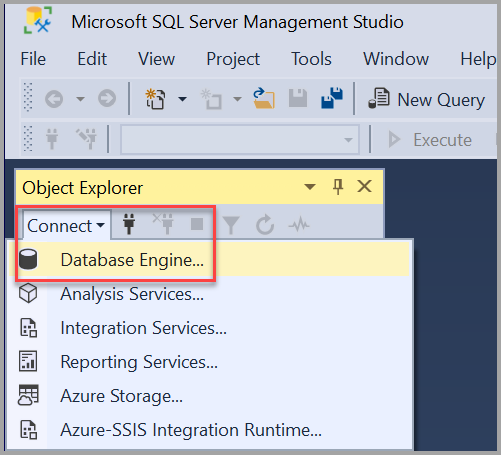
Start SQL Server Management Studio (SSMS). The first time you run SSMS, the Connect to Server window opens. If it doesn't open, you can open it manually by selecting Object Explorer > Connect > Database Engine.
The Connect to Server dialog box appears. Enter the following information:
| Setting | Suggested value | Details |
|---|---|---|
| Server type | Database Engine | Select Database Engine (usually the default option). |
| Server name | The fully qualified server name | Enter the name of your Azure SQL Database or Azure SQL Managed Instance name. |
| Authentication | ||
| Microsoft Entra ID 1 | ||
| - Universal with MFA | See Using Microsoft Entra multifactor authentication. | |
| - Password - Integrated - Service Principal |
See Microsoft Entra service principal with Azure SQL. | |
| - Managed Identity | See Managed identities in Microsoft Entra for Azure SQL. Connecting to a SQL instance with SSMS using a managed identity requires an Azure VM. See Use a Windows VM system-assigned managed identity to access Azure SQL |
|
| - Default | The default option can be used when connecting using any Microsoft Entra authentication mode that's passwordless and noninteractive. | |
| SQL Server Authentication | Use SQL Server Authentication for Azure SQL to connect. | |
| Login | Server account user ID | The user ID from the server account used to create the server. |
| Password | Server account password | The password from the server account used to create the server. |
| Encryption 2 | Encryption method | Select the encryption level for the connection. The default value is Mandatory. |
| Trust server certificate | Trust Server Certificate | Check this option to bypass server certificate validation. The default value is False (unchecked), which promotes better security using trusted certificates. |
| Host Name in Certificate | Host name of the server | The value provided in this option is used to specify a different, but expected, CN or SAN in the server certificate. |
1 The Windows Authentication method isn't supported for Azure SQL. For more information, see Azure SQL authentication.
2 The default value is Mandatory in SSMS 20. Strict (SQL Server 2022 and Azure SQL) encryption should be used for Azure SQL Database and Azure SQL Managed Instance. Strict (SQL Server 2022 and Azure SQL) encryption can be used for SQL Server when the instance has Force Strict Encryption enabled.
You can also modify additional connection options by selecting Options. Examples of connection options are the database you're connecting to, the connection timeout value, and the network protocol. This article uses the default values for all the options.
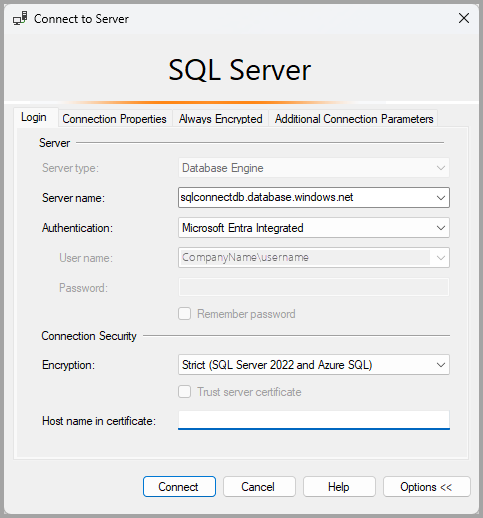
After you complete all the fields, select Connect.
If your firewall isn't set up, a prompt appears to configure the firewall. Once you sign in, fill in your Azure account sign in information and continue to set the firewall rule. Then select OK. This prompt is a one time action. Once you configure the firewall, the firewall prompt shouldn't appear.

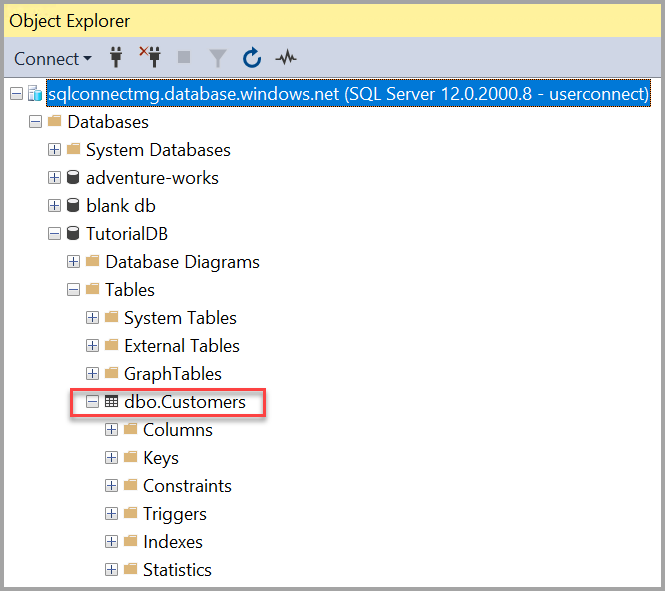
To verify that your Azure SQL Database or Azure SQL Managed Instance connection succeeded, expand and explore the objects within Object Explorer where the server name, the SQL Server version, and the username are displayed. These objects are different depending on the server type.

If your browser fails to connect to SQL Database when using Microsoft Entra with MFA, you can navigate to Tools > Options > Azure Cloud, and change the value for either Use system default web browser or Use Web Account Manager. For more information, see Options (Azure Services).
You can experience connection problems with Azure SQL Database. For more information on troubleshooting connection problems, visit Troubleshooting connectivity issues.
You can prevent, troubleshoot, diagnose, and mitigate connection and transient errors that you encounter when interacting with Azure SQL Database or Azure SQL Managed Instance. For more information, visit Troubleshoot transient connection errors.
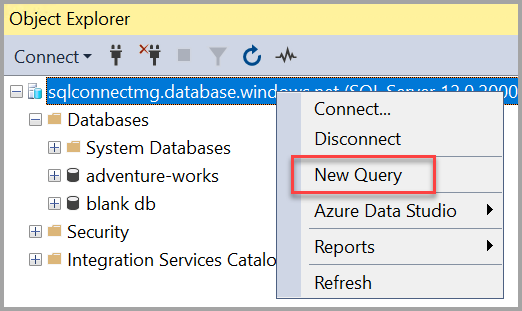
Now let's create a database named TutorialDB by following the below steps:
Right-click your server instance in Object Explorer, and then select New Query:
Paste the following T-SQL code snippet into the query window:
IF NOT EXISTS (
   SELECT name
   FROM sys.databases
   WHERE name = N'TutorialDB'
)
CREATE DATABASE [TutorialDB];
GO

ALTER DATABASE [TutorialDB]
SET QUERY_STORE = ON;
GO
Execute the query by selecting Execute or selecting F5 on your keyboard.

After the query is complete, the new TutorialDB database appears in the list of databases in Object Explorer. If it isn't displayed, right-click the Databases node, and then select Refresh.
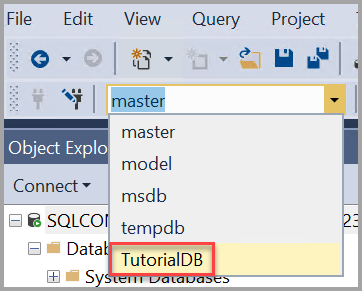
In this section, you create a table in the newly created TutorialDB database. Because the query editor is still in the context of the master database, switch the connection context to the TutorialDB database by doing the following steps:
In the database dropdown list, select the database that you want, as shown here:
Paste the following T-SQL code snippet into the query window:
USE [TutorialDB];
GO

-- Create a new table called 'Customers' in schema 'dbo'
-- Drop the table if it already exists
IF OBJECT_ID('dbo.Customers', 'U') IS NOT NULL
    DROP TABLE dbo.Customers;
GO

-- Create the table in the specified schema
CREATE TABLE dbo.Customers (
    CustomerId INT NOT NULL PRIMARY KEY, -- primary key column
    Name NVARCHAR(50) NOT NULL,
    Location NVARCHAR(50) NOT NULL,
    Email NVARCHAR(50) NOT NULL
);
GO
Execute the query by selecting Execute or selecting F5 on your keyboard.
After the query is complete, the new Customers table is displayed in the list of tables in Object Explorer. If the table isn't displayed, right-click the TutorialDB > Tables node in Object Explorer, and then select Refresh.
Now let's insert some rows into the Customers table that you created. Paste the following T-SQL code snippet into the query window, and then select Execute:
-- Insert rows into table 'Customers'
INSERT INTO dbo.Customers (
    [CustomerId],
    [Name],
    [Location],
    [Email]
)
VALUES
   (1, N'Orlando', N'Australia', N''),
   (2, N'Keith', N'India', N'keith0@adventure-works.com'),
   (3, N'Donna', N'Germany', N'donna0@adventure-works.com'),
   (4, N'Janet', N'United States', N'janet1@adventure-works.com');
GO
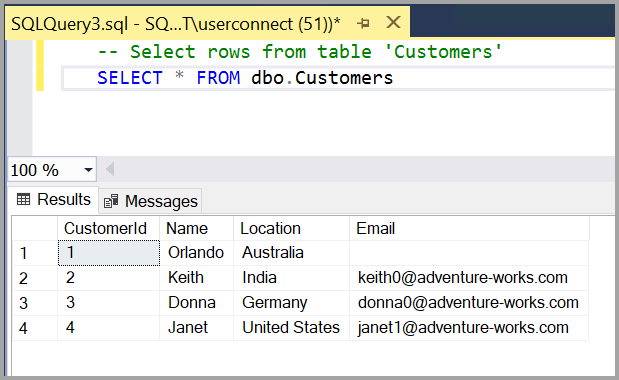
The results of a query are visible beneath the query text window. To query the Customers table and view the rows that were inserted, follow these steps:
Paste the following T-SQL code snippet into the query window, and then select Execute:
-- Select rows from table 'Customers'
SELECT * FROM dbo.Customers;
The query results are displayed under the area where the text was entered.
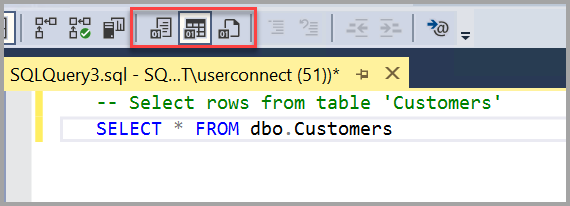
You can also modify the way results are presented by selecting one of the following options:
You can find information about the connection properties under the results of your query. After you run the previously mentioned query in the preceding step, review the connection properties at the bottom of the query window.
You can determine which server and database you're connected to, and your username.
You can also view the query duration and the number of rows returned by the previously executed query.

You can also use Azure Data Studio to connect and query SQL Server, Azure SQL Database, and Azure Synapse Analytics.
Events
Take the Microsoft Learn AI Skills Challenge
Sep 24, 11 PM - Nov 1, 11 PM
Elevate your skills in Microsoft Fabric and earn a digital badge by November 1.
Register nowTraining
Learning path
Get Started Querying with Transact-SQL - Training
Get Started Querying with Transact-SQL
Certification
Microsoft Certified: Azure Database Administrator Associate - Certifications
Administer an SQL Server database infrastructure for cloud, on-premises and hybrid relational databases using the Microsoft PaaS relational database offerings.