Note
Access to this page requires authorization. You can try signing in or changing directories.
Access to this page requires authorization. You can try changing directories.
The Windows 10 Team 2020 Update introduces support for configuring non-global admin accounts with limited permissions to manage only the Settings app on Surface Hub devices joined to a Microsoft Entra domain. This enables IT administrators to scope admin permissions specifically to Surface Hub, reducing the risk of unwanted access across the entire Microsoft Entra domain.
Important
Microsoft recommends that you use roles with the fewest permissions. This helps improve security for your organization. Global Administrator is a highly privileged role that should be limited to emergency scenarios when you can't use an existing role.
Windows 10 Team 2020 Update 2 introduces support for the LocalUsersAndGroups CSP, now the recommended method. While the RestrictedGroups CSP remains supported, it is deprecated.
Note
Before you begin, confirm that your Surface Hub is joined to Microsoft Entra and auto-enrolled in Intune. If not, reset the Surface Hub and complete the out-of-the-box (OOBE) setup with Microsoft Entra ID. Only accounts authenticated via Microsoft Entra ID can use non-global admin configurations.
Summary
The process of creating non-Global Admin accounts involves these steps:
- In Intune, create a security group containing designated Surface Hub admins.
- Use PowerShell to obtain the Microsoft Entra group’s SID.
- Create an XML file with the Microsoft Entra group SID.
- Create a Security Group containing the Surface Hub devices that the non-Global admins Security group manages.
- Create a custom Configuration profile to target the security group that contains your Surface Hub devices.
Create Microsoft Entra security groups
First, create a security group containing the admin accounts. Then create another security group for Surface Hub devices.
Create security group for Admin accounts
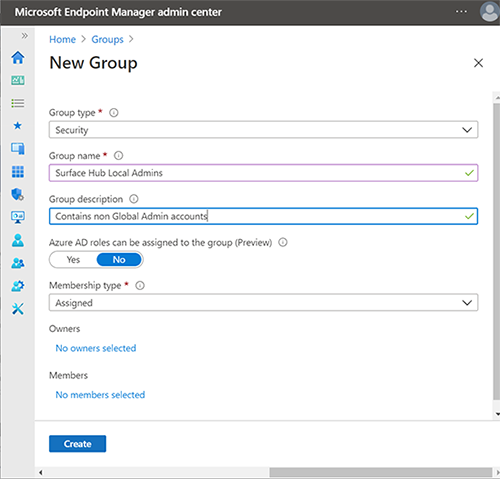
Sign in to Intune via the Microsoft Intune admin center, select Groups > New Group > and under Group type, select Security.
Enter a group name, such as Surface Hub Local Admins, and select Create.
Open the group, select Members, and choose Add members to add the designated admin accounts. To learn more about creating groups in Intune, see Add groups to organize users and devices.
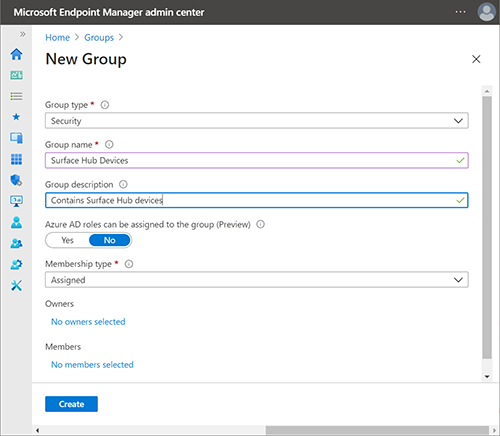
Create security group for Surface Hub devices
Repeat the previous procedure to create a separate security group for Hub devices, such as Surface Hub devices.
Obtain Microsoft Entra group SID using PowerShell
Launch PowerShell with elevated account privileges (Run as Administrator) and ensure your system is configured to run PowerShell scripts. To learn more, refer to About Execution Policies.
Sign in to your Microsoft Entra tenant.
Connect-AzureADNote
Azure AD and MSOnline PowerShell modules are deprecated as of March 30, 2024. To learn more, read the deprecation update. After this date, support for these modules are limited to migration assistance to Microsoft Graph PowerShell SDK and security fixes. The deprecated modules will continue to function through March, 30 2025.
We recommend migrating to Microsoft Graph PowerShell to interact with Microsoft Entra ID (formerly Azure AD). For common migration questions, refer to the Migration FAQ.
Be aware that versions 1.0.x of MSOnline may experience disruption after June 30, 2024.
When you're signed in to your tenant, run the following commandlet. It prompts you to "Please type the Object ID of your Microsoft Entra group."
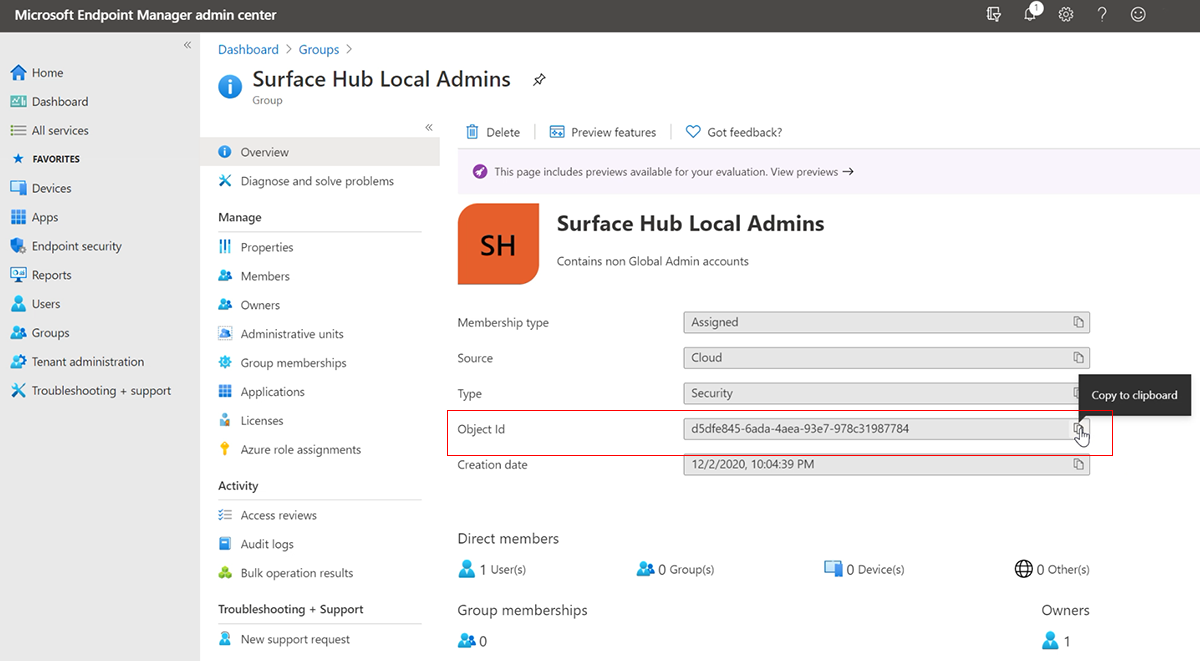
function Convert-ObjectIdToSid
{    param([String] $ObjectId)
     $d=[UInt32[]]::new(4);[Buffer]::BlockCopy([Guid]::Parse($ObjectId).ToByteArray(),0,$d,0,16);"S-1-12-1-$d".Replace(' ','-')

}
In Intune, select the group you created earlier and copy the Object ID, as shown in the following figure.
Run the following commandlet to get the security group's SID:
$AADGroup = Read-Host "Please type the Object ID of your Azure AD Group"
$Result = Convert-ObjectIdToSid $AADGroup
Write-Host "Your Azure Ad Group SID is" -ForegroundColor Yellow $Result
Paste the Object ID into the PowerShell commandlet, press Enter, and copy the Microsoft Entra group SID into a text editor.
Create XML file containing Microsoft Entra group SID
Copy the following code into a text editor:
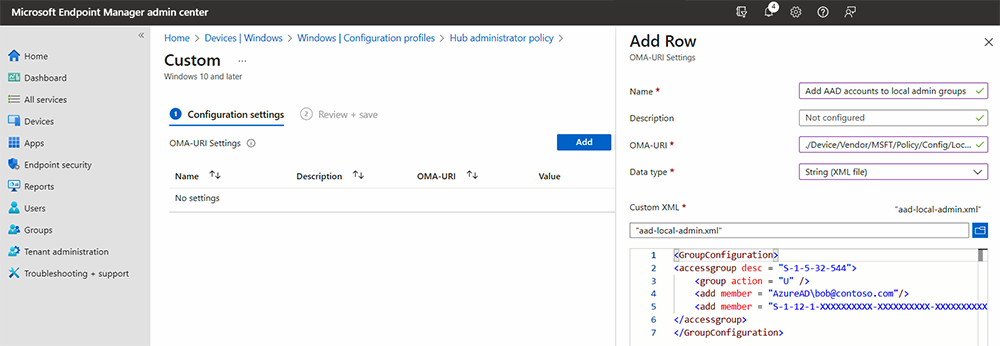
<GroupConfiguration>
<accessgroup desc = "S-1-5-32-544">
    <group action = "U" />
    <add member = "AzureAD\bob@contoso.com"/>
    <add member = "S-1-12-1-XXXXXXXXXX-XXXXXXXXXX-XXXXXXXXXX-XXXXXXXXXX"/>
</accessgroup>
</GroupConfiguration>
Replace the placeholder SID (beginning with S-1-12-1) with your Microsoft Entra group SID and then save the file as XML; for example, Microsoft Entra ID-local-admin.xml.
Note
Users can also be added directly using their User Principal Names (UPNs):
<member name="AzureAD\user@contoso.com" />
Create Custom configuration profile
In Microsoft Intune, go to Devices > Configuration profiles > Create profile.
Select Windows 10 and later for the platform. For the profile, choose Templates > Custom > Create.
Provide a name and description, then select Next.
Under Configuration settings > OMA-URI Settings, select Add.
Add a name and use the following OMA-URI:
./Device/Vendor/MSFT/Policy/Config/LocalUsersAndGroups/ConfigureNote
The RestrictedGroups/ConfigureGroupMembership policy setting allows adding or replacing local group members. However, it cannot selectively add or remove members without replacing the entire group. For Windows 10 Team 2020 Update 2, LocalUsersAndGroups is the recommended setting. Applying both policy settings to Surface Hub is unsupported and may yield unpredictable results.
Under Data type, select String XML and browse to open the XML file you created in the previous step.
Select Save.
Select Select groups to include and choose the security group you created earlier (Surface Hub devices). Select Next.
Under Applicability rules, add a Rule if desired. Otherwise, select Next and then select Create.
To learn more about custom configuration profiles using OMA-URI strings, see Use custom settings for Windows 10 devices in Intune.
Non Global admins managing Surface Hub
Members of the newly configured Surface Hub Local Admins Security group can now sign in to the Settings app on Surface Hub and manage settings.
Important
If the LocalUsersAndGroups CSP is applied, access to the Settings app by global admins is removed unless explicitly configured using the “U” action.