Note
Access to this page requires authorization. You can try signing in or changing directories.
Access to this page requires authorization. You can try changing directories.
Warning
This walkthrough (guide) provides instructions for the usage of the Surface Diagnostic Toolkit (SDT) in repair operations on Microsoft Surface devices. This guide is supplementary to the written Service Guide for each product and should be used in conjunction with the Service Guide for your Microsoft Surface device.
Glossary of Terms
The following terms are used throughout this guide.
SDT – Surface Diagnostic Toolkit
TDM – Touch Display Module is the complete screen with all layers
BMR – Bare Metal Recovery. Another name for the official service image released by Microsoft for your Surface product.
FRU – Field Replaceable Units are sub-system components such as the SIM/rSSD door, Kickstand, and rSSD. FRUs are available only to ASPs. Some replaceable units will only be available as FRUs and therefore are only supported at an ASP.
Commercial Spares/CRU – Customer Replaceable Units available to commercial customers for repair by a skilled technician.
Zip Archive – A single file that contains one or more compressed files or directories.
Software Tools & References
How To: Surface Service Guide Center
Download: Surface drivers and firmware
Download: Surface Diagnostic Toolkit (SDT)
Download: Surface Data Eraser
Download: Surface Recovery Images
Required Tools
USB 3.0 Flash Drive – 16GB for SDT
2.5mm jack Headphones
USB A Flash Drive
USB C Flash Drive
USB-C to HDMI cable
Monitor
Surface Power Supply
Service Diagnostics/Troubleshooting Overview
For general Surface support, visit www.support.microsoft.com.
To troubleshoot device feature/function problems or learn more about Surface products visit www.aka.ms/SurfaceProHelp.
If you’d like to learn more about Windows, visit aka.ms/WindowsHelp.
To learn more about the accessibility features of the Surface Pro, go to the online user guide at aka.ms/Windows-Accessibility.
Prerequisite Steps – Software
Important
Prior to running SDT for Diagnostic or Repair purposes, please ensure the following tasks are completed to ensure the best possible chance of a successful run and accurate diagnostics.
Ensure the device is updated to the latest OS/FW versions available using Windows Update.
The device must be capable of booting into a Windows user account. If it is unable to do so, please reimage the device using the Surface Recovery Image for your model.
When using a Surface Recovery Image, ensure that this custom image doesn't block PowerShell scripts from running.
Ensure that SDT is being run by an account that is also a local Admin on the device.
If after 1. and 2. SDT Touch Repair (Setup) is not running, copy the SDT folder to C:\Users\local admin user name" folder.
After clicking on Touch Repair (Setup) in SDT note if the PowerShell window opens.
If blocked, Open PowerShell as admin. Navigate to the SDT folder and run the following command: Unblock-File *
If you continue to see an error, Note the error in SDT and close the application.
This will generate the TDM calibration log file in "logfiles" folder inside the SDT folder.
When escalating this error to Partner Device Desk, please provide this log file to their technical team for review.
Surface Diagnostic Toolkit – Navigation
This section will take you through the Surface Diagnostic Toolkit in detail.
Launching the Surface Diagnostic Toolkit
Insert the USB 3.0 Flash Drive loaded with the Surface Diagnostic Toolkit
Locate Microsoft.Surface.Diagnostics.App.Wpf.exe and double-click to launch the Surface Diagnostic Toolkit application on your device.
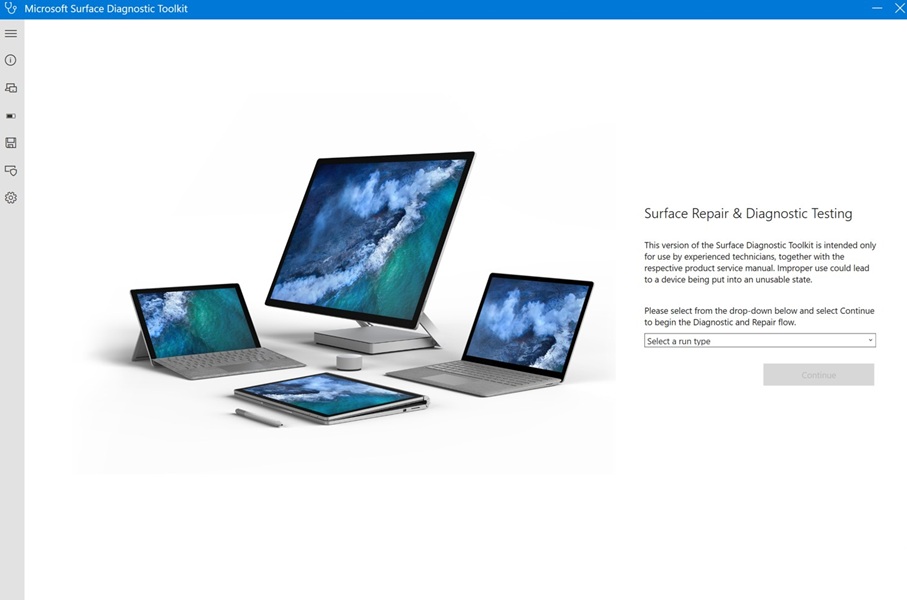
The software will launch and after a few moments of loading will arrive at the Welcome screen.
Navigating the Welcome screen
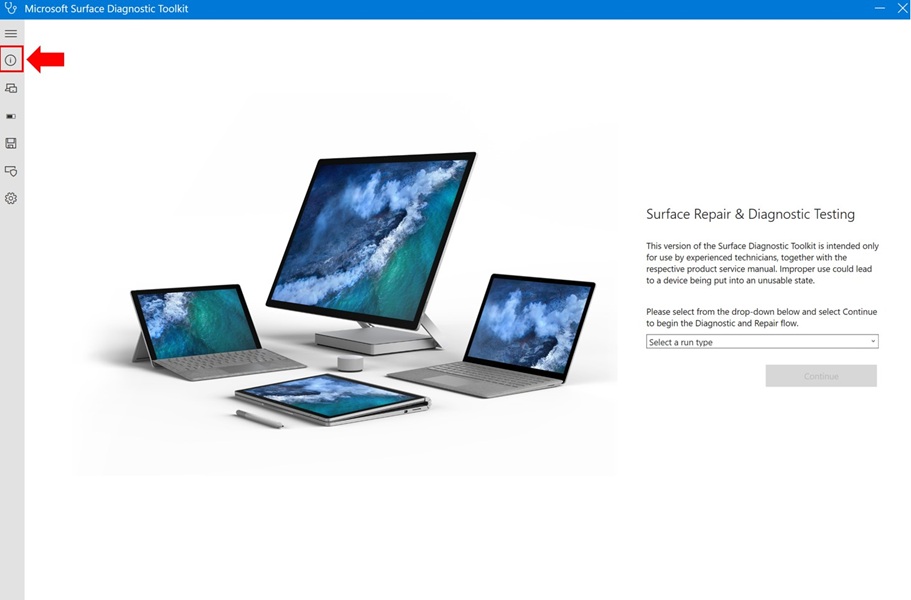
In the upper left corner, selecting the hamburger menu will bring out the Menu sidebar detailing additional sections of the Surface Diagnostic Toolkit outside of the Diagnostic and Repair workflows.
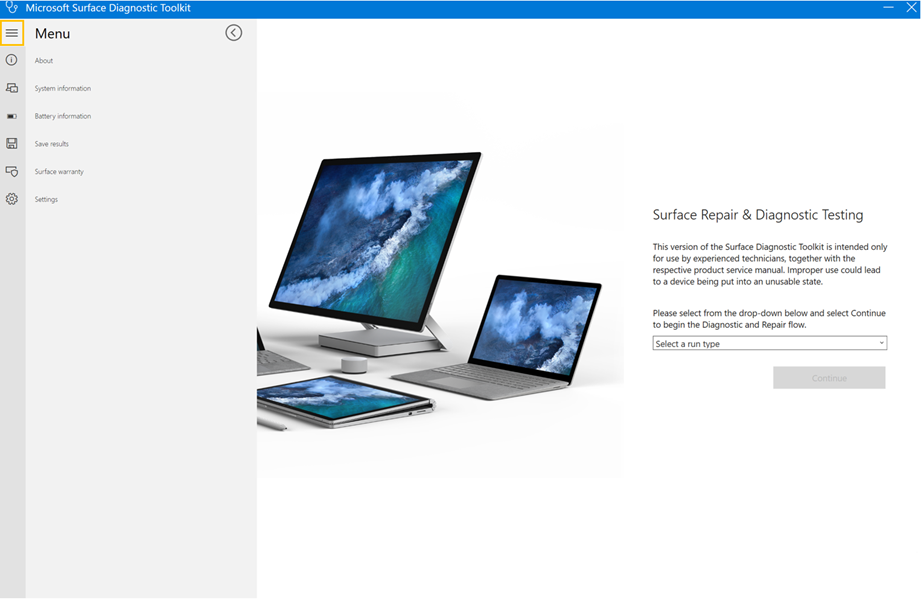
About – provides the user with the software information for SDT including build version, current language, modality, and location of the log file for troubleshooting purposes.
System Information – provides the user with key device information including serial number, device model, and device specifications.
Battery Information – provides the user with a read out of the current statistics for the battery installed in a device if the device has a battery installed. This includes the battery wear level, number of charge/discharge cycles, and current charge.
Save Results – allows the user to save an output of all completed diagnostic information to a file on the device for review.
Surface warranty – displays the devices currently warranty information from Microsoft based on the devices serial number. Requires a connection to the internet.
Settings – Allows the user to change the display language for the SDT software to another supported language.
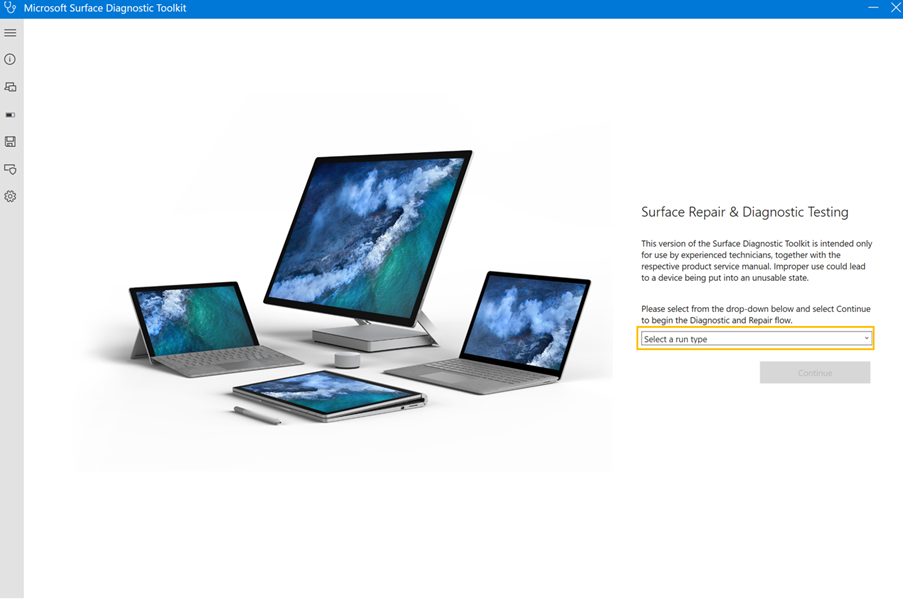
On the right side of the screen, there is a drop-down menu that allows you to choose between the diagnostic workflow and the repair workflow.
The Diagnostic workflow allows you to perform a series of diagnostic tests to determine the functionality of the devices core functions.
The Repair workflow allows you to perform targeted calibration and authentication workflows as detailed in the written Service Guide to enable the installation of a replacement Microsoft part.
Select an option from the drop-down menu and select Continue to continue to the workflow selection screen.
The Results Screen
The results screen is the end screen that appears once you have completed the Diagnostic or Repair workflows. This screen displays the outputs of any completed diagnostic test or repair script.
Note
Key Tip: You can use the Save Results icon from the Side Bar on the left to save an output of all results in an easy to-read format.
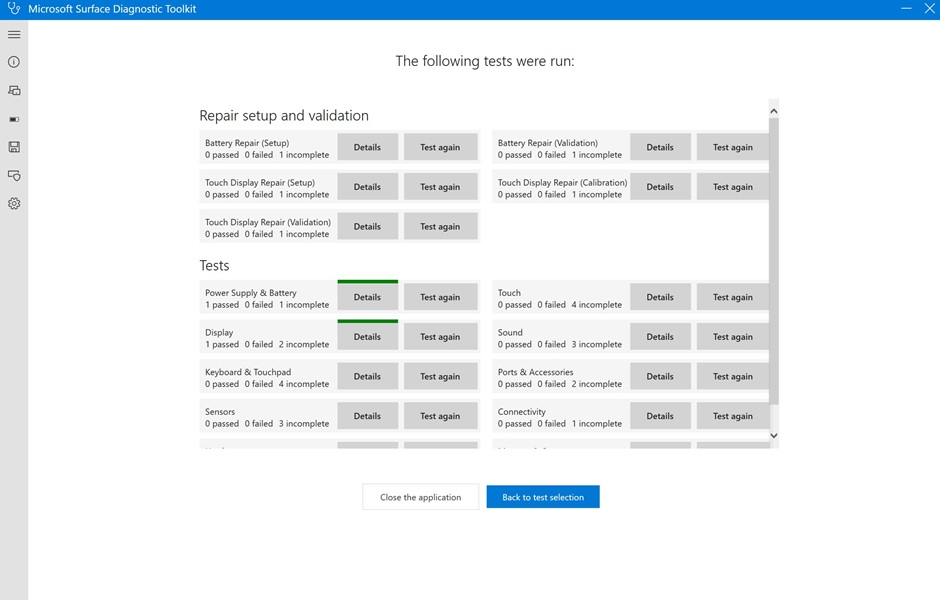
The color above the Details box denotes the result of the test. You can select the Details button next to each test to learn more details about the test outcomes and potential next steps.
Green: Tests passed.
Yellow: Additional details available – test failures, additional information, next steps.
Surface Diagnostic Toolkit – Diagnostic Workflow
This section will detail the Diagnostic workflow in the SDT tool. Please see Navigating the Welcome screen for details on how to access this workflow.
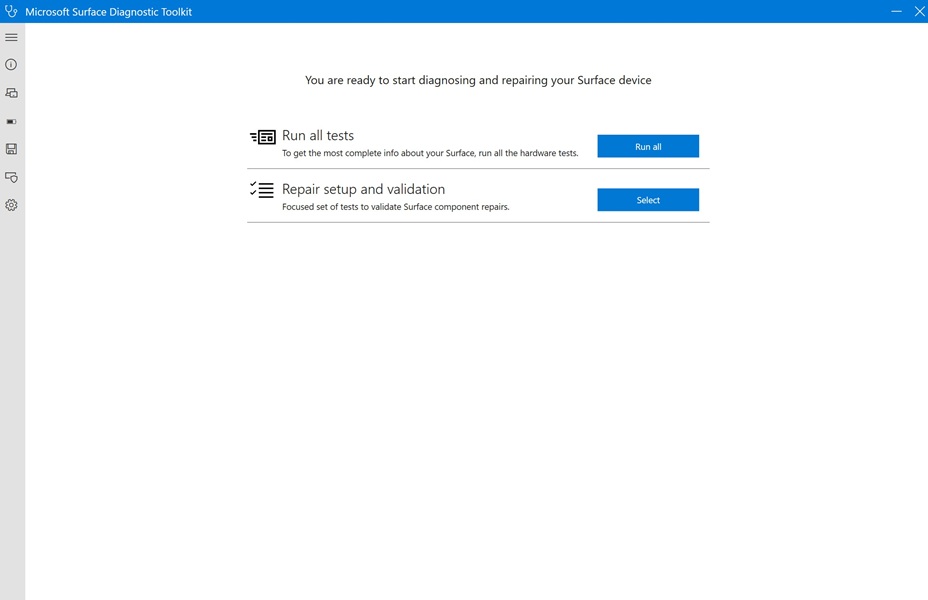
Select Diagnostic in the drop-down menu on the welcome screen and select Continue to be brought to the Diagnostic workflow home screen.
On this screen there are two options:
Run all tests – automatically begins to run thru all diagnostics tests in the SDT testing suite. Useful for fully evaluating a device to ensure complete functionality. Note: most tests in SDT require user interaction or input to complete.
Repair setup and validation – brings the user to a screen where they can select from the suite of tests to run a customized list. Useful for targeted testing of specific components.
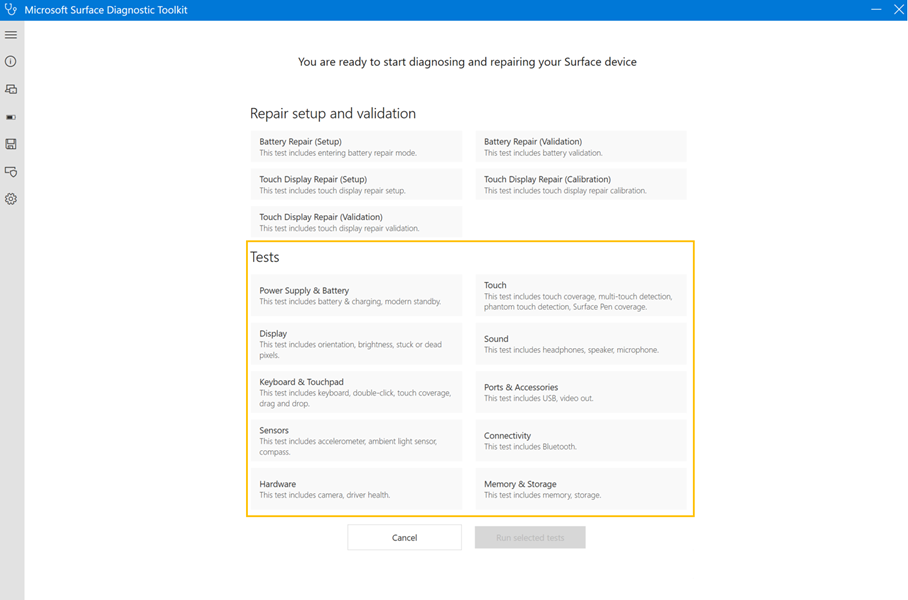
Diagnostic Workflow – Test Overview
This section will provide details for each of the tests in the SDT diagnostic suite. Please note that not every test will be present for every model of Microsoft Surface as the test suite is tailored to the device’s capabilities.
Note
It's critical to follow the instructions for each test as detailed on the screen to ensure the most accurate result.
| Diagnostic Test | User Action (if required) | What to look for |
|---|---|---|
| Battery & Charging | When directed, unplug the device's power supply, and plug it back in. | The test will automatically pass or fail depending on whether the device switched charging states. |
| Modern Standby | No user action required. | The test will automatically fail based on a series of checks against Modern Standby support. |
| Touch Coverage | Trace the spiral on the screen with your finger. | Your finger input should be recorded on the screen with no gaps or stuttering. |
| Multi-touch Detection | Touch the screen with multiple fingers. | The counter on the screen should accurately count each finger placed on the screen (up to 10). |
| Phantom Touch Detection | Do not touch the screen for 5 seconds. | No touch input should be detected during the countdown; any input results in a failed test. |
| Brightness | The screen will adjust from 0% to 100% brightness. | Ensure the screen changes brightness evenly and successfully as expected. |
| Stuck or Dead Pixels | The screen will display a series of colored screens and images. Click the trackpad to move. | Look for any pixels that are the wrong color or stuck (white/black). |
| Headphones | Plug in headphones and listen for tones played by the software. | Listen for distorted or absent sound. |
| Speaker | Audio will be played back through the left and right speakers. | Listen for distorted or absent sound. |
| Microphone | Count down from 5 to 1 aloud while the device records. Playback follows. | Listen for distorted or absent recorded audio. |
| Keyboard | Ensure the correct keyboard language is selected. Press each key until all keys are tested. | Look for keys that do not register on screen. |
| Touchpad Double-Click | Using the touchpad, double-click the icon on the screen. | Verify the ability to successfully double-click the icon. |
| Touchpad Touch Coverage | Trace the surface of the touchpad until the entire image on the screen is filled in. | Look for areas that do not fill in when touched. |
| Touchpad Drag and Drop | Drag the document icon on the screen to the recycle bin icon. | Verify the ability to successfully drag the document icon to the recycle bin. |
| USB | Plug a USB flash drive into each USB port and ensure detection on the screen. | Verify whether the USB device is detected when plugged into each port. |
| Video Out | Connect an external monitor to a USB-C port on your Surface. | Ensure the external monitor powers on and displays an image. |
| Ambient Light Sensor | Move the device around and observe the Ambient Light Sensor bar. | The sensor bar should move with changing brightness levels in the room. |
| Bluetooth | The test displays all Bluetooth devices detected by the onboard Bluetooth radio. | Verify the device displays any Bluetooth devices on-screen. |
| Camera | The screen displays output from each camera on the device. | Look for failure to output or distortion in the image. |
| Driver Health | No user action needed. | The test automatically passes or fails based on the state of the device’s drivers. |
| Memory | No user action needed. | The test automatically passes or fails based on the state of the device’s memory. |
| Storage | No user action needed. | The test automatically passes or fails based on the state of the device’s storage. |
Surface Diagnostic Toolkit – Repair Workflow
This section will detail the Diagnostic workflow in the SDT tool. Please see Navigating the Welcome screen for details on how to access this workflow.
Select Repair in the drop-down menu on the welcome screen and Select Continue to be brought to the Repair workflow home screen.
On this screen there are two options:
Run all tests – automatically begins to run thru all diagnostic tests in the SDT testing suite. Does not contain the repair scripts.
Repair setup and validation – brings the user to a screen where they can select from the suite of tests to run a customized list. This is where the Repair setup and validation scripts are located.
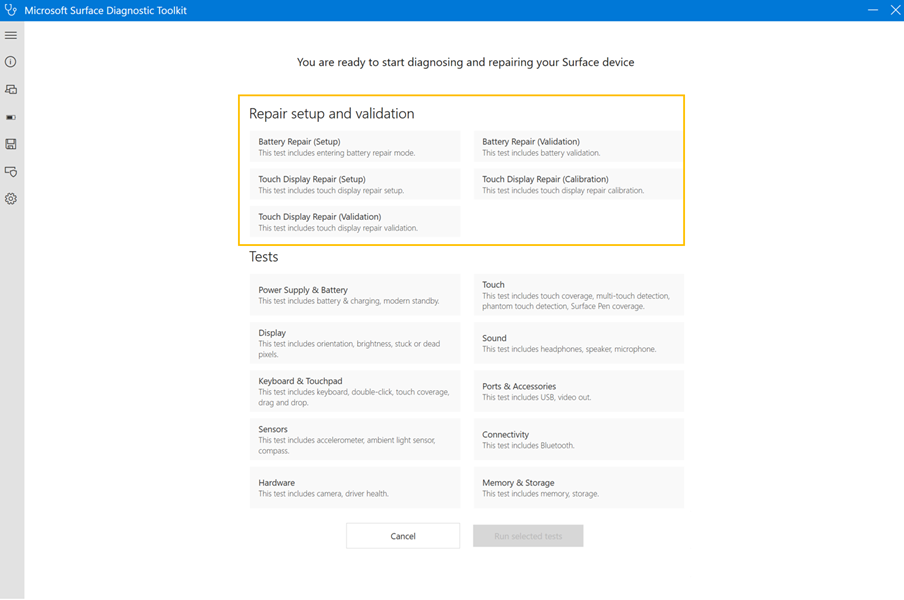
Repair Workflow – Script Overview
This section will provide details for each of the repair scripts in the SDT diagnostic suite. Please note that each script is only required for specific repairs and is called out in the Service Guide for your device. The repair scripts below are organized by required repair (Battery, Touch Display Module, PCBA/Motherboard, and Trackpad).
Note
It's critical to follow the instructions for each script as detailed on the screen to ensure a successful result.
| FRU | Repair Action and Required Scripts | Purpose |
|---|---|---|
| Battery Replacement | ||
| Run Battery Repair (Setup): Prior to replacing the battery, follow the on-screen instructions and allow the device to shut down when prompted. | This step prepares the device to receive a replacement battery. | |
| Run Battery Repair (Validation): After replacing the battery, follow the on-screen instructions to authenticate and evaluate the installed battery. Note: This script requires a connection to the internet to successfully authenticate the replacement battery with Microsoft. Additionally, the Surface Management Extension also needs to be installed and up to date. The latest version of the Surface Management Extension can be downloaded here. |
This script checks with Microsoft to ensure the battery installed is an authentic Microsoft replacement Surface battery. It then evaluates the battery device functions to ensure all are within defined parameters. | |
| Touch Display Module (TDM) Replacement | ||
| Run Touch Display Repair (Setup): Follow the onscreen instructions and allow the device to shut down when prompted. It is recommended to do this before starting a display replacement. | This script prepares the device to accept a new display. This step must be completed before running Display Calibration and Validation steps on a replacement display. | |
| Run Touch Display Repair (Calibration): After replacing the TDM, follow the on-screen instructions to perform a calibration of the display. | This script applies a calibration dataset to the display to ensure optimal operation. It is required even if the original TDM was removed and reused. | |
| Run Touch Display Repair (Validation): After replacing the TDM and running the Touch Display Repair (Calibration) script, follow the on-screen prompts to complete the targeted diagnostic tests to evaluate core display functionality. | This script performs a series of targeted diagnostic tests to ensure the display is functioning to specification. It is required even if the original TDM was removed and reused. | |
| PCBA/Motherboard Replacement | ||
| Run Battery Repair (Validation): After replacing the PCBA/Motherboard, follow the on-screen instructions to authenticate and evaluate the installed battery. Note: This script requires a connection to the internet to successfully authenticate the replacement battery with Microsoft. Additionally, the Surface Management Extension also needs to be installed and up to date. The latest version of the Surface Management Extension can be downloaded here. |
This script checks with Microsoft to ensure the battery installed is an authentic Microsoft Surface battery. It then evaluates the battery device functions to ensure all are within defined parameters. | |
| Run Touch Display Repair (Calibration): After replacing the PCBA/Motherboard, follow the on-screen instructions to perform a calibration of the display. | This script applies a calibration dataset to the new display to ensure optimal operation after PCBA/Motherboard replacement. It is required even if the original TDM was removed and reused. | |
| Trackpad Replacement | ||
| Run Touchpad Repair (Setup): Prior to replacing the trackpad, follow the on-screen instructions. At the end of this step, you’ll be prompted to shut down your device. Note: You must accept shutdown of the device for the test to succeed. |
This script includes entering the Battery Repair (Setup) mode and preps the device to receive a new trackpad. | |
| Run Touchpad Repair (Validation): After completing the trackpad swap, power on the device and run Touchpad Repair (Validation) and follow the instructions until the test is completed. | This script performs a series of targeted diagnostic tests to ensure the trackpad is functioning to specification. | |
| C-cover Replacement | ||
| Run Touchpad Repair (Setup): Prior to replacing the trackpad, follow the on-screen instructions. At the end of this step, you’ll be prompted to shut down your device. Note: You must accept shutdown of the device for the test to succeed. |
This script includes entering the Battery Repair (Setup) mode and preps the device to receive a new trackpad. | |
| Run Touchpad Repair (Validation): After completing the trackpad swap, power on the device and run Touchpad Repair (Validation) and follow the instructions until the test is completed. | This script performs a series of targeted diagnostic tests to ensure the trackpad is functioning to specification. |
Reporting Issues and Log Locations
In instances where you encounter an issue with the Surface Diagnostic Toolkit, Microsoft may request log files to determine the root cause of the problem.
Important
If you encounter a bug while running SDT, please complete the test completely until you reach the test summary page or the main page of the application. This will provide the most complete log files for review.
Reporting a software error with SDT
If an error is encountered while running the Surface Diagnostic Toolkit (SDT) on a device in for repair, the following information must be gathered and included with the escalation to ensure proper support.
| ASP Company: | Insert Company Name |
|---|---|
| Site: | Insert Partner Work / Store location |
| Surface Device Models: | Insert the Model of Surface device impacted |
| Number of Impacted Devices: | Insert the number of impacted devices experiencing the issue |
| Surface Diagnostic Toolkit (SDT) Details: | Insert Surface Diagnostic Toolkit details found in the About section here. Instructions are located below. |
| Issue Description: | Provide a quick summary of your issue and any steps to recreate it. |
| Logs Attached: | Attach logs to this email in a ZIP format. Additional logs are required for issues related to Display Calibration. All Logs pertinent to your experienced issue must be included for triage purposes. |
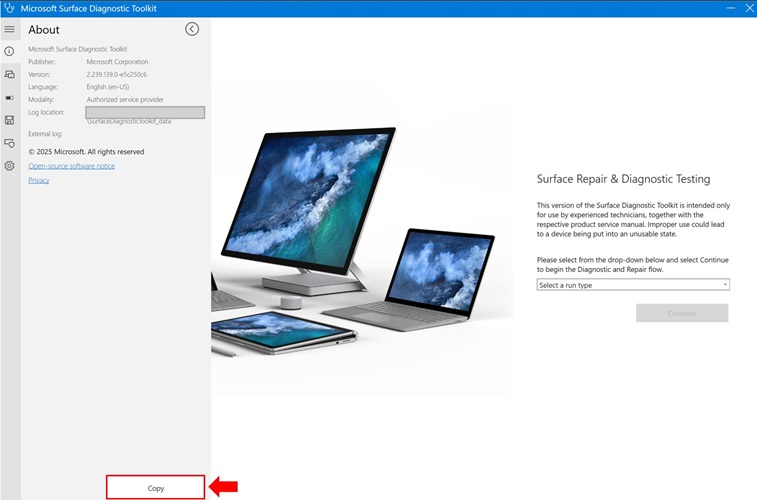
Retrieving Surface Diagnostic Toolkit Details
Launch the Surface Diagnostic Toolkit (SDT) on a device.
At the SDT launch screen, locate the information symbol (circle with i) in the upper left corner of the screen, and select it to launch the About panel.
- Select Copy in the left section of the screen and paste the contents into the Surface Diagnostic Toolkit (SDT) Details section above.
Locating Touch/TDM Logs
If you are experiencing an error in SDT related to the calibration of a display pre or post-repair, also provide the calibration logs:
Navigate to the folder directory where the Surface Diagnostic Toolkit executable (Microsoft.Surface.Diagnostics.App.Wpf.exe) is located. Locate the folder titled "LogFiles" and navigate to it.
Copy the contents of the LogFiles folder and create a ZIP archive. Instructions for creating a ZIP archive can be found here.
Attach the ZIP archive to this email.
Note
The LogFiles location will only be present if a Display Calibration has been attempted. If the folder does not exist or no logs are present, attempt the Display Calibration again and ensure Surface Diagnostic Toolkit reaches the Results screen before exiting the program.
Locating SDT Logs
General SDT logs are located at the folder location identified in the About section in SDT in the Log Location entry of the About section. Instructions to locate the About section can be found in the Grabbing Surface Diagnostic Toolkit Details section of this email.
Navigate to the folder location identified and make a copy of all folders located in the SurfaceDiagnosticToolkit_data folder.
Once copied, create a ZIP archive of the folders and all content. Instructions for creating a ZIP archive can be found here.