Note
Access to this page requires authorization. You can try signing in or changing directories.
Access to this page requires authorization. You can try changing directories.
With Operations Manager, you can provide credentials for an unprivileged account to be elevated on a UNIX or Linux computer using sudo, allowing the user to run programs or access files that have the security privileges of another user account. For agent maintenance, you also have the ability to use Secure Shell (SSH) keys instead of a password for secure communication between Operations Manager and the targeted computer.
Note
Operations Manager supports SSH Key-based authentication with key file data in the PuTTY Private Key (PPK) format. Currently supports SSH v.1 RSA keys and SSH v.2 RSA and DSA keys.
To obtain and configure the SSH key from the UNIX and Linux computer, you need the following software on your Windows-based computer:
- A file transfer tool, such as WinSCP, to transfer files from the UNIX or Linux computer to the Windows-based computer.
- The PuTTY program, or a similar program, to run commands on the UNIX or Linux computer.
- The PuTTYgen program to save the private SHH key in OpenSSH format on the Windows-based computer.
Note
The sudo program exists at different locations on UNIX and Linux operating systems. To provide uniform access to sudo, the UNIX and Linux agent installation script creates the symbolic link /etc/opt/microsoft/scx/conf/sudodir to point to the directory expected to contain the sudo program. The agent then uses this symbolic link to invoke sudo.
When the agent is installed this symbolic link is created automatically, there are no additional actions required on standard UNIX and Linux configurations; however, if you have sudo installed at a non-standard location, you should change the symbolic link to point to the directory where sudo is installed. If you change the symbolic link, its value is preserved across uninstall, re-install, and upgrade operations with the agent.
Configure an account for sudo elevation
Note
The information provided in this section walks through configuring an example user, scomuser, and grants it full rights on the client computer.
If you already have user accounts and/or want to setup Low Privilege monitoring, sudoers templates are available and grant only the permissions needed for successful monitoring and maintenance operations. For more information, see: Sudoers templates for elevation in UNIX/Linux monitoring
The following procedures create an account and sudo elevation by using scomuser for a user name.
Create a user
- Sign in the UNIX or Linux computer as
root - Add the user:
useradd scomuser - Add a password and confirm the password:
passwd scomuser
You can now configure sudo elevation and create an SSH key for scomuser, as described in the following procedures.
Configure sudo elevation for the user
Sign in the UNIX or Linux computer as
rootUse the visudo program to edit the sudo configuration in a vi text editor. Run the following command:
visudoFind the following line:
root ALL=(ALL) ALLInsert the following line after it:
scomuser ALL=(ALL) NOPASSWD: ALLTTY allocation isn't supported. Ensure the following line is commented out:
# Defaults requirettyImportant
This step is required for sudo to work.
Save the file and exit visudo:
- Press
ESCthen: (colon)followed bywq!, and then pressEnterto save your changes and exit gracefully.
- Press
Test the configuration by entering in the following two commands. The result should be a listing of the directory without being prompted for a password:
su - scomuser
sudo ls /etc
You can now access the scomuser account by using its password and sudo elevation, allowing you to specify credentials in task and discovery wizards, and within RunAs Accounts.
Create an SSH key for authentication
Tip
SSH keys are only used for agent maintenance operations and are not used for monitoring, ensure you're creating the key for the correct user if using multiple accounts.
The following procedures create an SSH key for the scomuser account that was created in the previous examples.
Generate the SSH key
- Sign in as
scomuser. - Generate the key by using the Digital Signature Algorithm (DSA) algorithm:
ssh-keygen -t dsa- Note the optional passphrase if you provided it.
The ssh-keygen utility creates the /home/scomuser/.ssh directory with the private key file id_dsa and the public key file id_dsa.pub inside, these files are used in the following procedure.
Configure a user account to support the SSH key
- At the command prompt, type the following commands. To navigate to the user account directory:
cd /home/scomuser - Specify exclusive owner access to the directory:
chmod 700 .ssh - Navigate to the .ssh directory:
cd .ssh - Create an authorized keys file with the public key:
cat id_dsa.pub >> authorized_keys - Give the user read and write permissions to the authorized keys file:
chmod 600 authorized_keys
You can now copy the private SSH key to the Windows-based computer, as described in the next procedure.
Copy the private SSH key to the Windows-based computer and save in OpenSSH format
- Use a tool, such as WinSCP, to transfer the private key file
id_dsa(with no extension) from the client to a directory on your Windows-based computer. - Run PuTTYgen.
- In the PuTTY Key Generator dialog box, select the Load button, and then select the private key
id_dsathat you transferred from the UNIX or Linux computer. - Select Save private key and name and save the file to the desired directory.
- You can use the exported file within a maintenance RunAs account configured for
scomuser, or when performing maintenance tasks through the console.
You can use the scomuser account by using the SSH key and sudo elevation for specifying credentials in Operations Manager wizards and for configuring Run As accounts.
Important
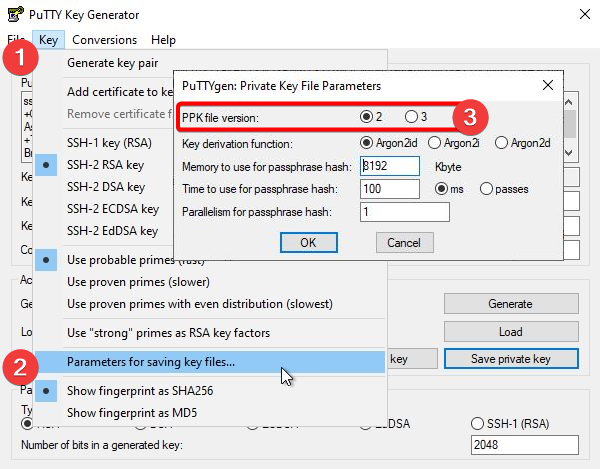
PPK file version 2 is the only version currently supported for System Center Operations Manager.
By default, PuTTYgen is set to use PPK file version 3. You may change the PPK file version to 2 by going to the toolbar and selecting Key > Parameters for saving key files..., then select the radio button for 2 for PPK file version.
Next steps
- Review Credentials You Must Have to Access UNIX and Linux Computers to understand how to authenticate and monitor your UNIX and Linux computers.
- Review Configuring SSL Ciphers if you need to reconfigure Operations Manager to use a different cipher.