Install Service Manager on four computers
When you're ready to move System Center - Service Manager into a production environment, or if you want to maximize performance and scalability, you can consider an installation topology in which each part of the Service Manager installation resides on its own computer. This topology requires the use of four computers, as shown in figure 3.
Figure 3: Four-computer topology
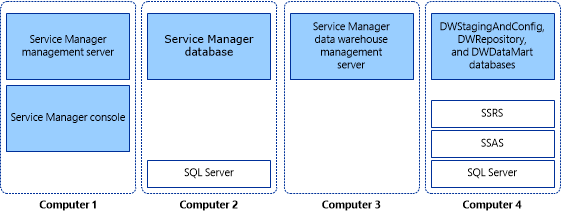
In this deployment scenario, you install Microsoft SQL Server only on the computers that hosts databases (computers 2 and 4). You install SQL Server Reporting Services (SSRS) and SQL Server Analysis Services (SSAS) on the computer that hosts the data warehouse databases (computer 4).
Important
For this release, Service Manager doesn't support case-sensitive instance names. Setup will display a warning if you attempt to install Service Manager on a case-sensitive instance of Microsoft SQL Server.
Install the Service Manager management server (four-computer scenario)
The following procedure describes how to install the System Center - Service Manager management server, the Service Manager database, the data warehouse management server, data warehouse databases, and the Service Manager console in a four-computer topology. You start the deployment process by installing the Service Manager management server and the Service Manager console on one computer and the Service Manager database on a second computer. Before you start, ensure that Microsoft SQL Server 2016 is installed on the computer that will host the Service Manager database.
During Setup, you'll be prompted to provide credentials for the following accounts:
Management group administrator
Service Manager services account
Service Manager workflow account
For more information about the permissions that these accounts require, see Accounts Required During Setup.
Install the Service Manager management server, Service Manager database, and console
Sign in to the computer that will host the Service Manager management server by using an account that has administrative rights.
On the System Center Service Manager installation media, double-click the Setup.exe file.
On the Service Manager Setup Wizard page, select Service Manager management server.
On the Product registration page, in the Product key boxes, enter the product key that you received with Service Manager, or as an alternative, select Install as an evaluation edition (180 day trial). Read the Microsoft Software License Terms, and, if applicable, select I have read, understood, and agree with the terms of the license agreement, and select Next.
On the Installation location page, verify that sufficient free disk space is available. If necessary, select Browse to change the location of where the Service Manager management server will be installed. Select Next.
On the System check results page, ensure that the prerequisite check passed or at least passed with warnings.
If the prerequisite checker determines that the Microsoft Report Viewer Redistributable hasn't been installed, select Install Microsoft Report Viewer Redistributable. After the Microsoft Report Viewer Redistributable 2008 (KB971119) Setup Wizard completes, select Check prerequisites again. Select Next.
On the Configure the Service Manager database page, in the Database server field, enter the name of the computer that will host the Service Manager database, and press the TAB key. Ensure that SQL Server instance box is set to the desired SQL Server instance and that Create a new database is selected, and select Next. For example, enter Computer 2 in the Database server box.
Important
A warning message appears if you're using the default collation (SQL_Latin1_General_CP1_CI_AS). Support for multiple languages in Service Manager isn't possible when you're using the default collation. If later you decide to support multiple languages using a different collation, you have to reinstall SQL Server. See Planning Guide for System Center - Service Manager.
On the Configure the Service Manager management group page, complete these steps:
In the Management group name box, enter a unique name for the group name.
Important
Management group names must be unique. Don't use the same management group name even when you're deploying a Service Manager management server and a Service Manager data warehouse management server. Furthermore, don't use the management group name that is used for Operations Manager.
In the Management group administrators areas, select Browse, enter the user or group that you want to be the Service Manager administrator, and select Next. For example, select the group Woodgrove\SM_Admins.
On the Configure the account for Service Manager services page, select Domain account; specify the user name, password, and domain for the account; and select Test Credentials. After you receive a The credentials were accepted message, select Next.
On the Configure the Service Manager workflow account page, select Domain account; specify the user name, password, and domain for the account; and select Test Credentials. After you receive a The credentials were accepted message, select Next.
On the Diagnostic and usage data page, indicate your preference for sharing your Service Manager diagnostic and usage data with Microsoft. As an option, select Privacy statement for System Center Service Manager, and select Next.
On the Use Microsoft Update to help keep your computer secure and up-to-date page, indicate your preference for using Microsoft Update to check for Service Manager updates. If you want Windows Update to check for updates, select Initiate machine wide Automatic update. Select Next.
On the Installation summary page, select Install.
On the Setup completed successfully page, we recommend that you leave Open the Encryption Backup or Restore Wizard selected, and select Close. For more information about backing up the encryption key, see Completing Deployment by Backing Up the Encryption Key.
Install the Service Manager data warehouse (four-computer scenario)
To start deployment of the System Center - Service Manager data warehouse and data warehouse databases, install the data warehouse management server on one computer (for example, computer 3), and all of the data warehouse databases on another computer (for example, computer 4).
During Setup, you'll be prompted to provide credentials for the following accounts:
Management group administrator
Service Manager services account
Reporting account
Analysis Services account
For more information about the permissions that these accounts require, see Accounts Required During Setup.
The data warehouse databases include the following three databases: DWStagingAndConfig, DWRepository, and DWDataMart. The first two databases, DWStagingAndConfig and DWRepository, must reside on the same instance of Microsoft SQL Server. The DWDataMart database can reside on a separate instance of SQL Server. The optional OMDWDataMart and CMDWDataMart databases can reside together or separately on their own instances of Microsoft SQL Server.
Install a data warehouse management server
Because, in this scenario, the computer that hosts SQL Server Reporting Services (SSRS) isn't the same computer that hosts the data warehouse management server, you've to prepare the computer that will remotely host SSRS for Service Manager. See Manual Steps to Configure the Remote SQL Server Reporting Services before continuing with this procedure.
Sign in to the computer that will host the data warehouse management server by using an account that has administrator rights. For example, run Setup on Computer 3.
On the System Center Service Manager installation media, double-click the Setup.exe file.
On the Service Manager Setup Wizard page, select Service Manager data warehouse management server.
On the Product registration page, in the Product key boxes, enter the product key that you received with Service Manager, or as an alternative, select Install as an evaluation edition (180 day trial). Read the Microsoft Software License Terms, and, if applicable, select I have read, understood, and agree with the terms of the license agreement, and select Next.
On the Installation location page, verify that sufficient free disk space is available, and select Next. If necessary, select Browse to change the location where the Service Manager management server will be installed.
On the System check results page, verify that prerequisites passed or at least passed with warnings, and select Next.
On the Configure data warehouse databases page, in the Database server box, enter the computer name of the physical computer that will host the data warehouse databases, the SQL server port, and Database name for all three data warehouse databases, and select Next.
Important
A warning message appears if you're using the default collation (SQL_Latin1_General_CP1_CI_AS). Support for multiple languages in Service Manager isn't possible when you're using the default collation. If later you decide to support multiple languages using a different collation, you have to reinstall SQL Server. See Planning Guide for System Center - Service Manager.
In the list of the three databases, select Data Mart. In the Database server box, enter the computer name of the server that will host the Data Mart database. For example, enter Computer 4, and then press the TAB key. When Default appears in the SQL Server instance box, select Next.
On the Configure additional data warehouse datamarts page, complete these steps:
Select OM Data mart. In the Database server box, enter the computer name of the computer that will host the Operations Manager data mart database. For example, enter Computer 4, and then press the TAB key.
Select CM Data mart. In the Database server box, enter the computer name of the computer that will host the CM data mart database. For example, enter Computer 4, and then press the TAB key.
Select Next.
On the Configure the data warehouse management group page, complete these steps:
In the Management group name box, enter a unique name for the group name.
Caution
Management group names must be unique. Don't use the same management group name even when deploying a Service Manager management server and a Service Manager data warehouse management server. Furthermore, don't use the management group name that is used for Operations Manager. All data warehouse management group names have the prefix DW_.
Select Browse, enter the user or group that you want to be the Service Manager administrator, and select Next.
Note
The group Domain\Administrators isn't allowed as a management group administrator.
On the Configure the reporting server for the data warehouse page, follow these steps:
In the Report server box, enter the name of the computer that will host the reporting server. In this example, this will be the computer that hosts the data warehouse database, enter Computer 4, and then press the TAB key.
Note
- Manually configure the SQL Server Reporting Services even when SSRS and data warehouse management server MS are on the same machine. For detailed information, see Manual steps to configure remote SQL Server Reporting Services.
- The URL that you are presented with might not be in the form of a fully qualified domain name (FQDN). If the URL as presented can't be resolved in your environment, you'll need to configure SQL Server Reporting URLs so that the FQDN is listed in the Web service URL field. For more information, see the TechNet article Configure a URL.
Verify that Default is displayed in the Report server instance box.
Because you followed the procedure Manual Steps to Configure the Remote SQL Server Reporting Services, select the I have taken the manual steps to configure the remote SQL Server Reporting Services as described in the Service Manager Deployment Guide checkbox, and select Next.
On the Configure the account for Service Manager services page, select Domain account, specify the user name, password, and domain for the account, and select Test Credentials. After you receive a The credentials were accepted message, select Next.
For example, enter the account information for the domain user SM_Acct.
On the Configure the reporting account page, specify the user name, password, and domain for the account, and select Test Credentials. After you receive a The credentials were accepted message, select Next.
On the Configure Analysis Service for OLAP cubes page, in the Database server box, enter the computer name of the server that will host the Analysis Services database, and then press the TAB key. When Default appears in the SQL Server instance box, select Next. For example, enter Computer 4 in the Database server box.
Warning
If you're installing SQL Server Analysis Services on a computer other than the computer hosting the data warehouse management server and there is a firewall in your environment, you must ensure that the proper firewall ports are opened. For more information, see Port Assignments for Service Manager.
On the Configure Analysis Services credential page, select a domain account, select Domain account, specify the user name, password, and domain for the account, and select Test Credentials. After you receive a The credentials were accepted message, select Next.
Note
The account you specify here must have administrator rights on the computer hosting SQL Server Analysis Services.
On the Diagnostic and usage data page, indicate your preference for sharing your Service Manager diagnostic and usage data with Microsoft. As an option, select Privacy statement for System Center Service Manager, and select Next.
On the Use Microsoft Update to help keep your computer secure and up-to-date page, indicate your preference for using Microsoft Update to check for Service Manager updates. Select Initiate machine wide Automatic update if you want Windows Update to check for updates. Select Next.
On the Installation summary page, select Install.
On the Setup completed successfully page, we recommend that you leave Open the Encryption Backup or Restore Wizard selected, and select Close. For more information about backing up the encryption key, see Completing Deployment by Backing Up the Encryption Key.
After the installation, do the following:
Disable all the Data Warehouse jobs. To do this, open the Service Manager shell, and then run the following commands:
$DW ='DWMS Servername'

Get-scdwjob -Computername $DW | %{disable-scdwjobschedule -Computername $DW -jobname $_.Name}
Make the required changes in the following PowerShell script based on the data source views in your environment, and then run the script by using elevated privileges:
$SSAS_ServerName = "ssas servername" # - to be replaced with Analysis Service instance Name

[System.Reflection.Assembly]::LoadWithPartialName("Microsoft.AnalysisServices")
$Server = New-Object Microsoft.AnalysisServices.Server
$Server.Connect($SSAS_ServerName)
$Databases = $Server.Databases
$DWASDB = $Databases["DWASDataBase"]

#update DWDatamart dsv. Comment the below 3 commands if DWdatamart dsv isn't present

$DWASDB.DataSourceViews["DwDataMart"].Schema.Tables["OperatingsystemDim"].Columns["PhysicalMemory"].DataType  =  [decimal]

$DWASDB.DataSourceViews["DwDataMart"].Schema.Tables["LogicalDiskDim"].Columns["Size"].DataType  =  [decimal]

$DWASDB.DataSourceViews["DwDataMart"].Update([Microsoft.AnalysisServices.UpdateOptions]::ExpandFull)

#update CMDatamart dsv.Comment the below 2 commands if cmdatamart dsv isn't present

$DWASDB.DataSourceViews["CMDataMart"].Schema.Tables["OperatingsystemDim"].Columns["PhysicalMemory"].DataType  =  [decimal]

$DWASDB.DataSourceViews["CMDataMart"].Update([Microsoft.AnalysisServices.UpdateOptions]::ExpandFull)

#update OperatingsystemDim
$DWASDB.Dimensions["OperatingsystemDim"].Attributes["PhysicalMemory"].KeyColumns[0].DataType =  [System.Data.OleDb.OleDbType]::Double

$DWASDB.Dimensions["OperatingsystemDim"].Update([Microsoft.AnalysisServices.UpdateOptions]::ExpandFull + [Microsoft.AnalysisServices.UpdateOptions]::AlterDependents)
#update LogicalDiskDim

$DWASDB.Dimensions["LogicalDiskDim"].Attributes["Size"].KeyColumns[0].DataType =  [System.Data.OleDb.OleDbType]::Double

$DWASDB.Dimensions["LogicalDiskDim"].Update([Microsoft.AnalysisServices.UpdateOptions]::ExpandFull + [Microsoft.AnalysisServices.UpdateOptions]::AlterDependents)
Enable the job schedules by running the following commands:
$DW ='DWMS Servername'

Get-scdwjob -Computername $DW | %{enable-scdwjobschedule -Computername $DW -jobname $_.Name}
Restart the Data Warehouse management server.
Validate the four-computer installation
The procedures in this article describe how to validate the four-computer installation of System Center - Service Manager.
Step 1: validate the installation of the management server and database
Validate a Service Manager management server installation
- On the computer hosting the Service Manager management server, verify that a Program Files\Microsoft System Center 2016\Service Manager folder exists.
- On the computer hosting the Service Manager management server, verify that a Program Files\Microsoft System Center\Service Manager folder exists.
Run services.msc, and then verify that the following services are installed, that they have the status of Started, and that the startup type is Automatic:
- System Center Data Access Service
- Microsoft Monitoring Agent
- System Center Management Configuration
Validate the Service Manager console installation
On the first computer, select Start, select All Programs, select Microsoft System Center, and select Service Manager Console.
The first time that you run the Service Manager console, the Connect to Service Manager Server dialog appears. In the Server name box, enter the computer name of the server that is hosting the Service Manager management server.
The Service Manager console successfully connects to the Service Manager management server.
Validate the Service Manager database
On the computer hosting the Service Manager database, select Start, select All Programs, select Microsoft SQL Server 2016, and select SQL Server Management Studio.
In the Connect to Server dialog, select the following:
In the Server Type list, select Database Engine.
In the Server Name list, select the server name for your Service Manager database. For example, select Computer 2.
In the Authentication list, select Windows Authentication, and select Connect.
In the Object Explorer pane, expand Databases.
Verify that the ServiceManager database is listed.
Exit Microsoft SQL Server Management Studio.
Step 2: validate the installation of the data warehouse management server and database
Validate a data warehouse management server installation
On the computer hosting the data warehouse management server (the server you ran Setup on), run services.msc, and verify that the following services have been installed:
- System Center Data Access Service
- Microsoft Monitoring Agent
- System Center Management Configuration
Validate data warehouse databases
On the computer hosting the data warehouse management databases, select Start, select All Programs, select Microsoft SQL Server 2016, and select SQL Server Management Studio.
In the Connect to Server dialog, select the following:
In the Server Type list, select Database Engine.
In the Server Name list, select the server and instance for your Service Manager data warehouse database. For example, select Computer 4.
In the Authentication list, select Windows Authentication, and select Connect.
In the Object Explorer pane, expand Databases.
Verify that the DWStagingAndConfig and DWRepository databases are listed.
On the computer hosting SQL Server Reporting Services (SSRS), select Start, select All Programs, select Microsoft SQL Server 2016, and select SQL Server Management Studio.
In the Connect to Server dialog, select the following:
In the Server Type list, select Database Engine.
In the Server Name list, select the server and instance for your Service Manager data warehouse database. For example, select Computer 4.
In the Authentication list, select Windows Authentication, and select Connect.
In the Object Explorer pane, expand Databases.
Verify that the DWDataMart database is listed.
In the Object Explorer pane, select Connect, and select Analysis Services.
In the Server Name list, enter the computer name for the computer hosting the Service Manager data warehouse database. In this example, enter localhost.
In the Object Explorer pane, expand the new entry for Analysis Services, and then expand Databases.
Verify that the DWASDataBase database is listed.
Exit Microsoft SQL Server Management Studio.
Next steps
- To manually configure SSRS in situations where SSRS isn't on the same server as the data warehouse management server, review Manual steps to configure remote SQL Server Reporting Services.
Feedback
Coming soon: Throughout 2024 we will be phasing out GitHub Issues as the feedback mechanism for content and replacing it with a new feedback system. For more information see: https://aka.ms/ContentUserFeedback.
Submit and view feedback for