Ensure that you have at least local admin permissions on the computer before you run the setup.
The service account should be an administrator on the VMM server.
Note
During VMM Installation, ensure that the SQL Database isn't part of any Availability Group.
Run setup
Note
The service account for VMM can be:
A local account.
A user account used for service.
A group managed service account.
If you're using a local account, you can't have VMM in a highly available configuration.
If you're using gMSA account, the format should be domainFQDN\gMSAAccount$.
Close any open programs and ensure that no restarts are pending on the computer.
To start the Virtual Machine Manager Setup wizard, on your installation media, right-click setup.exe and then select Run as administrator.
In the main setup page, select Install.
On the Select features to install page,
Select the VMM management server checkbox, and then select Next.
The VMM console installs automatically. If you're installing on a cluster node, you'll be asked if you want to make the management server highly available.
On the Product registration information page, provide the appropriate information and select Next. If you don't enter a product key, VMM installs as an evaluation version that expires in 180 days after installation.
On the Please read this license agreement page,
Review the license agreement, select the I have read, understood, and agree with the terms of the license agreement checkbox, and then select Next.
On the Diagnostic and Usage Data page,
Review Microsoft's data collection policy and how to disable data collection. Then select Next.
If the Microsoft Update page appears,
Select whether you want to use Microsoft Update, and then select Next.
If you've already chosen to use Microsoft Update on this computer, the page won't appear.
On the Diagnostic and Usage Data page,
Review Microsoft's data collection policy and how to disable data collection and then select Next.
On the Installation location page,
Use the default path or enter a different installation path for the VMM program files, and then select Next.
The setup program checks the computer on which you're installing the VMM management server to ensure that the computer meets the appropriate hardware and software requirements. If the computer doesn't meet a prerequisite, a page that contains information about the prerequisite and how to resolve the issue appears.
On the Database configuration page,
If you're using a remote SQL instance, specify the name of the computer that's running the SQL Server.
If you're installing the VMM management server on the same computer that's running the SQL Server, then in the Server name box, either enter the name of the computer (for example, vmmserver01) or localhost.
If the SQL Server is in a cluster, enter the cluster name.
Don't specify a Port value if you don't have a remote instance of the SQL Server or if you have a remote SQL Server that uses the default port (1433).
Specify the SQL Server instance name and whether to use an existing or new database. You need an account with permissions to connect to the instance.
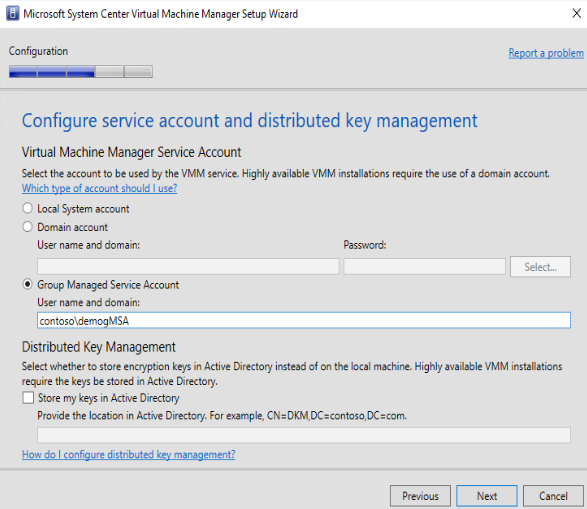
On the Configure service account and distributed key management page,
Specify the account that the VMM service uses. You can't change the identity of the VMM service account after installation. Learn more about distributed key management here.
Under Distributed Key Management, select whether to store encryption keys in Active Directory or not.
On the Port configuration page,
Use the default port number for each feature or provide a unique port number that's appropriate in your environment.
You can't change the ports that you assign during the installation of a VMM management server unless you uninstall and then reinstall the VMM management server. Also, don't configure any feature to use port 5986 because that port number is preassigned.
On the Library configuration page,
Select whether to create a new library share or to use an existing library share on the computer.
The default library share that VMM creates is named MSSCVMMLibrary, and the folder is located at %SYSTEMDRIVE%\ProgramData\Virtual Machine Manager Library Files. ProgramData is a hidden folder, and you can't remove it.
After the VMM management server is installed, you can add library shares and library servers by using the VMM console or by using the VMM command shell.
On the Installation summary page,
Review your selections and then select Install. The Installing features page appears and displays the installation progress.
On the Setup completed successfully page,
Select Close to finish the installation.
To open the VMM console, ensure that Open the VMM console when this wizard closes is checked or select the Virtual Machine Manager Console icon on the desktop.
Note
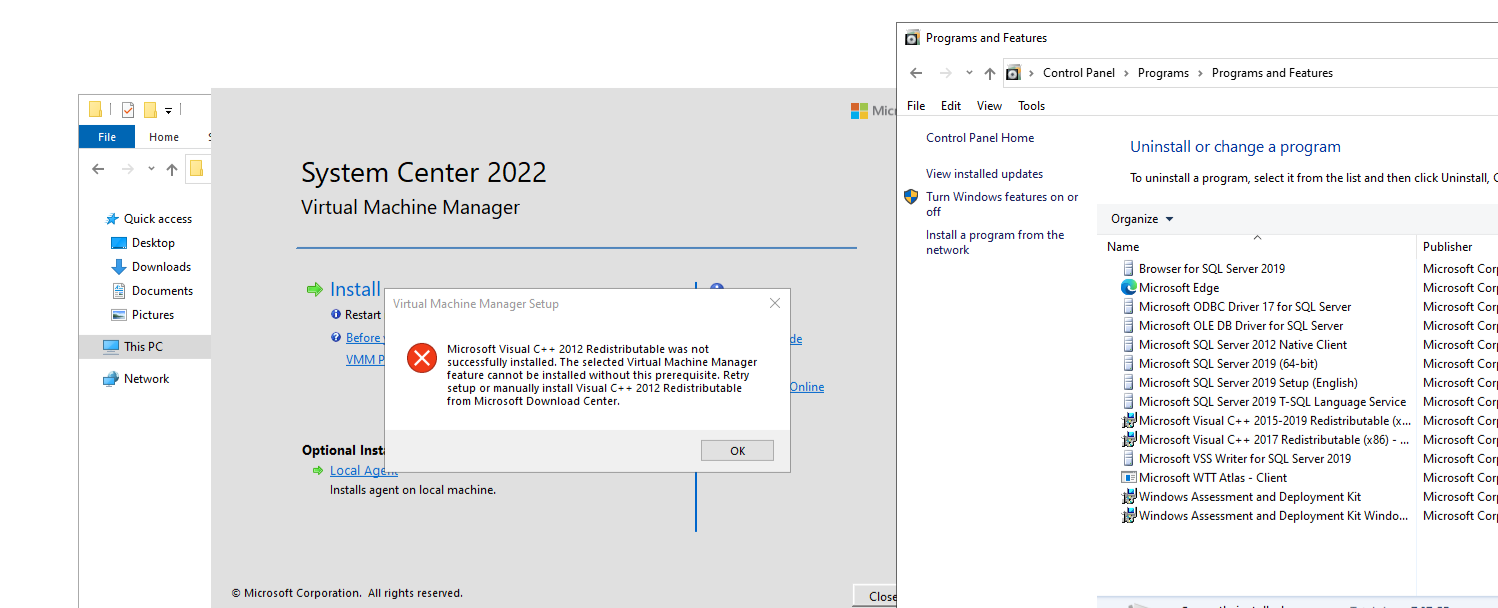
If VMM 2022 and SQL 2019 are installed on the same machine, the following error appears:
Reboot the machine for successful installation.
During Setup, VMM enables the following firewall rules. These rules remain in effect even if you later uninstall VMM.
Windows Remote Management
Windows Standards-Based Storage Management
Note
If Setup doesn't finish successfully, consult the log files in the %SYSTEMDRIVE%\ProgramData\VMMLogs folder. ProgramData is a hidden folder.
Note
If you run into ADK file path issue while installing VMM, copy the files from the amd64 folder in ADK root folder to the ADK root folder itself. The default ADK folder path is C:\Program Files (x86)\Windows Kits\10\Assessment and Deployment Kit\Deployment Tools\WSIM, but it can be different based on your choice of folder path during ADK installation.
Install VMM from a command prompt
You can install VMM from a command prompt. The installation media contains .ini files for all the VMM features:
VMServer.ini: Settings for the VMM management server.
VMClient.ini: Settings for the VMM console.
VMServerUninstall.ini: Uninstallation settings for the VMM management server.
Each of these files contains key/value pairs with default values. These entries are commented out. Remove the comment symbol (#) and change the value.
Edit the VMServer.ini file with the options in the table below this procedure.
After you edit, open an elevated command prompt and run setup.exe with the following parameters. For example, to use a VMServer.ini file that is stored in C:\Temp with a SQL Server administrator account of contoso\SQLAdmin01 and a VMM service account of contoso\VMMadmin14, use the following command:
setup.exe /server /i /f C:\Temp\VMServer.ini /SqlDBAdminDomain contoso /SqlDBAdminName SQLAdmin01 /SqlDBAdminPassword password123 /VmmServiceDomain contoso /VmmServiceUserName VMMadmin14 /VmmServiceUserPassword password456 /IACCEPTSCEULA
VMServer.ini values
Option
Values
Default
ProductKey
Product key in the format: xxxxx-xxxxx-xxxxx-xxxxx-xxxxx
xxxxx-xxxxx-xxxxx-xxxxx-xxxxx
UserName
Optional display name for the user who is installing the features. UserName isn't the user account for the installation.
Administrator
CompanyName
Optional display name for the organization that is installing the features.
Microsoft Corporation
ProgramFiles
Location for VMM files.
C:\Program Files\Microsoft System Center\Virtual Machine Manager
CreateNewSqlDatabase
0: Use an existing Microsoft SQL Server database.
1: Create a new SQL Server database.
1
SqlInstanceName
Name of the new or existing instance of SQL Server.
MICROSOFT$VMM$
SqlDatabaseName
Name of the new or existing SQL Server database.
VirtualManagerDB
RemoteDatabaseImpersonation
0: Don't impersonate the administrator account for SQL Server. The user that runs setup.exe must be an administrator for the server that is hosting the SQL Server.
1: Impersonate the administrator account for SQL Server by using the provided credentials. The user who runs setup.exe must provide values for the SqlDBAdminName, SqlDBAdminPassword, and SqlDBAdminDomain parameters.
0
SqlMachineName
Name of the server that is hosting SQL Server. Don't specify localhost. Instead, specify the actual name of the computer.
<sqlmachinename>
(various ports)
Ports used by VMM
IndigoTcpPort: 8100
IndigoHTTPSPort: 8101
IndigoNETTCPPort: 8102
IndigoHTTPPort: 8103
WSManTcpPort: 5985
BitsTcpPort: 443
CreateNewLibraryShare
0: Use an existing library share.
1: Create a new library share.
1
LibraryShareName
Name of the file share to be used or created.
MSSCVMMLibrary
LibrarySharePath
Location of the existing file share or the new file share to be created.
0: Use a domain account for the VMM service (scvmmservice).
1: Use the Local System account for the VMM service.
To use a domain account, when you run setup.exe, provide values for the VMMServiceDomain, VMMServiceUserName, and VMMServiceUserPassword parameters.
0
TopContainerName
Container for Distributed Key Management (DKM); for example, CN=DKM,DC=contoso,DC=com.
VMMServer
HighlyAvailable
0: Don't install as highly available.
1: Install as highly available.
0
VmmServerName
Clustered service name for a highly available VMM management server. Don't enter the name of the failover cluster or the name of the computer on which the highly available VMM management server is installed.
<VMMServerName>
VMMStaticIPAddress
IP address for the clustered service name for a highly available VMM management server if you're not using Dynamic Host Configuration Protocol (DHCP). Both IPv4 and IPv6 are supported.
<comma-separated-ip-for-HAVMM>
Upgrade
0: Don't upgrade from a previous version of VMM.
1: Upgrade from a previous version.
1
Setup-exe parameters
Parameter
Details
/server
Specifies installation of the VMM management server.
/i or /x
Specifies whether to install (/i) or uninstall (/x) the server.
/f <filename>
Specifies the .ini file to use. Be sure that this parameter points to the correct .ini file. If setup.exe doesn't find an .ini file, it performs the installation by using its own default values.
/VmmServiceDomain <domainName>
Specifies the domain name for the account that is running the VMM service (scvmmservice). Use this parameter only if you set VmmServiceLocalAccount to 0 in VMServer.ini.
/VmmServiceUserName <userName>
Specifies the username for the account that is running the VMM service (scvmmservice). Use this parameter only if you set VmmServiceLocalAccount to 0 in VMServer.ini.
/VmmServiceUserPassword <password>
Specifies the password for the account that is running the VMM service (scvmmservice). Use this parameter only if you set VmmServiceLocalAccount to 0 in VMServer.ini.
/SqlDBAdminDomain <domainName>
Specifies the domain name for the administrator account for the SQL Server database. Use this parameter if the current user doesn't have administrative rights to SQL Server.
/SqlDBAdminName <userName>
Specifies the username for the administrator account for the SQL Server database. Use this parameter if the current user doesn't have administrative rights to SQL Server.
/SqlDBAdminPassword <password>
Specifies the password for the administrator account for the SQL Server database. Use this parameter if the current user doesn't have administrative rights to SQL Server.
/IACCEPTSCEULA
Notes acceptance of the Microsoft Software License Terms. This is a mandatory parameter.
For example, to use a VMServer.ini file that is stored in C:\Temp with a SQL Server administrator account of contoso\SQLAdmin01 and a VMM service account of contoso\VMMadmin14, use the following command: setup.exe /server /i /f C:\Temp\VMServer.ini /SqlDBAdminDomain contoso /SqlDBAdminName SQLAdmin01 /SqlDBAdminPassword password123 /VmmServiceDomain contoso /VmmServiceUserName VMMadmin14 /VmmServiceUserPassword password456 /IACCEPTSCEULA
Uninstall VMM or the VMM console
Ensure that the VMM console and VMM command shell are closed.
On the computer on which the VMM management server is installed, select Start and then select Control Panel.
Under Programs, select Uninstall a program. Under Name, right-click Microsoft System Center Virtual Machine Manager.
On the What would you like to do? page, select Remove features.
On the Select features to remove page, select the VMM management server checkbox, and then select Next. If you want to uninstall the VMM console, select the VMM console checkbox.
Note
If you've a highly available VMM deploy, you must remove both the VMM server and the VMM console.
On the Database options page, select whether you want to retain or remove the VMM database, and, if necessary, credentials for the database, and then select Next.
On the Summary page, review your selections and select Uninstall. The Uninstalling features page appears, and uninstallation progress is displayed.
After the VMM management server is uninstalled, on the The selected features were removed successfully page, select Close.
The following firewall rules, which were enabled during VMM Setup, remain in effect after you uninstall VMM:
File Server Remote Management
Windows Standards-Based Storage Management firewall rules
If there's a problem with setup completing successfully, consult the log files in the %SYSTEMDRIVE%\ProgramData\VMMLogs folder. ProgramData is a hidden folder.
Uninstall VMM from the command line
To uninstall VMM, edit the VMServerUninstall.ini file as described.
Then run setup.exe for the uninstall. For example, to uninstall using an ini file stored in C:\Temp with an account contoso.SQLAdmin01 type: setup.exe /server /x /f C:\Temp\VMServerUninstall.ini /SqlDBAdminDomain contoso /SqlDBAdminName SQLAdmin01 /SqlDBAdminPassword password123
VMServerUnisntall.ini
Option
Details
Default value
RemoteDatabaseImpersonation
0: Local SQL Server installation.
1: Remote SQL Server installation.
When you run setup.exe, provide a value for the SqlDBAdminName, SqlDBAdminPassword, and SqlDBAdminDomain parameters unless the user who is running setup.exe is an administrator for SQL Server.
0
RetainSqlDatabase
0: Remove the SQL Server database.
1: Don't remove the SQL Server database
To remove the SQL Server database, when you run setup.exe, provide a value for the SqlDBAdminName, SqlDBAdminPassword, and SqlDBAdminDomain parameters unless the user who is running Setup is an administrator for SQL Server.
0
ForceHAVMMUninstall
0: Don't force uninstallation if setup.exe can't verify whether this node is the final node of the highly available installation.
1: Force the uninstallation.
Support for gMSA account
Group Managed Service Account (gMSA) helps improve the security posture and provides convenience through automatic password management, simplified service principle name (SPN) management, and the ability to delegate the management to other administrators.
VMM supports the use of gMSA for Management server service account.
Note
gMSA, when used as VMM Service account, needs to have logon as a service and Replace a process level token permissions.
Prerequisites
Review this article and create gMSA as per the guidance available in the article.
Ensure that the servers on which VMM Management service would be installed have permissions to retrieve the password of the gMSA account.
Note
You don't need to specify the SPN when creating the gMSA. VMM service sets the appropriate SPN on the gMSA.
Use the following steps:
Start the VMM installation setup.
On the Service account configuration page, select Group Managed Service Account as the option for VMM service account.
Enter the gMSA account details in Domain\gMSA account format.
This module covers cmdlets that are used to configure settings related to Group Policy, Server Manager, Hyper-V, and Internet Information Services (IIS).
As a Windows Server hybrid administrator, you integrate Windows Server environments with Azure services and manage Windows Server in on-premises networks.