Set up NAT for traffic forwarding in the SDN infrastructure
This article describes how to set up Network Address Translation (NAT) for traffic forwarding in a software-defined network (SDN) infrastructure set up in the System Center Virtual Machine Manager (VMM) fabric.
NAT allows virtual machines (VMs) in an isolated SDN virtual network to obtain external connectivity. VMM configures a Virtual IP (VIP) to forward the traffic to and from an external network.
The following two NAT types are supported by VMM.
- Outbound NAT - Forwards the VM network traffic from a virtual network to external destinations.
- Inbound NAT - Forwards the external traffic to a specific VM in a virtual network.
This article provides information about how to configure a NAT connection for SDN virtual networks using VMM.
VMM 2022 supports dual stack. NAT rules to Dual stack VM networks isn't supported at VMM console. NAT rules can be specified using PowerShell cmdlets. For more information, see Add rules to a NAT connection.
Note
- From VMM 2019 UR1, One Connected network type is changed to Connected Network
- VMM 2019 UR2 and later supports IPv6.
Before you start
Ensure the following:
- SDN network controller and the SDN software load balancer are deployed.
- An SDN VM network with network virtualization is created.
Create a NAT connection
Use the following procedure:
In the VMM console, select VMs and Services > VM Networks. Right-click the selected VM network for which you want to create the NAT connection and select Properties.
Select Connectivity on the wizard page displayed.
In Connectivity, select Connect directly to an additional logical network and select Network address translation (NAT) under this option.
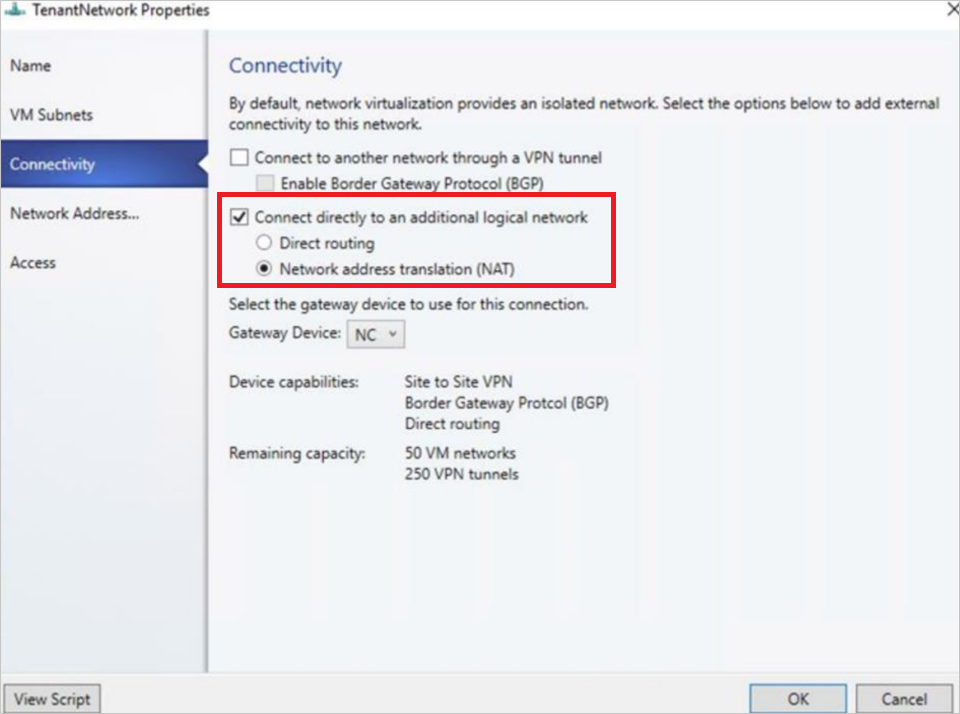
In the IP address pool, choose the IP pool from which the VIP must come from. In IP address, choose an IP address from the pool selected. Select OK.
- To enable IPv6, select an IPv6 address pool and provide an IPv6 address.
A NAT connection will be created for this VM network.
Note
- Along with the NAT connection, this procedure also creates a default Outbound NAT rule that enables the outbound connectivity for the VM network.
- To enable inbound connectivity and forward an external traffic to a specific VM, you must add NAT rules to the NAT connection.
Add rules to a NAT connection
VMM 2022 supports dual stack. NAT rules to dual stack VM networks isn't supported at the VMM console. NAT rules can be specified using PowerShell cmdlets.
$vmNetwork = Get-SCVMNetwork -ID <VMNetwork ID>

$vmSubnet = Get-SCVMSubnet -Name <VMSubnet Name> | where { $_.ID -eq <VMSubnet ID> }
$gatewayDevice = Get-SCNetworkGateway -ID <Gateway Device ID>
$VmNetworkGateway = Add-SCVMNetworkGateway -Name "TenantDS_Gateway" -EnableBGP $false -NetworkGateway $gatewayDevice -VMNetwork $vmNetwork
For IPv6 NAT Connection
$externalIpPoolVar = Get-SCStaticIPAddressPool -ID <VIP Pool Id>
$natConnectionIPv6 = Add-SCNATConnection -VMNetwork $vmNetwork -Name "TenantDS_NatConnection_IPv6" -ExternalIPPool $externalIpPoolVar -ExternalIPAddress <IP From IPv6 VIP Pool>
Add-SCNATRule -Name "NATIPv6" -Protocol "TCP" -InternalIPAddress <IP From IPv6 subnet> -ExternalPort <External Port> -NATConnection $natConnectionIPv6 -InternalPort <Internal Port>
For IPv4 NAT Connection
$externalIpPoolVar1 = Get-SCStaticIPAddressPool -Name "PublicVIP_IPAddressPool_0"
$natConnectionIPv4 = Add-SCNATConnection -VMNetwork $vmNetwork -Name "TenantDS_NatConnection_IPv4" -ExternalIPPool $externalIpPoolVar1 -ExternalIPAddress <IP From IPv4 VIP Pool>
Add-SCNATRule -Name "NATIPv4" -Protocol "TCP" -InternalIPAddress <IP From IPv4 subnet>" -ExternalPort <External Port> -NATConnection $natConnectionIPv4 -InternalPort <Internal Port>
Use the following procedure to add rules to a NAT connection:
In the VMM console, select VMs and Services > VM Networks. Right-click the selected VM network and select Properties.
Select Network Address Translation on the wizard.
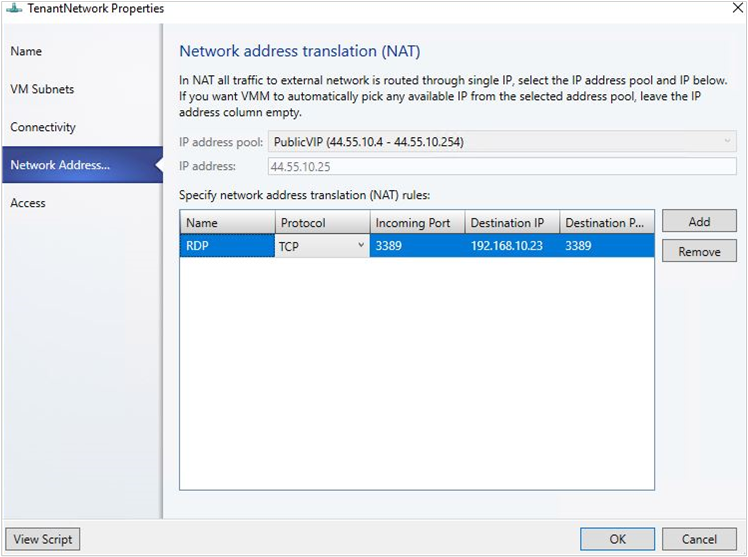
Under Specify network address translation (NAT) rules, select Add. Type the following details as appropriate:
- Name – Name for the inbound NAT rule.
- Protocol – Inbound network traffic protocol. TCP/UDP are supported.
- Incoming Port – Port number that you want to use along with the VIP to access the VM.
- Destination IP – IP address of the VM to which you want to direct the external traffic.
- Destination Port – Port number on the VM, the external traffic must be forwarded to.
- Select OK.
Note
Multiple NAT rules can be created to forward the traffic to multiple VMs that are part of the VM network.
Remove a NAT rule
Use the following procedure:
- In the VMM console, select VMs and Services > VM Networks. Right-click the selected VM network and select Properties.
- Select Network Address Translation on the wizard.
- Select the NAT rule that you want to remove, select Remove, and then select OK.
Remove a NAT connection
- In the VMM console, select VMs and Services > VM Networks. Right-click the selected VM network and select Properties.
- Select Connectivity on the wizard.
- Clear the option Connect directly to an additional logical network and select OK.