Note
Access to this page requires authorization. You can try signing in or changing directories.
Access to this page requires authorization. You can try changing directories.
This article describes how to set up a cluster with Storage Spaces Direct (S2D) in the System Center - Virtual Manager (VMM) fabric. You can set up a couple of types of clusters:
- A hyper-converged deployment that runs compute and storage resources in the same cluster.
- A disaggregated deployment in which compute and storage run in separate environments. The storage component is built using S2D and scale-out file server (SOFS) to provide an independently scalable storage repository for VMs and apps.
Before you start
- Ensure you're running VMM 2016 or a later version.
- Hyper-V hosts in a cluster should be running Windows Server 2016 or later with the Hyper-V Role installed and configured to host VMs.
- You should set up networks on hosts that are nodes in the cluster before you enable S2D.
- For hyper-converged deployments, you can enable S2D when you add an existing Hyper-V cluster to the VMM fabric, or when you create a cluster from standalone Hyper-V hosts in the VMM fabric. You can't currently enable S2D on a Hyper-V cluster deployed from bare-metal computers with the Nano operating system.
Deploy a hyper-converged cluster
You can deploy a hyper-converged cluster in the VMM fabric using the same methods that you would with any other Hyper-V cluster:
- Enable S2D on a Hyper-V cluster currently managed in the VMM fabric.
- Add an existing Hyper-V cluster to the VMM fabric, with or without S2D enabled.
- Provision a Hyper-V cluster and enable S2D from the existing Hyper-V hosts.
- Provision a Hyper-V cluster with S2D enabled from bare-metal servers.
- You can't currently enable S2D in a hyper-converged deployment on a Hyper-V cluster deployed from bare-metal computers with the Nano operating system.
Deployment steps
- Create a Hyper-V cluster in the VMM fabric, and enable S2D on it. Alternatively if you already have a S2D cluster you configured outside VMM, you add it to the VMM fabric.
- Set up networking on the cluster. Learn more.
- Modify the storage pool, and create cluster-shared volumes (CSVs).
- Deploy VMs on the cluster.
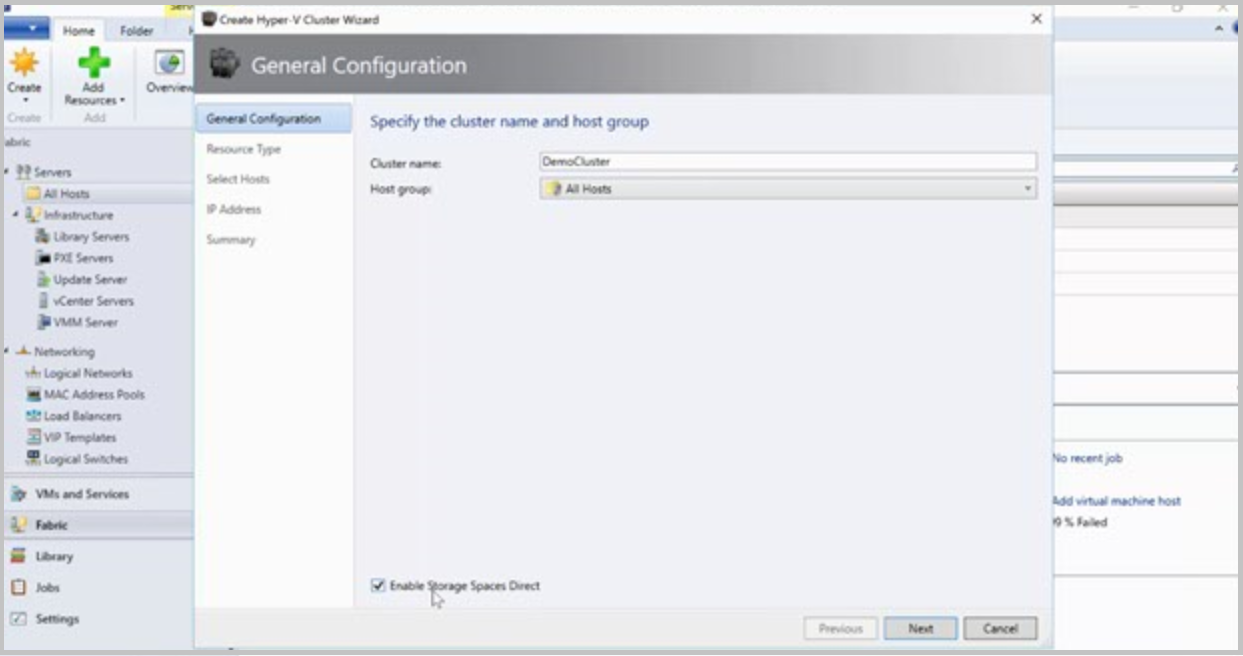
Create a cluster
- Select Fabric Resources > Create > Hyper-V Cluster.
- In General Configuration, specify a cluster name, select a host group, and select Enable Storage Spaces Direct.
- The rest of the steps are identical to the instructions for creating a Hyper-V host cluster with an existing server. Note that you've to validate the cluster when S2D is enabled.
When you create the cluster, VMM does the following:
- On each host:
- Installs the File Server role.
- Installs the Failover Clustering feature.
- Enables Storage Replica and data deduplication.
- Validates the cluster configuration.
- Creates the cluster.
- Enables S2D, and creates a storage pool with the same name as the one provided in the wizard.
Add an existing cluster
- Select VMs and Services, right-click All Hosts, and select Add Hyper-V Hosts and Clusters.
- If the cluster isn't in the VMM domain, select The Windows server computer is in an untrusted Active Directory domain.
- Specify the cluster, and provide a Run As account. This adds the host cluster into VMM.
- If the cluster isn't S2D enabled, you need to enable it on the cluster properties.
Manage pool and create CSVs
After you set up networking on the cluster, create CSVs.
- Select Fabric > Storage > Arrays, right-click the Storage Spaces Direct cluster > Manage Pool. Change the name of the pool that was created by default if you need to.
- To create a volume, right-click the cluster > Properties > Shared Volumes.
- In the Create Volume Wizard > Capacity, you can specify the volume size, file system, resiliency, and storage tiering options. A virtual disk will be created automatically when you create the volume.
If you use PowerShell, the pool and the storage tier is automatically created with the Enable-ClusterS2D autoconfig=true option.
Deploy VMs
VMs can be directly deployed on the hyper-converged cluster. Their virtual hard disks are placed on the volumes you create. You create and deploy these VMs just as you would any other VM.
Deploy a disaggregated deployment
In a disaggregated deployment, compute and storage run in separate environments. The storage component is built using S2D and scale-out file server (SOFS) to provide an independently scalable storage repository for VMs and apps.
Set up an SOFS cluster and enable S2D
Select Fabric Resources > Create > File Server Cluster.
In General Configuration, specify a cluster name, select a host group, and select Storage attached directly to each cluster node (Storage Spaces Direct).
In Resource Type, specify the RunAs account with local admin permissions on the servers you want to add to the cluster, and specify whether to add existing Windows servers or bare-metal machines.
In Cluster Nodes, define a list of computers to add to the cluster.
On the Summary page, confirm the settings and select Finish.
If you want to add additional nodes to the SOFS cluster, VMM automatically discovers any disks associated with the node. When you modify a storage pool and select the new disks to add, VMM makes those disks available to the hosts and VMs that use the share supported by that pool. Learn more about adding nodes to an SOFS.
Add an existing SOFS cluster with S2D enabled
- Select Fabric >Add Resources, Storage Devices.
- In the Add Resource Wizard, select Windows-based File Server.
- In Discovery Scope, specify the cluster IP address or FQDN, provide a Run As account with cluster access, and if required check that the cluster is in another domain.
- In Storage Device, select the SOFS to add to the VMM fabric. You should only assign a classification to the pool after you add the provider.
- In Summary, check settings and complete the wizard.
Manage pool and create CSVs
- After the SOFS cluster is in the VMM fabric, right-click Storage > File Servers > Manage Pools. Select New to create a pool.
- In the New Storage Pool Wizard > General, specify a name and classification for the pool.
- In Physical Disks, select the virtual disks to create the pool. Re-scan and check that the pool appears in Storage > Arrays.
- Now you can create file shares from the pool. Select Create File Share.
- In the Create File Share Wizard > General, specify a name for the share and select the pool from which storage should be taken.
- In Capacity, specify the share size and settings.
- In Summary, verify the settings. After the share is created, a new CSV is added under the storage pool.
Next steps
- You specify the file share path in the properties of a Hyper-V host or cluster. Learn more about provisioning storage.