Exercise - Fix issues with form accessibility
In this exercise, you use Accessibility Insights for Web to identify and fix accessibility issues in a form.
Install the Accessibility Insights for Web browser extension
- Go to the Accessibility Insights for Web page in either Google Chrome or Microsoft Edge.
- Select the install button that corresponds to your browser.
- When the extension page appears, select the appropriate button for your browser (Get for Microsoft Edge, Add to Chrome for Chrome) to install the extension.
Inspect the form using by FastPass
For this exercise, you use the FastPass tool. In FastPass, you run three tests to find the most common accessibility issues in less than five minutes.
Open Launch pad for Accessibility Insights for Web by selecting the extension's toolbar button in the browser. You can also use the keyboard shortcut Ctrl+Shift+K (⌘+Shift+K for macOS).

Select the FastPass link. A second window opens and lists the accessibility issues that FastPass detected in automated checks.
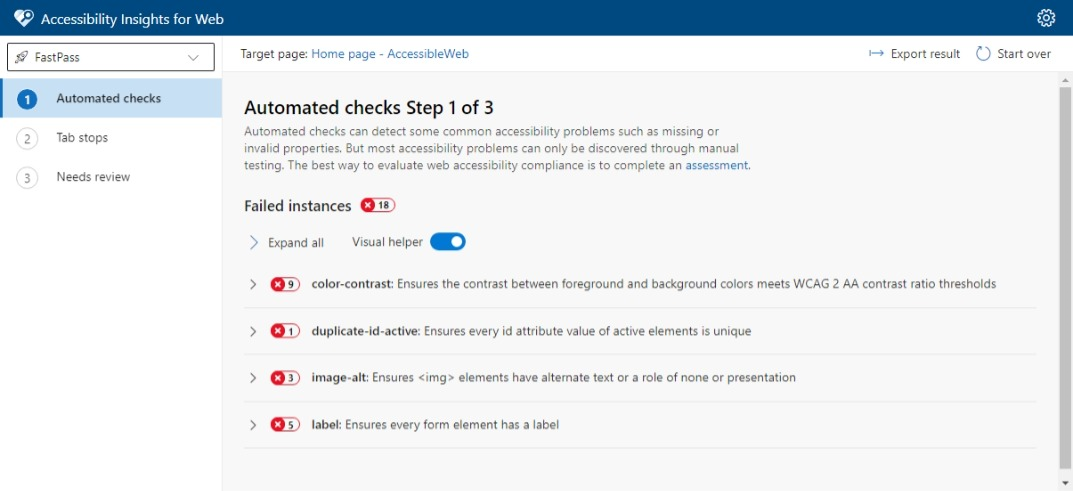
Automated checks detected many errors. We're going to focus on the form in this exercise.
There are two ways to interact with error messages. You can use the list in the FastPass tool, or you can select the error messages on the webpage. In this case, the FastPass tool lists errors across the entire page, which can be a little overwhelming when you want to focus on the form. Let's use the in-page error message for now.
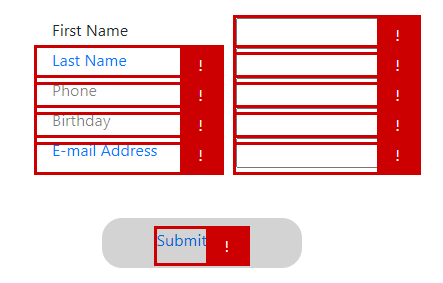
Select the exclamation point to the right of the First Name label.

The UI shows that this label has low contrast. It also brings to your attention that you're using color coding to indicate required fields in this form.
By selecting the error icons for the other labels, you can see that they all have low contrast. Let's look at the HTML for the First Name section of the form to understand the color contrast issue.
<div class="row">
  <div class="col-4 text-primary">
    First Name
  </div>
  <div class="col-8">
    <input type="text" id="Name">
  </div>
</div>
Here, you can see that the First Name label is using a Bootstrap
text-primaryclass to show a light blue text color that indicates a required field. Remove thetext-primaryclass and add arequiredattribute to the<input>tag instead, like this.<div class="row"> <div class="col-4"> First Name </div> <div class="col-8"> <input type="text" id="Name" required> </div> </div>Run the application again, and then run FastPass as before. You can see that the error for the First Name label is now cleared.
Great! Now that you know the fix, you can do the same thing for the rest of the labels.
Review the HTML for the rest of the form. You can see that the labels are using either
text-primaryortext-black-50for color. Remove these attributes, and add therequiredattribute to the Last Name and Email Address input fields.<form name="CustomerInfo"> <div class="container w-50 p-3"> <div class="row"> <div class="col-4"> First Name </div> <div class="col-8"> <input type="text" id="Name" required> </div> </div> <div class="row"> <div class="col-4"> Last Name </div> <div class="col-8"> <input type="text" id="Name" required> </div> </div> <div class="row"> <div class="col-4"> Phone </div> <div class="col-8"> <input type="text" id="Phone"> </div> </div> <div class="row"> <div class="col-4"> Birthday </div> <div class="col-8"> <input type="text" id="Birthday"> </div> </div> <div class="row"> <div class="col-4"> Email Address </div> <div class="col-8"> <input type="text" id="Email" required> </div> </div> <div class="button"> <a href="#" onclick="document.getElementById('CustomerInfo').Submit();"> Submit Form </a> </div> </div> </form>Run the application and view FastPass again. You can see that all of the label error messages are now cleared.
It isn't strictly required, but you can continue to show an indication for the required fields. Update the
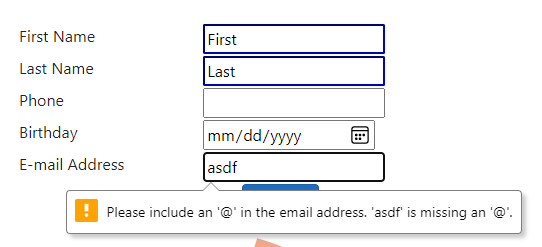
<style>block near the top of the page to include rules for required and optional fields.input:optional { border-color: #ccc; } input:required { border-color: mediumblue; }There's now a blue border around the required fields.
You're now ready to fix the form element. Selecting the error indication for the First Name field shows that there are two errors. The first error indicates that the form's
<input>tag doesn't have a unique attribute. This attribute value is a problem because HTML IDs are always assumed to be unique, and assistive technologies often only act on the first element.
In the source code, you can see that you used
Nameas the ID for both the First Name and Last Name fields.<div class="col-8"> <input type="text" id="Name" required> </div> </div> <div class="row"> <div class="col-4"> Last Name </div> <div class="col-8"> <input type="text" id="Name" required> </div> </div>Change the IDs to
FirstNameandLastName, respectively.<div class="col-8"> <input type="text" id="FirstName" required> </div> </div> <div class="row"> <div class="col-4"> Last Name </div> <div class="col-8"> <input type="text" id="LastName" required> </div> </div>Run the application and check FastPass again. Selecting the error indication for each input field shows that you're getting close now. Each input field has the same error message that says it needs a label.
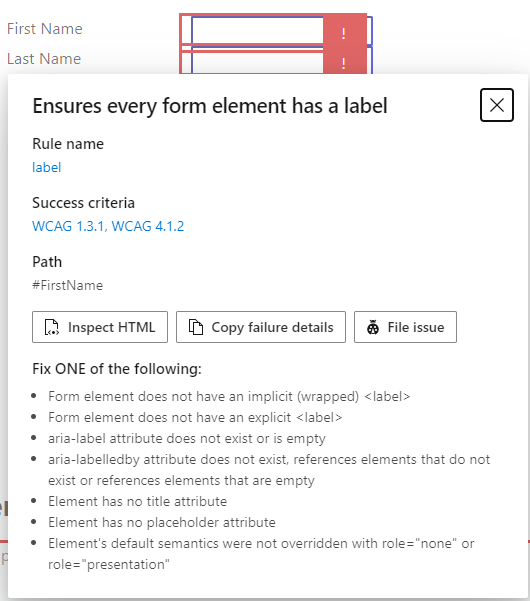
Update the First Name text to use a
<label>tag.<div class="row"> <div class="col-4"> <label for="FirstName">First Name</label> </div> <div class="col-8"> <input type="text" id="FirstName" required> </div> </div>Run the application and check FastPass again. You should see two things. First, the error message for the
FirstNameelement is now cleared. Second, selecting the First Name label now selects the First Name input.Add
<label>tags to the other form input fields. Your form code should now look like this.<form name="CustomerInfo"> <div class="container w-50 p-3"> <div class="row"> <div class="col-4"> <label for="FirstName">First Name</label> </div> <div class="col-8"> <input type="text" id="FirstName" required> </div> </div> <div class="row"> <div class="col-4"> <label for="LastName">Last Name</label> </div> <div class="col-8"> <input type="text" id="LastName" required> </div> </div> <div class="row"> <div class="col-4"> <label for="Phone">Phone</label> </div> <div class="col-8"> <input type="text" id="Phone"> </div> </div> <div class="row"> <div class="col-4"> <label for="Birthday">Birthday</label> </div> <div class="col-8"> <input type="text" id="Birthday"> </div> </div> <div class="row"> <div class="col-4"> <label for="Email">Email Address</label> </div> <div class="col-8"> <input type="text" id="Email" required> </div> </div> <div class="button"> <a href="#" onclick="document.getElementById('CustomerInfo').Submit();"> Submit Form </a> </div> </div> </form>This code clears all the form field errors!
Now it's time to fix the Submit button. The problems here are low contrast (as shown in the error message) and an
onclickevent that runs custom JavaScript. You can fix both of them by replacing the button with a standard<input type="submit">class.Find this code.
<div class="button">
  <a href="#" onclick="document.getElementById('CustomerInfo').Submit();">
    Submit Form
  </a>
</div>
Replace it with this code.
<div class="text-center">
   <input class="btn btn-primary" type="submit">
</div>
You completed all the required fixes, but there's one more quick improvement that you can make. You can change the input types from text to something more specific where available.
Change the
typeattribute for the Phone field totel.Change the
typeattribute for the Birthday field todate.Change the
typeattribute for the Email field toemail. The completed code for the form should now look like this.<form name="CustomerInfo"> <div class="container w-50 p-3"> <div class="row"> <div class="col-4"> <label for="FirstName">First Name</label> </div> <div class="col-8"> <input type="text" id="FirstName" required> </div> </div> <div class="row"> <div class="col-4"> <label for="LastName">Last Name</label> </div> <div class="col-8"> <input type="text" id="LastName" required> </div> </div> <div class="row"> <div class="col-4"> <label for="Phone">Phone</label> </div> <div class="col-8"> <input type="tel" id="Phone"> </div> </div> <div class="row"> <div class="col-4"> <label for="Birthday">Birthday</label> </div> <div class="col-8"> <input type="date" id="Birthday"> </div> </div> <div class="row"> <div class="col-4"> <label for="Email">Email Address</label> </div> <div class="col-8"> <input type="email" id="Email" required> </div> </div> <div class="text-center"> <input class="btn btn-primary" type="submit"> </div> </div> </form>Run the application and check FastPass. You can see that you improved the experience for all users while fixing accessibility issues. The new form shows no errors in FastPass. It includes browser-native input controls with validation and required field checking with no other code.