Create a workload identity for a GitHub Actions workflow
Now that you understand the concept of a workload identity, you might wonder how you create one and link it to a GitHub Actions deployment workflow. This unit shows you the steps to accomplish that.
Create a Microsoft Entra application
In the preceding unit, you learned that workload identities require creating an application registration in Microsoft Entra ID.
Note
Creating and modifying application registrations requires you to have permissions in Microsoft Entra ID. In some organizations, you might need an administrator to perform these steps for you.
When you create an application registration, you need to specify a display name. The display name is a human-readable name that describes the application registration.
Tip
Use a clear, descriptive display name for your application registration. It's important to help your team understand what the application registration is for, so that nobody accidentally deletes it or changes its permissions.
Here's an example Azure CLI command to create a new Microsoft Entra application:
az ad app create --display-name $applicationRegistrationName
Here's an example Azure PowerShell command to create a new Microsoft Entra application:
New-AzADApplication -DisplayName $applicationRegistrationName
The output of the preceding command includes important pieces of information, including:
- Application ID: The application registration has a unique identifier, often called an application ID or sometimes a client ID. You use this identifier when your workflow needs to sign in to Azure.
- Object ID: The application registration has an object ID, which is a unique identifier that Microsoft Entra ID assigns. You'll see an example of how to use an object ID later in this module.
When you create an application registration, you typically set only the display name. Azure assigns the other names and identifiers automatically.
Caution
A display name isn't unique. Multiple application registrations might share the same display name. Be careful when you grant permissions to an application registration by using its display name to identify it. You might accidentally give permissions to the wrong application registrations. It's a good practice to use one of the unique identifiers instead.
Federated credentials
When an identity needs to communicate with Azure, it signs in to Microsoft Entra ID. By itself, an application registration doesn't allow a workflow or application to sign in to Azure. You need to assign some credentials first. Federated credentials are one type of application credential. Unlike most credentials, federated credentials don't require you to manage any secrets like passwords or keys.
When you create a federated credential for a deployment workflow, you effectively tell Microsoft Entra ID and GitHub to trust each other. This trust is called a federation.
Then, when your workflow tries to sign in, GitHub provides information about the workflow run so that Microsoft Entra ID can decide whether to allow the sign-in attempt. The information that GitHub provides to Microsoft Entra ID during each sign-in attempt can include the following fields:
- The GitHub user or organization name.
- The GitHub repository name.
- The branch of your repository that the workflow is currently running on.
- The environment that your workflow job targets. You'll learn more about environments in a future module.
- Whether the creation of a pull request triggered the workflow.
You can configure Microsoft Entra ID to allow or deny a sign-in attempt from GitHub, depending on the values of the properties listed earlier. For example, you can enforce the following policies:
- Only permit sign-in attempts when a workflow runs from a specific GitHub repository within my organization.
- Only permit sign-in attempts when a workflow runs from a specific GitHub repository within my organization and the branch name is main.
Here's an illustration of how a deployment workflow can sign in by using a workload identity and federated credential:
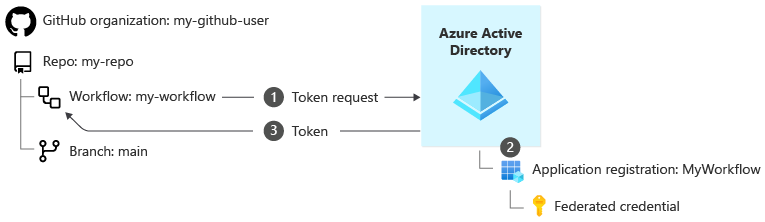
The steps involved in the sign-in process are:
When your workflow needs to communicate with Azure, GitHub securely contacts Microsoft Entra ID to request an access token. GitHub provides information about the GitHub organization (
my-github-user), the repository (my-repo), and the branch on which the workflow is running (main). It also includes your tenant ID within Microsoft Entra ID, the application ID of the workflow identity's application registration, and the Azure subscription ID to which your workflow wants to deploy.Microsoft Entra ID validates the application ID and checks whether a federated credential exists within the application for the GitHub organization, repository, and branch.
After Microsoft Entra ID determines that the request is valid, it issues an access token. Your workflow uses the access token when it communicates with Azure Resource Manager.
Create a federated credential
When you use the Azure CLI, you define a federated credential by creating a JSON file or variable. For example, look at the following JSON file:
{
  "name": "MyFederatedCredential",
  "issuer": "https://token.actions.githubusercontent.com",
  "subject": "repo:my-github-user/my-repo:ref:refs/heads/main",
  "audiences": [
    "api://AzureADTokenExchange"
  ]
}
In that file, the subject property specifies that the federated credential should be valid only when a workflow runs for the following situations:
| Field | Value |
|---|---|
| GitHub organization name | my-github-user |
| GitHub repository name | my-repo |
| Branch name | main |
After you create a policy in JSON and save it to a file named policy.json, you can use the Azure CLI to create the federated credential:
az ad app federated-credential create \
  --id $applicationRegistrationObjectId \
  --parameters @policy.json
When you use Azure PowerShell, you define a federated credential by creating a string similar to the following:
$policy = "repo:my-github-user/my-repo:ref:refs/heads/main"
The preceding string specifies that the federated credential should be valid only when a workflow runs for the following situations:
| Field | Value |
|---|---|
| GitHub organization name | my-github-user |
| GitHub repository name | my-repo |
| Branch name | main |
After you've created a policy string, you can use Azure PowerShell to create the federated credential:
New-AzADAppFederatedCredential `
  -Name 'MyFederatedCredential' `
  -ApplicationObjectId $applicationRegistrationObjectId `
  -Issuer 'https://token.actions.githubusercontent.com' `
  -Audience 'api://AzureADTokenExchange' `
  -Subject $policy
Manage the lifecycle of your workload identity
It's important to consider the whole lifecycle of each workload identity that you create. When you build a workload identity for a deployment workflow, what will happen if the workflow is eventually deleted or is no longer used?
Workload identities and federated credentials aren't removed automatically, so you need to audit and remove old ones. Even though your deployment workflow's workload identities don't have secret credentials that could be reused, it's still best to remove them when they're no longer needed. That way, there's no chance that somebody could create another GitHub repository with the same name and unexpectedly get access to your Azure environment.
It's a good practice to document your workload identities in a place that you and your team can easily access. Include the following information for each workload identity:
- Key identifying information, like its name and application ID
- Its purpose
- Who created it, who's responsible for managing it, and who might have answers if there's a problem
- The permissions that it needs and a clear justification for why it needs them
- Its expected lifetime
You should regularly audit your workload identities to ensure that they're still being used and that the permissions they've been assigned are still correct.