Create an invitation
Using the Dynamics 365 Customer Voice connector in Power Automate is the right solution when you need to send a survey by using the Dynamics 365 Customer Voice mail service. Additionally, it's the right solution when you are using an email template that has been created and saved within Dynamics 365 Customer Voice.
Another Dynamics 365 Customer Voice connector action is also available for you to use: the Create an invitation action. Creating an invitation still creates the survey invitation activity record, similar to the process with the Send a survey action. However, using the Create an invitation action creates a personalized link that is accessible throughout the rest of the flow. Consider the following examples as reasons to use the Create an invitation action:
- Sending a feedback request to a customer through email platforms such as Outlook or Gmail rather than within Dynamics 365 Customer Voice
- Using an SMS (text messaging) service and using the link as part of the message, which provides a different way to keep customers up to date and a way of communicating with them
- Generating an invitation and using the invitation link to add to a custom column on a contact record in your Microsoft Dataverse environment, and then using the column as part of a customer journey in Dynamics 365 Customer Insights - Journeys
- Creating a unique link for a survey invitation, which can then be used to conduct a survey over the phone with a customer who doesn't have access to complete the survey on their own
These reasons should help you determine whether the Send a survey action or the Create an invitation action would better fulfill an organization’s survey requirement. To create a new flow, go to Send > Automate and then select one of the provided templates. For experienced Power Automate users, or if none of the templates will meet the needs of the organization that is sending out the survey, a new flow can be created from blank.
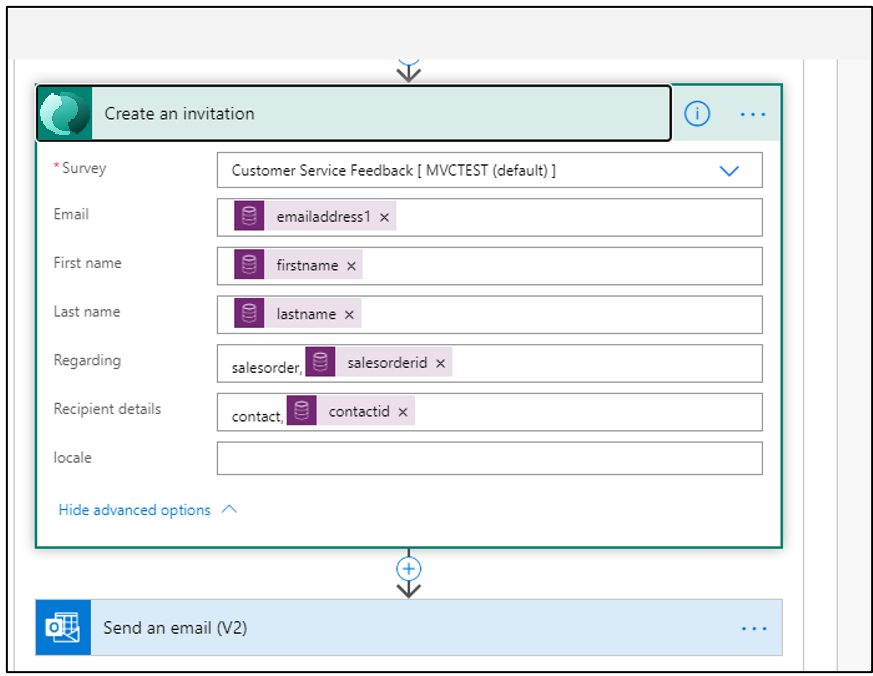
In this example, the Send a survey when an order is fulfilled in Dynamics 365 template is selected. You can delete the Send a survey step and search for and add the Create an invitation action instead. Similar to the Send a survey step, you can use dynamic values to populate the email, first name, and last name variables. The Regarding column is linked to the sales order, and the Recipient details column is linked to the contact that will receive the survey invitation.

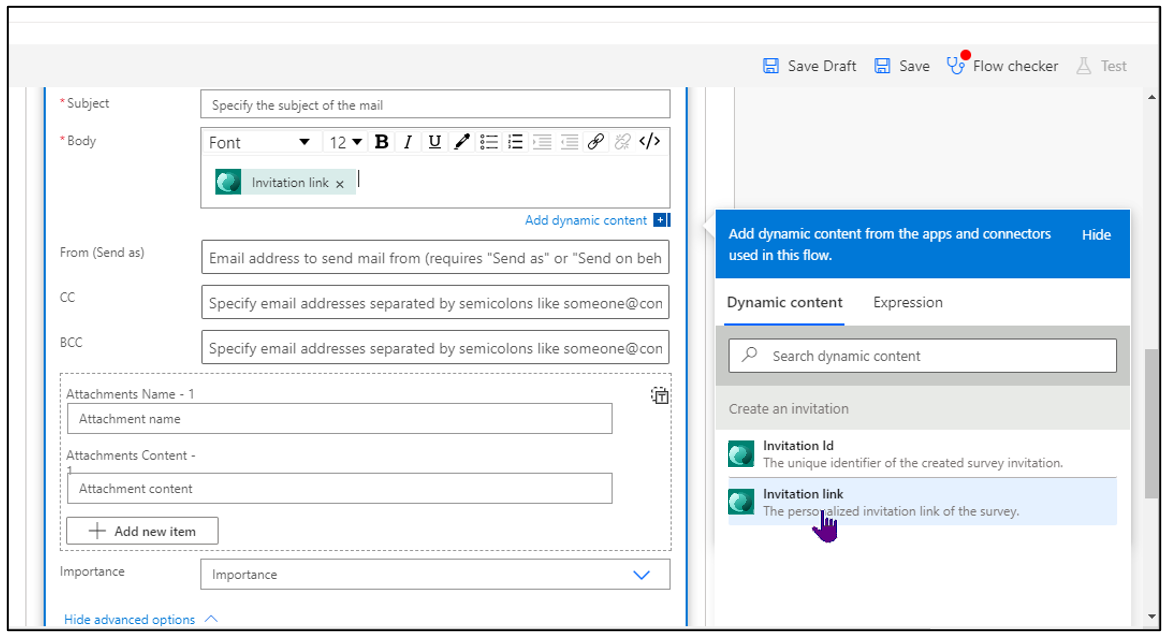
The next step will be to add the action that is needed to send the invitation. You can accomplish this task in many ways; however, the following example uses Outlook connector. Outlook is not a marketing tool, so sending hundreds of survey invitation emails in this way is not advisable. Any survey maker or flow creator should consult with their IT department before using this option on a mass email basis. Columns such as Subject, To, and From should be populated as required. In the body of the email, you can add dynamic content from the Create an invitation step. The invitation link should be added as well. Using the direct link will result in a long string appearing in the email. Instead, you can create a shortened link by using simple HTML tags. Select the HTML </> button to show the HTML view, and then add the following logic:
<a href="[InvitationLink]">Complete Our Survey</a>
When the email is generated and sent out, the respondent will see Complete Our Survey underlined as a hyperlink. Selecting this link will take them to the survey to complete. After the survey has been completed, the survey response will be linked to the records that are added in the Regarding and Recipient details columns that are set in the flow in Power Automate.
